TOA Electronics FPS1000-48 User manual

Category
Power supply units
Type
User manual

This manual is also suitable for

This Manual Cover Models:
FPS1000-12 FPS1000-24
FPS1000-32 FPS1000-48
FPS-S1U 19” Rack Single Output
FPS-T1U 19” Rack Triple Output
FPS SERIES 1000W In 1U
Front End Power Supplies
INSTRUCTION MANUAL
DWG NO: IA599-04-02-A
FPS1000 SERIES
INSTRUCTION MANUAL
DWG NO: IA599-04-02 A
TABLE OF CONTENTS
Warranty .................................................................................................................................Pg. 1
FPS1000, FPS-S1U and FPS-T1U rack Safety instructions ................................................. Pg. 2
FPS1000 Power Supply
Chapter 1: FPS1000 Series Specifications ............................................................................ Pg. 4
Chapter 2: FPS1000 Series Outline drawings ........................................................................Pg. 5
Chapter 3: FPS1000 Series Installation instructions ..............................................................Pg. 7
Chapter 4: Functions and features .......................................................................................Pg. 11
Chapter 5: Basic connections for operation .........................................................................Pg. 14
Chapter 6: Parallel and Series operation .............................................................................Pg. 16
Chapter 7: I
2
C BUS Interface option ....................................................................................Pg. 19
Chapter 8: FPS1000 Maintenance ......................................................................................Pg. 23
FPS-S1U rack
Chapter 9: FPS-S1U rack Specifications .............................................................................Pg. 25
Chapter 10: FPS-S1U rack Installation instructions .............................................................Pg. 26
Chapter 11: FPS-S1U and FPS-S1U/P Outline drawings ....................................................Pg. 30
Chapter 12: Basic connections for operation .......................................................................Pg. 32
Chapter 13: Parallel and Series operation ...........................................................................Pg. 34
Chapter 14: FPS-S1U I
2
C BUS Interface option ..................................................................Pg. 37
Chapter 15: FPS-S1U rack Maintenance .............................................................................Pg. 38
FPS-T1U rack
Chapter 16: FPS-T1U rack Specifications ............................................................................Pg. 40
Chapter 17: FPS-T1U rack Installation instructions .............................................................Pg. 41
Chapter 18: FPS-T1U and FPS-T1U/P Outline drawings ....................................................Pg. 45
Chapter 19: Basic connections for operation .......................................................................Pg. 47
Chapter 20: Parallel and Series operation ...........................................................................Pg. 49
Chapter 21: FPS-T1U I
2
C BUS Interface option ..................................................................Pg. 51
Chapter 22: FPS-T1U rack Maintenance .............................................................................Pg. 52
1
WARRANTY
This Densei-Lambda product is warranted against defects in materials and workmanship for a period of
two years from date of shipment.
During the warranty period , Densei-Lambda will, at it's option, either repair or replace products which
prove to be defective.
LIMITATION OF WARRANTY
The warranty shall not apply to defects resulting from improper or inadequate usage or maintenance by
the buyer, buyer supplied products or interfacing. The warranty shall not apply to defects resulting from
unauthorized modifications or from operation exceeding the environmental specifications of the product
or if the Warranty seal has been removed or altered by anyone other than Densei-Lambda authorized
personnel.
Densei-Lambda does not warrant the buyers circuitry or malfunctions of Densei- Lambda products resulting
from the buyer's circuitry. Furthermore, Densei-Lambda does not warrant any damage occurring as a
result of the buyer's circuitry or the buyer's-supplied products.
No other warranty is expressed or implied.
WARRANTY SERVICE
This product must be returned to an authorized Densei-Lambda service facility for repairs or other warranty
service. For products returned to Densei-Lambda for warranty service, the buyer shall prepay shipping
charges to Densei-Lambda and Densei-Lambda shall pay the shipping charges to return the product to
the buyer.
DISCLAIMER
The information contained in this document is subject to change without notice.
Densei-Lambda shall not be liable for errors contained in this document or for incidental or consequential
damages in connection with the furnishing, performance, or use of this material. No part of this document
may be photo-copied, reproduced or translated to another language without prior written consent of Densei-
Lambda.
FPS1000 Instruction Manual
2
FPS1000 POWER SUPPLY AND FPS-S1U RACK SAFETY INSTRUCTIONS
IMPORTANT SAFETY INSTRUCTIONS
Operating personnel must not remove the FPS1000, FPS-S1U and the FPS-T1U cover.
No internal adjustment or component replacement is allowed by non Densei-Lambda qualified service personnel. Never
replace components with power cable connected. To avoid injuries,always disconnect power, discharge circuits and remove
external voltage sources before touching components. These products are not authorized for use as critical components
in nuclear control systems, life support systems or equipment for use in hazardous environments without the express written
approval of the managing director of Densei-Lambda.
Restricted Access Area: The equipment should only be installed in a Restricted Access Area.
Access should be available to service personnel only.
WICHTIGE SICHERHEITSHINWEISE
Bedienungspersonal oder Anwender duerfen die Gehaeuseabdeckung des FPS1000, FPS-S1U und desFPS-T1U nicht entfernen.
Ersatzteiltausch - und Aenderungen duerfen nur von autorisiertem Densei-Lambda SERVICE-Personen bzw. Organisationen
durchgefuehrt werden.
Vor Austausch von Bauteilen ist das Netzkabel bzw. die Versorgungsspannung zu trennen.
Energieversorgungsanschluesse sind immer zu trennen, um Personenverletzungen durch gefaehrliche Energieinhalte und
Spannungen auszuschliessen.
Die Stromkreise sind zu entladen, externe Spannungsquellen sind zu entfernen bevor Bauteile bzw. Komponenten getauscht
werden.
Der direkte Zugriff auf das Racksystem ist nur dem geschulten Service-Personal erlaubt.
SAFETY APPROVALS
UL60950-1, UL Recognized, C-UL for canada. IEC/EN60950-1. CE marking, when applied to the FPS1000, FPS-S1U and
the FPS-T1U products, indicates compliance with the Low Voltage Directive (73/23EEC) as modified by the CE Marking
Directive (93/68EEC) in that it complies with EN60950-1.
SAFETY-CLASS OF INSULATION
The FPS1000, FPS-S1U and the FPS-T1U are designed for the following safety parameters: Material group IIIa, Pollution
degree 2, Overvoltage category II, Class I (earthed), indoor use as part of an overall equipment such that the FPS product
is accessible to service personnel only.
GROUNDING
These products are Safety Class I instruments. To minimize shock hazard, the instruments chassis must be connected to
an electrical ground. The instruments must be connected to the AC power supply mains through a three conductor power
cable, with the ground wire firmly connected to an electrical ground (safety ground) at the power outlet.
For instruments designed to be hard-wired to the supply mains, the protective earth terminal must be connected to the
safety electrical ground before any other connection is made.
Any interruption of the protective ground conductor, or disconnection of the protective earth terminal will cause a potential
shock hazard that might cause personal injury.
INPUT RATINGS
Do not use AC supply which exceeds the input voltage and frequency rating of these instruments. The input voltage and
frequency rating is: 100-240V~ , 50/60Hz. For safety reasons, the mains supply voltage flactuations should not exceed +/-
10% of nominal voltage.
FPS-S1U RACK AC INPUT
CAUTION:
Risk of electrical shock and energy hazard. Disconnecting one power supply disconnects only one power supply
module. To isolate the unit completely, disconnect all power supplies.
ACHTUNG:
Spannungsfuehrende Teile - Gefahr durch elektrischen Schlag order hohe Energieinhalte.
Alle Netzstecker der einzelnen Komponenten bzw. der Einschuebe muessen getrennt werden, damit das System
“spannungsfrei” ist.
3
FPS1000 Instruction Manual
ATTENTION:
Risque de choc et de danger e'lectriques. Le de'branchement d'une seule alimenttation stabilise'e ne de'branche uniquement
qu'un module "Alimentation Stabilise'e".
Pour isoler completement le module en cause, il faut de'brancher toutes les alimentations stabilise'es.
SAFETY SYMBOLS
CAUTION Risk of Electrical Shock.
Instruction manual symbol. The instrument will be marked with this symbol when it is
necessary for the user to refer to the instruction manual.
Indicates hazardous voltage.
Indicates ground terminal.
Protective Ground Conductor Terminal
Denotes hazard. An attention to a procedure is called. Not following the procedure correctly
could result in personal injury. A WARNING sign should not be skipped and all indicated
conditions must be fully understood and met.
Denotes hazard. An attention to a procedure is called. Not following the procedure correctly
could result in damage to the equipment.
ENERGY HAZARD
The FPS1000, FPS-S1U and the FPS-T1U products are capable of providing hazardous energy.
Manufacturers final equipment must provide protection to service personnel against inadvertent contact with these models
output terminals. If set such that hazardous energy can occur then the output terminals or connections therefore must not
be user accessible.
OVERCURRENT PROTECTION:
A readily accessible Listed branch circuit overcurrent protective device rated 20 A must be incorporated in the building wiring.
SERIAL OPERATION
The FPS-T1U product is capable of providing hazardous voltage output in case of the serial connection of two or more FPS1000
units in the rack. Manufacturers final equipment must provide protection to service personnel against inadvertent contact with
these models output terminals. If set such that hazardous voltage can occur then the output terminals or connections therefore
FUSES
There are no user replaceable fuses in the FPS1000, FPS-S1U and the FPS-T1U products. Internal fuses are sized for fault
protection and if a fuse was opened it would indicate that service is required. Fuse replacement should be made by qualified
technical personnel.
FPS-S1U and FPS-T1U racks contains no fuses. FPS1000 fuses rating are described below.
F101: F20A H 250Vac
F102: 6.3A 400Vdc
SICHERHEITSHINWEISE
Vor Anschluss an die Netzversorgung ist die Aufstellanleitung zu beachten!
1. Absicherung: F101: F20A H 250VAC, F102: 6.3A 400VDC
2. Der maximale Ableitstrom der Gesamtanlage darf 3.5mA nicht ueberschreiten.
3. Die Gehaeuseabdeckung darf nur im stromlosen Zustand geoeffnet werden.
ACHTUNG:
Sicherungen duerfen nur durch geschulte Service Personen getauscht werden.
4
CHAPTER 1 FPS1000 SERIES SPECIFICATIONS
Model FPS1000 FPS1000 FPS1000
V/I -24 -32 -48
24 32 48
29 38.4 58
33 26 17.25
40 31 21
V1 (V)
V2 (V)
I1 (A)
I2 (A)
V1
V2
Fig. 1: Rated output current vs output voltage
Vout (V)
I1
Iout (A)
I2
Notes:
*1: For cases where conformance to various safety standards (UL, EN etc.) is required,
to be described as 100-240Vac (50/60Hz).
*2: At 100/200Vac, rated load and 25˚C ambient temperature.
*3: Not applicable for the noise filter inrush current less than 0.2mS.
*4: Measured with JEITA RC-9131A 1:1 probe, 20MHz B.W.
*5: From 85~132Vac or 170~265Vac, constant load.
*6: From No-load to Rated load, constant input voltage. Measured at the sensing point in Remote sense.
*7: Remote sensing can compensate up to 1V drop on each load wire.
*8: Inverter shut down method. Reset by AC voltage recycle or by On/Off control.
*9: Derate Maximum output power by 10% for input voltage less than 100V
RMS
.
*10 For FPS 1000-12/P(S), when used not with FPS-S1U or FPS-T1U
racks, an EMI suppressor clamp should be attached to the AC cable,
as close as possible to the AC inlet, to meet class B.
FPS1000
-12
12
13.2
66
72
1V
2V
3V
4A
5W
6
Input voltage / frequency range
(*1) ---
7
Maximum input current (at 100/200Vac)
A
8 ---
9 (*2) %
10 (*3) A
11 mS
12 (*5) ---
13 (*6) ---
14 (*4) mV
15 ---
16
PPM/°C
17 (*7) V
18 (*9) ---
19
Series operation
(*10)
---
20 ---
21 (*8) V
22 ---
23 ---
24 ---
25 ---
26 ---
27 ---
28 ---
29 ---
30 ---
31 ---
32 ---
33 ---
34 ---
35 ---
36 ---
37 ---
38 ---
39 ---
40 ---
41
---
42 ---
43 mA
44 Kg
45 ---
Rated output voltage
12
32
48
FPS1000 SERIES SPECIFICATIONS
FPS1000-12
FPS1000-32
FPS1000-48
Output voltage range
10.5~13.2
28.8~38.4
43~58
Output voltage set point
12+/-1%
32+/-1%
48+/-1%
Maximum output power
864
992
1008
Maximum Output Current (Refer to Fig.1)
72
31
21
85~265Vac continuous, 47~63Hz, Single phase
12.0/6.0
Power Factor (Typ)
>0.98 at 115/230V and maximum output power
Inrush current
Less than 40A
Efficiency (Typ)
84/86%
84/86%
85/88%
Hold-up time
20mS typical at 100Vac input, rated output voltage and less than 80% of rated load.
Maximum line regulation
0.40%
Max load regulation
0.80%
Output Ripple and noise pk-pk
200
250
300
Temperature stability
0.05% of rated Vout for 8hrs after 30min warm-up. Constant line, load and temperature.
Temperature coefficient
200
Remote sensing
Possible. Refer to Instruction Manual.
Parallel operation
Possible. Refer to Instruction Manual.
Over current protection
105~125% of maximum output current. Refer to Fig. 1
Over voltage protection
31~34
41.5~45.5
62~66
Over temperature protection
Inverter shut down method, automatic reset.
Remote On/Off control
By electrical signal or dry contact. ON: 0~0.6V or short. OFF: 2~15V or open.
DC OK signal
Open collector signal. On when Vout>80+/-5% rated output. Max.sink current: 10mA
Over-Temp. warning
Open collector signal. Refer to Instruction Manual
AC fail signal
Open collector signal. Refer to Instruction Manual
Auxiliary power supply
11.2~12.5VDC. 0.25A Maximum output current.
Vout voltage trimming
Possible, via Vout Trim pin in the I/O connector. Refer to Instruction Manual.
Front panel indicators
AC OK, DC OK, DC FAIL
I
2
C Interface
Optional. Refer to Instruction Manual.
Operating temperature-models without IEC inlet
models with IEC inlet
0~50°C: 100% load. Derate 2%/°C, 50°C to 60°C, Derate 2.5%/°C, 60°C to 70°C.
Storage temperature
-30~85°C
Operating humidity
10~90% RH, no condensation.
Storage humidity
10~95% RH, no condensation.
Cooling
By internal Fans. Variable speed control.
Vibration
Built to meet ETS 300 019
Shock
Built to meet ETS 300 019
Conducted emission
EN55022B, FCC part 15J-B, VCCI-B
Radiated emission
EN55022B, FCC part 15J-B, VCCI-B
Applicable safety standards
UL60950-1, EN60950-1
Withstand voltage
Input-Output: 3000Vrms, 1min. Input-Ground: 2000Vrms, 1min. Output-Ground:
500Vrms,1min.
Insulation resistance
More than 100Mohm at 25° C and 70% RH. Output-Ground: 500Vdc
Leakage current
Less Than 1.1mA at 230Vac
Weight (Typ)
2.0
Size (W*H*D)
127x41x290mm. Refer to Outline Drawing.
24
FPS1000-24
21.5~29
24+/-1%
960
40
81/83%
150
14.3~15.7
0~50°C: 100% load. Derate 2%/°C, 50°C to 60°C.
---
5
CHAPTER 2 OUTLINE DRAWINGS
1.2 FPS 1000 SERIES OUTLINE DRAWINGS
FPS1000 Instruction Manual
6
2.2 FPS 1000/P SERIES OUTLINE DRAWINGS
7
CHAPTER 3 FPS1000 POWER SUPPLY INSTALLATION
3.1 GENERAL
This chapter contains instructions for initial inspection, preparation for use and repackaging forshipment.
NOTE
FPS1000 power supplies series generate magnetic field
which might affect the operation of other instruments.
If your equipment is susceptible to magnetic fields, do
not position it adjacent to the FPS1000 unit.
3.2 PREPARATION FOR USE
In order to be operational the power supply must be connected to an appropriate AC source.
The AC source voltage should be within the power supply specification. Do not apply power before reading
sections 3.6 and 3.7.
Table 3-1 below describes the basic setup procedure. Follow the instructions in Table 3-1 in the sequence
given to prepare the power supply for use.
3.3 INITIAL INSPECTION
Prior to shipment this power supply was inspected and found free of mechanical or electrical defects.
Upon unpacking of the power supply, inspect for any damage which may have occurred in transit.
The inspection should confirm that there is no exterior damage to the power supply.
Keep all packing material until the inspection has been completed. If damage is detected , file a claim with
carrier immediately and notify the Lambda sales or service facility nearest you.
3.4 FPS1000 MOUNTING
The FPS1000 power supplies series is designed to fit in the FPS-S1U and FPS-T1U, 19" rack, or in an
equivalent rack designed for the FPS1000 power supply.
The FPS1000 is secured to the rack using the spring lock device, located at the FPS1000 front panel.
Refer to the FPS1000 and the FPS-S1U and FPS-T1U outline drawings in Chapter 2, Chapter 11 and
Chapter 18.
When installation using mounting screws is required, the FPS1000 can be secured to the equipment using
the M3 mounting holes at its bottom surface. Refer to the FPS1000 outline drawings.
3.5 LOCATION MOUNTING AND COOLING
This power supply is fan cooled. The air intake is at the front panel and the exhaust is at the rear panel.
Upon installation allow cooling air to reach the front panel ventilation inlets and allow minimum 50mm of
unrestricted air space at the rear of the unit for the air exhaust.
3.6 AC SOURCE REQUIREMENTS
The FPS1000 series can be operated from a nominal 100V to 240V, single phase, 47~63Hz. Refer to the
specifications in chapter 1 for the input voltage range and the current required.
Ensure that under heavy load, the AC voltage supplied to the power supply does not fall below the "low
limit" specifications.
CAUTION
Connection of this power supply to an AC
power source should be made by an
electrician or other qualified personnel.
WARNING
There is a potential shock hazard if the power supply
chassis and cover are not connected to an electrical safety
ground via the safetyground in the AC input connector.
Step no Item Description Reference
1 Inspection Initial physical inspection of the power supply Section 3.3
2 Installation Installing the power supply. Section 3.4
Ensuring adequate ventilation. Section 3.5
3 AC source AC source requirements Section 3.6
4 Load connection Wire size selection. Local / Remote Section 3.7
sensing. Single or multiple loads.
Table 3-1: Basic setup procedure
FPS1000 Instruction Manual
8
3.7 CONNECTING THE LOAD
wire size
Resistivity Maximum length in Feet to limit voltage
AWG Ohm/kft drop to 1V or less.
5A 10A 20A 50A 150A
14 2.526 80 40 20 8 2
12 1.589 120 60 30 12 3.4
10 0.9994 200 100 50 20 6
8 0.6285 320 160 80 32 10
6 0.3953 500 250 125 50 16
4 0.2486 800 400 200 80 26
2 0.1564 1200 600 300 125 40
0 0.0983 2000 1000 500 200 68
Table 3-2:Maximum wire length for 1V drop on lead (in feet).
Cross sect. Resistivity
Maximum length in meters to limit voltage
Area
Ohm/km drop to 1V or less.
(mm^2) 5A 10A 20A 50A 150A
2.5 8.21 24.0 12.0 6.0 2.4 0.8
4 5.09 39.2 18.6 9.8 4.0 1.4
6 3.39 59.0 29.4 14.8 5.8 2.0
10 1.95 102.6 51.2 25.6 10.2 3.4
16 1.24 160.0 80.0 40.0 16.0 5.4
25 0.795 250.0 125.0 62.0 25.2 8.4
35 0.565 354.0 177.0 88.0 35.4 11.8
Table 3-3:Maximum wire length for 1V drop on lead (in meters).
For currents not shown in Tables 3-2 and 3-3 , use the formula :
Maximum length=1000/(current*resistivity)
Where current is expressed in ampers and resistivity in ohms/km or ohms/1000ft.
3.7.1 Load Wiring.
The following considerations should be made to select wiring for connecting the load to the power supply:
* Current carrying capacity of the wire (refer to 3.7.2).
*Insulation rating of the wire should be at least equivalent to the maximum output voltage of the power
supply.
*Maximum wire length and voltage drop (refer to 3.7.2).
*Noise and impedance effects of the load wiring (refer to 3.7.3).
3.7.2 Current Carrying Capacity
Two factors should must be considered while selecting the wire size. 1.Wires should be at least heavy
enough not to overheating while carrying the power supply load current at the rated load, or the current
that would flow in the event the load wires were shorted, whichever is greater.
2.Wire size should be selected to enable voltage drop per lead to be less than 1.0V at the rated current.
Please refer to Tables 3-2 and 3-3 for maximum wire length to limit the voltage drop in American and
European dimensions respectively.
WARNING
Turn off the AC input power before making or changing any rear panel
connection. Ensure that all connections are securely tightened before
applying power. There is a potential shock hazard when using a power
supply with a rated output greater than 40V.
Fig. 3-2: FPS1000/P front panel
1
2 34
56
Fig. 3-1: FPS1000 front panel
1
4
5
3
2
9
3.7.6 Front panel controls and indicator
3.7.3 Noise and Impedance Effects
To minimize the noise pickup or radiation, the load wires and remote sense wires should be twisted-pairs
of the shortest possible length. Shielding of the sense leads may be necessary in high noise environments.
Even if noise is not a concern, the load and remote sense wires should be twisted-pairs to reduce coupling
between them, which might impact the stability of power supply. The sense leads should be separated
from the power leads.
Twisting the load wires reduces the parasitic inductance of the cable which could produce high frequency
voltage spikes at the load and the output of power supply because of current variation in the load itself.
The impedance introduced between the power supply output and the load could make the ripple and noise
at the load worse than the noise at the power supply rear panel output. Additional filtering with bypass
capacitors at the load terminals may be required to bypass the high frequency load current.
3.7.4 Inductive loads
To prevent damage to the power supply from inductive kickback, a diode should be connected across the
output. The diode voltage and current rating should be greater than the power supply maximum output
voltage and current rating. Connect the cathode to the positive output and the anode to the negative
output. Where positive load transients such as back EMF from a motor may occur, connect a surge
suppressor across the output to protect the power supply. The breakdown voltage rating of the suppressor
must be approximately 10% higher than the maximum output voltage of the power supply.
3.7.5 Making the load connections
Hazardous voltages may exist at the outputs and the load connections
when using a power supply with a rated output greater than 40V. To protect
personnel against accidental contact with hazardous voltages, ensure that
the load and it's connections has no accessible live parts.
Ensure that the load wiring insulation rating is greater than or equal to the
maximum output voltage of the power supply.
WARNING
!
1: Handle
2: DC OK green LED, on when the output
voltage is above 80% +/- 5% of its rated value.
3: DC Fail red LED, on when the output voltage
is lower than 80% +/- 5% of its rated value.
4: AC OK green LED, on when the input
voltage is higher than 85Vrms
5: Lock/Unlock lever. Automatically locks the
power supply to the FPS-S1U rack chassis
when the FPS1000 power supply is
inserted. Push the Lock/Unlock lever toward
the power supply cooling fan to withdraw
the FPS1000 from the rack.
6: IEC320 AC inlet
FPS1000 Instruction Manual
10
3.7.7 Input/Output connector information
The FPS1000 series uses male connector PCIB24W9M400A1, Positronic connector. To mate FPS1000
series to the load circuitry, use female connector PCIB24W9F400A1-S1031, Positronic connector.
Refer to Table 3-4 and to the Outline drawing in chapter 2 for the connector pinout description.
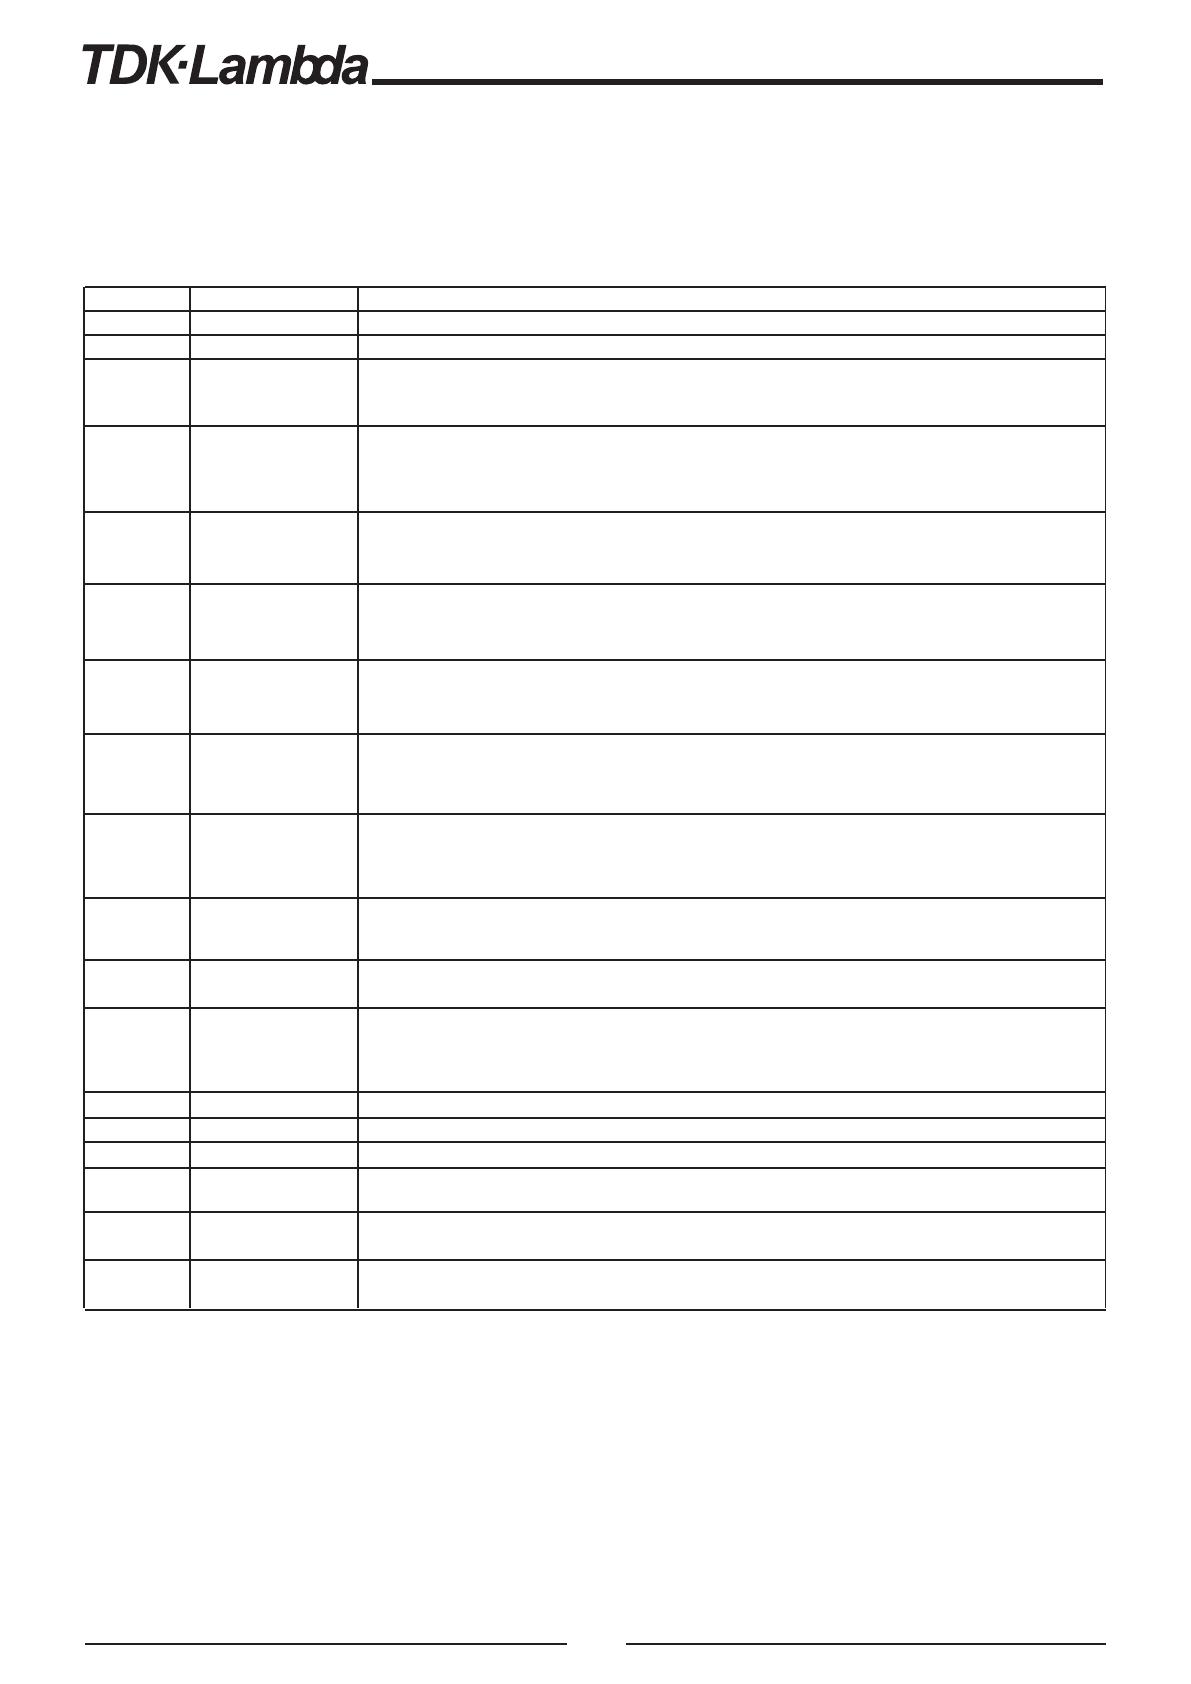
Table 3-4: Rear In/Out connector pins function description
3.7.8 REPACKAGING FOR SHIPMENT
The original packaging material is reusable. If the original package is not available, contact the Lambda
Sales or service facility near you for details on obtaining suitable packaging and shipping information.
To ensure safe transportation of the instrument, it is recommended to use the original package.
Please attach a tag to the power supply describing the problem and specifying the owner, model number
and serial number of the power supply.
Pin No Function Description
1,2,4 +V Positive output voltage. Maximum current capacity: 24A/contact.
3,5,6 -V Negative output voltage. Maximum current capacity: 24A/contact.
7 On/Off control
8
+Sense
9 DC_OK
10 Signal_Return
11 AC_Fail
12
Over
Temperature
Alarm
13 -Sense
14 V_Trim
15 CS
16 +12V Auxiliary
17 SDA
Serial Data used in the I
2
C interface option. Refer to the I
2
C interface description.
18 SCL
Serial Clock used in the I
2
C interface option. Refer to the I
2
C interface description.
19,20,21 A0, A1, A2
I
2
C interface address lines. Refer to the I
2
C interface description in Chapter 7.
22 ACG
23 AC Line
24 AC Neutral
Turns the output to On and Off by electrical signal or dry contact between pin 7
and pin 10 (Signal Return). 0~0.6V or Short: On, 2~15V or Open: Off.
The maximum source current is 2.6mA.
Positive sensing. The +Sense signal should be connected to the positive terminal
of the load. The +Sense and -Sense leads should be twisted pair to minimize noise
pick-up effect. The maximum load wires drop compensation is 1V/wire.
Return for the following control and supervisory signals: On/Off, DC_OK,
Over_temperature Alarm, AC_Fail, Auxiliary 12V supply. The Signal return is isolated
from the output terminals.
Open collector signal, referenced to pin 10 (Signal Return). On when Vout80%+/-
5% of its rated value. The maximum sink current is 10mA and the maximum
external voltage is 15V.
Open collector signal, referenced to pin 10 (Signal Return). On when the internal
temperature is within safe limit, Off approx. 10°C below Thermal shut down. The
maximum sink current is 10mA and the maximum external voltage is 15V.
Open collector signal, referenced to pin 10 (Signal Return). On when the input
voltage is 85Vrms. The maximum sink current is 10mA and the maximum external
voltage is15Vdc.
Negative sensing. The -S signal should be connected to the negative terminal of
the load. The -S and +S leads should be twisted pair to minimize noise pick-up
effect. The maximum load wires drop compensation is 1V/wire.
Connection for output voltage trimming. The voltage can be trimmed within its
range specifications.
Current sharing signal. When units are connected in parallel, the CS pins of the
units should be connected to allow current balance between units.
Auxiliary voltage output, 11.2~12.5V, referenced to pin 10 (Signal Return). The
maximum load current is 0.25A. This output has built in Oring diode and is not
controlled by the On/Off control.
AC Ground connection, refer to the safety instructions for safety standards requirements.
For "/P" models the AC Ground is connected via the front panel IEC inlet.
AC Line connection, refer to the safety instructions for safety standards requirements.
For "/P" models the AC Line is connected via the front panel IEC inlet.
AC Neutral connection, refer to the safety instructions for safety standards requirements.
For "/P" models the AC Neutral is connected via the front panel IEC inlet.
11
CHAPTER 4 FUNCTIONS AND FEATURES
4.1 Input Voltage Range
Input voltage is single phase 85~265Vac (47~63Hz). The power supply can be operated also with a DC input voltage,
120~330VDC but the safety approvals apply to the AC voltage only. Input voltage which is out of the specifications
might cause damage to the unit.
4.2 Output voltage trimming
The output voltage can be adjusted within the specifications via the V_Trim pin at the In/Out connector.
Refer to Fig 4-1 typical connection and calculation of the adjustment resistors:
Note that the Over Voltage Protection may trigger if the output voltage exceeds the maximum voltage specification.
4.3 Over Voltage Protection (OVP)
The OVP triggers when the output voltage exceeds the maximum rating and reaches the OVP limit. When the OVP
is triggered, the output voltage shuts down. In order to resume operation, the AC input voltage should be removed
for more than 30 sec. The OVP level is factory set and is not adjustable.
4.4 Over Current Protection (OCP)
A constant current limiting with automatic recovery is provided. The OCP operates when the output current exceeds
105%~125% of the rated output current. The output voltage recovers automatically when the overload condition is removed.
Avoid operating the power supply under overload condition for long time as it might cause damage to the power
supply.
4.5 Over Temperature Protection (OTP)
The OTP is activated when the ambient temperature or the power supply internal temperature exceeds a safe temperature.
When the OTP is activated, the power supply output shuts down. The output recovers automatically when the ambient
temperature or the internal temperature cools to a safe limit.
4.6 Auxiliary 12V output
An isolated 11.2V~12.5V output is provided (Referenced to the Signals_Return potential). The maximum output
current from this output is 0.25A. This output has a built-in Oring diode to allow paralleling FPS1000 units. Use this
output for the control and monitoring signals described in this chapter or to operate application circuits.
4.7 Over Temperature Alarm
An open collector output provides an Over Temperature Alarm approx. 10°C below shut down by the OTP. The open
collector output is referenced to the Signals_Return potential and is isolated from the power supply +V and -V
terminals
The maximum sink current is 10mA and the maximum external voltage is 15V.
Refer to Fig 4-2 for typical application.
8
FPS1000 R1 KΩ
14
V_trim
13 R2 KΩ
Fig 4-1
+S
-S
FPS1000 Instruction Manual
16
12V aux
FPS1000 10KΩ
12
Over temperature alarm
10
Signals return
Fig 4-2
FPS1000-24:
R2=0.0785*V
2
out -5.819*Vout+105.132
R1(K
Ω)=20(KΩ)-R2(KΩ)
FPS1000-48:
R2=0.0497*V
2
out-7.2795*Vout+259.04
R1(K
Ω)=50(KΩ)-R2(KΩ)
FPS1000-32:
R2=0.0463*V
2
out -4.5805*Vout+109.49
R1(K
Ω)=20(KΩ)-R2(KΩΩ)
FPS1000-12:
R2=0.0324*V
2
out -1.1298*Vout+9.9342
R1(K
Ω)=5(KΩ)-R2(KΩ)
+V
-V
12
4.8 DC_OK signal
An open collector output provides a low output voltage detection signal. The open collector output is on when the
output voltage is higher than 80%+/-5% of the rated output voltage of the power supply.
The open collector output is referenced to the Signals_Return potential and is isolated from the power supply +V
and -V terminals
The maximum sink current is 10mA and the maximum external voltage is 15V.
Refer to Fig 4-3 for typical application.
4.10 Remote On/Off control
A Remote On/Off control input is provided. The Remote On/Off input is isolated from the power supply +V and -V
terminals and is referenced to the Signals_Return potential. The Remote On/Off can be operated either by electrical
signal or by dry contact.
(1) Operation by electrical signal:
0~0.6V: Output is On.
2~15V: Output is Off.
The maximum sink current is 2.6mA and the maximum external voltage is 15V.
(2) Operation by dry contact (relay or switch):
Short between On/Off input and Signals Return: Output is On.
Open circuit between On/Off input and Signals Return: Output is Off.
When the Remote On/Off function is not used, connect a short circuit between the On/Off control and the Signals_Return.
Refer to Fig 4-5 for the remote On/Off circuit description:
4.9 AC_Fail signal
An open collector output provides a low AC input voltage detection signal. The open collector output is on when the
input voltage is 85Vac or higher.
The open collector output is referenced to the Signals_Return potential and is isolated from the power supply +V
and -V terminals
The maximum sink current is 10mA and the maximum external voltage is 15V.
Refer to Fig 4-4 for typical application.
16 12V aux
FPS1000 10KΩ
9
DC_OK
10
Signals return
Fig 4-3
16 12V aux
FPS1000 10KΩ
11
AC_Fail signal
10
Signals return
Fig 4-4
16 12V aux
FPS1000 4.7KΩ
7
I source 2.6mA max, 15Vdc max.
On/Off control
10
Signals return
Fig 4-5
13
Fig 4-6
4.11 Remote Sensing
The Remote sensing compensates voltage drop on the load wiring. The maximum voltage drop on each wire is 1V,
however, it is recommended to minimize the voltage drop on the load wires to improve the response to load current
changes.
In case that the sensing wires are long, use separate twisted pair wires for the sensing and for the load wires to
minimize noise pick-up.
It is recommended to connect electrolytic capacitors in the following locations:
1) Across the load terminals
2) Between the "+S" terminal and the "+V" terminal of the power supply.
3) Between the "-S" terminal and the "-V" terminal of the power supply.
Refer to Fig 4-6 for typical connection of remote sensing.
LOAD
FPS1000
+V
+S
-S
-V
8
13
1,2,4
3,5,6
+
+
+
-
FPS1000 Instruction Manual
14
Fig 5-1: single load connection, local sensing
Fig 5-2: Remote sensing, single load.
CHAPTER 5 BASIC CONNECTIONS FOR OPERATION
5.1 Connecting single load, Local sensing
Local sensing is suitable for applications where load regulation is not critical. Fig 5-1 shows recommended
load and sensing connections for applications with a single load.
5.2 Connecting Single Load, Remote Sensing
Remote sensing is used in cases where the load regulation is important at the load terminals. Use twisted
or shielded wires to minimize noise pick-up. If shielded wires are used, the shield should be connected
to the ground at one point, either the power supply side or the load. The optimal point for the shield ground
should be determined by experimentation. Refer to the power supply specifications for the maximum
voltage drop allowed at the load wires.
Fig 5-3: Multiple loads connection , radial distribution
5.3 Connecting Multiple loads, radial distribution method
In cases of multiple loads connected to one supply, each load should be connected to the power supply's
output terminals using separate pairs of wires. It is recommended that each pair of wires will be as short
as possible and twisted or shielded to minimize noise pick-up and radiation.
The sense wires should be connected to the power supply output terminals or to the load with the most
critical load regulation requirement.
LOAD
FPS1000
SIGNAL
RTN
ON/
OFF
+V
+S
-S
-V
8
13
710
1,2,4
3,5,6
FPS1000
SIGNAL
RTN
ON/
OFF
+V
+S
-S
-V
8
13
710
1,2,4
3,5,6
LOAD # 1
+
-
LOAD # 2
+
-
LOAD # 3
+
-
+
-
LOAD
FPS1000
SIGNAL
RTN
ON/
OFF
+V
+S
-S
-V
8
13
710
Sense lines
Twisted pairs
Load line.
Up to 1V drop.
Load line.
Up to 1V drop.
1,2,4
3,5,6
+
-
In Local sense applications, the +/- sense have to be connected to the
+/-V terminals of the FPS1000 units prior the operating the FPS1000 units
*
15
Fig 5-4: Multiple loads connection with distribution terminal
5.4 Multiple loads connection with distribution terminals
If remotely located output distribution terminals are used, the power supply output terminals should be
connected to the distribution terminals by a pair of twisted or shielded wires. Each load should be separately
connected to the remote distribution terminals (see Fig 5-4). If remote sensing is required, the sensing
wires should be connected to the distribution terminals or at the most critical load.
5.5 Grounding outputs
Either the positive or negative output terminals can be grounded. To avoid noise problems caused by
common-mode current flowing from the load to ground, it is recommended to ground the output terminal
as close as possible to the power supply's output. Always use two wires to connect the load to the power
supply regardless of how the system is grounded.
FPS1000
SIGNAL
RTN
ON/
OFF
+V
+S
-S
-V
8
13
710
1,2,4
3,5,6
LOAD # 1
+
-
LOAD # 2
+
-
LOAD # 3
+
-
+V
-V
FPS1000 Instruction Manual
16
CHAPTER 6 PARALLEL AND SERIES OPERATION
6.1 Parallel operation
Up to 8 FPS1000 units of the same output voltage rating can be connected in parallel. By connecting the CS signal
between the paralleled units, automatic current balance is achieved, with +/-10% accuracy. Derate the total output
current by 10% when using parallel operation to prevent overload condition.
The built-in Oring diodes on the main output and the 12V Auxiliary output allow N+1 operation.
For input voltages less than 100Vac, maximum output Power derated by 10% of the Power rating.
6.1.1 Parallel operation with Remote sensing
Fig 6-1 shows typical connection of parallel operation with Remote sensing. The CS signal wires should be as short
as possible and with the same length.
Fig 6-1: Parallel operation with Remote sensing
Fig 6-2: Output voltage trimming at parallel operation
6.1.2 Output voltage trimming at parallel operation
The output voltage of the units connected in parallel can be made by a single trimmer or resistive divider as shown
in Fig 6-2.
LOAD
FPS1000 #1
SIG.
RTN
ON/
OFF
+V
+S
-S
-V
CS
+S
-S
FPS1000 #2
SIG.
RTN
ON/
OFF
+V
+S
-S
-V
CS
+S
-S
+S
-S
FPS1000 #N
SIG.
RTN
ON/
OFF
+V
+S
-S
-V
CS
+S
-S
+V
-V
71015
71015
71015
FPS1000 #1
SIG.
RTN
ON/
OFF
V TRIM
+S
-S
CS
SIG.
RTN
ON/
OFFCS
FPS1000 #N
SIG.
RTN
ON/
OFFCS
FPS1000 #2
V TRIM
+S
-S
V TRIM
+S
-S
V TRIM
+S
-S
R1
R2
710
710
710
15
15
15
FPS1000-24:
R2=0.0785*V
2
out -5.819*Vout+105.132
R1(K
Ω)=20(KΩ)-R2(KΩ)
FPS1000-48:
R2=0.0497*V
2
out-7.2795*Vout+259.04
R1(K
Ω)=50(KΩ)-R2(KΩ)
FPS1000-32:
R2=0.0463*V
2
out -4.5805*Vout+109.49
R1(K
Ω)=20(KΩ)-R2(KΩΩ)
FPS1000-12:
R2=0.0324*V
2
out -1.1298*Vout+9.9342
R1(K
Ω)=5(KΩ)-R2(KΩ)
+V
-V
17
Fig 6-3: Signal Return connection at parallel operation
Fig 6-4: Remote On/Off control at parallel operation
6.1.3 Signal Return bus at parallel operation
The Signal Return of each paralleled unit can be connected together to form a common Signal Return bus.
By this way, the control and monitoring signals of the paralleled units can be connected to the same control and
monitoring circuitry.
The Signal Return bus can be connected to the -V or -S or +V or -S or float. Fig 6-3 shows typical connection of
the Signal Return at parallel operation.
6.1.4 Remote On/Off control at parallel operation
The paralleled units can be turned On or Off via a single On/Off control. Refer to Fig 6-4 for typical application. The
Signal Return function of all the paralleled units should be connected together to create a common Signal Return
bus. The Signal Return bus may be connected to the -V or the +V potential or floated. In any case do not connect
the Signal Return bus to different potentials.
ON OFF
FPS1000 #1
SIG.
RETURN
ON/OFF
FPS1000 #2
SIG.
RETURN
ON/OFF
FPS1000 #N
SIG.
RETURN
ON/OFF
7
10
7
10
7
10
FPS1000 Instruction Manual
FPS1000 #1
SIG.
RETURN
AC_FAIL
DC_OK
9, 11, 12
10
10
10
FPS1000 #1 SIGNALS
FPS1000 #2 SIGNALS
FPS1000 #N SIGNALS
SIGNALS RETURN
OVER-TEMP
ALARM
FPS1000 #2
SIG.
RETURN
AC_FAIL
DC_OK
OVER-TEMP
ALARM
FPS1000 #N
SIG.
RETURN
AC_FAIL
DC_OK
OVER-TEMP
ALARM
9, 11, 12
9, 11, 12
CONTROL AND
MONITORING CIRCUITS
  • Page 1 1
  • Page 2 2
  • Page 3 3
  • Page 4 4
  • Page 5 5
  • Page 6 6
  • Page 7 7
  • Page 8 8
  • Page 9 9
  • Page 10 10
  • Page 11 11
  • Page 12 12
  • Page 13 13
  • Page 14 14
  • Page 15 15
  • Page 16 16
  • Page 17 17
  • Page 18 18
  • Page 19 19
  • Page 20 20
  • Page 21 21
  • Page 22 22
  • Page 23 23
  • Page 24 24
  • Page 25 25
  • Page 26 26
  • Page 27 27
  • Page 28 28
  • Page 29 29
  • Page 30 30
  • Page 31 31
  • Page 32 32
  • Page 33 33
  • Page 34 34
  • Page 35 35
  • Page 36 36
  • Page 37 37
  • Page 38 38
  • Page 39 39
  • Page 40 40
  • Page 41 41
  • Page 42 42
  • Page 43 43
  • Page 44 44
  • Page 45 45
  • Page 46 46
  • Page 47 47
  • Page 48 48
  • Page 49 49
  • Page 50 50
  • Page 51 51
  • Page 52 52
  • Page 53 53
  • Page 54 54
  • Page 55 55
  • Page 56 56
  • Page 57 57

TOA Electronics FPS1000-48 User manual

Category
Power supply units
Type
User manual
This manual is also suitable for

Ask a question and I''ll find the answer in the document

Finding information in a document is now easier with AI