Page is loading ...

DF-NML202 – HEAVY DUTY SINGLE LEVER ARC RV
LAVATORY FAUCET
DURA FAUCET LIMITED LIFETIME WARRANTY
Dura Faucet warrants its RV faucets to be leak and drip free during normal use for
as long as the original consumer purchaser owns a Dura Faucet. If the faucet should
leak or drip during normal use, Dura Faucet will, free of charge, mail to the
purchaser the cartridge necessary to put the faucet in good working condition. This
warranty applies only to Dura Faucets installed in the United States of America,
Canada or Mexico (North America). | Dura Faucet also warrants all other aspects
of the faucet or accessories to be free of defects in material and workmanship during
normal usage in a recreational vehicle for as long as the original consumer
purchaser owns his or her Dura Faucet. Plated metal and plated plastic finishes are
warranted for (1) year. If a defect is found during normal use, Dura Faucet will, at
its election, repair, provide a replacement part or product, or make appropriate
adjustment. Damage to a product caused by accident, misuse, or abuse is not
covered by this warranty. Improper care and cleaning will void the warranty. Proof
of purchase (original sales receipt) must be provided to Dura Faucet with all
warranty claims. Dura Faucet is not responsible for labor charges, installation, or
other incidental or consequential costs. In no event shall the liability of Dura Faucet
exceed the purchase price of the faucet. | If you believe that you have a warranty
claim, contact Dura Faucet through our online contact form or send an email to
[email protected] Please be sure to provide all pertinent
information regarding your claim, including a complete description of the problem,
the product, model number, color, finish, the date the product was purchased and
from whom the product was purchased. Also include your original invoice. If you
don't have an original invoice, a photo of your faucet showing our brand markings is
required. DURA FAUCET AND/OR SELLER DISCLAIM ANY LIABILITY FOR
SPECIAL, INCIDENTAL OR CONSEQUENTIAL DAMAGES.
Some states/provinces do not allow limitations of how long an
implied warranty lasts or the exclusion or limitation of such damages,
so these limitations and exclusions may not apply to you. This
warranty gives the consumer specific legal rights. You may also have
other rights that vary from state/province to state/province.
* Never use cleaners containing abrasive cleansers, ammonia, bleach, acids,
waxes, alcohol, solvents or other products not recommended for plated metal
or plastic finishes. This will void the warranty.
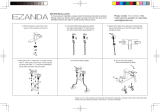
Item
Part
Description
01
E0410UA01-CP30
Handle
02
C07400008-CP30
Cap
03
C10300008-ZN39
Adjusting Assembly
04
E031020-54
Ceramic Disk Cartridge
05
D04400008-CP30
Plug
06
C01303701-CP30
Cover
07
E01193711-RZ
Body Assembly
08
E071001-CP30
Aerator
09
C01303702-CP30
Under Cover
10
C10230015-RZ
Mounting Shank
11
E021002-01
Part Assembly
12
C10960072-RZ
Washer
13
C10300004-ZN39
Lock Nut
14
D01950002-RZ
Screw

1 Fastening Deck-Plate
Apply plumbers putty or other suitable
sealant to the bottom edges of the base-
plate (optional). Once applied, align
base-plate and press into place to firmly
attach to sink. Remove excess plumbers
putty and place deck-plate onto base-
plate.
2 Secure Faucet
Remove both the lock-nut and washer
provided. Place faucet on sink by
feeding hoses down through the center
hole in the sink. From below secure
faucet by re-attaching lock-nut and
washer and screwing down until tight.
Make sure you tighten lock the nut
before the screws.
3 Install Drain
Remove the stopper from the drain and
unscrew drain from plastic pipe.
Remove plastic lock-nut, washer, and
rubber seal from the drain. Apply
plumbers putty or Silicone sealant to
the bottom edges of the drain. Once
applied, press firmly into place (note:
there should be excess plumbers putty
pushing out from the edges. This can be
removed later). Attach rubber seal,
washer, and lock-nut back onto bottom
of sink. Once applied, attach the plastic
pipe with the retaining nut attached and
screw into place.
4 Install Horizontal Pivot Rod
Remove the Retaining nut being sure to
leave the plastic ring inside. Remove
the Metal spring attached to the
horizontal pivot rod, set aside. Insert
the horizontal pivot rod, ball first, into
the pipe. Feed the retaining nut over the
rod and lightly attach without
tightening.
5 Insert Stopper
With the horizontal pivot rod in place,
but not tightened down, insert the
stopper making sure the end of the
horizontal pivot rod goes through the
loop at the bottom of the stopper. Once
the rod is through the hole tighten down
the retaining nut to secure the rod in the
loop.
6 Attach Clevis
Put the spring from the horizontal pivot
rod halfway onto the rod. While it is
still half on attach the clevis (choosing
the hole to match the needed height for
your sink or preference). Lock the
clevis into place by completely
attaching the spring and sliding it along
the horizontal pivot rod to a desired
location.
7 Attach Stopper Rod
Loosen the clevis screw until you can
insert the stopper rod. From above the
sink, feed the stopper rod down through
the faucet opening and through the
holes in the clevis. Tighten down the
clevis screw to secure stopper rod.
8 Connect Supplies
With the stopper correctly installed
(you should be able to push it up and
down now) securely attach marked
supply lines with corresponding hot and
cold tubes from faucet. Tighten all
connections with wrench to ensure that
no leaking occurs. With all pipe
attachments plumbers tape can be
utilized to help reduce the risk of
leaking.
9 Flush Lines
Remove the aerator by unscrewing it
from the faucet spout. Turn on the hot
and cold water supply lines. Turn the
faucet handle to the cold side and lift
the handle to the “on” position. Run the
water for one minute to remove any
potential debris. Rotate handle to the
warm side and run for a minute. During
this process watch for any water leaks
in the pipes. Reinstall the aerator.
MAINTENANCE AND CLEANING
Cleaning Tips: The finish on your
faucet is designed to retain its beautiful
sheen for years. To maintain the
original look of the finish, a little care
and caution should be used. We
recommend the use of mild soap and
water to clean the faucet. THE USE OF
ABRASIVE CLEANERS MAY
SCRATCH THE FINISH OR CAUSE
OTHER DAMAGE.
RECOMMENDED TOOLS AND
MATERIALS
¨ Plumbers Putty
¨ Adjustable Wrench
¨ Basin Wrench
¨ Phillips Screwdriver
BEFORE YOU BEGIN
There are a variety of things to do
before installing any new plumbing
system into your home or residence.
Before you begin work make sure you:
¨ Shut off the main water
supply
¨ Observed any local plumbing
codes
¨ If possible, install the faucet
before the sink
¨ Inspect tubing for damage -
Replace as necessary
Dura Faucet reserves the right to make
any revisions in the design of faucets
without notice.
(Optional)
/