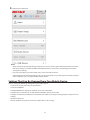
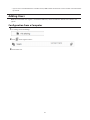
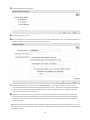
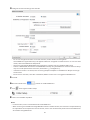
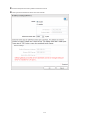
Buffalo LS210D0201 User manual
- Category
- NAS & storage servers
- Type
- User manual
This manual is also suitable for

LinkStation 200
User Manual
Americas: www.buffaloamericas.com
Europe: www.buffalo-technology.com
Asia Pacific: www.buffalo-asia.com
35020312-10
2016.11

1
Contents
Chapter 1 Getting Started .............................................6
Diagrams ...........................................................................................6
Changing Admin Password and Adding a Shared Folder .............7
Installing Applications .....................................................................9
NAS Navigator2 .......................................................................................... 9
SmartPhone Navigator ............................................................................10
WebAccess ................................................................................................10
Accessing Shared Folders ............................................................. 10
Accessing from a Computer ....................................................................10
Accessing from a Mobile Device .............................................................10
Turning the LinkStation On and Off ............................................ 11
Chapter 2 Configuration ............................................. 12
Opening Settings from a Computer ............................................ 12
Opening Settings from a Mobile Device ..................................... 17
Settings That Can Be Changed from Your Mobile Device .....................19
Chapter 3 Sharing Files ............................................... 20
Adding Shared Folders ................................................................. 20
Configuration from a Computer .............................................................20
Configuration from a Mobile Device ......................................................23
Adding Users ................................................................................. 25
Configuration from a Computer .............................................................25
Configuration from a Mobile Device ......................................................27
Adding Groups .............................................................................. 29

Access Restrictions ........................................................................ 30
Local Users/Groups .................................................................................. 31
Active Directory .......................................................................................33
NT Domain ................................................................................................36
User Authentication with an External SMB Server ................................38
Chapter 4 Managing Storage...................................... 42
RAID Arrays .................................................................................... 42
Working with RAID Arrays ............................................................ 42
Using JBOD ...............................................................................................42
Changing RAID Mode ..............................................................................43
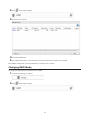
RMM (RAID Mode Manager) ....................................................................45
RAID Scanning..........................................................................................46
Adding an External Hard Drive .................................................... 47
Connecting an External Drive .................................................................47
Compatibility ...........................................................................................47
Dismounting Drives ...................................................................... 48
Dismounting with the Function Button .................................................48
Dismounting from Settings on a Computer ..........................................48
Dismounting from Settings on a Mobile Device ...................................49
Checking Drives ............................................................................ 50
Formatting Drives ......................................................................... 51
Erase Data on the LinkStation Completely ................................. 53
Disk Quotas ................................................................................... 54
Quotas for Users .......................................................................................55
Quotas for Groups ...................................................................................55
Hard Drive Replacement .............................................................. 56
Rebuilding the RAID Array from a Computer ........................................57
2

Rebuilding the RAID Array from a Mobile Device .................................59
Chapter 5 Remote Access ............................................ 64
WebAccess ..................................................................................... 64
Configuring from a Computer ................................................................64
Configuring from a Mobile Device .........................................................67
FTP .................................................................................................. 75
Chapter 6 Backup ........................................................ 77
Back Up from the LinkStation ...................................................... 77
Preparing a Backup Destination .............................................................77
Configuring a Backup Job .......................................................................79
Backing Up Your Mac with Time Machine ................................... 82
Copying from a USB Device .......................................................... 87
Configuring Direct Copy from a Computer ............................................ 88
Configuring Direct Copy from a Mobile Device .....................................89
Starting Direct Copy ................................................................................90
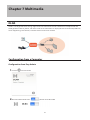
Chapter 7 Multimedia ................................................. 92
DLNA .............................................................................................. 92
Configuration from a Computer .............................................................92
Configuration from a Mobile Device ......................................................94
Playing Files .............................................................................................95
Connected DLNA-compatible Devices ...................................................95
Streaming to DLNA-compatible Devices ...............................................96
Disabling Playback from Specific Devices .............................................97
iTunes Server ................................................................................. 98
BitTorrent ....................................................................................... 99
3

Opening Download Manager ...............................................................100
Downloading Files .................................................................................102
Connecting a Printer ................................................................... 103
Setting Up a Printer from a Computer .................................................103
Setting Up a Printer from a Mobile Device ..........................................104
Chapter 8 Advanced Features .................................. 105
Email Notification ....................................................................... 105
Sleep Mode .................................................................................. 106
Encrypting Data Transmission ................................................... 108
Encrypting Settings Data ......................................................................108
Encrypting FTP Transfer Data ...............................................................108
SSL Encryption .......................................................................................108
Restoring Factory Defaults ......................................................... 109
Initializing from Settings ......................................................................109
Initializing with the Function Button ...................................................109
Online Update ............................................................................. 109
Name, Date, Time, and Language .............................................. 110
Jumbo Frames ............................................................................. 112
Changing the IP Address ............................................................ 114
Chapter 9 Utilities ...................................................... 116
NAS Navigator2 for Windows ..................................................... 116
Mounting as a Network Drive ...............................................................118
Changing the IP Address .......................................................................119
NAS Navigator2 for macOS ........................................................ 120
Mounting as a Network Drive ...............................................................122
4

Changing the IP Address .......................................................................123
NovaBACKUP ............................................................................... 123
Installing from CD ..................................................................................123
Installing from Website .........................................................................124
Chapter 10 Appendix ................................................ 125
When the Power LED Blinks ........................................................ 125
Default Settings .......................................................................... 127
Specifications .............................................................................. 127
Chapter 11 Regulatory Compliance Information .... 129
For Customers in the United States ........................................... 129
For Customers in Europe ............................................................ 129
5

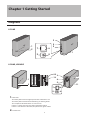
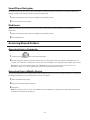
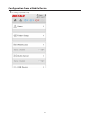
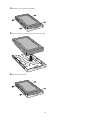
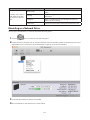
Chapter 1 Getting Started
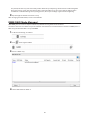
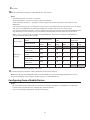
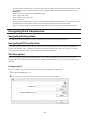
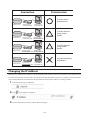
Diagrams
LS210D
LS220D, LS220DE
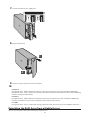
1
2
3
4
5
11
12
13
9
6
8
7
10
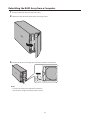
1 Power LED
The white power LED will light up while the LinkStation is on.
The white power LED blinks while booting or shutting down.
The red power LED blinks when an error occurs.
If there is a status message, the power LED blinks amber.
If there is new firmware available, the power LED glows amber.
2 Function LED
6

7
This LED glows white while the LinkStation is being initialized and while dismounting USB devices. It blinks
white during Direct Copy.
For enclosure models, the red function LED glows when turning the LinkStation on for initial hard drive
installation and blinks after pushing the function button.
3 Function Button
Use this button for Direct Copy, dismounting USB devices, and initializing settings.
4 Power Switch
Move the switch up and down to power on and off.
5 USB 2.0 Port
Compatible Buffalo USB hard drives, USB flash drives, digital cameras, and USB printers can be connected. USB
hubs are not supported.
6 LAN Port
Connect to a router, hub, or switch on your Ethernet network with the included Ethernet cable.
7 Link and Activity LED
This LED shows network activity. It blinks green when the LinkStation is accessed over the network.
8 Power Connector
Use the included power cable to connect to a surge protector or outlet.
9 Power Status LED
The LED glows green when the power cable is connected.
10 Fan (LS220D and LS220DE only)
Do not block the fan.
11 Anti-Theft Security Slot
Use this slot to secure your LinkStation with a cable lock (not included).
12 Drive 1 Error LED (LS220D and LS220DE only)
If there is an error on drive 1, this LED will light.
13 Drive 2 Error LED (LS220D and LS220DE only)
If there is an error on drive 2, this LED will light.
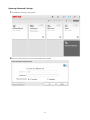
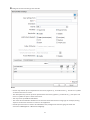
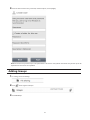
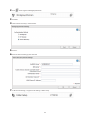
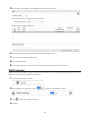
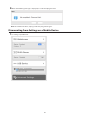
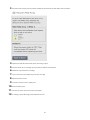
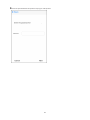
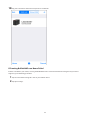
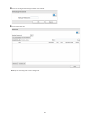
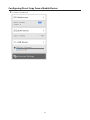
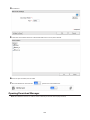
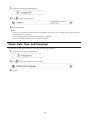
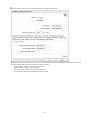
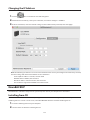
Changing Admin Password and Adding a Shared Folder
After initial setup, changing your password and creating other shared folders are recommended.
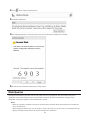
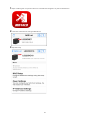
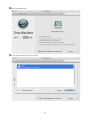
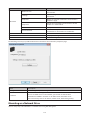
1 Double-click the icon to start NAS Navigator2.

8
2 Right-click on your LinkStation's icon and select Settings. On the Mac, select the LinkStation's icon while
holding down the control key, then select Settings.
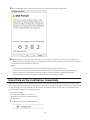
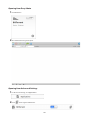
3 Changing the password from the default is recommended.
Note: You can open this same screen by clicking Getting Started from Easy Admin.
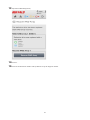
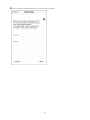
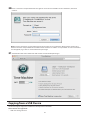
4 Enter the new password (twice), then click Next.

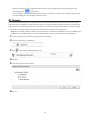
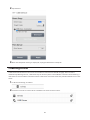
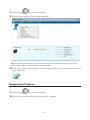
9
Note: The default username and password are "admin" and "password". To keep the defaults, leave both fields
blank and click Next.
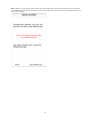
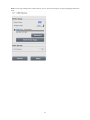
5 Configure levels of sharing for all existing shared folders (public or private) to finish the initial setup wizard.
Notes:
• Select "Set as private folder" to restrict access to the folder to specific users.
• Click Create Shared Folder to create a new shared folder from the wizard. By default, SMB and AFP connections
can be used to access this folder.
6 Click OK when the following message is displayed.
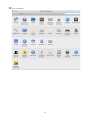
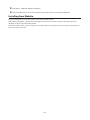
Installing Applications
NAS Navigator2
1 Insert the LinkNavigator CD into your computer. You can also download the latest LinkNavigator from the
Buffalo website. LinkNavigator will launch.
2 Click NAS Navigator2 Install.
3 Follow the screen instructions to install NAS Navigator2.
4 When the installation finished, click Finish.

10
SmartPhone Navigator
SmartPhone Navigator will allow to open LinkStation's Settings, change the IP address, and configure WebAccess
settings. Follow the instructions below to install the application.
1 Open the App Store (iOS devices) or Google Play (Android devices).
2 Install "SmartPhone Navigator".
WebAccess
WebAccess will allow you access files in the LinkStation. Follow the instructions below to install WebAccess
application.
1 Open the App Store (iOS devices) or Google Play (Android devices).
2 Install "WebAccess".
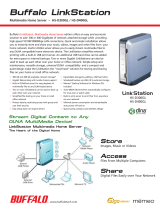
Accessing Shared Folders
Accessing from a Computer
1 Double-click the icon to start NAS Navigator2.
2 In NAS Navigator2, double-click your LinkStation's icon. The Explorer will open with shared folders' lists. For
macOS, the LinkStation is mounted as a drive icon on the desktop or it is displayed in the sidebar of the Finder.
Note: When you access a shared folder from a Windows PC, you may be asked to enter a username and
password. In such a case, enter "guest" for the username and the password is blank.
Accessing from a Mobile Device
To access shared folders from a mobile device with the following steps, you must configure WebAccess settings first.
To configure WebAccess, see the "WebAccess" section in chapter 5.
1 Open SmartPhone Navigator.
2 Tap your LinkStation from the NAS list.
3 Tap Browse.
Note: Alternatively, you can access shared folders from the WebAccess app. Open the application and tap your
LinkStation's hostname in the NAS list.

11
Turning the LinkStation On and Off
Move the power switch on the back of the LinkStation to the "on" position to turn it on. To turn it off, move the
switch to the "off" position and wait for the unit to fully shut down before unplugging it. Never unplug the AC
adapter without properly shutting down the LinkStation first.
When all the LEDs on the front of the LinkStation turn off, the shutdown process is complete.

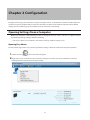
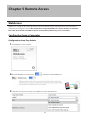
Chapter 2 Configuration
Configure and manage your LinkStation using the Settings interface, accessible from a browser window. Open the
interface using the procedure below or type the LinkStation's IP address in the URL field of your browser. Within
Settings, the Easy Admin page gives you quick access to commonly used settings.
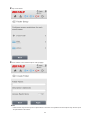
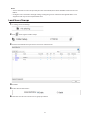
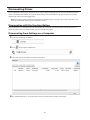
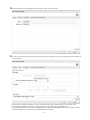
Opening Settings from a Computer
Note: Internet Explorer 9, Microsoft Edge, Firefox 18, Google Chrome 24, Safari 5, and later are supported. If you
have difficulty viewing Settings, check the following:
• If you have a proxy server enabled in the browser settings, disable the proxy server.
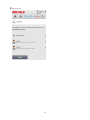
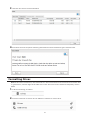
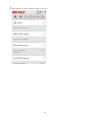
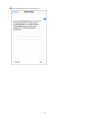
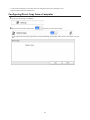
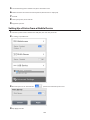
Opening Easy Admin
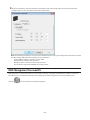
The Easy Admin page makes it easy to change common settings. Follow the steps below to open Easy Admin.
1 Double-click the icon to start NAS Navigator2.
2 Right-click on your LinkStation's icon and choose Settings. For macOS, click your LinkStation's icon while
holding down the control key, then select Settings.
12

13
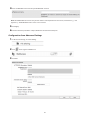
3 The Easy Admin screen will open.
Notes:
• If you click any buttons, you will need to enter a username and password.
• If the time-out period is set to "10 minutes", you will be logged out of Settings after 10 minutes of inactivity.
You will also be logged out when you reboot the LinkStation or close the web browser, even if you select
"Unlimited".
• Click Secure Connection to log in with an encrypted connection.
• You can also use Bonjour to log in to Settings from macOS. In Safari, click View - Show Bookmarks Bar. From
Bookmarks, click Bonjour - LinkStation name.
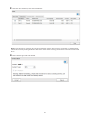
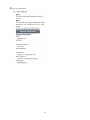
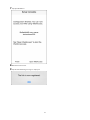
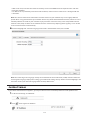
Getting Started
The wizard lets you configure the following settings:
• Changing administrator password
• Creating shared folders
• Access restrictions

14
The first time you access your LinkStation, this page will open. Step through the wizard to change your
administrative password.
WebAccess
Configure WebAccess to access your LinkStation remotely. Refer to the WebAccess section in chapter 5 for more
information.

15
BitTorrent
Configure BitTorrent to download large files efficiently. Refer to the BitTorrent section in chapter 7 for more
information.
DLNA
Configure DLNA to stream media files to DLNA-compatible devices on the LAN. Refer to the DLNA section in chapter
7 for more information.

16
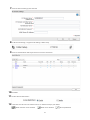
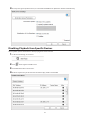
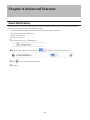
Opening Advanced Settings
1 Click Advanced Settings in Easy Admin.
2 Enter the administrator username and password, then click OK.

17
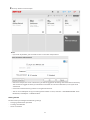
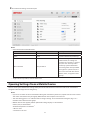
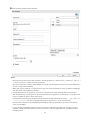
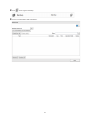
3 The Advanced Settings screen will open.
Notes:
• Username/Password Combinations:
Username Password Settings Available
admin password All
guest blank System information (read-only)
Your username Your password
If a user is assigned as an
administrator, all settings are
available. If assigned as a general
user, the user can only access
read-only system information
and change their own password.
If assigned as a power user, the
user can create and edit shared
folders, users, and general users
groups.
• To go back to Easy Admin, click the Home icon.
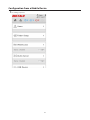
Opening Settings from a Mobile Device
You can access your LinkStation's Settings from your iOS or Android device. Download and install "SmartPhone
Navigator" from the App Store or Google Play.
Notes:
• If you have an older version of SmartPhone Navigator installed on your device, update it to the latest version.
Your icons and software may be slightly different from the examples in this manual.
• You must be logged in as an administrator to change settings. To use SmartPhone Navigator, log in as a
member of the administrators group.
• Mobile devices that support mobile-optimized Settings display are listed below:
iPhone, iPad, and iPod touch
*
Android smartphones and tablets
**
* iOS 5 or later
** Android 2.3 or later

18
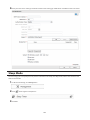
1 Open "SP Navigator" on your iOS device or "SmartPhone Navigator" on your Android device.
2 Tap Open Settings.

19
3 Settings will be displayed.
Notes:
• The first time you go through setup, you'll be given a chance to change the default password, correct the
time zone settings, and select the RAID mode (models with 2+ drives only). Step though the wizard to
change these settings.
• If you tap any buttons, you will need to enter a username and password.
• Tap Desktop to show Advanced Settings. This screen gives the full array of settings that could be changed
from a computer, but is not optimized for mobile devices.
Settings That Can Be Changed from Your Mobile Device
You can change the following settings from your mobile device:
• Create users, change usernames and passwords.
• Create shared folders.
• Configure WebAccess settings to remotely access your LinkStation.
• Configure your LinkStation to use with DLNA-compatible devices on the LAN.
• Configure and dismount USB devices connected to your NAS, including Direct Copy options and print server
settings.
• Update the firmware.
• Recover the RAID array when a drive fails (models with 2+ drives only).
Page is loading ...
Page is loading ...
Page is loading ...
Page is loading ...
Page is loading ...
Page is loading ...
Page is loading ...
Page is loading ...
Page is loading ...
Page is loading ...
Page is loading ...
Page is loading ...
Page is loading ...
Page is loading ...
Page is loading ...
Page is loading ...
Page is loading ...
Page is loading ...
Page is loading ...
Page is loading ...
Page is loading ...
Page is loading ...
Page is loading ...
Page is loading ...
Page is loading ...
Page is loading ...
Page is loading ...
Page is loading ...
Page is loading ...
Page is loading ...
Page is loading ...
Page is loading ...
Page is loading ...
Page is loading ...
Page is loading ...
Page is loading ...
Page is loading ...
Page is loading ...
Page is loading ...
Page is loading ...
Page is loading ...
Page is loading ...
Page is loading ...
Page is loading ...
Page is loading ...
Page is loading ...
Page is loading ...
Page is loading ...
Page is loading ...
Page is loading ...
Page is loading ...
Page is loading ...
Page is loading ...
Page is loading ...
Page is loading ...
Page is loading ...
Page is loading ...
Page is loading ...
Page is loading ...
Page is loading ...
Page is loading ...
Page is loading ...
Page is loading ...
Page is loading ...
Page is loading ...
Page is loading ...
Page is loading ...
Page is loading ...
Page is loading ...
Page is loading ...
Page is loading ...
Page is loading ...
Page is loading ...
Page is loading ...
Page is loading ...
Page is loading ...
Page is loading ...
Page is loading ...
Page is loading ...
Page is loading ...
Page is loading ...
Page is loading ...
Page is loading ...
Page is loading ...
Page is loading ...
Page is loading ...
Page is loading ...
Page is loading ...
Page is loading ...
Page is loading ...
Page is loading ...
Page is loading ...
Page is loading ...
Page is loading ...
Page is loading ...
Page is loading ...
Page is loading ...
Page is loading ...
Page is loading ...
Page is loading ...
Page is loading ...
Page is loading ...
Page is loading ...
Page is loading ...
Page is loading ...
Page is loading ...
Page is loading ...
Page is loading ...
Page is loading ...
Page is loading ...
Page is loading ...
Page is loading ...
-
 1
1
-
 2
2
-
 3
3
-
 4
4
-
 5
5
-
 6
6
-
 7
7
-
 8
8
-
 9
9
-
 10
10
-
 11
11
-
 12
12
-
 13
13
-
 14
14
-
 15
15
-
 16
16
-
 17
17
-
 18
18
-
 19
19
-
 20
20
-
 21
21
-
 22
22
-
 23
23
-
 24
24
-
 25
25
-
 26
26
-
 27
27
-
 28
28
-
 29
29
-
 30
30
-
 31
31
-
 32
32
-
 33
33
-
 34
34
-
 35
35
-
 36
36
-
 37
37
-
 38
38
-
 39
39
-
 40
40
-
 41
41
-
 42
42
-
 43
43
-
 44
44
-
 45
45
-
 46
46
-
 47
47
-
 48
48
-
 49
49
-
 50
50
-
 51
51
-
 52
52
-
 53
53
-
 54
54
-
 55
55
-
 56
56
-
 57
57
-
 58
58
-
 59
59
-
 60
60
-
 61
61
-
 62
62
-
 63
63
-
 64
64
-
 65
65
-
 66
66
-
 67
67
-
 68
68
-
 69
69
-
 70
70
-
 71
71
-
 72
72
-
 73
73
-
 74
74
-
 75
75
-
 76
76
-
 77
77
-
 78
78
-
 79
79
-
 80
80
-
 81
81
-
 82
82
-
 83
83
-
 84
84
-
 85
85
-
 86
86
-
 87
87
-
 88
88
-
 89
89
-
 90
90
-
 91
91
-
 92
92
-
 93
93
-
 94
94
-
 95
95
-
 96
96
-
 97
97
-
 98
98
-
 99
99
-
 100
100
-
 101
101
-
 102
102
-
 103
103
-
 104
104
-
 105
105
-
 106
106
-
 107
107
-
 108
108
-
 109
109
-
 110
110
-
 111
111
-
 112
112
-
 113
113
-
 114
114
-
 115
115
-
 116
116
-
 117
117
-
 118
118
-
 119
119
-
 120
120
-
 121
121
-
 122
122
-
 123
123
-
 124
124
-
 125
125
-
 126
126
-
 127
127
-
 128
128
-
 129
129
-
 130
130
-
 131
131
-
 132
132


Buffalo LS210D0201 User manual
- Category
- NAS & storage servers
- Type
- User manual
- This manual is also suitable for
Ask a question and I''ll find the answer in the document
Finding information in a document is now easier with AI
Related papers
-
Buffalo LinkStation 220 + 2x WD30PURX User manual
-
Buffalo LinkStation 441D 12TB User manual
-
Buffalo TeraStation 5010 User manual
-
Buffalo LinkStation Mini User manual
-
Buffalo Technology LinkStation LS-WVL User manual
-
Buffalo LinkStation User manual
-
-
-
Buffalo TS1400D1604 User manual
-
 Buffalo Technology LINKSTATION HD-HLAN User manual

Other documents
-
 MECHEER USB Flash Drive 32GB 2 Pack USB 2.0 Thumb Drive Jump Drive Bulk Memory Sticks Zip Drives Keychain Design User guide
-
Intellinet Network Attached Storage Appliance User manual
-
Soundmaster UR965 Datasheet
-
Universal-Tech MyXerver Pro MX3800 User guide
-
Apple iPod User manual
-
 Buffalo Tech LinkStation HD-H120LAN User manual
-
 Buffalo Technology LinkStation HS-D300GL User manual
-
 Buffalo Technology Home Server User manual
-
APPS To Do Hard reset manual
-
ACRONIS BackupAgent Management Console 4.1.6 User manual


