Page is loading ...

INSTRUCTION MANUAL
16" STAND FAN
Thank you for choosing BLACK+DECKER!
PLEASE READ BEFORE RETURNING THIS PRODUCT FOR
ANY REASON.
If you have a question or experience a problem with your BLACK+DECKER
purchase, go to www.blackanddecker.com/instantanswers
If you can’t find the answer or do not have access to the Internet, call
844-299-0879 from 10:30 a.m. to 6:30 p.m. EST Mon. - Fri. to speak with an
agent. Please have the catalog number available when you call.
SAVE THIS MANUAL FOR FUTURE REFERENCE.
CATALOG NUMBER
BFSR16

Page 2

Thank you for purchasing our
BLACK+DECKER product. This
easy-to-use manual will guide you
in getting the best use of your fan.
Remember to record the model and
serial numbers. They are on a label
on the rear.
Staple your receipt to your manual.
You will need it to obtain warranty service.
Model number
Serial number
Date of purchase
PRODUCT REGISTRATION
CONTENTS
SAFETY INFORMATION
Important Safety Instructions ......................................................................................................................................... 4-6
Electrical Requirements ....................................................................................................................................................... 5
SET UP & USE
Parts & Features........................................................................................................................................................................ 7
Operation & Use ..................................................................................................................................................8-11
Replacing the Fuse ................................................................................................................................................ 12
CLEANING & CARE ............................................................................................................................................... 12
TROUBLE SHOOTING & WARRANTY
Before You Call For Service ...............................................................................................................................13
Customer Service ................................................................................................................................................... 13
Troubleshooting ......................................................................................................................................................13
Limited Warranty ................................................................................................................................................................... 14
Page 3

Page 4
SAFETY INFORMATION
IMPORTANT SAFETY INSTRUCTIONS
1. READ ALL INSTRUCTIONS BEFORE USE
2. Never insert fingers, pencils, or any other object through the grill
when fan is running
3. Disconnect fan when moving from one location to another.
4. Disconnect fan when not in use and before cleaning.
5. To protect against risk of electrical shock, do not immerse fan in
water or any other liquid.
6. Do not let cord hang over edge of table or counter.
7. Be sure fan is on a stable surface when operating to avoid
overturning.
8. Do not use fan in window. Rain may create electrical hazard.
9. Close supervision is necessary when any appliance is used by or near
children.
10. This product employs overload protection (fuse). A blown fuse
indicates an overload or short-circuit situation. If the fuse blows,
unplug the product from the outlet. Replace the fuse as per the user
manual (follow product marking for proper fuse rating) and check
the product. If the replacement fuse blows, a short-circuit may be
present and the product should be discarded or returned to an
authorized service facility for examination and/or repair.
11. Do not operate any fan with a damaged cord or plug. Discard fan or
return to an authorized service facility for examination and/or repair.
12. Do not run cord under carpeting. Do not cover cord with throw rugs,
runners, or similar coverings. Do not route cord under furniture or
appliances. Arrange cord away from trac area and where it will not
be tripped over.
WARNING
WARNING - Hazards or unsafe
practices which COULD result in
severe personal injury or death
DANGER
DANGER - Immediate hazards
which WILL result in severe
personal injury or death
CAUTION
CAUTION - Hazards or unsafe
practices which COULD result in
minor personal injury
WARNING
When using electrical appliances, basic safety precautions
should be followed, including the following

Page 5
SAFETY INFORMATION
13. To reduce the risk of fire or electric shock, DO NOT use this fan with
any solid state speed control devices.
14. Do not use outdoors.
15. Ensure that the fan is switched o from the supply mains before
removing the grille.
SAVE THESE INSTRUCTIONS
HOUSEHOLD USE ONLY
ELECTRICAL REQUIREMENTS
This appliance has a polarized plug (one blade is wider than the other). To reduce the
risk of electric shock, this plug is intended to fit into a polarized outlet only one way.
If the plug does not fit into the outlet, reverse the plug. If it still does not fit, contact a
qualified electrician. Do not attempt to modify the plug in any way.
POWER SUPPLY CORD
1. If the power supply cord is too short, do not use an extension cord. Have a qualified
electrician or serviceman to install an outlet near the appliance.
2. If it is absolutely necessary to use longer cord sets or an extension cord, extreme
care must be exercised.
a) The marked electrical rating of the cord set or extension cord must equal to or
be greater than the electrical rating of the appliance. The longer cord should be
arranged so that it will not drape over the counter top or table top where it can be
pulled on by children or tripped over unintentionally.
NOTE: Neither BLACK+DECKER nor the dealer can accept any liability for damage
to the product or personal injury resulting from failure to observe the
electrical connection procedures.

Page 6
SAFETY INFORMATION
HANDLING ALKALINE BATTERIES
1. Should fluid from the battery accidentally get into your eyes, there is a threat
of loss of eyesight, do not rub them. Immediately rinse your eyes with clean tap
water and then consult a physician immediately.
2. Do not put the battery in a fire, expose it to heat, dismantle or modify it. If the
insulation or safety valve is damaged, the battery may leak fluid, overheat or
explode.
3. Do not insert the battery with the poles reversed. Doing so may cause some
abnormality or a short and the battery may leak fluid, overheat or explode.
4. Keep the battery out of the reach of children. If the battery is swallowed, contact a
physician immediately.
5. If the alkali fluid gets in your mouth, rinse your mouth with water and contact a
physician immediately.
6. If the alkali fluid gets on your skin or clothes, it may burn your skin, thoroughly
rinse the aected area with tap water.
7. Do not mix new and old batteries or other makes of batteries. The dierent
attributes may cause the battery to leak fluid, overheat or explode.
8. This battery was not made to be recharged. Recharging this battery may damage
the insulation or internal structure and may cause the battery to leak fluid,
overheat or explode.
9. Do not damage or remove the label on the exterior of the battery. Doing so may
cause the battery to short, leak fluid, overheat or explode.
10. Do not drop, throw or expose the battery to extreme impact. Doing so may cause
the battery to leak fluid, overheat or explode.
11. Do not alter the shape of the battery. If the insulation or safety valve is damaged,
the battery may leak fluid, overheat or explode.
12. Immediately remove batteries when they have lost all power. Leaving the batteries
in the unit for a long time may cause the batteries to leak fluid, overheat or
explode due to gas that is generated by the batteries.
Contact your local government for disposal practices in your area.
WARNING
When handling alkaline batteries, basic safety precautions
should be followed, including the following

Page 7
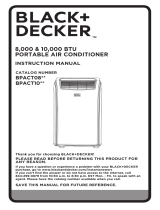
PARTS & FEATURES
SET UP & USE
Spinner
Front grill
Rear grill
Piano switch
Fan blade
Plastic nut
Motor shaft
Clutch knob
Motor housing
Tighten
Loosen
Extension Pole
Internal Pole
Thumb
screw
Height
Adjustment
Ring
Base
7-shape Bolt
Case
Remote
Control
Holder

Page 8
SET UP & USE
ASSEMBLY OF BASE & COLUMN UNIT
1. Unscrew the 7-shape Bolt from the Extension Pole. (see Fig. 1)
2. Insert the extension pole in the base and tighten the 7-shape Bolt. (see Fig. 2)
3. From the extension pole, loosen the height adjustment ring and adjust the
internal pipe to the desired height.
NOTE: If you can’t find the internal pole, it has slid inside the extension pole. You
will need to retrieve it by pulling it out from the extension pole ( see Fig. 3).
4. To attach the upper portion of the fan to the extension pole, loosen the thumb
screw slightly on the bottom of the head unit. Place the head unit on the extension
pole and tighten the thumb screw in alignment with the groove on the internal
pole. (see Fig. 4).
CAUTION: Height adjustment ring must be fully fastened before the assembly of
the motor housing to the extension pole.
Loosen
Mounting Hole
Thumb Screw
Annular Groove
Fig. 1 Fig. 2 Fig. 3 Fig. 4

Page 9
GRILL & FAN BLADE ASSEMBLY
WARNING: Never attempt to run the fan without the grill in place and properly
secured. Failure to have the grill in place can result in serious injury.
1. Unscrew the spinner clockwise and the plastic nut counterclockwise to remove
both of them. Fix the rear grill so it sits perfectly flush to the motor then tighten the
plastic nut clockwise. (see Fig. 5)
2. Insert the blade into shaft, and make sure the rotor shaft pin is fitted into groove of
the blade. Turn the spinner counterclockwise to tighten the blade. (see Fig. 6)
3. Fasten the front grill and the rear grill to each other by using the grill clips.
(see Fig. 7)
Spinner
Tight
Loose
Plastic Nut
Spinner
Tight
Blade
Retaining
Pin
Slot
Clip
Fig. 5 Fig. 6 Fig. 7
SET UP & USE

SET UP & USE
OPERATION INSTRUCTIONS
CONTROL PANEL
On the control panel, there are two keys and six indicator lights. (see Fig.8)
1. SPEED ON/OFF KEY - The key is for switching on the fan. The fan will be started at
low speed. Press the key again, the fan will work at medium speed. Press again, it
will work at the high speed. Press again, it will be switched o.
2. TIMER KEY - This key can be touched repeatedly or just held down as you select
auto shuto of one, two or four hours. The corresponding LED will illuminate to
confirm your choice.
NOTE: Do not press the timer key if you want the fan to operate continuously.
OSCILLATION CONTROL
To make the fan oscillate, press down the clutch knob located on the top of the motor
housing. To resume directional airflow, pull the clutch knob up to its initial position.
TILT ADJUSTING
To adjust the air flow upward or downward, push the grill section lightly to the
desired direction.
HEIGHT ADJUSTING
The height of the fan can be adjusted by loosening the height adjustment ring.
Carefully raise or lower to desired height and re-tighten the height adjustment ring.
Remote Control
Battery
Battery Cover
Fig. 8
Page 10

REMOTE CONTROL
1. Battery Installation (batteries not included)
(1) Slide open the battery compartment cover.
(2) Insert 2 x “AAA” batteries as shown in Fig. 9.
(3) Slide back on the battery cover.
NOTE: Use size “AAA” alkaline batteries. Do not use rechargeable batteries.
2. Operation
On the remote control, there are three keys. (see Fig. 10)
(1) POWER: The key is for switching the fan ON and OFF
(2) SPEED: The key is for setting fan speed. Press once and the fan will be started
at slow speed. Press the key again, the fan will work at medium speed.
Press again, it will work at high speed.
(3) TIMER: The key can be touched repeatedly or just held down as you select the
timer for auto shuto of one, two or four hours.
SET UP & USE
Remote Control
Battery
Battery Cover
Fig. 9
Page 11
Fig. 10
Remote Control
Battery
Battery Cover
Speed Power
Timer

Page 12Page 12
SET UP & USE
REPLACING THE FUSE
• Disconnect fan from power outlet by grabbing the plug at the end of the cord. Do
not unplug by pulling the cord itself
• Open fuse cover located in the side of the power cord plug by sliding it toward the
plug blades (Fig 1)
• Remove fuse carefully by taking a small tool and slowly prying out one end. Once
you have one end out, slowly pry out the other end.
• To avoid the risk of fire, replace only with similar 2.5 Amp, 125V fuse.
• Close fuse cover by sliding cover toward the top of the plug.
CAUTION: Do not attempt to replace the plug itself. Discard the product entirely if
the plug itself is damaged.
CLEANING AND MAINTENANCE
WARNING: Never attempt to run the fan without the grill in place and properly
secured. Failure to have the grill in place can result in serious injury.
Be sure to unplug from the electrical supply source before cleaning.
Be sure not to get water or any other liquid inside the motor.
• Plastic parts of the fan should be cleaned with mild soap and a damp cloth or
sponge. Rinse with clean water to remove any soapy film residue.
Fig. 1

Page 13Page 13
TROUBLESHOOTING & WARRANTY
BEFORE YOU CALL FOR SERVICE
IF THE APPLIANCE FAILS TO OPERATE:
A) Check to make sure that the appliance is plugged in securely. If it is not, remove
the plug from the outlet, wait 10 seconds and plug it in again securely.
B) Check for a blown circuit fuse or a tripped main circuit breaker. If these seem to be
operating properly, test the outlet with another appliance.
IF NONE OF THE ABOVE SOLVES THE PROBLEM, CONTACT A QUALIFIED
TECHNICIAN. DO NOT TRY TO ADJUST OR REPAIR THE APPLIANCE YOURSELF.
IMPORTANT
DO NOT RETURN THIS PRODUCT TO THE STORE
If you have a problem with this product, please contact the
W Appliance Co. Customer Satisfaction Center at
844-299-0879 or service@appliance.com.
DATED PROOF OF PURCHASE, MODEL # AND SERIAL #
REQUIRED FOR WARRANTY SERVICE
TROUBLE POSSIBLE CAUSE POSSIBLE REMEDY
Appliance does not turn on
Appliance is not plugged in Check that appliance is
plugged into a working outlet
The fuse cover may be open Disconnect the plug from
outlet and close the cover of
the fuse.
Troubleshoot your problem by using the chart below. If the appliance still does not
work properly, contact W Appliance Co. customer service center or the nearest
authorized service center. Customers must never troubleshoot internal components.
SPECIFICATIONS
• Unit Dimensions (W x D x H): 17.72” x 15.75” x 49.21”
• Net Weight: Approx. 11.02 lbs.

Page 14
TROUBLESHOOTING & WARRANTY
LIMITED WARRANTY
Any repair, replacement, or warranty service,
and all questions about this product should be
directed to W Appliance Co. at 844-299-0879
from the USA or Puerto Rico.
W Appliance Co. warrants to the original purchaser
that the product will be free from defects in material,
parts and workmanship for the period designated for
this product. The warranty commences the day the
product is purchased and covers up to a period of 1
year (12 months) for labor/1 year (12 months) for parts
(manufacturing defects only).
W Appliance Co. agrees that it will, at its option,
replace the defective product with either a new
or remanufactured unit equivalent to your original
purchase during the warranty period.
Exclusions: This warranty does not apply to the
below:
1. If the appearance or exterior of
the product has been damaged or
defaced, altered or modified in design or
construction.
2. If the product original serial number
has been altered or removed or cannot
be readily determined.
3. If there is damaged due to power line
surge, user damage to the AC power
cord or connection to improper voltage
source.
4. If damage is due to general misuse,
accidents or acts of God.
5. If repair attempts are done by
unauthorized service agents, use of
parts other than genuine parts or parts
obtained from persons other than
authorized service companies.
6. On units that have been transferred
from the original owner.
7. On products that have been purchased
as refurbished, like new, second-hand, in
a “As-Is” or “Final Sale” terms.
8. To products used in a commercial or
rental setting.
9. To products used in settings other than
ordinary household use or used other
than in accordance with the provided
instructions.
10. To damages for service calls for
improper installations.
11. Transportation and shipping costs
associated with the replacement of the
unit.
12. Service calls to instruct you how to use
your product.
13. Service calls to repair or replace the
house fuse, reset the circuit breaker or
correct the wiring in the house.
REPAIR OR REPLACEMENT AS PROVIDED UNDER
THIS WARRANTY IS THE EXCLUSIVE REMEDY OF
THE CUSTOMER; W Appliance Co. SHALL NOT BE
LIABLE FOR ANY INCIDENTAL OR CONSEQUENTIAL
DAMAGES FOR BREACH OF ANY EXPRESS OR
IMPLIED WARRANTY ON THIS PRODUCT, EXCEPT
TO THE EXTENT PROHIBITED BY APPLICABLE LAW.
ANY IMPLIED WARRANTY OF MERCHANTABILITY
OF FITNESS FOR A PARTICULAR PURPOSE ON THIS
PRODUCT IS LIMITED TO THE DURATION OF THE
WARRANTY.
Some states do not allow the exclusion or limitations
of incidental or consequential damages, or limitations
on how long the warranty lasts. In these cases the
above exclusions or limitations may not apply to you.
This warranty gives you specific legal rights and you
may also have other rights which vary from state to
state.
Obtaining Service: To obtain service, product
literature, supplies or accessories please call
844-299-0879 to create a ticket for exchange/repair.
Please make sure to provide the date of purchase,
model number and a brief description of the problem.
Our customer service representative
will contact you or send detailed return instructions.
W Appliance Co. does not warrant that the appliance will work
properly in all environmental conditions, and makes no warranty
and representation, either implied or expressed, with respect
to the quality, performance, merchantability, or fitness for a
particular purpose other than the purpose identified within this
user’s manual. W Appliance Co. has made every eort to ensure
that this user’s manual is accurate and disclaims liability for any
inaccuracies or omissions that may have occurred. Information in
this user’s manual is subject to change without notice and does
not represent a commitment on the part of W Appliance Co.. W
Appliance Co. reserves the right to make improvements to this
user’s manual and/or to the products described in this user’s
manual at any time without notice. If you find information in this
manual that is incorrect, misleading, or incomplete, please contact
us at 844-299-0879.
W Appliance Co.
1356 Broadway
New York, NY 10018

Page 15
This device complies with part 15 of the FCC rules. Operation is subject to the
following two conditions: 1) This device may not cause harmful interference, and 2)
This device must accept any interference received, including interference that may
cause undesired operation. This equipment has been tested and found to comply
with the limits for a Class B digital device, pursuant to Part 15 of the FCC rules. These
limits are designed to provide reasonable protection against harmful interference
in a residential installation. This equipment generates, uses and can radiate radio
frequency energy and, if not installed and used in accordance with the instructions,
may cause harmful interference to radio communications. However, there is no
guarantee that the interference will not occur in a particular installation. If this
equipment does cause harmful interference to radio or television reception, which
can be determined by turning the equipment o and on, the user is encouraged to
try to correct the interference by one or more of the following measures: a) Reorient
or relocate the receiving antenna. b) Increase the separation between the equipment
and the receiver. c) Connect the equipment into an outlet dierent from that
which the receiver is connected. d) Consult the dealer or an experienced radio/TV
technician for help.

Page 16
BLACK & DECKER, BLACK+DECKER, the BLACK & DECKER and
BLACK+DECKER logos and product names and the orange and black color
scheme are trademarks of The Black & Decker Corporation, used under license.
All rights reserved.
Product in this box may differ slightly from that pictured. Does not affect
function. Not all accessories shown in photography are included in this
package.
Imported by W Appliance, Inc., 1356 Broadway, New York, NY 10018
March 2017 Printed in China
/