TEAC CR- H101 Reference guide
- Category
- CD players
- Type
- Reference guide
This manual is also suitable for

Z
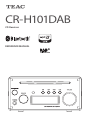
CR-H101DAB
CD Receiver
REFERENCE MANUAL

2
CAUTION: TO REDUCE THE RISK OF ELECTRIC SHOCK, DO
NOT REMOVE COVER (OR BACK). NO USER-SERVICEABLE
PARTS INSIDE. REFER SERVICING TO QUALIFIED SERVICE
PERSONNEL.
<
The lightning flash with arrowhead symbol,
within an equilateral triangle, is intended
to alert the user to the presence of unin-
sulated “dangerous voltage” within the
product’s enclosure that may be of suf-
ficient magnitude to constitute a risk of
electric shock to persons.
B
The exclamation point within an equilat-
eral triangle is intended to alert the user to
the presence of important operating and
maintenance (servicing) instructions in the
literature accompanying the appliance.
WARNING: TO PREVENT FIRE OR
SHOCK HAZARD, DO NOT EXPOSE THIS
APPLIANCE TO RAIN OR MOISTURE.
CLASS " apparatus with double insulation, and no
protective earth provided.
CAUTION
o DO NOT REMOVE THE EXTERNAL CASES OR CABINETS TO
EXPOSE THE ELECTRONICS. NO USER SERVICEABLE PARTS
ARE INSIDE.
o IF YOU ARE EXPERIENCING PROBLEMS WITH THIS
PRODUCT, CONTACT THE STORE WHERE YOU PURCHASED
THE UNIT FOR A SERVICE REFERRAL. DO NOT USE THE
PRODUCT UNTIL IT HAS BEEN REPAIRED.
o USE OF CONTROLS OR ADJUSTMENTS OR PERFORMANCE
OF PROCEDURES OTHER THAN THOSE SPECIFIED HEREIN
MAY RESULT IN HAZARDOUS RADIATION EXPOSURE.
IN USA/CANADA, USE ONLY ON 120 V SUPPLY.
The nameplate is located on the bottom of the unit as
shown below.
Nameplate
Front side
IMPORTANT SAFETY INSTRUCTIONS
The Bluetooth® word mark and logos are registered trademarks owned by Bluetooth SIG, Inc. and any use of such marks by TEAC
CORPORATION is under license.
© 2013 CSR plc and its group companies. The aptX® mark and the aptX logo are trade marks of CSR plc or one of its group com-
panies and may be registered in one or more jurisdictions.
This product is protected by certain intellectual property rights of Microsoft. Use or distribution of such technology outside of
this product is prohibited without a license from Microsoft.
Windows is a registered trademark of Microsoft Corporation in the United States and/or other countries.
Mac, Mac OS and OS X are trademarks of Apple Inc., registered in the U.S. and other countries.
Other company names, product names and logos in this document are the trademarks or registered trademarks of their respec-
tive owners.

3
1) Read these instructions.
2) Keep these instructions.
3) Heed all warnings.
4) Follow all instructions.
5) Do not use this apparatus near water.
6) Clean only with dry cloth.
7) Do not block any ventilation openings. Install in accor-
dance with the manufacturer's instructions.
8) Do not install near any heat sources such as radiators,
heat registers, stoves, or other apparatus (including
amplifiers) that produce heat.
9) Do not defeat the safety purpose of the polarized or
grounding-type plug. A polarized plug has two blades
with one wider than the other. A grounding type plug
has two blades and a third grounding prong. The wide
blade or the third prong are provided for your safety. If
the provided plug does not fit into your outlet, consult
an electrician for replacement of the obsolete outlet.
10) Protect the power cord from being walked on or
pinched particularly at plugs, convenience receptacles,
and the point where they exit from the apparatus.
11) Only use attachments/accessories specified by the
manufacturer.
12) Use only with the cart, stand,
tripod, bracket, or table spec-
ified by the manufacturer,
or sold with the apparatus.
When a cart is used, use cau-
tion when moving the cart/
apparatus combination to
avoid injury from tip-over.
13) Unplug this apparatus during lightning storms or when
unused for long periods of time.
14) Refer all servicing to qualified service personnel.
Servicing is required when the apparatus has been
damaged in any way, such as power-supply cord or plug
is damaged, liquid has been spilled or objects have fallen
into the apparatus, the apparatus has been exposed to
rain or moisture, does not operate normally, or has been
dropped.
o The apparatus draws nominal non-operating power
from the AC outlet with its POWER or STANDBY/ON
switch not in the ON position.
o The mains plug is used as the disconnect device, the dis-
connect device shall remain readily operable.
o Caution should be taken when using earphones or
headphones with the product because excessive sound
pressure (volume) from earphones or headphones can
cause hearing loss.
CAUTION
o Do not expose this apparatus to drips or splashes.
o Do not place any objects filled with liquids, such as
vases, on the apparatus.
o Do not install this apparatus in a confined space
such as a book case or similar unit.
o The apparatus should be located close enough to
the AC outlet so that you can easily reach the power
cord plug at any time.
o If the product uses batteries (including a battery
pack or installed batteries), they should not be
exposed to sunshine, fire or excessive heat.
o CAUTION for products that use replaceable lithium
batteries: there is danger of explosion if a battery is
replaced with an incorrect type of battery. Replace
only with the same or equivalent type.
V
Precautions concerning batteries
Misuse of batteries could cause them to rupture or leak lead-
ing to fire, injury or the staining of nearby things. Please read
and observe the following precautions carefully.
o Be sure to insert the batteries with correct positive (¥)
and negative (^) orientations.
o Use batteries of the same type. Never use different types
of batteries together.
o If the remote control is not used for a long time (more
than a month), remove the batteries to prevent them
from leaking.
o If the batteries leak, wipe away the leakage inside the
battery compartment and replace the batteries with
new ones.
o Do not use batteries of types other than those specified.
Do not mix new batteries with old ones or use different
types of batteries together.
o Do not heat or disassemble batteries. Never throw bat-
teries into fire or water.
o Do not carry or store batteries with other metallic
objects. The batteries could short circuit, leak or explode.
o Never recharge a battery unless it is confirmed to be a
rechargeable type.

4
IMPORTANT SAFETY INSTRUCTIONS (continued)
Laser information
This product contains a semiconductor laser system inside
the cabinet and is classified as a “CLASS 1 LASER PRODUCT”.
To prevent being exposed to the laser beam, do not try to
open the enclosure.
Laser:
Type: EP-HD870PB
Manufacturer: GUANGDONG EVER BRIGHT GROUP CO.,LTD
Laser output: Less than 1 mW on the objective lens
Wavelength: 792±25 nm
Model for USA
This product has been designed and manufactured accord-
ing to FDA regulations “title 21, CFR, chapter 1, subchapter
J, based on the Radiation Control for Health and Safety Act
of 1968”, and is classified as class ! laser product. There is not
hazardous invisible laser radiation during operation because
invisible laser radiation emitted inside of this product is com-
pletely confined in the protective housings.
The label required in this regulation is as follows:
Front side
Bottom
For European Customers
Disposal of electrical and electronic equip-
ment and batteries and/or accumulators
(a) All electrical/electronic equipment and waste
batteries/accumulators should be disposed of
separately from the municipal waste stream via
collection facilities designated by the government
or local authorities.
(b) By disposing of electrical/electronic equipment
and waste batteries/accumulators correctly, you
will help save valuable resources and prevent any
potential negative effects on human health and the
environment.
(c) Improper disposal of waste electrical/electronic
equipment and batteries/accumulators can have
serious effects on the environment and human
health because of the presence of hazardous sub-
stances in the equipment.
(d) The Waste Electrical and Electronic
Equipment (WEEE) symbols, which show
wheeled bins that have been crossed
out, indicate that electrical/electronic
equipment and batteries/accumulators
must be collected and disposed of sepa-
rately from household waste.
If a battery or accumulator contains more
than the specified values of lead (Pb),
mercury (Hg), and/or cadmium (Cd) as
defined in the Battery Directive (2006/66/
EC), then the chemical symbols for those
elements will be indicated beneath the WEEE
symbol.
(e) Return and collection systems are available to end
users. For more detailed information about the
disposal of old electrical/electronic equipment and
waste batteries/accumulators, please contact your
city office, waste disposal service or the shop where
you purchased the equipment.
Pb, Hg, Cd
DECLARATION OF CONFORMITY
We, TEAC AUDIO EUROPE, Gutenbergstr. 3,
82178 Puchheim, Germany declare in own
responsibility, the TEAC product described
in this manual is in compliance with the
corresponding technical standards.

5
Compliance of radio transmitter and
interference
Model for USA
Declaration of Conformity
Responsible party:
TEAC AMERICA, INC.
Address: 1834 Gage Road, Montebello,
California, U.S.A.
Telephone number : 1-323-726-0303
This device complies with Part 15 of the FCC Rules.
Operation is subject to the following two conditions: (1)
this device may not cause harmful interference, and (2)
this device must accept any interference received, includ-
ing interference that may cause undesired operation.
Labeling of authorization
FCC ID: XEGCR-H101
Model for Canada
Compliance of radio transmitter
This device complies with Industry Canada’s license-exempt
RSSs. Operation is subject to the following two conditions:
1) This device may not cause interference; and
2) This device must accept any interference, including
interference that may cause undesired operation of the
device.
Labeling of authorization
IC: 1559C-CRH101
Compliance of interference
This Class B digital apparatus complies with Canadian
ICES-003.
Model for EEA (European Economic Area)
This equipment complies with the harmonised standards of
DIRECTIVE 1999/5/EC (R&TTE).
Labeling of conformity
CE marking:
CAUTION
Authorization of wireless devices are different in countries or
regions. Please use only in the country where you purchased
the product.
o Depending on the country, restrictions on the use of
Bluetooth wireless technology might exist.
Wireless equipment precautions
Radiation Exposure requirements
This equipment meets the regulation, which is recognized
internationally, for the case of human exposure to radio
waves generated by the transmitter.
Statement of compliance
Model for USA
This equipment complies with FCC radiation exposure limits
set forth for an uncontrolled environment and meets the
FCC radio frequency Exposure Guidelines.
Model for Canada
This equipment complies with IC RSS-102 radiation exposure
limits set forth for an uncontrolled environment.
EEA (European Economic Area) model
This equipment complies with EN.62311; Assessment of
electronic and electrical equipment related to human expo-
sure restrictions for electromagnetic fields; the harmonised
standard of DIRECTIVE 1999/5/EC.
CAUTION
Changes or modifications not expressly approved by the
party responsible for compliance could void the user’s
authority to operate the equipment.
Information for interference (FCC requirements)
This equipment has been tested and found to comply with the
limits for a Class B digital device, pursuant to Part 15 of the FCC
Rules. These limits are designed to provide reasonable protec-
tion against harmful interference in a residential installation.
This equipment generates, uses, and can radiate radio fre-
quency energy and, if not installed and used in accordance
with the instructions, may cause harmful interference to
radio communications.
However, there is no guarantee that interference will not
occur in a particular installation.
If this equipment does cause harmful interference to radio or
television reception, which can be determined by turning the
equipment off and on, the user is encouraged to try to correct
the interference by one or more of the following measures.
o Reorient or relocate the equipment and/or the receiving
antenna.
o Increase the separation between the equipment and
receiver.
o Connect the equipment into an outlet on a circuit differ-
ent from that to which the receiver is connected.
o Consult the dealer or an experienced radio/TV techni-
cian for help.

6
Included accessoriesTable of contents
Check to be sure the box includes all the supplied accesso-
ries shown below.
Please contact the store where you purchased this unit if
any of these accessories are missing or have been damaged
during transportation.
Power cord × 1
Remote control (RC-1324) × 1
Batteries for remote control (AAA) × 2
Basic DAB/FM antenna × 1
Owner’s manual × 1
o Keep this manual in a safe place for future reference.
o See page 43 for information about the warranty.
Using the TEAC Global Site
You can download updates for this unit from the TEAC
Global Site: http://teac-global.com/
1) Open the TEAC Global Site.
2) In the TEAC Downloads section, click the desired lan-
guage to open the Downloads website page for that
language.
NOTE
If the desired language does not appear, click Other
Languages.
3) Click the product name in the “Products” section.
4) Select and download the updates that are needed.
Thank you for choosing TEAC product.
Read this manual carefully to get the best performance from
this unit.
After reading it, keep it in a safe place for future reference.
IMPORTANT SAFETY INSTRUCTIONS ........................2
Wireless equipment precautions ............................5
Included accessories ........................................6
Using the TEAC Global Site ..................................6
Before use ..................................................7
Setting the clock. . . . . . . . . . . . . . . . . . . . . . . . . . . . . . . . . . . . . . . . . . . .7
Adjusting the clock automatically ...........................7
Notes about discs ..........................................8
Connecting the DAB/FM antenna ...........................9
Connections .............................................. 10
Connecting speakers ..................................... 12
Using the remote control .................................13
Names and functions of parts (remote control) ............ 14
Names and functions of parts (main unit) .................16
Basic operation ........................................... 17
Display information ....................................... 21
Listening to CDs .......................................... 23
Listening to FM radio ..................................... 27
RDS ...................................................... 29
Using DAB tuner .......................................... 31
Playing back music on a computer ........................34
Bluetooth® function ...................................... 36
Settings .................................................. 37
Message list .............................................. 39
Troubleshooting .......................................... 40
Specifications ............................................. 41

7
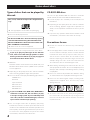
Setting the clockBefore use
This unit has a clock built-in.
After completing connections, set the current time.
The time appears on the display when, for example, the unit
is in standby mode.
o See “Set clock (time settings)” on page 38 for how to
set the clock.
Example of display when in standby
T AM 09:18
Current time
Appears when the on/off timer is on
o The clock will be reset if the unit's power cord is discon-
nected from an outlet. Reset the current time when you
use the unit.
o The clock is not perfectly precise, so we recommend
resetting the time occasionally.
Adjusting the clock automatically
The clock setting of this unit can be automatically adjusted
by DAB or RDS clock time (CT) data it receives.
To turn on/off DAB or RDS automatic clock adjustment,
select DAB or RDS as the playback source for the one
you want to set (page 17) and hold down the RDS
button for at least 8 seconds.
Display
example
DAB DAB CT on
FM CT off
o DAB and RDS CT automatic clock settings cannot both
be enabled at the same time. If you enable one, the
other will be automatically disabled.
o If automatic clock adjustment is on, the unit adjusts its
clock when that type of CT data is received, regardless of
whether DAB or RDS mode is selected.
If you tune in a DAB/RDS station that is broadcasting incor-
rect CT data, the clock might be incorrectly adjusted. This
could eventually affect timer operation.
If you do not want the clock of this unit to be set by received
DAB/RDS CT data, turn off automatic clock adjustment for
that type of data.
V
Placement of the unit
o Avoid placing it in high temperature environments
such as in direct sunlight or close to a source of heat.
Moreover, do not place the unit on an amplifier or any
other device that generates heat. Doing so could cause
discoloration, deformation or malfunction.
o Do not place anything on top of the unit. Do not put
cloth on top of the unit or place it on top of bedding or
thick carpet.
Maintenance
Wipe dirt from the top cover and other panel surfaces using
a soft cloth that has been slightly dampened with a diluted
neutral cleanser.
Do not use chemically-treated wipes, thinner or similar sub-
stances because they could damage the surface of the unit.
V
For safety, disconnect the power cord from
the outlet before cleaning.

8
Notes about discs
Types of discs that can be played by
this unit
CDs (12cm) with the Compact Disc Digital Audio
logo
o This logo appears on disc labels and packaging.
o This unit cannot play 8cm CDs.
CD-R and CD-RW discs that have been properly
recorded and finalized using the audio CD format.
CD-R and CD-RW discs that have been written with
MP3 or WMA files and finalized.
o Multi-session discs are not supported.
This unit cannot play discs of types other than those above.
V
If you try to play any other type of disc with this
unit, loud noises that damage speakers or harm
hearing could occur. Never try to play any type of
disc other than those shown above.
o WMA files
Windows Media Audio Professional (WMA Pro) and
Windows Media Audio Lossless (WMA Lossless) formats
are not supported.
o Depending on the quality of the disc and the condition
of the recording, playback might not be possible.
o This unit cannot read or play the following types of discs.
CD-ROM discs
Video CDs
Super Audio CDs
DVD video discs
DVD audio discs
DVD-ROM discs
V
If you load a DVD video, DVD audio, DVD-ROM or
similar disc into this unit, the unit will try to play
it and spin at high speed. If you accidentally load
such a disc, the disc could be damaged, so do not
try to remove it until it stops spinning.
o This unit might not be able to properly play Copy
Control CDs, Dual Discs or other special CDs that do not
conform to the Red Book CD standard. Operation and
sound quality cannot be guaranteed when special discs
are used in this unit. If playback of a special disc should
cause trouble, contact the seller of the disc.
CD-R/CD-RW discs
This unit can play CD-R/CD-RW discs that are in audio CD
format (CD-DA) or that contain MP3 or WMA format files.
o In order to play a disc created by a CD recorder, be sure
to finalize it.
o Depending on the quality of the disc and the condition
of the recording, playback might not be possible. For
details, see the operation manual for the device you are
using.
o If you have any questions about how to handle a CD-R
or CD-RW disc, contact the seller of the disc directly.
Precautions for use
o Do not use cracked discs because they could damage
the unit.
o Do not apply labels or other materials to discs. Do not
use discs that have had tape, stickers or similar materials
removed from them as they may have left a sticky resi-
due on the disc’s surface. Other discs to avoid are ones
that have exposed glue around the edges of stickers, for
example. Using such a disc in this unit could cause the
disc to become stuck or could damage the unit.
o When writing something on the label side of a disc, use
a felt tip permanent marker. The use of a ballpoint pen or
other pen with a hard tip could damage the disc, making
it unplayable.
o Never use commercially-available CD stabilizers. Doing
so could make the disc unplayable or damage the unit.
o Never use discs with irregular shapes, including heart-
shaped and octagonal discs, because they could
damage the unit.
o To remove a disc from its case, while pressing down on
the center of the case, hold the disc by its edges. Do not
touch the side of the disc that has the data encoded on
it (unlabeled side).

9
If a disc will not load properly
If a disc becomes caught or is otherwise difficult to insert,
do not push it in forcefully. Press the eject (-) button and
remove the disc once before reinserting it. (Pushing a disc
forcefully could damage the unit.)
Storing discs
o Discs should be stored in their cases when not being
used. Failure to do so could result in warping and
scratches.
o Do not leave discs in places that are exposed to direct
sunlight or that are very humid or hot. Doing so could
cause discs to become deformed or degraded, making
them unplayable.
o CD-R and CD-RW discs are more susceptible to the
impacts of heat and ultraviolet rays than ordinary
CDs. For this reason, do not leave them for long times
in places that are exposed to direct sunlight or near
devices that generate heat, for example.
o Always clean discs before storing them. Leaving a disc
in an unclean state might result in skipping or degraded
sound quality.
Maintenance
o If the side of the disc that has the data encoded on it
(unlabeled side) becomes dirty with fingerprints or dust,
use a soft cloth to wipe the surface from the center
directly toward the edge.
o Never use record cleaners, antistatic treatments, thinners
or similar chemicals to clean discs. Such chemicals could
harm the surface of the disc.
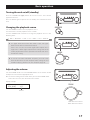
Connecting the DAB/FM antenna
Indoor antenna
Connect the included antenna to the antenna connector on
the rear panel and extend the antenna.
Fix the antenna to a window frame, wall or other position
that improves reception the most.
Outdoor antenna
In an area where DAB signals are weak, use an outdoor DAB
antenna.
There are two main types of antennas available.
Multi-element
Dipole

10
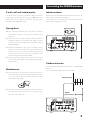
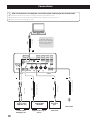
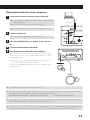
Connections
V
After all connections are complete, connect the power cord’s plug to the AC wall outlet.
o Read the instructions of each device that you intend to use with this unit.
o Do not bundle connecting cables with power cords. Doing so could cause noise.
o Be sure to connect each plug securely.
DC
B
A
E F
USB cable
Cassette deck,
MD player, etc.
Line input
jack
SubwooferDigital audio output
device
DIGITAL OUT
(OPTICAL)
Wall outlet
Optical digital cable
RCA cable
Included power cord
RCA cable
Audio output
(LINE OUT, etc.)
c
Install the dedicated
driver on the computer
before connecting this
unit to it (page 34).

11
A
USB port
Use to input digital audio from a computer. Connect
to the USB port of a computer to input digital audio
from it.
Use a commercially-available USB cable.
ATTENTION
Install the dedicated TEAC driver software on the com-
puter before connecting the unit (page 34).
B
DAB/FM antenna connector
When receiving a DAB/FM broadcast, extend this
antenna and position it for the best reception.
After moving this unit, readjust the position again.
For detailed information about how to make DAB/FM
antenna connections, see page 9.
C
Analog audio input connectors (LINE IN)
Use these to input analog audio.
Connect an audio output device such as a cassette deck
or MD player to these jacks using commercially-available
RCA cables.
Use commercially-available cables for connections.
Connect the R connector of this unit to the right (R)
connector of the audio output device and the L con-
nector of this unit to the left (L) connector of the audio
output device.
D
Digital audio input connector (OPTICAL)
Input digital audio. Connect the digital audio output
connector of a digital audio device to it.
Use a commercially-available optical digital (TOS)
cable to make the connection.
o Sampling frequencies up to 192 kHz are supported.
E
SUBWOOFER OUT connector
If you want to use a subwoofer, connect it to this
connector.
o The output level is linked to the VOLUME controls
on the front of the unit and on the remote control.
F
Power inlet (~IN)
Insert the included power cord here.
After all other connections are complete, connect the
power cord's plug to a wall outlet.
V
Do not use any power cord other than the
one included with this unit. Use of other
power cords could result in fire or electric
shock. Unplug the cord from the outlet
when not using the unit for a long time.

12
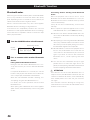
Connecting speakers
V
Precautions when making connections
o After all connections are complete, connect the power
cord’s plug to the AC wall outlet.
o Read the instructions of each device that you intend to
use with this unit.
CAUTION
o When not connecting LS-101HR speakers, use speakers
with 4–8Ω nominal impedance. If speakers with different
impedance ratings are used, the protection circuit could
operate, causing sound output to stop.
o The red speaker terminals are positive (+) and the black
speaker terminals are negative (−). Generally, the + wire
of the speaker cable is marked to distinguish it from
the − wire of the cable. Connect the marked wire to
the red + terminal and the unmarked wire to the black
− terminal.
o The metal portions of the two separate wires should
not touch. If they touch an electrical short might occur.
Shorted wires can create a fire hazard or cause equip-
ment failure.
Never allow speaker cables to cause a short.
o Be sure to insert each plug securely. To prevent hum and
noise, avoid bundling the cables together with the AC
power cord or other cables.
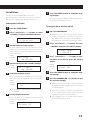
How to connect speakers
1 Turn the terminal cap counterclockwise to
loosen it. The speaker terminal caps cannot
be fully removed from the unit.
2 Insert the wire into the terminal and turn the
terminal cap clockwise to securely connect it.
o Make sure none of the wire insulation is under the
terminal and only the bare, stripped wire is touching
the terminal.
3 Conrm that the cable is fastened securely
by gently pulling the cable.
LS-101HR speakers or speakers with
4–8Ω nominal impedance

13
Connecting with banana plugs
You can also make connections using commercially-avail-
able banana plugs. First, connect the banana plugs to the
speaker cables and then connect the plugs to the terminals.
o Keep the caps tightened when in use.
o Carefully read the instructions for the banana plugs that
you are using.
Notice about the European model
In accordance with European safety regulations, con-
necting banana plugs to speaker terminals is not
allowed on European models. The holes into which
banana plugs could be inserted have been covered
with black caps. Connect speakers using bare wires or
spade lugs. If a black cap should become separated
from its terminal, return it to its original position.
Precautions for use
V
Misuse of batteries could cause them to
rupture or leak leading to fire, injury or
the staining of items nearby. Please read
and observe the precautions on page 3
carefully.
o When using the remote control, point it toward the
remote control signal receiver on the main unit from a
distance of 5 m (16 ft) or less. Do not place obstructions
between the main unit and the remote control.
o The remote control might not work if the remote control
signal receiver on the main unit is exposed to sunlight or
bright lights. In this case, try moving the main unit.
o Beware that use of this remote control could cause the
unintentional operation of other devices that can be
controlled by infrared rays.
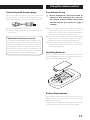
Installing batteries
Remove the cover on the back of the remote control, and
insert 2 AAA batteries into the case, aligning them with the
¥ and ^ indications. Replace the cover.
Battery Replacement
If the operation range of the remote control decreases, the
batteries have become exhausted. In this case, replace the
batteries with new ones.
Dispose of the used batteries according to the instructions
on them or requirements set by your local municipality.
Using the remote control

14
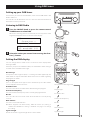
a
Standby/on (¤) button
Press this button to turn the unit on and put it in
standby. When the unit is ON, the ring around the
main unit STANDBY/ON (¤) button lights blue.
b
TIMER button
Use to set the on/off timer.
c
SLEEP button
Use to set the sleep timer.
d
PTY button
Use to search for stations by program type (PTY).
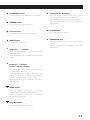
Names and functions of parts (remote control)
e
RDS/INFO button
When the playback source is FM, use this button
to select an RDS mode. Please ignore “INFO” on the
remote control unit. (INFO function does not work on
this unit.)
f
DISPLAY button
Use to change the text shown on the bottom line of
the display.
g
SELECT button
Use to change settings.
h
CLOCK button
Press repeatedly to show the time and the on/off timer
setting, and then return to showing the previous infor-
mation on the display.
i
Skip (.//) buttons
When the playback source is CD, use to skip to the
previous or next track.
When the playback source is DAB/FM, use to change
presets.
j
MUTE button
Press this button to mute the sound temporarily. To
restore the sound, press it again.
k
LOUDNESS button
Press to turn low-frequency emphasis on and off.
When on, the icon appears on the display.
l
VOLUME (−/+) buttons
Use these to adjust the volume.
m
Eject (-) button
Press to partially eject the disc. Hold the disc by its
edges and pull it out.
When both the main unit and the remote control have
buttons with the same functions, the instructions in this
manual refer only to one, but the other can be used in
the same way.
b
a
d
c
e
f
g
h
i
j
k
l
m
n
o
p
q
r
s
t
u
v
w
x

15
n
UPCONVERT button
Press this button to turn upconversion on and off.
o
DIMMER button
Press to change the display brightness.
p
Source buttons
Use these buttons to select the playback source.
q
MENU button
Press to enter setting mode.
r
Direction (k/j) buttons
When the playback source is CD, use to select folders.
(MP3/WMA only)
When the playback source is DAB/FM, use to change
presets.
s
Direction (l/;) buttons
Search (m/,) buttons
When the playback source is CD, press during playback
to search backward/forward.
When the playback source is FM, use to lower/raise the
frequency received. Press and hold for at least two sec-
onds to begin automatically selecting stations.
When the playback source is DAB, press to select a
DAB menu item.
t
MODE button
When the playback source is CD, use to switch
between repeat playback and shuffle playback.
When the playback source is FM, use to switch
between stereo and mono.
u
Stop (8) button
Press during playback to stop playback.
v
Play/pause (7/9) button
When the playback source is CD and the unit is
stopped or paused, press to start disc playback.
Use this button to pause playback during playback.
When the playback source is FM, use to select presets
and frequencies.
w
CLEAR button
Use to clear programmed tracks.
x
PROGRAM button
When the playback source is CD, use with program
playback.
When the playback source is DAB/FM, use with radio
station presets.

16
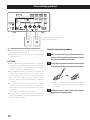
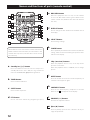
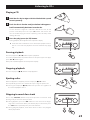
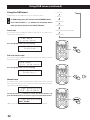
Names and functions of parts (main unit)
A
STANDBY/ON (¤) button
Press this button to turn the unit on and put it in
standby. When the unit is ON, the ring around the
button lights blue.
o When this unit is in standby mode, it consumes
standby power. For this reason, we use the term
“standby” rather than “off”.
B
Disc slot
Insert a disc here. After a disc is inserted partway, the
unit will automatically draw it in.
C
Skip (.//) buttons
When the playback source is CD, use to skip to the
previous or next track. During playback, press and hold
to search backward/forward.
D
Play/pause (7/9) button
When paused, press to resume playback.
Press during playback to pause.
Press again to resume playback.
E
Stop/eject (8/-) button
Press during playback to stop playback.
When stopped, press to partially eject the disc. Hold
the disc by its edges and pull it out.
F
PHONES jack
Connect headphones (3.5mm stereo mini plug) here.
o When headphones are connected to the unit,
audio will not be output from the SPEAKERS termi-
nals on its back.
G
SOURCE knob
Turn to select the playback source.
H
Remote control signal receiver
Receives signals from the remote control. When oper-
ating the remote control, point it at this sensor.
I
Display
This shows a variety of information.
J
VOLUME knob
Use this knob to adjust the volume. To increase the
volume, turn the knob clockwise. To decrease the vol-
ume, turn the knob counterclockwise.
o When the volume is adjusted with the remote
control, the main unit volume knob will not turn
in response.
A
J
BC DE
FG HI

17
Basic operation
Turning the unit on/off (standby)
Press the STANDBY/ON (¤) button to turn the unit on. The indicator
lights blue when on.
Press the button again to put the unit in standby. The indicator becomes
unlit.
Changing the playback source
Turn the SOURCE knob to select the playback source.
The name of the selected playback source is shown.
Turn the SOURCE knob clockwise to change the playback source in the
following order.
USB w Bluetooth w LINE w CD wDAB w FM w OPTICAL
o If a digital audio format other than PCM is input, “No Signal”
will be shown and no sound will be output.
If this is the case, the connected digital audio output device
might have a “PCM” digital output format setting that would
enable playback. Refer to the operation manual for that device
to make this setting.
o To use this unit with a Windows computer, you must install
the dedicated driver on that computer before setting this unit
to USB and playing audio files on the computer (page 34).
Adjusting the volume
Turn the VOLUME knob or use the VOLUME buttons on the remote control
to adjust the volume to the appropriate level.
o The volume setting will be shown when you turn the VOLUME knob.
As the value increases, the volume becomes louder.
Display example
CD
VOLUME 15
Volume
MIN: Minimum volume
MAX: Maximum volume

18
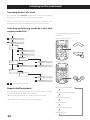
Upconversion
You can use the upconversion function with digital input (USB, Bluetooth,
CD, OPTICAL).
Press the UPCONVERT button on the remote control to enable the upcon-
version function. The icon will appear on the display.
Input sampling frequencies and sampling frequencies after
upconversion
Input sampling frequency Sampling frequency after upconversion
44.1 kHz 88.2 kHz
48 kHz 96 kHz
88.2 kHz 176.4 kHz
96 kHz 192 kHz
176.4 kHz 176.4 kHz
192 kHz 192 kHz
HR loudness
Press the remote control LOUDNESS button to turn low-frequency empha-
sis on and off. When on, the icon appears on the display.
Since this uses high-resolution (192kHz/24-bit) digital audio processing, it
can enhance low frequencies without degrading the audio quality.
Muting playback
If you want to temporarily mute the volume of this unit, press the MUTE
button on the remote control.
“MUTING” appears on the display when muted.
Display
example
CD PLAY
MUTING
Press the MUTE button on the remote control again to return to the previ-
ous volume level.
o Muting will stop if you change the playback source or use the VOLUME
knob or remote control VOLUME buttons (−/+).
Dimmer
Press the remote control DIMMER button to cycle through display bright-
ness levels.
Bright Dim Unlit
o This setting is retained when the unit is in standby.
Basic operation (continued)

19
On/off timer
The unit can turn on/off (standby) at a set time.
o Confirm that the unit's clock is set correctly in advance.
o Use the included remote control to set the timer.
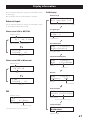
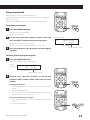
Setting the on/off time
1 Press the TIMER button.
2 Press a direction (l/; ) button to show
“2.Setting”, and press the SELECT button.
Timer MENU
< 2.Setting >
3 Set the time to turn the unit on.
The hour position blinks. Use the direction (k/j)
buttons to set the hour of the on time and press the
SELECT button. Next, the minute position blinks. Set it
in the same manner.
Display
example
On Time
AM 07:00
4 Set the time to turn the unit o (standby).
Display
example
Off Time
AM 08:00
5 Select the playback source.
Use the direction (k/j) buttons to select the play-
back source (CD or TUNER) and press the SELECT
button.
Display
example
Select source
CD
o If you select CD, load a CD before putting the unit
in standby.
6 Set that playback volume.
Use the direction (k/j) buttons to set the volume
and press the SELECT button.
Display
example
Select volume
Volume 23
7 Press the TIMER button to complete mak-
ing settings.
Be sure to set the Timer ON/OFF setting to ON to make
the unit turn on/off at the set times.
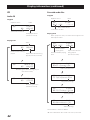
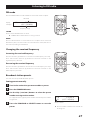
Turning the timer function on/off
1 Press the TIMER button.
o When the unit is at its factory default settings
before on and off times have been set, if you press
the TIMER button, “First Timer Set” will appear on
the display. You must set these before proceeding.
2 Press a direction (l/; ) button to show
“1.ON/OFF”, and press the SELECT button.
Timer MENU
< 1.ON/OFF >
3 Press a direction (k/j) button to turn
the timer on or off and press the SELECT
button.
Display
example
Timer MENU
Timer ON
4 Press the TIMER button to complete mak-
ing settings.
5 Press the STANDBY/ON (¤) button to put
the unit into standby.
o When the timer is set to ON, “T” will be shown at
the bottom left of the display when the unit is put
in standby (page 7).
o If the unit is already on, the timer will not function
at the scheduled times. Always put the unit into
standby to enable the timer to function.
o If the playback source is CD, but no CD is loaded,
the FM radio will play instead.

20
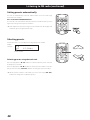
Checking the timer setting
Press the CLOCK button to show the current time and then the timer
setting.
Display
example
CD
Timer ON
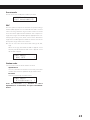
Using the sleep timer
This function puts the unit in standby after a set amount of time passes.
Press the SLEEP button to set the amount of time (in minutes) until the unit
enters standby.
30 60 90 OFF
When the sleep timer is enabled, the display becomes dim.
Display
example
CD PLAY
SLEEP 25
When the sleep timer is enabled, press the SLEEP button once to show the
amount of time until standby for a few seconds.
Press it again to reset the time.
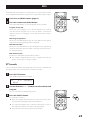
Automatic power saving function
This unit has an automatic power saving function.
The operation of this function depends on the automatic power saving
setting and the selected playback source.
o See “APS (automatic power saving) setting” on page 38 for how to set
the automatic power saving function.
When automatic power saving is on
If there is no signal from the selected playback source and no operation
has occurred for about 30 minutes, the unit will enter standby mode.*
o Turn the unit on again to end standby.
*Power consumption in standby mode is 1 W or less.
Checking whether automatic power saving is on or off
When automatic power saving is on
“APS ON” is shown when the unit is turned on.
When automatic power saving is off
“APS OFF” is shown when the unit is turned on.
Basic operation (continued)
Page is loading ...
Page is loading ...
Page is loading ...
Page is loading ...
Page is loading ...
Page is loading ...
Page is loading ...
Page is loading ...
Page is loading ...
Page is loading ...
Page is loading ...
Page is loading ...
Page is loading ...
Page is loading ...
Page is loading ...
Page is loading ...
Page is loading ...
Page is loading ...
Page is loading ...
Page is loading ...
Page is loading ...
Page is loading ...
Page is loading ...
Page is loading ...
-
 1
1
-
 2
2
-
 3
3
-
 4
4
-
 5
5
-
 6
6
-
 7
7
-
 8
8
-
 9
9
-
 10
10
-
 11
11
-
 12
12
-
 13
13
-
 14
14
-
 15
15
-
 16
16
-
 17
17
-
 18
18
-
 19
19
-
 20
20
-
 21
21
-
 22
22
-
 23
23
-
 24
24
-
 25
25
-
 26
26
-
 27
27
-
 28
28
-
 29
29
-
 30
30
-
 31
31
-
 32
32
-
 33
33
-
 34
34
-
 35
35
-
 36
36
-
 37
37
-
 38
38
-
 39
39
-
 40
40
-
 41
41
-
 42
42
-
 43
43
-
 44
44


TEAC CR- H101 Reference guide
- Category
- CD players
- Type
- Reference guide
- This manual is also suitable for
Ask a question and I''ll find the answer in the document
Finding information in a document is now easier with AI
Related papers
Other documents
-
Blaupunkt PP15DAB Owner's manual
-
Memorex MP4047 User manual
-
Caliber HPG406D Owner's manual
-
Lenco MC-150 User manual
-
Sony CMT-SBT20B User manual
-
Bush WOW DAB MICRO SYSTEM User manual
-
RCA RS2867B User manual
-
-
Sony ZS-PS55B User manual
-