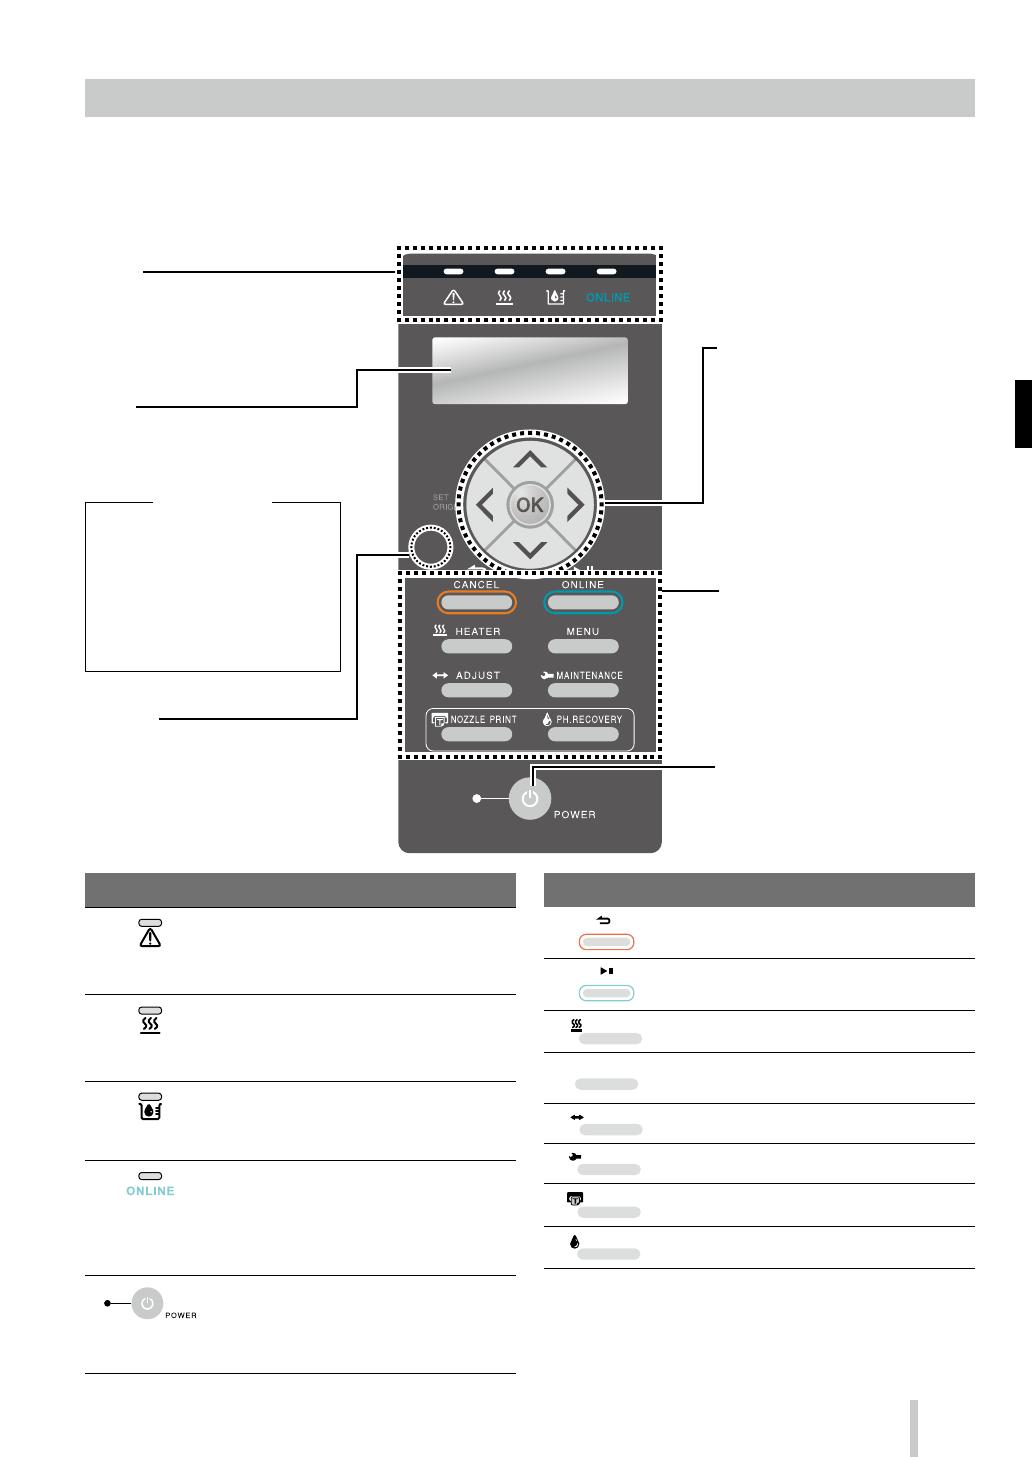
OKI ColorPainter E-64s Reference guide

Category
Print & Scan
Type
Reference guide

This manual is also suitable for

日本語
クイックリファレンスガイド
ENGLISH
Quick Reference Guide
FRANÇAIS
Guide de référence rapide
ITALIANO
Guida di riferimento rapido
DEUTSCH
Schnellreferenz
ESPAÑOL
Guía de consulta rápida
PORTUGUÊS
Manual de Consulta Rápida
РУССКИЙ
Краткое справочное руководство
Solvent Ink Color Inkjet Printer
IP-5630/5530
7
8
9
10
11
12
POWER
HEATER MENU
CANCEL
SET
ORIGIN
ONLINE
ADJUST
MAINTENANCE
NOZZLE PRINT PH.RECOVERY
7
Table of Contents
IP-5630/5530
Quick Reference Guide
ENGLISH
Appearance and main components ............28
Printer front (take-up side) ............................................. 28
Printer rear (supply side) ................................................. 29
Printer interior ....................................................................30
Printer heater unit ............................................................. 30
Operation panel ................................................................. 31
Media installation and removal ...................32
Loading the media on the feeding unit .................... 32
Installing the media on the TUR unit ......................... 34
Removing the media from the feeding unit ........... 36
Adjustment ...................................................... 37
Adjusting the media advance ...................................... 37
Adjusting the bidirectional position .......................... 38
Maintenance ....................................................39
Nozzle print ......................................................................... 39
Waste ink bottle check and replacement .................40
Wiper cleaning liquid check and supply ................... 41
Wiper blades check ............................................................ 42
Wiper blades replacement .............................................. 43
Cap cleaning (capping unit cleaning, cleaning)...... 45
Other maintenance operations .................................... 47
After the operation of the day ...................................... 49
Ink cartridge replacement...............................................50
27
Appearance and main components
Printer front (take-up side)
28
Maintenance area cover
Open to perform print head
maintenance.
Front cover
Must be closed during printing.
Capping unit cover
Opened when cleaning the capping
unit or the carriage.
Operation panel
Equipped with LEDs and LCD to display
the printer status, and buttons to set
functions.
Inner take-up
Winding o
Outer take-up
Pressure roller up/down lever
This lever fixes or releases the media.
Take-up reel unit
Winds the printed media.
Output paper guide
Contains the afterheater that dries ink.
Media cutter blade (option)
It cuts the media.
Media clip (option)
After cutting the media, clip it to not
let it fall.
Cutter unit (option)
Waste ink bottle
Take-up direction switch
Sets the media take-up direction.
Printer rear (supply side)
29
USB port
Used to connect a USB drive to the printer.
USB connector
Used to connect the printer to a computer.
Pressure roller up/down lever
A lever used to fixe or release the media.
Moves together with the pressure roller lever at
the printer front side.
Position to install optional exhaust attachment
Power inlet
Connect the power cable to the power inlet.
Media holder
To be installed at both ends of
the roll media.
Caster
Set the lock to OFF when moving the printer and
set the lock to ON when locking the printer.
Printer interior
Printer heater unit
The printer is equipped with three heaters for ink fusing and image quality stabilization.
• Preheater (rear)
Preheats media.
• Print heater (front)
Penetrates ink into media to fuse
the ink.
• Afterheater (nishing)
Dries ink to stabilize print
quality.
Media feed direction
Media
Print
head
Carriage
Paper guide(rear)
* These three heaters are controlled independently.
The temperature of the heaters can be controlled from the operation panel, the RIP software and CP_Manager.
WARNING
Do not touch these heaters to avoid burn as they become hot.
• Carriage
Houses the print heads
insid
e, and prints image with
scanning media.
• Ionizer (option)
R
emoves static electricity from
the media and reduces print
def
ects caused by ink mist.
Sensors for automatic print adjustment
Optical sensors used for automatic print
adjustment.
• Media edge guar
d
Pr
otects print heads from
being damaged by the curling
or
feathering media edge.
• C
utter groove
T
he cutter blade is inserted
into this groove when
cutting the media so that it
is cut straight.
Pressure roller
When lowering the pressure roller
up/down lever, it pinches the media.
• Grit roller
The grit roller advances or rewinds
the media.
• Platen
T
ransports media.
T
he platen incorporates suction fans
and print heater to cure the ink
.
Wiping unit
Removes foreign substances
on the print head’s nozzle
surface.
• Capping unit
Prevents the print head’s
nozzles from drying.
30
Operation panel
The buttons, LEDs and LCD are placed on the printer's operation panel as shown below. In addition, the operation
panel is also equipped with a buzzer to draw attention in case an error occurs or an invalid button is pressed.
The printer enters waiting mode if it is not used for a given length of time.
Buttons
CANCEL
Cancels entered parameters or returns back to the
upper menu.
ONLINE
Switches between online and oine states, and
puts the printer in pause or resumes printing.
HEATER
Enters heater control menu.
MENU
Used to display information about the printer and
change printer settings.
ADJUST
Used to enter the adjustment menu.
MAINTENANCE
Used to enter the maintenance menu.
NOZZLE PRINT
Used to perform a nozzle print.
PH.RECOVERY
Used to enter the cleaning menu.
LED
Error LED
(Orange)
Indicates whether an error has occurred.
ON: An error has occurred.
Blink: Warning state.
OFF: Normal (no error)
Media heater LED
(Green)
Indicates the status of the media heater.
- ON: The set temperature has been reached
- Blink: Currently heating
- OFF: Media heater is o
Ink LED (Green)
Indicates whether ink is remaining.
ON: Ink of all colors is present.
Blink: Ink near-end (The level of any color is low.)
OFF: No ink.
ONLINE LED
(Green)
Indicates the online, oine, data reception, and
pause status.
- ON: Online
- Blink (slowly): In pause
- Blink (fast): Data reception
- OFF: Oine
Power LED
(Green)
Indicates whether the printer is turned on or o.
- ON: The printer is turned on.
(The LED is lit also when the printer is in waiting
mode.)
- OFF: The printer is turned o.
31
Power switch
Used to turn on or off the power of the
printer.
Used to manually enter and exit waiting
mode.
Buttons
Use these buttons to operate the menu
of the printer.
Refer to the table below.
Up, Down, Left, Right buttons
Used to select menu options, switch
between menus (selection, increasing/
decreasing values), etc.
OK button
Used to confirm the menu and
parameters.
LCD
It shows the status of the printer and
displays the menu window (2 rows, 20
characters).
Buzzer
Sounds when an error occurs or an
invalid button is pressed, and warns of
daily maintenance and when the print
heads are uncapped.
LED
ON, blinking and OFF indicate the
status of the printer.
Refer to the table below.
Waiting mode
(During waiting mode)
LCD: Display and backlight turned o
Online LED: Flashes slowly
Other LEDs: O
(Exiting waiting mode)
The printer exits waiting mode when
- any button is pressed,
- the printer receives print data.
Media installation and removal
Loading the media on the feeding unit
1
2
3
4
5
6
32
7
8
9
10
11
12
POWER
HEATER MENU
CANCEL
SET
ORIGIN
ONLINE
ADJUST
MAINTENANCE
NOZZLE PRINT PH.RECOVERY
33
Installing the media on the TUR unit
1
OFF
2
3
4
5
6
7
8
ON
POWER
HEATER MENU
CANCEL
SET
ORIGIN
ONLINE
ADJUST
MAINTENANCE
NOZZLE PRINT PH.RECOVERY
34
9
10
OFF
11
POWER
HEATER MENU
CANCEL
SET
ORIGIN
ONLINE
ADJUST
MAINTENANCE
NOZZLE PRINT PH.RECOVERY
12
13
ON
LOOSETUR MODE TENSION
HIGH
(recommended)
SUCTION FAN
POWER
HIGH
(recommended)
FORWARD ONLY
BACK & FWD LOW
BACK & FWD HIGH
FWD LESS WRINKLES
MEDIA ADVANCE
MODE
FORWARD ONLY
FWD LESS WRINKLES
Vinyl and coated paperTarget media Banner
Cannot be used Can be used
Can be used Can be used
Inner take-up
Outer take-up
35
Removing the media from the feeding unit
1
Pressure roller up/down lever
2
3
4
36
Adjustment
Adjusting the media advance
1
2
PRINTER READY
01: PAPER / 1626mm
3
ADJUST
2
MEDIA ADVANCE
, ,
4
>MEDIA ADVANCE
2
MEDIA ADVANCE AUTO
, ,
5
>>MEDIA ADVANCE AUTO
EXECUTE OK?
6
To make finer adjustment, perform manual adjustment.
Refer to the User’s Guide for the manual adjustment
procedure.
37
Adjusting the bidirectional position
1
2
PRINTER READY
01: PAPER / 1626mm
3
ADJUST
2
BIDIR POSITION
, ,
4
>BIDIR POSITION
2
MEDIA ADVANCE AUTO
, ,
5
>>MEDIA ADVANCE AUTO
2
CARRIAGE SPD NORM
, ,
6
>>MEDIA ADVANCE AUTO
EXECUTE OK?
7
To make finer adjustment, perform manual adjustment.
Refer to the User’s Guide for the manual adjustment
procedure.
38
Maintenance
Nozzle print
1
PRINTER READY
01: PAPER / 1626mm
2
NOZZLE PRINT
2
PRINT?
3
NOZZLE PRINT
EXECUTING
4
Example of nozzle print pattern
5
Ink is not ejected
straight
Missing lines are found
Example when lines for nozzles 24 and
133 are missing in the printout.
Example when the nozzle 159
does not eject ink straight.
The line printed by the nozzle 159
(shown with the arrow) is bent
toward the line of nozzle 161.
BAD BAD
* If lines are missing or bent lines are found on the the
nozzle print pattern, perform normal cleaning and
repeat the procedure starting from step 1.
Press the PH.RECOVERY button to perform normal
cleaning.
If the same problems occur even after normal
cleaning, set nozzle map for the defective nozzle
numbers following the procedure from step 6.
* Nozzle map can be set to manual configuration or
automatic configuration.
(Refer to the User’s Guide for details on automatic
configuration.)
6
PRINTER READY
01: PAPER / 1626mm
7
ADJUST
2
SET NOZZLE MAP
, ,
8
>SET NOZZLE MAP
2
Lc
, ,
9
>>SET NOZZLE MAP Lc
2
#01:***/VAL
, ,
10
>>>Lc:#1
2
***/
VAL
g
133/
VAL
, , , ,
11
>>
>
Lc:#1
2
133/VAL
g
133/VAL
* If several lines are missing or several bent lines
are found, repeat the procedure to set nozzle
map for all defective nozzles.
39
Waste ink bottle check and replacement
1
GOOD
BAD
2
3
4
5
6
RESET WST INK COUNT?
2
YES
, ,
* In addition to daily checks, replace the waste
ink bottle also when the printer displays a
message that prompts you to do so.
40
Wiper cleaning liquid check and supply
1
The procedure
is nished.
Continue the
procedure from step 2.
GOOD
BAD
2
PRINTER READY
01: PAPER / 1626mm
3
MAINTENANCE
2
WIPER MAINTENANCE
, ,
4
WIPER MAINTENANCE
2
REPLACE LIQUID
, ,
5
>REPLACE LIQUID
OK?
6
OPEN COVERS, REPLACE
WIPER CLEANG LIQUID
7
(1)
(2)
8
Used wiper cleaning liquid
* Wear gloves to perform this procedure.
9
New wiper cleaning liquid
Printer set cap
IP6-251 Wiper cleaning liquid set A
* IP6-251 is also included in the IP5-280 daily
maintenance kit A.
10
GOODBAD
11
AFTER REPLACING WCL
CLOSE COVERS
12
(1)
(2)
13
REPLACED WCL?
2
YES
, ,
* In addition to daily checks, supply wiper
cleaning liquid also when the printer displays
a message that prompts you to do so.
41
Wiper blades check
1
PRINTER READY
01: PAPER / 1626mm
2
MAINTENANCE
2
CAP CLEANING
3
MAINTENANCE
2
WIPER MAINTENANCE
4
>WIPER MAINTENANCE
2
WIPER BLADE CHECK
, ,
5
>>WIPER BLADE CHECK
OK?
6
WIPER IS MOVING...
PLEASE WAIT
The part stops moving.
7
OPEN THE COVERS AND
CHECK WIPER BLADE
8
The procedure
is nished.
Continue the procedure
from step 2.
GOOD
BAD
9
AFTER CHECKING WIPER
BLADE, CLOSE COVERS
WIPER IS MOVING...
PLEASE WAIT
The part stops moving.
>WIPER MAINTENANCE
2
WIPER BLADE CHECK
42
Wiper blades replacement
1
The procedure
is nished.
Continue the procedure
from step 2.
GOOD
BAD
2
PRINTER READY
01: PAPER / 1626mm
3
MAINTENANCE
2
WIPER MAINTENANCE
, ,
4
>WIPER MAINTENANCE
2
REPLACE BLADE
, ,
5
>>REPLACE BLADE
OK?
6
CARRIAGE IS MOVING
PLEASE WAIT
Carriage stops moving.
7
OPEN THE COVERS AND
REPLACE SPONGE BLADE
8
(1)
(2)
9
10
43
11
(1)
(2)
(1) Sponge
(2) Rubber
(3) Rubber
Protrusion
The protrusion is in the center
Parts are in contact at both the right and left side
s
The spaces on the right and left are equal
They are parallel
IP5-281 Wiper blade
* Be sure to install the blades in the right order.
* IP5-281 is also included in the IP5-280 daily
maintenance kit A.
12
AFTER REPLAC. SPONGE
BLADE, CLOSE COVERS
13
(1)
(2)
WIPER IS MOVING...
PLEASE WAIT
The part stops moving.
14
OPEN THE COVERS AND
REPLACE RUBBER BLADE
15
AFTER REPLAC. RUBBER
BLADE, CLOSE COVERS
16
(1)
(2)
CARRIAGE IS MOVING
PLEASE WAIT
Carriage stops moving.
17
REPLACED WIPE BLADE?
2
YES
, ,
* In addition to daily checks, replace the wiper
blades also when the printer displays a
message that prompts you to do so.
44
  • Page 1 1
  • Page 2 2
  • Page 3 3
  • Page 4 4
  • Page 5 5
  • Page 6 6
  • Page 7 7
  • Page 8 8
  • Page 9 9
  • Page 10 10
  • Page 11 11
  • Page 12 12
  • Page 13 13
  • Page 14 14
  • Page 15 15
  • Page 16 16
  • Page 17 17
  • Page 18 18
  • Page 19 19
  • Page 20 20
  • Page 21 21
  • Page 22 22
  • Page 23 23
  • Page 24 24
  • Page 25 25
  • Page 26 26
  • Page 27 27
  • Page 28 28
  • Page 29 29
  • Page 30 30
  • Page 31 31
  • Page 32 32
  • Page 33 33
  • Page 34 34
  • Page 35 35
  • Page 36 36
  • Page 37 37
  • Page 38 38
  • Page 39 39
  • Page 40 40
  • Page 41 41
  • Page 42 42
  • Page 43 43
  • Page 44 44
  • Page 45 45
  • Page 46 46
  • Page 47 47
  • Page 48 48
  • Page 49 49
  • Page 50 50
  • Page 51 51
  • Page 52 52
  • Page 53 53
  • Page 54 54
  • Page 55 55
  • Page 56 56
  • Page 57 57
  • Page 58 58
  • Page 59 59
  • Page 60 60
  • Page 61 61
  • Page 62 62
  • Page 63 63
  • Page 64 64
  • Page 65 65
  • Page 66 66
  • Page 67 67
  • Page 68 68
  • Page 69 69
  • Page 70 70
  • Page 71 71
  • Page 72 72
  • Page 73 73
  • Page 74 74
  • Page 75 75
  • Page 76 76
  • Page 77 77
  • Page 78 78
  • Page 79 79
  • Page 80 80
  • Page 81 81
  • Page 82 82
  • Page 83 83
  • Page 84 84
  • Page 85 85
  • Page 86 86
  • Page 87 87
  • Page 88 88
  • Page 89 89
  • Page 90 90
  • Page 91 91
  • Page 92 92
  • Page 93 93
  • Page 94 94
  • Page 95 95
  • Page 96 96
  • Page 97 97
  • Page 98 98
  • Page 99 99
  • Page 100 100
  • Page 101 101
  • Page 102 102
  • Page 103 103
  • Page 104 104
  • Page 105 105
  • Page 106 106
  • Page 107 107
  • Page 108 108
  • Page 109 109
  • Page 110 110
  • Page 111 111
  • Page 112 112
  • Page 113 113
  • Page 114 114
  • Page 115 115
  • Page 116 116
  • Page 117 117
  • Page 118 118
  • Page 119 119
  • Page 120 120
  • Page 121 121
  • Page 122 122
  • Page 123 123
  • Page 124 124
  • Page 125 125
  • Page 126 126
  • Page 127 127
  • Page 128 128
  • Page 129 129
  • Page 130 130
  • Page 131 131
  • Page 132 132
  • Page 133 133
  • Page 134 134
  • Page 135 135
  • Page 136 136
  • Page 137 137
  • Page 138 138
  • Page 139 139
  • Page 140 140
  • Page 141 141
  • Page 142 142
  • Page 143 143
  • Page 144 144
  • Page 145 145
  • Page 146 146
  • Page 147 147
  • Page 148 148
  • Page 149 149
  • Page 150 150
  • Page 151 151
  • Page 152 152
  • Page 153 153
  • Page 154 154
  • Page 155 155
  • Page 156 156
  • Page 157 157
  • Page 158 158
  • Page 159 159
  • Page 160 160
  • Page 161 161
  • Page 162 162
  • Page 163 163
  • Page 164 164
  • Page 165 165
  • Page 166 166
  • Page 167 167
  • Page 168 168
  • Page 169 169
  • Page 170 170
  • Page 171 171
  • Page 172 172
  • Page 173 173
  • Page 174 174
  • Page 175 175
  • Page 176 176
  • Page 177 177
  • Page 178 178
  • Page 179 179
  • Page 180 180
  • Page 181 181
  • Page 182 182
  • Page 183 183
  • Page 184 184
  • Page 185 185
  • Page 186 186
  • Page 187 187
  • Page 188 188
  • Page 189 189
  • Page 190 190
  • Page 191 191
  • Page 192 192
  • Page 193 193
  • Page 194 194
  • Page 195 195
  • Page 196 196
  • Page 197 197
  • Page 198 198
  • Page 199 199
  • Page 200 200
  • Page 201 201
  • Page 202 202
  • Page 203 203
  • Page 204 204
  • Page 205 205
  • Page 206 206
  • Page 207 207
  • Page 208 208
  • Page 209 209
  • Page 210 210

OKI ColorPainter E-64s Reference guide

Category
Print & Scan
Type
Reference guide
This manual is also suitable for

Ask a question and I''ll find the answer in the document

Finding information in a document is now easier with AI