Page is loading ...

Thank you for purchasing this Croydex product. Please follow the fixing and care instructions to ensure
that your bathroom product is fitted safely and that it retains its high quality finish. Please retain this
leaflet for future reference.
This instruction leaflet applies to the following products:
WA971022 MAINE MIRROR
WA971122 MAINE TOILET ROLL HOLDER
WA971422 MAINE SHELF
WA971522 MAINE TOWEL RING
WA971722 MAINE ROBE HOOK
WA971822 MAINE TUMBLER HOLDER
WA971922 MAINE SOAP DISH
WA972422 MAINE TOILET BRUSH HOLDER (Not wall mounted)
WA972622 MAINE SINGLE TOWEL RAIL
Fixing Pack Contents and Wall Bracket
Fixing screws x 2
x2x2
Wall plugs x 2
Fixing template x 1
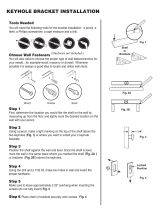
Tools Required
Drill; 6mm masonry drill bit (6mm ceramic drill bit optional); Cross head screwdriver; Pencil; Spirit level;
Tape measure.
KEEP DIY TOOLS OUT OF THE REACH OF CHILDREN
Home Safety Advice
Always take care when using an electric drill, particularly in the bathroom. Always check for hidden
cables and pipework before drilling and take extreme care if there is any water in the working area.
Always wear suitable eye protection when drilling.
If the product is to be fitted on a ceramic tiled wall, a ceramic drill bit should be used. Always ensure that
the drill hole passes through the central tiled area rather than through the grouted area. To prevent
uneccessary damage to the tile, mask the area around the hole with tape before drilling.
Do not strike the product with hard or sharp objects.
Do not overload the shelf. Maximum safe working load is 2.5kg evenly distributed if mounted on to a
solid wall. If mounted on to a cavity wall reduce the load to 2kg evenly distributed.
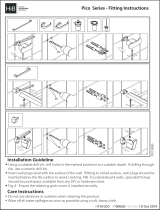
Accessories Fitting Instructions
1. Select position of product and mark centre of mounting holes on wall - using the template supplied. It
is important to ensure that the hole centres are horizontal. Check measurement against product
before drilling.

2. Using a 6mm masonry drill, drill the holes in marked positions to a depth of 50mm. If drilling through
tiles, please pre-drill using a ceramic drill bit.
3. Insert the wall plugs to the surface of the wall. If fitting to a tiled surface, the wall plug should be
inserted below the surface of the tile to avoid cracking.
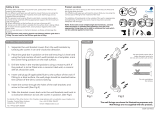
4. Screw the screws into the wall plugs leaving the screw head protruding by approximately
3mm
(see Fig 1).
5. Align the keyhole fixings on the rear of the product (see Fig 2) with the protruding screws and push
down firmly to ensure the product locates tightly against the wall. If adjustment is required remove
the product and either loosen or tighten the screws until the product is held firmly in place.
Product Care
To retain the best quality finish, clean product regularly with a soft cloth and mild detergents. Do not use
abrasive or chemical cleaners as these will damage the product.
Do not place hot objects onto the surface of the shelf.
For details of the other items in the Croydex range please visit our website: www.croydex.co.uk
Croydex Limited, Central Way, Andover, Hants, SP10 5AW, UK.
REVISION 2
SEPT 2006
/