Page is loading ...

0099001721-01
MODEL:
S L161
Jump Starter
OWNER’S MANUAL
PLEASE SAVE THIS OWNER’S MANUAL AND READ BEFORE
EACH USE. This manual will explain how to use the unit safely
and effectively. Please read and follow these instructions and
precautions carefully.
POR FAVOR GUARDE ESTE MANUAL DEL PROPIETARIO Y
LEER ANTES DE CADA USO. En este manual se explica cómo
utilizar la unidad segura y efectiva. Por favor, lea y siga las siguientes
instrucciones y precauciones.

• 2 •
1. IMPORTANT SAFETY INSTRUCTIONS
SAVE THESE INSTRUCTIONS.
WARNING – RISK OF EXPLOSIVE GASES.
WORKING IN THE VICINITY OF A LEAD-ACID BATTERY IS
DANGEROUS. BATTERIES GENERATE EXPLOSIVE GASES
DURING NORMAL OPERATION. IT IS IMPORTANT THAT YOU
FOLLOW THESE INSTRUCTIONS EACH TIME YOU USE THE UNIT.
To reduce the risk of battery explosion, follow these instructions and
those published by the battery manufacturer and the manufacturer
of any equipment you intend to use in the vicinity of a battery.
Review cautionary markings on these products and on the engine.
WARNING! RISK OF ELECTRIC SHOCK OR FIRE.
1.1 Read the entire manual before using this product. Failure to do so could
result in serious injury or death.
1.2 Keep out of reach of children.
1.3 Do not put ngers or hands into any of the unit’s outlets.
1.4 Do not expose the unit to rain or snow.
1.5 Use only recommended attachments. Use of an attachment not
recommended or sold by Schumacher
®
Electric Corporation for the
SL161 may result in a risk of re, electric shock or injury to persons or
damage to property.
1.6 To reduce the risk of damage to the electric plug or cord, pull by the
adaptor rather than the cord when disconnecting the unit.
1.7 Do not operate the unit with damaged cables or clamps.
1.8 Do not operate the unit if it has received a sharp blow, been dropped or
otherwise damaged in any way; take it to a qualied service person.
1.9 Do not disassemble the unit; take it to a qualied service person when
service or repair is required. Incorrect reassembly may result in a risk of
re or electric shock.
WARNING! RISK OF EXPLOSIVE GASES.
1.10 To reduce the risk of a battery explosion, follow these instructions and
those published by the battery manufacturer and the manufacturer of
any equipment you intend to use in the vicinity of the battery. Review the
cautionary markings on these products and on the engine.
1.11 Do not set the unit on ammable materials, such as carpeting, upholstery,
paper, cardboard, etc.
1.12 Never place the unit directly above battery being jumped.
1.13 Do not use the unit to jump start a vehicle while charging the internal battery.

• 3 •
2. PERSONAL PRECAUTIONS
WARNING! RISK OF EXPLOSIVE GASES. A SPARK NEAR THE
BATTERY MAY CAUSE A BATTERY EXPLOSION. TO REDUCE THE
RISK OF A SPARK NEAR THE BATTERY:
2.1 NEVER smoke or allow a spark or ame in the vicinity of a battery or engine.
2.2 Remove personal metal items such as rings, bracelets, necklaces and
watches when working with a lead-acid battery. A lead-acid battery can
produce a short-circuit current high enough to weld a ring to metal,
causing a severe burn.
2.3 Be extra cautious, to reduce the risk of dropping a metal tool onto the
battery. It might spark or short-circuit the battery or other electrical part
that may cause an explosion.
2.4 Do not permit the internal battery of the unit to freeze. Never charge a
frozen battery.
2.5 To prevent sparking, NEVER allow clamps to touch together or contact
the same piece of metal.
2.6 Consider having someone nearby to come to your aid when you work
near a lead-acid battery.
2.7 Have plenty of fresh water, soap and baking soda nearby for use, in case
battery acid contacts your eyes, skin, or clothing.
2.8 Wear complete eye and body protection, including safety goggles and
protective clothing. Avoid touching your eyes while working near the
battery.
2.9 If battery acid contacts your skin or clothing, immediately wash the area
with soap and water. If acid enters your eye, immediately ood the eye
with cold running water for at least 10 minutes and get medical attention
right away.
2.10 If battery acid is accidentally swallowed, drink milk, the whites of eggs
or water. DO NOT induce vomiting. Seek medical attention immediately.
2.11 Neutralize any acid spills thoroughly with baking soda before attempting
to clean up.
2.12 This product contains a lithium ion battery. In case of re, you
may use water, a foam extinguisher, Halon, CO
2
, ABC dry chemical,
powdered graphite, copper powder or soda (sodium carbonate)
to extinguish the re. Once the re is extinguished, douse the
product with water, an aqueous-based extinguishing agent, or other
nonalcoholic liquids to cool the product and prevent the battery from
re-igniting. NEVER attempt to pick up or move a hot, smoking, or
burning product, as you may be injured.
2.13 WARNING: This product contains one or more chemicals known
to the State of California to cause cancer and birth defects or other
reproductive harm.

• 4 •
3. PREPARING TO USE THE UNIT
WARNING! RISK OF CONTACT WITH BATTERY ACID. BATTERY
ACID IS A HIGHLY CORROSIVE SULFURIC ACID.
3.1 Make sure the area around the battery is well ventilated while the unit is
in use.
3.2 Clean the battery terminals before using the jump starter. During cleaning,
keep airborne corrosion from coming into contact with your eyes, nose
and mouth. Use baking soda and water to neutralize the battery acid and
help eliminate airborne corrosion. Do not touch your eyes, nose or mouth.
3.3 Determine the voltage of the battery by referring to the vehicle owner’s
manual and make sure that the output voltage is 12V.
3.4 Make sure that the unit’s cable clamps make tight connections.
4. FOLLOW THESE STEPS WHEN CONNECTING TO A BATTERY
WARNING! A SPARK NEAR THE BATTERY MAY CAUSE A BATTERY
EXPLOSION. TO REDUCE THE RISK OF A SPARK NEAR THE BATTERY:
4.1 Before plugging the clamps into the unit, attach the output cables to the
battery and chassis as indicated below. Never allow the output clamps to
touch each other.
4.2 Position the DC cables to reduce the risk of damage by the hood, door
and moving or hot engine parts. NOTE: If it is necessary to close the hood
during the jump starting process, ensure that the hood does not touch the
metal part of the battery clips or cut the insulation of the cables.
4.3 Stay clear of fan blades, belts, pulleys and other parts that can cause injury.
4.4 Check the polarity of the battery posts. The POSITIVE (POS, P, +) battery
post usually has a larger diameter than the NEGATIVE (NEG, N, -) post.
4.5 Determine which post of the battery is grounded (connected) to the
chassis. If the negative post is grounded to the chassis (as in most
vehicles), see step 4.6. If the positive post is grounded to the chassis, see
step 4.7.
4.6 For a negative-grounded vehicle, connect the POSITIVE (RED) clamp
from the jump starter to the POSITIVE (POS, P, +) ungrounded post
of the battery. Connect the NEGATIVE (BLACK) clamp to the vehicle
chassis or engine block away from the battery. Do not connect the clamp
to the carburetor, fuel lines or sheet-metal body parts. Connect to a heavy
gauge metal part of the frame or engine block.
4.7 For a positive-grounded vehicle, connect the NEGATIVE (BLACK)
clamp from the jump starter to the NEGATIVE (NEG, N, -) ungrounded
post of the battery. Connect the POSITIVE (RED) clamp to the vehicle
chassis or engine block away from the battery. Do not connect the
clamp to the carburetor, fuel lines or sheet-metal body parts. Connect to
a heavy gauge metal part of the frame or engine block.
4.8 When nished using the jump starter, disconnect the clamps from the unit,
remove the clamp from the vehicle chassis and then remove the clamp
from the battery terminal.

• 5 •
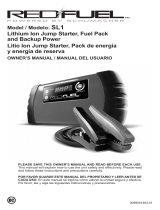
5. FEATURES
1. SL161
2. Battery clamps
with smart cable
3.
Jump start button
4. Carrying case
5. 100V~240V AC wall charger
6. Micro USB + Lightning charging
cable
7. LCD display
8. ON/OFF switch
9. Input socket for recharging
10. USB port – 2.1A
11. USB port – 1A
12. Jump start output socket
13.
Display ON/OFF button
14. LED light (on back)
1
4
5
2
3
9
8
10
11
12
13
7
6
6. CHARGING THE JUMP STARTER
IMPORTANT! CHARGE IMMEDIATELY AFTER PURCHASE,
AFTER EACH USE AND EVERY 30 DAYS, OR WHEN THE
CHARGE LEVEL FALLS BELOW 85%, TO KEEP THE INTERNAL
BATTERY FULLY CHARGED AND PROLONG BATTERY LIFE.
6.1 CHECKING THE LEVEL OF THE INTERNAL BATTERY
1. Slide the ON/OFF switch to the ON position. The LCD display will show
the battery’s percentage of charge. A fully charged internal battery will read
100%. Charge the internal battery if the display shows it is under 85%.
2. To reduce the risk of electric shock, unplug the unit’s wall charger from the
outlet before attempting any maintenance or cleaning. Simply turning off
the controls will not reduce this risk.
3. When charging the internal battery, work in a well ventilated area and do
not restrict the ventilation in any way.
6.2 CHARGING THE INTERNAL BATTERY
WARNING! Use only the charger included with the unit to charge the
internal battery. Using any other charger will damage the unit.
1. Plug the AC wall charger into the unit’s 15V/1A input socket.
2. Connect the wall charger to a 120VAC electrical wall outlet.
3. The LCD display will light, the digit begins to ash and show “IN”,
indicating that charging has begun.

• 6 •
4. The jump starter will fully charge in 2-3 hours. When the unit is fully
charged, the display will show “100%”.
5. When the battery is fully charged, disconnect the wall charger from the
AC outlet, and then unplug the wall charger from the unit. Slide the ON/
OFF switch to the OFF position, if you are not using the unit immediately.
6. Charge the unit as soon as possible after use.
7. OPERATING INSTRUCTIONS
7.1 JUMP STARTING A VEHICLE ENGINE
IMPORTANT: Do not use the jump starter while charging its internal battery.
IMPORTANT: Using the jump starter without a battery installed in the
vehicle will damage the vehicle’s electrical system.
NOTE: The internal battery must have a charge if at least 40% to
jump start a vehicle.
1. Turn the ignition OFF.
2. Lay the DC cables away from any fan blades, belts, pulleys and other
moving parts. Make sure all of the vehicle’s electrical devices are turned off.
3. For a negative-grounded vehicle, connect the POSITIVE (RED) clamp
from the jump starter to the POSITIVE (POS, P, +) ungrounded post of the
battery. Connect the NEGATIVE (BLACK) clamp to the vehicle chassis
or engine block away from the battery. Do not connect the clamp to the
carburetor, fuel lines or sheet-metal body parts. Connect to a heavy gauge
metal part of the frame or engine block.
4. For a positive-grounded vehicle, connect the NEGATIVE (BLACK)
clamp from the jump starter to the NEGATIVE (NEG, N, -) ungrounded
post of the battery. Connect the POSITIVE (RED) clamp to the vehicle
chassis or engine block away from the battery. Do not connect the
clamp to the carburetor, fuel lines or sheet-metal body parts. Connect to
a heavy gauge metal part of the frame or engine block.
5. Plug the battery clamp cable into the jump starter’s output socket.
6. Slide the ON/OFF switch to the ON position. Press and hold the button
on the smart cable for 1 second. The green LED should light.
NOTE: If the vehicle battery is extremely discharged, the initial current
draw from the jump starter may activate short circuit protection in the
smart cable. When the condition is corrected, the smart cable will
automatically reset.
7. After a proper connection has been made, crank the engine. If the engine
does not start within 5-8 seconds, stop cranking and wait at least 1 minute
before attempting to start the vehicle again.
NOTE: If the car does not crank a second time, check the smart cable to
see if the green LED is lit. If an LED is ashing, refer to the information on
the back of the smart cable and note which error code is in effect.
When the condition is corrected, the smart cable will automatically reset.
NOTE: Cold weather may affect the performance of the jump starter’s
lithium battery. If you hear only a click and the engine does not turn
over, try the following:
With the jump starter connected to the car battery and the green LED
illuminated on the smart cable, turn on all lights and electrical accessories for
one minute. This draws current from the jump starter and warms the battery.

• 7 •
Now try to crank the engine. If it does not turn over, repeat the procedure.
Extremely cold weather may require two or three battery warmings before
the engine will start.
IMPORTANT: DO NOT attempt to jump start your vehicle more
than three consecutive times. If the vehicle will not start after three
attempts, consult a service technician.
8. After the engine starts, unplug the battery clamps from the jump starter
socket and then disconnect the black clamp (-) and the red clamp (+),
in that order. Slide the ON/OFF switch to the OFF position.
9. Recharge the unit as soon as possible after each use.
7.2 CHARGING A MOBILE DEVICE, USING THE USB PORTS
The SL161 includes two USB ports. One provides up to 2.1A at 5V DC;
the other provides up to 1A at 5V DC.
1. Consult your mobile device manufacturer for proper charging power
specications. Connect a mobile device cable to the appropriate USB port.
2. Slide the ON/OFF switch to the ON position. Charging should begin
automatically. The display will show which port is in use.
3. Charging time will vary, based on the mobile device’s battery size and the
charging port used.
NOTE:
Most devices will charge with either USB port, but may charge
at a slower rate.
4. When nished using the USB port, disconnect the charging cable from
your mobile device and then disconnect the charging cable from the unit.
Slide the ON/OFF switch to the OFF position.
5. Recharge the unit as soon as possible after each use.
NOTE:
If no USB device is connected, power to the USB ports will
automatically shut off after 30 seconds.
7.3 USING THE LED LIGHT
1. Slide the ON/OFF switch to the ON position.
2. Hold down the display button for 3 seconds.
3. Once the LED light is on, press and release the display button to cycle
through the following modes:
• Flash for an SOS signal
• Flash in strobe mode
• Steady glow
4. When nished using the LED light, press and hold the display button
until the light turns off.
5. Slide the ON/OFF switch to the OFF position.
6. Recharge the unit as soon as possible after each use.
8. MAINTENANCE INSTRUCTIONS
1. After use and before performing maintenance, unplug and disconnect
the unit.
2. Use a dry cloth to wipe all battery corrosion and other dirt or oil from the
battery clamps, cords, and the outer case.
3. Do not open the unit, as there are no user-serviceable parts.

• 8 •
9. STORAGE INSTRUCTIONS
1. Charge battery to full capacity before storage.
2. Store this unit at temperatures between
-
5°F-
+
140°F (
-
20°C-
+
60°C).
3. Never completely discharge the battery.
4. Charge after each use.
5. Charge at least once every month, if not in frequent use, to prevent over-
discharge.
10. TROUBLESHOOTING
PROBLEM SOLUTION
The jump starter’s display will
not turn on.
Make sure the unit is charged.
Connect to AC power, using the provided
wall charger, to reset.
Make sure the ON/OFF switch is set to
the ON position.
The display backlight is
ashing.
The unit is too hot or too cold. The light will
stop ashing when the condition is removed.
The battery is very low. Recharge the battery.
The jump starter will not
recharge.
Make sure to use only the provided wall
charger.
The jump starter turns on, but
won’t jump start my vehicle.
Make sure you have pressed the smart
cable’s button.
Verify the charge level of the jump starter is
at least 40%.
Do not attempt to jump start your vehicle
more than three consecutive times. If
the vehicle still does not start, consult a
qualied service technician.
The green LED on the smart
cable does not light when its
button is pressed.
Check connections.
If an LED is ashing, refer to the table
below. When the condition is corrected,
the smart cable will automatically reset.
Smart Cable LED Behavior
Green LED lit solid Ready to jump start
Green LED ashes three times Reverse charging protection
Red LED ashes once Reverse polarity protection
Red LED ashes twice Short circuit protection
Red LED ashes four times Low voltage protection
Red LED ashes ve times High temperature protection
Red LED lit solid
OK to press button to jump start

• 9 •
11. BEFORE RETURNING FOR REPAIRS
If these solutions do not eliminate the problem,
or for more information about troubleshooting,
contact customer service for assistance:
www.batterychargers.com
or call 1-800-621-5485
Monday-Friday 7:00am to 5:00pm CST
For REPAIR OR RETURN, contact Customer Service at
1-800-621-5485. DO NOT SHIP UNIT until you receive a
RETURN MERCHANDISE AUTHORIZATION (RMA) number
from Customer Service at Schumacher Electric Corporation.
When returning an item, place the original package into a shipping
carton. If you received an emailed label from Schumacher, please
print the label and tape it to the carton. Only ship via insured
ground service with a tracking number. Return shipping
charges are the responsibility of the customer. We cannot accept
C.O.D. deliveries and are not responsible for lost or damaged
packages. Please do not place stickers or shipping labels on the
original manufacturer’s package. Please allow 2-3 days from date
we received the package for us to process your return. All return
shipping charges must be prepaid.
12. SPECIFICATIONS
Internal battery type .......................................... Lithium ion polymer
Charger ................................................100V~240V AC wall charger
Capacity ............................................................8,000 mAh/29.6 Wh
USB output .............................................................5V DC, 2.1A / 1A
Jump start ................................................400A peak/200A cranking
Charging Temperature..................................... 32
°
-122
°
F (0
°
-50
°
C)
13. REPLACEMENT PARTS
Battery clamp smart cable .......................................... 3899003548Z
AC wall charger .......................................................... 3899003549Z

• 10 •
14. LIMITED WARRANTY
SCHUMACHER ELECTRIC CORPORATION, 801 BUSINESS CENTER
DRIVE, MOUNT PROSPECT, IL 60056-2179, MAKES THIS LIMITED
WARRANTY TO THE ORIGINAL RETAIL PURCHASER OF THIS PRODUCT.
THIS LIMITED WARRANTY IS NOT TRANSFERABLE OR ASSIGNABLE.
Schumacher Electric Corporation (the “Manufacturer”) warrants this
jump starter for one (1) year from the date of purchase at retail against
defective material or workmanship that may occur under normal use
and care. If your unit is not free from defective material or workmanship,
Manufacturer’s obligation under this warranty is solely to repair or replace
your product, with a new or reconditioned unit, at the option of the
Manufacturer. It is the obligation of the purchaser to forward the unit, along
with proof of purchase and mailing charges prepaid to the Manufacturer or
its authorized representatives in order for repair or replacement to occur.
Manufacturer does not provide any warranty for any accessories used
with this product that are not manufactured by Schumacher Electric
Corporation and approved for use with this product. This Limited Warranty
is void if the product is misused, subjected to careless handling, repaired,
or modied by anyone other than Manufacturer or if this unit is resold
through an unauthorized retailer.
Manufacturer makes no other warranties, including, but not limited to,
express, implied or statutory warranties, including without limitation,
any implied warranty of merchantability or implied warranty of tness
for a particular purpose. Further, Manufacturer shall not be liable for
any incidental, special or consequential damage claims incurred by
purchasers, users or others associated with this product, including, but not
limited to, lost prots, revenues, anticipated sales, business opportunities,
goodwill, business interruption and any other injury or damage. Any and
all such warranties, other than the limited warranty included herein, are
hereby expressly disclaimed and excluded. Some states do not allow the
exclusion or limitation of incidental or consequential damages or length
of implied warranty, so the above limitations or exclusions may not apply
to you. This warranty gives you specic legal rights and it is possible you
may have other rights which vary from this warranty.
THIS LIMITED WARRANTY IS THE ONLY EXPRESS LIMITED WARRANTY
AND THE MANUFACTURER NEITHER ASSUMES OR AUTHORIZES
ANYONE TO ASSUME OR MAKE ANY OTHER OBLIGATION TOWARDS
THE PRODUCT OTHER THAN THIS WARRANTY.
Schumacher
®
and the Schumacher logo are registered trademarks
of Schumacher Electric Corporation.

• 11 •
WARRANTY CARD
SAVE ON POSTAGE! ACTIVATE YOUR WARRANTY ONLINE –
THE QUICK AND EASY WAY!
Go to www.batterychargers.com to register your product online.
(No internet access? Send in the completed warranty card.)
1 YEAR LIMITED WARRANTY PROGRAM REGISTRATION
MODEL: _________________________________________
DESCRIPTION: ___________________________________
This is the only express limited warranty, and the manufacturer neither assumes nor authorizes anyone
to assume or make any other obligation. There is no other warranty, other than what is described in the
product owner’s manual.
The warranty card should be submitted within 30 days of purchase. The customer must keep the
ORIGINAL receipt because it will be required for any warranty claims.This warranty is not transferable.
Send warranty card only. DO NOT SEND UNIT TO THIS ADDRESS FOR REPAIR.
Mail this card to: Schumacher Electric Corporation
801 Business Center Drive
Mount Prospect, IL 60056-2179
Name _______________________________________________________________________________
Street address ________________________________________________________________________
City ________________________________State __________________ Zip code _________________
Phone ______________________________Email ___________________________________________
Name of store where purchased ____________________________ Date of purchase ________________
Store location ___________________________ UPC number __________________________________
Serial number (See Product) _____________________________________________________________
For faster warranty activation, go to www.batterychargers.com to register your product online.
/