LG LAC7910N User manual
- Category
- Car video systems
- Type
- User manual
This manual is also suitable for
LG LAC7910N is a car CD/MP3/WMA receiver that lets you enjoy your favorite music on the go. With its detachable control panel, you can easily take it with you when you leave your vehicle, and the built-in Bluetooth wireless technology allows you to make and receive calls hands-free. You can also connect an auxiliary device, such as an MP3 player or smartphone, to the AUX input, and the USB slot lets you play music directly from a USB drive.
LG LAC7910N is a car CD/MP3/WMA receiver that lets you enjoy your favorite music on the go. With its detachable control panel, you can easily take it with you when you leave your vehicle, and the built-in Bluetooth wireless technology allows you to make and receive calls hands-free. You can also connect an auxiliary device, such as an MP3 player or smartphone, to the AUX input, and the USB slot lets you play music directly from a USB drive.


-
 1
1
-
 2
2
-
 3
3
-
 4
4
-
 5
5
-
 6
6
-
 7
7
-
 8
8
-
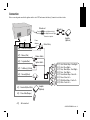 9
9
-
 10
10
-
 11
11
-
 12
12
-
 13
13
-
 14
14
-
 15
15
-
 16
16
-
 17
17
-
 18
18
-
 19
19
-
 20
20


LG LAC7910N User manual
- Category
- Car video systems
- Type
- User manual
- This manual is also suitable for
LG LAC7910N is a car CD/MP3/WMA receiver that lets you enjoy your favorite music on the go. With its detachable control panel, you can easily take it with you when you leave your vehicle, and the built-in Bluetooth wireless technology allows you to make and receive calls hands-free. You can also connect an auxiliary device, such as an MP3 player or smartphone, to the AUX input, and the USB slot lets you play music directly from a USB drive.
Ask a question and I''ll find the answer in the document
Finding information in a document is now easier with AI
