SKODA Octavia (2004/10) Owner's manual
- Category
- Cars
- Type
- Owner's manual
This manual is also suitable for

SIMPLY CLEVER
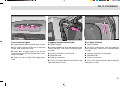
ŠkodaOctavia Tour
OWNER´ S MANUAL
Návod k obsluze
Octavia anglicky 10.04
S63.5610.32.20
1U0 012 003 GR
www
.skoda-auto.com
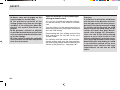
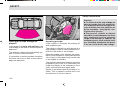
How you can contribute to a cleaner envi-
ronment
The fuel consumption of your Škoda - and thus
the
level of pollutants contained in the exhaust
- is also determined by how you drive.
The
noise level and wear and tear are also influ-
enced
by how you personally handle your vehi-
cle. This Owner ´s Manual tells you how to drive
your Škoda to achieve the minimum impact on
the
environment, and how to save money at
the same time. Look up „Environment“ in the
Index to find out more.
Please also refer to all the texts identified with a
in this Owner ´s Manual.
Mak
e your contribution - for the sake of
the environment.
Octavia anglicky 10.04 S63.5610.32.20

1
You have opted for a Škoda,
sincere thanks for your confidence.
Your Škoda has proven to be a successful car for all-round use.
Functionality, customer satisfaction and environmental protection
aspects played an important part in its design, the selection of
materials used and manufacture.
The results speak for themselves.
Your Škoda is extremely economic when it comes to fuel con-
sumption, has a low pollution level, needs only a small amount of
servicing at long intervals and has durable wearing parts.
Your Škoda thus has all the virtues typical for a modern car such
as good motoring economy, quality, reliability and long-time re-
tention of its value.
An efficient service organisation is available for looking after your
Škoda: in Europe alone, the service network already comprises
more than 2500 Škoda Dealers that work economically and pro-
fessionally in accordance with factory guidelines.
These Škoda Dealers are also committed to ensure that your
Škoda is always in proper condition.
A requirement for warranting repairs free of charge is that
the Service Inspections (see Service Schedule) and repairs
during the warranty period have been carried out by an au-
thorized Škoda Dealer.
Warranty claims are void if the damage to the vehicle has been
caused by parts and accessories not approved by the manufac-
turer Škoda Auto, or by failure to observe maintenance and repair
instructions.
Your Škoda Dealers will gladly supply details of the aforemen-
tioned services and possible differences in specific countries.
Please also refer to the information in the Service Schedule.
We wish you pleasant motoring at all times.
Your Škoda Auto

2
TABLE OF CONTENTS
CONTROLS AND EQUIPMENT
Keys ........................................................ 6
Electronic immobiliser ............................. 7
Locking.................................................... 8
Storage compartments ......................... 10
Tailgate .................................................. 11
Remote control* .................................... 12
Anti-theft alarm system* ........................ 13
Power windows* .................................... 15
Rear-view mirrors .................................. 16
Head restraints...................................... 18
Front seats ............................................ 19
Electrically operated seat* .................... 20
Rear seat .............................................. 25
Luggage compartment cover ................ 26
Luggage compartment .......................... 27
Luggage compartment cover (Estate) .. 32
Raised luggage area* (Estate).............. 32
Net partition Estate* .............................. 33
Pedals ................................................... 35
Handbrake ............................................ 36
Armrest* ................................................ 36
Mobile phone, hands-free system* ....... 37
Manual gearbox .................................... 38
Automatic gearbox*............................... 39
Adjustable steering column .................. 43
Ignition lock ........................................... 43
Starting engine ...................................... 44
Switching off engine .............................. 46
Audible signals ...................................... 46
Audible signal when reversing*............. 47
Excess speed signal* ............................ 47
Instruments ........................................... 48
Navigation system* ............................... 55
Indicator/warning lights ......................... 56
Switches ................................................ 62
Tempomat (cruise control system)* ...... 68
Multifunction steering wheel* ................ 70
Windscreen wiper and washer system .. 71
Heating and ventilation ......................... 72
Air conditioning* .................................... 75
Climatronic (automatic air
conditioning)* ........................................ 79
Electric sliding/tilting roof* ..................... 85
Sun visors ............................................. 86
Storage compartment on the front
passenger side ..................................... 87
Beverage holder* .................................. 87
Interior lights ......................................... 87
Cigarette lighter, socket ........................ 89
Ashtrays ................................................ 90
Note holder* .......................................... 91
Note holder ........................................... 91
Roof rack* ............................................. 91
SAFETY
Basic information .................................. 93
Correct seated position ......................... 94
Seat belts .............................................. 98
Airbag system* .................................... 103
Child safety .......................................... 111
DRIVING TIPS
The first 1500 kilometres
(1000 miles) - and after ....................... 117
Driving economically while protecting
theenvironment .................................. 118
Brakes ................................................. 120
All-wheel drive* ................................... 123
Towing a trailer .................................... 124
GENERAL MAINTENANCE
Filling the tank ..................................... 127
Fuel ..................................................... 128
Care of car .......................................... 129
Bonnet ................................................. 135
LongLife Service* ................................ 138
Specification ....................................... 138
Power steering .................................... 141
Cooling system ................................... 142
Brake fluid ........................................... 144
Battery ................................................. 146
Spark plugs ......................................... 150
Ribbed belt .......................................... 150
Windscreen washer system ................ 151
Windscreen wiper blades ................... 151
Dust and pollen filter* .......................... 152
Wheels ................................................ 153
Motoring abroad .................................. 158
Mobile phones and two-way radios .... 159
Accessories, modifications and parts .. 159
Technical changes .............................. 160
DO-IT-YOURSELF
First-aid box, warning triangle............. 161
Car tool kit ........................................... 161
Tyre repair spray* ................................ 162
Tyre repair set* .................................... 162
Spare wheel ........................................ 162
Changing a wheel ............................... 163
Anti-theft lock of wheels* .................... 166
Fire extinguisher* ................................ 166
Fuses .................................................. 167
Replacing a bulb ................................. 169
Jump-starting ...................................... 177
Tow-starting/towing ............................. 178
TECHNICAL DATA
Vehicle identification data ................... 181

3
DOCUMENTATION
The documentation of your car includes in
addition to this Owners Manual, a Ser-
vice Schedule, Assistance in Europe,
Technical Data and all other instructions
related to the operation of the vehicle.
Moreover, other Instructions and Supple-
mentary Instructions may be provided de-
pending on the vehicle type and equipment
(e.g. operating instructions for the radio).
If you find that some of this printed material
is missing or if you believe that the informa-
tion on some types of equipment or model
versions are incomplete or differ, please con-
tact your koda Dealer immediately. Your
dealer will assist you in every possible way.
Please note that the information stated in
the vehicle registration documents always
takes precedence over the information
contained in the Owners Manual.
Refer to the technical documentation of
the vehicle or to the supplement to the
Owners Manual for the technical data
of your vehicle.
This Owners Manual
and the additional instructions are publica-
tions which you should read attentively as
soon as possible so that you become fa-
miliar with your car.
This Owners Manual describes the current
scope of equipment. Certain items of equip-
ment listed are only installed later on and
only envisaged for particular markets. The
illustrations can differ in minor details from
your vehicle; they are only intended for
general information.
Please pay particular attention to the sec-
tion on Driving Tips in this Owners
Manual: there you can find how you can
drive safely, economically and in an en-
vironmentally conscious way.
For safety reasons, please also pay at-
tention to the information on Accesso-
ries, Modifications and Replacement of
Parts on page 159.
The other chapters are also important, how-
ever, for proper treatment of your car - in ad-
dition to regular care and maintenance - helps
to retain its value and in many cases is also
one of the requirements for warranty claims.
The Service Schedule
contains:
- identification data of your car,
- the service intervals,
- the service inspection to be carried out
and the mobility warranty are confirmed.
- the service work,
- information on the warranty.
The service work carried out is also con-
firmed in the Service Schedule, this being
a requirement for any claims under the
warranty.
Please always present the Service Sched-
ule when you take your car to a koda Dealer.
In the event of loss, theft and invalidation of
the Service Schedule, please contact your
koda Dealer where your vehicle is regularly
serviced. You will receive a duplicate in which
your Dealer has entered all the information
regarding previously carried out services.
Assistance in Europe
contains addresses and telephone num-
bers of the koda Importer.
Technical data
contain important information regarding the
vehicle.
Notes on the layout of this Manual:
This Manual describes to the maximum
possible extent the current engineering and
range of equipment of your car at the time
of going to press. Certain equipment may
only be available after a certain delay or
not at all, or is offered only in certain ex-
port countries.
Equipment marked with * is fitted as stand-
ard only to certain model versions or is
available only for certain models as optional
equipment.
Texts with the heading Warning
and with this background colour, re-
fer to the risks of possible accidents
and injuries.
Texts marked with this symbol and
written in italic are important envi-
ronmental protection information.
One more request in conclusion:
If you sell your car, please hand over the
complete documentation to the new owner
for the documentation belongs in the car!

4
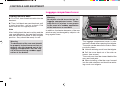
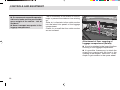
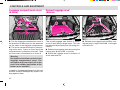
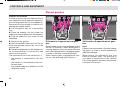
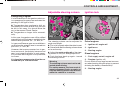
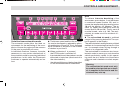
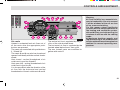
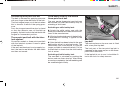
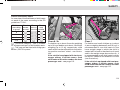
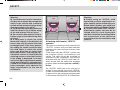
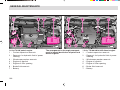
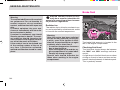
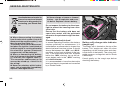
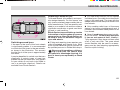
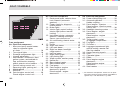
CONTROLS AND EQUIPMENT
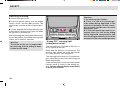
General view

5
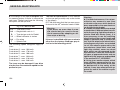
CONTROLS AND EQUIPMENT
Page
1 Exterior mirrors adjustable from inside* 17
2 Air vents 73, 76, 83
3
Lever for the multi-functional switch:
67, 68Turn signal lights, main beam, parking light,
low beam, headlight flasher and cruise control*
4
Instrument cluster:
48, 56
Instruments and warning lights
5
Lever for windscreen wiper/ washer
50, 71
with switch for multifunction display
6 Switch for heated rear window 63
7 Switch for ESP/TCS* 63
8 Switch for hazard warning light system 63
9 Thumbwheel for seat heater* 65
10
Remote fuel filler flap release from driver’s
65
seat*
11 Passenger airbag 103
12 Storage compartment in the front doors -
13
Button for central locking and electrical
8, 15
power windows
14 Remote bonnet release 135
15
Switch for parking light, low beam, rear fog 62
light
and instrument lighting 66
Page
16
Storage compartment below the steering wheel
-
17 Horn, driver airbag* 103
18 Lever for adjusting height of steering column
19 Ignition lock 43
20 Ashtrays 90
21
Gearshift lever (manual gearbox), or
38, 39
Selector lever (automatic gearbox)
22 Handbrake 36
23 Control for heating and air conditioning* 72, 75, 79
24 Storage compartment -
25 Radio
1)
-
26
Storage compartment on the front
87
passenger side
n The arrangement of the controls and the styling of the dash
panel depend on the model version.
n Equipment marked with * is fitted as standard only to certain
model versions or is available only for certain models as optional
equipment.
n On right-hand drive vehicles the arrangement of the controls
and switches and the location of some items may vary. The sym-
bols on the controls and switches are the same as for left-hand
drive vehicles.
1)
Cars with factory-fitted radio are supplied with a radio instruction leaflet.
43

6
CONTROLS AND EQUIPMENT
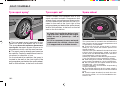
Keys
Two keys are supplied with the car. These
keys fit all the locks of the car.
Warning
Always withdraw the ignition key
when leaving the car - even if only for
a short time.
Note
Keep the groove of the key absolutely clean
as impurities (textile threads, dust, etc.) can
have a negative affect on the operation of
the locks, the remote control etc.
Key tab
The key tab contains the key numbers which
are essential for re-ordering replacement
keys. You can refer to these numbers to or-
der replacement keys from a Škoda Dealer.
Note
You should keep the key tab in a sepa-
rate and safe place for it is only possi-
ble to obtain replacement keys if a key
is lost or damaged by stating this num-
ber.
If you sell your car, please also hand over
the key tab to the new owner.
Key with light*
The light is switched on by pressing on the
middle of the key (arrow 1).
Changing battery or bulb
n Insert a coin into the slot on the side of
the handle (arrow 2) and lever off top part.
n Change battery or bulb.
Replacement batteries and bulbs are avail-
able from Škoda Dealers.
Dispose of the old battery in ac-
cordance with environmental regu-
lations.

7
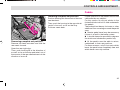
CONTROLS AND EQUIPMENT
Key with remote control*
For more detailed information - see page 12.
The key version may differ depending on
the vehicle equipment.
Refer to the text on p. 12 for further details.
Electronic immobiliser
The immobiliser prevents any unauthorized
attempt to start the car.
An electronic chip with a program code is
located in the head of the key. If the key
with the correct code is used, the engine
control unit is activated and it is thus pos-
sible to start the engine.
If the ignition key is lost or damaged,
please contact your Skoda Dealer who
will be able to obtain a replacement key
on the basis of the code number on the
key tab.
Keep the key tab separately in a safe
place.

8
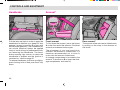
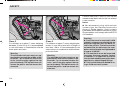
CONTROLS AND EQUIPMENT
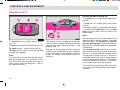
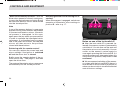
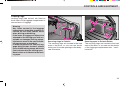
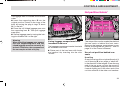
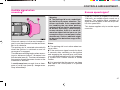
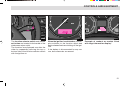
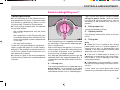
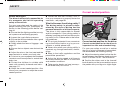
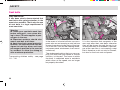
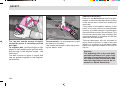
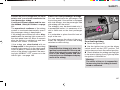
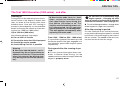
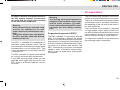
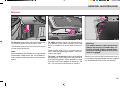
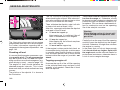
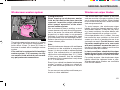
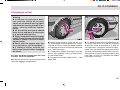
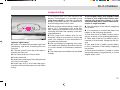
Central locking system*
The illustration shows how to operate the
central locking system of a car which is
equipped with the convenience system*.
All four doors and the tailgate can be loc-
ked or unlocked at the same time using the
central locking system.
The central locking system can be opera-
ted as follows:
- from the outside with the car key,
- from the inside with the pushbuttons 1 and
2 in the driver’s door - see illustration
Button 1 - to lock car
Button 2 - to unlock car
- by means of the locking buttons in the
doors (refer to ill. above)
only on cars which are not fitted with the
convenience system (only closing).
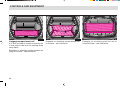
Locking
The following procedure applies to cars
not fitted with central locking:
Locking from outside
When the car is unlocked with the key, the
locking button in the door moves up - refer
to ill. on p. 8.
When the car is locked, the locking button
moves down - refer to ill. on p. 8.
Locking from inside
All doors which are closed can be locked
from the inside by pressing the locking but-
tons. If the locking buttons have been
pressed, it is not possible to open the doors
from the outside. The doors can be opened
from the inside in the following way:
n Pull once on the door opening lever to
unlock the door.
n Pull a further time on the door opening
lever to open the door.
Note
n The opened door at the front on the
driver side cannot be locked by means of
the locking button. This is intended to pre-
vent you unintentionally leaving the key in
the ignition lock of the locked car.
n The opened doors at the rear and the
front passenger door can be locked by
pressing the locking button and closing the
door.
n
Pay attention to the locking instruc-
tions - refer to p. 10.
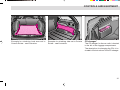
Child safety lock
The rear doors are additionally fitted with a
child safety lock.
n Insert car key into the slot.
n Turn the key in the direction of arrow
toward the symbol. The child safety lock is
activated.
The lever for opening the door on the in-
side is blocked. The door can only be
opened from the outside.
n The child safety lock is cancelled if the
key is inserted into the slot and turned in
the opposite direction of the arrow. The door
can then be opened in the usual way.

9
CONTROLS AND EQUIPMENT
n The car can be unlocked and locked
using button 1 and 2 in the door handle
even if the ignition is switched off (provided
the car is not locked from the outside).
n The tailgate can be unlocked and loc-
ked using button 1 and 2 or the car key -
see chapter „Tailgate“ (Owner’s Manual).
n If the central locking system fails, it is
only possible to unlock and lock the front
doors and the tailgate with the car key.
Opening a single door
This optional function enables you to un-
lock only the driver door. The other doors
remain locked and are not unlocked until a
further command is given (unlock). This
necessitates changing the coding of the
central locking control unit. This is an op-
eration which is carried out by your Škoda
dealer, who can provide you with more de-
tailed information on this facility.
- with the remote control.
Notes
n When the car is unlocked, all the loc-
king knobs move up.
n When the car is locked, the driver’s door
should be closed. The other doors can b e
closed also after the car has been locked.
n When the car is locked, all the locking
knobs should move down. If this is not the
case, open the relevant door once again
and close it properly.
n The indicator light in the driver door -
next to the locking button - flashes to con-
firm that the car has been correctly locked.
The indicator light does not flash if the Safe
lock has been deactivated - refer to p. 9.
This does not apply, however, to models
which are equipped with the anti-theft alarm
system* because the indicator lamp in this
case signals that the system is active.
Safe lock
After the car has been locked from the out-
side, all the door locks are automatically
blocked. It is no longer possible to pull out
the inside locking knobs. The warning light
in the driver’s door flashes. It is not possi-
ble to open the doors either with the inside
or the outside handle. This acts as a deter-
rent to any attempt to break into the car.
n The Safe lock can be deactivated. This
is done by locking the car twice with the key
or the remote control within 2 seconds.
n If the Safe lock has been deactivated,
the indicator light next to the locking knob
in the driver’s door does not flash.
This does not apply to models which are
equipped with an anti-theft alarm system*
because the warning lamp signals that the
system is active.
n The Safe lock is again operational once
the car has been unlocked and locked again.

10
CONTROLS AND EQUIPMENT
Note
If the car is locked and the Safe lock is
deactivated, it is possible to open the doors
from the inside as follows:
n The door is unlocked by pulling the door
opening handle.
n The door is opened by once again pul-
ling the handle.
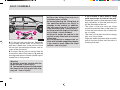
Convenience system
When unlocking and locking the car, it is
also possible to open and close the power
windows (only to close the sliding/tilting
roof) as follows:
n Hold the key in the unlocking or locking
position until all the windows are opened
or closed. The opening or closing operati-
on is stopped immediately once the key is
released.
The rollback protection is not active if
the convenience system is used. Refer
to p. 16 for further information.
Warning
n If the vehicle is locked from the
outside, make sure no persons or
animals are left behind. As locked
doors make outside emergency as-
sistance difficult, never leave chil-
dren or animals unattended in the
car.
n Locking the doors will prevent their
opening unintentionally in excep-
tional circumstances (accident).
Locked doors also prevent unauthor-
ized access e.g. while waiting at traf-
fic lights. However, they do make it
more difficult for emergency workers
to provide assistance inside the car.
n Check the locking process visu-
ally to ensure the locking knobs are
down.
n The car is unlocked automatically
if the airbag system is activated.
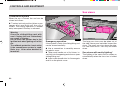
Storage compartments
An overview
You will find the following storage facilities
in your vehicle:
n Storage compartment on the front pas-
senger side - see page 87
n Storage compartment below the steer-
ing wheel - see page 4
n Storage compartment in the middle of
the dash panel - see page 4
n Storage compartment in the door panel
- see page 4
Warning
n
Please do not place anything on top
of the dash panel. Such objects might
slide or fall down when driving (when
accelerating or cornering) and may
distract you from concentrating on the
traffic situation - risk of accident!
n Use the storage compartments in
the door panels only for small items,
which do not project out of the com-
partment in order to avoid any inter-
ference with the proper operation of
the side airbags.
n Ensure that when driving no ob-
jects from the centre console of from
other storage possibilities may get
into the footwell of the driver.
You would then no longer be able to
apply the brakes, operate the clutch
or accelerator - risk of accident!

11
CONTROLS AND EQUIPMENT
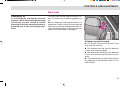
Tailgate
To unlock and open the tailgate:
Insert key into the lock with the slot in the
vertical position, turn to the left and release.
Raise tailgate handle slightly and lift tail-
gate open. The handle is located between
the licence plate lights. The tailgate is held
in the top position by a gas strut.
To lock the tailgate:
Pull the tailgate down and close with a slight
swing.
Turn the key to the right and remove it from
the lock.
The tailgate is maintained in the top posi-
tion by a gas strut.
The tailgate is properly closed when the key
slot is vertical.
Note
On models fitted with central locking sy-
stem* the tailgate is automatically unlocked
and locked together with the other locks.
On models fitted with anti-theft alarm sy-
stem* the tailgate can only be unlocked with
the remote control because the alarm is
triggered after it is unlocked with key.
Warning
n Please observe the correct proce-
dure for unlocking and opening the
tailgate. If you unlock tailgate with
the key and at the same time raise the
handle, this can result in the open-
ing mechanism being blocked. A
blocked mechanism can be released
by leaving the handle and locking the
tailgate with the key. Please always
follow the correct procedure to avoid
damaging the opening mechanism.
n After closing the tailgate, always
pull on the tailgate to check that it is
properly locked - the tailgate might
otherwise open suddenly when driv-
ing even if the lock has been prop-
erly closed.
n Never drive with the tailgate slight-
ly ajar or even open otherwise the
exhaust gases will be drawn into the
car!
n Do not press on the rear window
when closing the boot lid, it could
crack - risk of injury!
n If you find that the slot of the key
is not vertical, an attempt has been
made to break into the car. We rec-
ommend checking the vehicle equip-
ment. Turn the slot of the key into the
vertical position to ensure that the
lock closes properly. As a check, lock
the car once and then unlock it. If it
is not possible to insert the key into
the lock, the lock has been damaged.
Have it repaired at a Škoda Dealer.

12
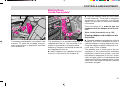
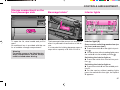
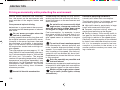
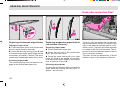
CONTROLS AND EQUIPMENT
The remote control integrated in the key
can be used to operate the central locking
and the anti-theft warning system - see
pages 8 and 13.
The central locking and anti-theft warning
systems can be operated from a distance
of up to 10 metres. If the batteries have lost
power, the range of the remote control is
reduced.
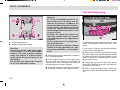
Remote control*
To unlock the car briefly press button
(pos. 1).
To lock the car briefly press button (pos. 2).
To open the key - press button (pos. 3).
To close the key - press button (pos. 3) and
fold the key together.
Note
The illustration shows the remote control
with the folding key. The functions of Un-
lock, Lock, etc. are the same as for the re-
mote control without folding key - refer to
the appropriate text.
Unlocking and locking car
To unlock the car, briefly press the button
(item 2).
To lock the car, briefly press the button
(item 1).
If the button (item 1) is pressed twice within
2 seconds when locking the car, the safe
lock and the interior motion sensor are
deactivated.
Note
After pressing one of the two buttons, the
indicator light in the key flashes. If the light
does not flash, the batteries in the key
may be discharged. Have the batteries
checked at a Škoda dealer and replaced,
if necessary.
The remote control can be used to acti-
vate the anti-theft alarm system and to lock
the car or to deactivate the anti-theft alarm
system and to unlock the car. If the car is
unlocked without the doors being opened
(e.g. by pressing the button of the remote
control accidentally), the car is automati-
cally locked again after 30 seconds.
The Safe lock and the anti-theft alarm are
not operational during these 30 seconds,
however.

13
CONTROLS AND EQUIPMENT
Synchronizing the car key code
If it is no longer possible to unlock the car
using the remote control, the problem may
be that the codes of the key and the con-
trol unit in the car no longer agree. This can
happen if the buttons of the key are pres-
sed several times beyond the effective ran-
ge of the system or if the battery of the re-
mote control has been replaced.
For this reason, the code must be re-syn-
chronized by pressing any desired button
on the remote control. Open the door with
the key within one minute after pressing the
button.
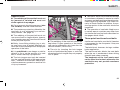
Anti-theft alarm system*
General notes
The anti-theft alarm system enhances the
protection provided against attempts to
break into the car.
The anti-theft alarm system monitors the
following parts of the car:
- Doors
- Tailgate
- Bonnet
- Ignition lock
- Interior of car
1)
.
- Voltage drop in electrical system.
The alarm is activated by:
n Opening the doors
n Opening the tailgate
n Opening the bonnet
n Switching on the ignition
n Movements inside the car.
The alarm is recognizable from the visual
and audible signals
2)
(the flashing of the
turn signal lights and the noise of the si-
ren) for 30 seconds.
1)
Alarm is triggered by the movement of persons
in the interior of the car or by an attempt to steal
the car radio. It is possible, in certain circum-
stances, that the rear area of the interior of the
car is not fully monitored.
2)
The characteristics of the visual and audible sig-
nal differ according to the country.
If a further attempt is made to break into
the car after these 30 seconds, the alarm
is again activated.
Operating the anti-theft alarm system
Activating alarm
Lock the car with the key or by pressing the
lock button of the remote control. The mo-
nitoring functions are thus switched on.
Deactivating alarm
is deactivated by pressing the Unlock key
on the remote control. The check functions
are switched off in this case. If the remote
control is not operating properly, you can
deactivate the anti-theft alarm system in the
following manner: unlock the car and then
switch the ignition on.
After unlocking and not opening the doors,
the alarm is reactivated after 30 seconds.

14
CONTROLS AND EQUIPMENT
The radio remote control can be used to
activate the anti-theft alarm system and to
lock the car, or to deactivate the anti-theft
alarm system and to unlock the car.
Switching off interior motion sensor
The procedure for switching the interior mo-
tion sensor off and on is the same as for
switching off the Safe lock - see page 9.
This function makes it possible, for examp-
le, to leave animals in the car.
Switching off alarm
If the alarm has been triggered, press and
hold the Unlock button of the remote con-
trol for about one second in order to switch
off the alarm. The alarm is then switched
off and the car is unlocked. You can also
switch off the alarm by unlocking the car
with the key and the switching the ignition
on. The anti-theft alarm system is re-acti-
vated by once again pressing the button
(lock car).
General notes
n The life of the siren source is 5 years.
Further information is available from
your Škoda Dealer.
n The frequency coding of the remote con-
trol and the receiver means that it is not
possible to use the remote control of other
cars.
n If the key and remote control are lost,
please contact your Škoda Dealer.
n The power for the remote control is sup-
plied by batteries. If the anti-theft alarm
system does not react to the remote con-
trol until you are less than 3 metres from
the car or if the indicator light in the key
does not flash when the button is pressed,
the batteries have to be replaced. This is
best done at a Škoda Dealer.

15
CONTROLS AND EQUIPMENT
Power windows*
The switches for the individual windows are
located in the armrest of the driver door, of
the front passenger door and in the rear
doors*.
The power windows can also be operated
when the ignition is switched off.
If the ignition is switched off, the power win-
dows can continue to be operated for about
10 minutes, but not anymore if the door is
opened and closed.
The buttons in the rear doors* can be de-
activated using the safety switch* 1. The
windows should be closed in this case. Af-
ter this, it is only possible to operate the
windows in the rear doors with the switches
in the armrest. After the safety switch has
been pressed once again the rear switches
again operate.
Opening and closing windows by
means of buttons on the driver’s
door
Opening versions
n The window is opened by applying slight
pressure to the relevant switch in the door.
The opening operation is stopped when the
switch is released.
n The front windows are automatically
opened fully if the switch is pressed as far
as the stop.
The window stops immediately when the
switch is again pressed.
Closing
n The window is closed by pulling up the
relevant switch slightly.
The closing operation is immediately
stopped when the switch is released.
n The front windows are automatically fully
closed if the switch is pulled up as far as
the stop.
The window stops immediately if the switch
is pulled once again.
Notes
n The two switches for the rear windows
each have only one closing and one open-
ing position. The switch has to be pressed
and held during the entire closing or open-
ing operation.
n It is only possible to automatically fully
open and close the two front windows us-
ing the switches in the driver’s door.
n If the battery is re-connected, the top
position of the closed window has to be set
(system activated):
- Close all the windows with the conve-
nience closing system.
- release the key
- After closing the window, hold the key in
the closed position for a further 3 sec-
onds or so.

16
CONTROLS AND EQUIPMENT
Driving in winter
In winter, the closing operation of the win-
dow may be stopped because of the higher
friction resistance, caused for example by
ice, and the window then returns to its ini-
tial position.
In such a case, the window must be closed
in the following way:
n Pull the switch (press switch at front
passenger door and at the rear doors) and
hold until the window is closed.
n If closing is interrupted, repeat the op-
eration.
Convenience operation of windows
When the car is unlocked and locked, it is
possible to open and close the power win-
dows (only to close the sliding/tilting roof),
as follows:
n Hold the key in the lock in the opening
or closing position until all the windows are
opened or closed. The opening or closing
operation is interrupted immediately when
the key is released.
The rollback protection is not active if
the convenience system is used. Refer
to the following text for more detailed
information.
Warning
n The system is equipped with a
safety device to prevent injuries from
bruises. If, for example, a person’s
arm becomes jammed in the window
as it closes, the closing operation is
interrupted and the window opens
again a short distance. Despite this,
take care when closing the windows.
Persons may suffer injuries if the
windows are closed inattentively or
in an uncontrolled way.
n No person should be left in the car
if it is locked from the outside. It is
not possible to open the windows
after about 10 minutes, or if the driv-
er’s door is opened and closed when
the ignition is switched off.
n It is important to always pay atten-
tion when the windows are closing
to avoid anyone being injured.
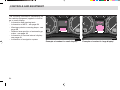
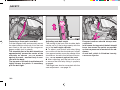
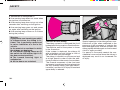
Adjusting mirrors
The rear-view mirrors should always be
adjusted properly before moving off so as
to ensure good vision to the rear.
Anti-dazzle inside mirror
The lever on the lower edge of the mirror
should be pointing forward when the basic
setting is made.
Pull lever to the rear to set the anti-dazzle
position.
Rear-view mirrors

17
CONTROLS AND EQUIPMENT
Electrically adjustable exterior mir-
rors*
are set by a rotary knob in the trim panel of
the driver’s door. The mirror is set to the
desired position by moving the rotary knob
in the desired direction with the ignition
switched on.
Position
Heating exterior mirror (applies only to mo-
dels with power windows)
Position L
- left-hand and right-hand mirrors at the
same time (applies to models with con-
venience system)
- left-hand mirror (applies to models wit-
hout convenience system)
Position R
Adjusting the right-hand mirror
If the electrical adjustment of the mirrors
fails, the mirrors can be adjusted by hand
by pressing on the edge of the surface of
the mirror.
Exterior mirror heating
(applies only to models not fitted with power
windows)
When the ignition is switched on, the exte-
rior mirrors are heated provided the rear
window heater is also operating.
Note for using convex or aspherical ex-
terior mirrors:
Convex exterior mirrors (curved outwards)
enlarge the field of view but they make ob-
jects look smaller.
These mirrors are only of limited use in
estimating how far away a following ve-
hicle is.
Aspherical exterior mirrors have a mirror
surface with different curvature. This wide-
angle mirror increases the field of view even
more so than conventional convex mirrors.
These mirrors are also only of limited
use in estimating how far away a follow-
ing vehicle is.
Warning
Use whenever possible the interior
rear mirror, for estimating the dis-
tance to the following vehicles.

18
CONTROLS AND EQUIPMENT
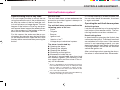
The head restraints can be adjusted for an-
gle and height and should be set to match
the size of the seat occupant. Head re-
straints which are correctly adjusted offer
effective protection together with the seat
belts.
Head restraints
Adjusting height
n Grasp the side of the head restraint with
both your hands and pull it up or down in
direction of arrow A.
n The best protection is obtained if the
upper edge of the head restraint is roughly
at eye level or higher.
Warning
In case the head restraints are not
correctly adjusted or when driving
without head restraints, you are ex-
posed to a risk of injury.
Adjusting angle
n The head restraints can be tilted in the
direction of arrow B and can be matched
to head height in the desired position to
provide enhanced comfort for the occupant.
Removing and installing
Pull the head restraint out of the backrest
as far as the stop. Press the locking button
in direction of arrow and pull the head re-
straint out of the backrest.
To install again, push the head restraint
rods into the guides until the locking but-
ton is heard to engage.

19
CONTROLS AND EQUIPMENT
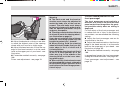
Front seats
Correct seat adjustment is important for:
- reliably and quickly reaching the controls
and switches,
- relaxed, fatigue-free body position,
- maximum protection from the seat
belts.
Warning
n For this reason, the front seats
should not be pushed too close to
the steering wheel or the instrument
panel.
n Each occupant must correctly fas-
ten the seat belt belonging to the
seat. Children must be fastened with
a suitable restraint system - see page
111.
n The front seats and the head re-
straints must always be adjusted to
match the body size of the seat oc-
cupant. The seat belts must always
be correctly fastened in order to pro-
vide an optimal protection for you
and your occupants.
n Always keep your feet in the foot-
well when the vehicle is moving - ne-
ver rest them on the instrument panel
or seats.
n Never transport more occupants
than the maximum seating in the ve-
hicle.
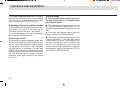
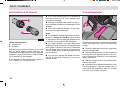
1 - To move seat forward and back
Pull up the lever located below the seat and
move seat into the desired position. Then,
release lever and move seat further until
the lock engages.
The driver’s seat should be adjusted so that
the pedals can be fully depressed with the
legs slightly angled.
Warning
For safety reasons the driver’s seat
must only be moved forward or back
when the vehicle is stationary!
2 - Adjusting seat height*
Move the lever repeatedly up and down in
the top position in order to raise the seat.
Move the lever repeatedly up and down in
the bottom position in order to lower the
seat.
Warning
For safety reasons the height of the
driver’s seat must only be adjusted
when the vehicle is stationary!
Page is loading ...
Page is loading ...
Page is loading ...
Page is loading ...
Page is loading ...
Page is loading ...
Page is loading ...
Page is loading ...
Page is loading ...
Page is loading ...
Page is loading ...
Page is loading ...
Page is loading ...
Page is loading ...
Page is loading ...
Page is loading ...
Page is loading ...
Page is loading ...
Page is loading ...
Page is loading ...
Page is loading ...
Page is loading ...
Page is loading ...
Page is loading ...
Page is loading ...
Page is loading ...
Page is loading ...
Page is loading ...
Page is loading ...
Page is loading ...
Page is loading ...
Page is loading ...
Page is loading ...
Page is loading ...
Page is loading ...
Page is loading ...
Page is loading ...
Page is loading ...
Page is loading ...
Page is loading ...
Page is loading ...
Page is loading ...
Page is loading ...
Page is loading ...
Page is loading ...
Page is loading ...
Page is loading ...
Page is loading ...
Page is loading ...
Page is loading ...
Page is loading ...
Page is loading ...
Page is loading ...
Page is loading ...
Page is loading ...
Page is loading ...
Page is loading ...
Page is loading ...
Page is loading ...
Page is loading ...
Page is loading ...
Page is loading ...
Page is loading ...
Page is loading ...
Page is loading ...
Page is loading ...
Page is loading ...
Page is loading ...
Page is loading ...
Page is loading ...
Page is loading ...
Page is loading ...
Page is loading ...
Page is loading ...
Page is loading ...
Page is loading ...
Page is loading ...
Page is loading ...
Page is loading ...
Page is loading ...
Page is loading ...
Page is loading ...
Page is loading ...
Page is loading ...
Page is loading ...
Page is loading ...
Page is loading ...
Page is loading ...
Page is loading ...
Page is loading ...
Page is loading ...
Page is loading ...
Page is loading ...
Page is loading ...
Page is loading ...
Page is loading ...
Page is loading ...
Page is loading ...
Page is loading ...
Page is loading ...
Page is loading ...
Page is loading ...
Page is loading ...
Page is loading ...
Page is loading ...
Page is loading ...
Page is loading ...
Page is loading ...
Page is loading ...
Page is loading ...
Page is loading ...
Page is loading ...
Page is loading ...
Page is loading ...
Page is loading ...
Page is loading ...
Page is loading ...
Page is loading ...
Page is loading ...
Page is loading ...
Page is loading ...
Page is loading ...
Page is loading ...
Page is loading ...
Page is loading ...
Page is loading ...
Page is loading ...
Page is loading ...
Page is loading ...
Page is loading ...
Page is loading ...
Page is loading ...
Page is loading ...
Page is loading ...
Page is loading ...
Page is loading ...
Page is loading ...
Page is loading ...
Page is loading ...
Page is loading ...
Page is loading ...
Page is loading ...
Page is loading ...
Page is loading ...
Page is loading ...
Page is loading ...
Page is loading ...
Page is loading ...
Page is loading ...
Page is loading ...
Page is loading ...
Page is loading ...
Page is loading ...
Page is loading ...
Page is loading ...
Page is loading ...
Page is loading ...
Page is loading ...
Page is loading ...
Page is loading ...
Page is loading ...
Page is loading ...
Page is loading ...
Page is loading ...
Page is loading ...
Page is loading ...
Page is loading ...
Page is loading ...
Page is loading ...
-
 1
1
-
 2
2
-
 3
3
-
 4
4
-
 5
5
-
 6
6
-
 7
7
-
 8
8
-
 9
9
-
 10
10
-
 11
11
-
 12
12
-
 13
13
-
 14
14
-
 15
15
-
 16
16
-
 17
17
-
 18
18
-
 19
19
-
 20
20
-
 21
21
-
 22
22
-
 23
23
-
 24
24
-
 25
25
-
 26
26
-
 27
27
-
 28
28
-
 29
29
-
 30
30
-
 31
31
-
 32
32
-
 33
33
-
 34
34
-
 35
35
-
 36
36
-
 37
37
-
 38
38
-
 39
39
-
 40
40
-
 41
41
-
 42
42
-
 43
43
-
 44
44
-
 45
45
-
 46
46
-
 47
47
-
 48
48
-
 49
49
-
 50
50
-
 51
51
-
 52
52
-
 53
53
-
 54
54
-
 55
55
-
 56
56
-
 57
57
-
 58
58
-
 59
59
-
 60
60
-
 61
61
-
 62
62
-
 63
63
-
 64
64
-
 65
65
-
 66
66
-
 67
67
-
 68
68
-
 69
69
-
 70
70
-
 71
71
-
 72
72
-
 73
73
-
 74
74
-
 75
75
-
 76
76
-
 77
77
-
 78
78
-
 79
79
-
 80
80
-
 81
81
-
 82
82
-
 83
83
-
 84
84
-
 85
85
-
 86
86
-
 87
87
-
 88
88
-
 89
89
-
 90
90
-
 91
91
-
 92
92
-
 93
93
-
 94
94
-
 95
95
-
 96
96
-
 97
97
-
 98
98
-
 99
99
-
 100
100
-
 101
101
-
 102
102
-
 103
103
-
 104
104
-
 105
105
-
 106
106
-
 107
107
-
 108
108
-
 109
109
-
 110
110
-
 111
111
-
 112
112
-
 113
113
-
 114
114
-
 115
115
-
 116
116
-
 117
117
-
 118
118
-
 119
119
-
 120
120
-
 121
121
-
 122
122
-
 123
123
-
 124
124
-
 125
125
-
 126
126
-
 127
127
-
 128
128
-
 129
129
-
 130
130
-
 131
131
-
 132
132
-
 133
133
-
 134
134
-
 135
135
-
 136
136
-
 137
137
-
 138
138
-
 139
139
-
 140
140
-
 141
141
-
 142
142
-
 143
143
-
 144
144
-
 145
145
-
 146
146
-
 147
147
-
 148
148
-
 149
149
-
 150
150
-
 151
151
-
 152
152
-
 153
153
-
 154
154
-
 155
155
-
 156
156
-
 157
157
-
 158
158
-
 159
159
-
 160
160
-
 161
161
-
 162
162
-
 163
163
-
 164
164
-
 165
165
-
 166
166
-
 167
167
-
 168
168
-
 169
169
-
 170
170
-
 171
171
-
 172
172
-
 173
173
-
 174
174
-
 175
175
-
 176
176
-
 177
177
-
 178
178
-
 179
179
-
 180
180
-
 181
181
-
 182
182
-
 183
183
-
 184
184
-
 185
185
-
 186
186
-
 187
187
-
 188
188
-
 189
189


SKODA Octavia (2004/10) Owner's manual
- Category
- Cars
- Type
- Owner's manual
- This manual is also suitable for
Ask a question and I''ll find the answer in the document
Finding information in a document is now easier with AI
Related papers
-
SKODA Octavia Tour 1U 04-2007 Owner's manual
-
-
-
SKODA Fabia Owner's manual
-
-
-
-
-
-
SKODA Octavia (2020/01) Owner's manual
Other documents
-
Hikvision Digital Technology DS-1213ZJ Datasheet
-
Audi A2 2001 Owner's manual
-
-
Honda Civic 5 Door Owner's manual
-
Vauxhall ASTRA Owner's manual
-
Lotus Europa Owner's Handbook Manual
-
 ZEEHOO ZCM01 User manual
-
CITROEN C Zero Quick start guide
-
Volkswagen Amarok Quick Reference Manual
-
