Page is loading ...

Page 1 of 2
09/26/2016
2321399D
IDEX Health & Science • 600 Park Court, Rohnert Park, CA 94928 • (707) 588-2000 • FAX (707) 588-2020 www.idex-hs.com
from the Actuator. Pod sh
of f
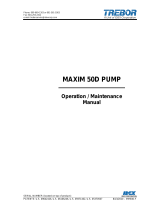
Figure 1
TitanHT Fully
Assembled
Pod
1. Removing Pod from Actuator
Remove sample loop if present then unscrew the Spanner that holds the Pod in
the Actuator as shown in Figure 1. (Do not use a wrench for this step. Spanner
should be tightened and loosened by hand only.) Once the Spanner is free, pull
the Pod ould be removed with only a minimal amount
orce.
Spanner
Actuator
2. Inserting Rapid Replacement Pod
The position of the Pod does not matter when installing. Pod can be misaligned as
shown in Figure 3.
Pod Clocking Pin
Figure 3
Actuator
Misaligned
Pull POD in this
direction after
removing spanner.
Actuator
Housing
Groove
Pod Union
TitanHT™ Rapid Replacement Pod™
Instructions

(Inserting Rapid Replacement Pod™ co
Page 2 of 2
09/26/2016
2321399D
ntinued)
he
ee Figure 3)
with Spline in the
Actuator (see Figure 4).
a. First, insert the new Pod into t
actuator. The Pod Union (s
will make contact
Figure 4
Actuator S
b. While lightly pressing, rotate the Pod
until the Pod Union slips further into the
Actuator and the Clocking Pin makes
contact with the Actuator. These
parts will only align one way
(see Fig. 5)
c. Next, rotate the Pod until
Clocking Pin in the Pod is
seated inside the Clocking
Groove in the Actuator as
shown in Figure 6.
d. Finally, reinstall the Spanner (hand tighten only), as shown in Figure 1,
and install sample loop (if equipped).
pline
Figure 5
Actuator.
TitanHT™ Clocking
Pin making contact
with
gure 6
locking Pin seated in
tuator Groove.
Fi
Tita
Ac
nHT C
IDEX Health & Science • 600 Park Court, Rohnert Park, CA 94928 • (707) 588-2000 • FAX (707) 588-2020 www.idex-hs.com
/