Page is loading ...

3
5
8
10
6
1
9
2
11
12
4
7
Comfort Ride
Shock absorber system part numbers 2450, 2460 and 2470
Installation Instructions
All specifications are subject to change without notice.
Required tools
• General hand tools • 12” long, 5/16” drill bit
• 9/16” socket and wrench • 3/4” socket and wrench
• Torque wrench • Blue threadlocker
Item Qty Part number Description
1 ...... 4 ...... 204000-00 ...... shock
2 .... 16 ...... 350054-50 ......3/8-16 x 1" grade 8 self-tapping screw - type 23
3 ...... 8 ...... 350095-00 ...... ½-13 x 1½" grade 5 bolt
4 ...... 8 ...... 350259-00 ...... ½-13 grade 5 nylon insert lock nut
5 .... 16 ...... 355720-00 ......M12 flat washer
6 ...... 8 ...... 357211-100 .... M12 x 1.75 x 100mm bolt - class 8.8
7 ...... 8 ...... 357212-50 ...... M12 x 1.75 nylon insert lock nut - class 8.8
8 ...... 4 ...... A-005494 ....... shock extension plate
9 ...... 8 ...... A-005764 ....... ½" spacer
10 ...... 4 ...... B-003305 ....... frame bracket
11 ...... 2 ...... C-003264 ....... tie plate with notch for 2-3/8" axle-2450
2 ...... C-003169 ....... tie plate with notch for 3" axle-2460
2 ...... C-003294 ....... tie plate with notch for 3½" axle-2470
12 ...... 2 ...... C-003265 ....... tie plate for 2-3/8" axle-2450
2 ...... C-003170 ....... tie plate for 3" axle-2460
2 ...... C-003295 ....... tie plate for 3½" axle-2470
FRONT OF
TRAILER
REAR OF
TRAILER
(driver’s side)
CENTER
HOLE
MOUNTING
FLANGE
FRONT OF
TRAILER
REAR OF
TRAILER
(passenger side)
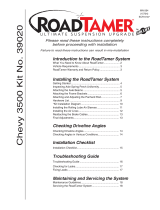
For ease of installation, the shocks are shipped with
restraining bands to hold them at a specific length. Don’t
remove the restraining bands until instructed to do so.
Early removal could result in property damage, serious
personal injury or even death.

Before you begin the installation…
ROADMASTER, Inc. • 6110 N.E. 127th Ave.
Vancouver, WA 98682 • 800-669-9690
Fax 360-735-9300 • roadmasterinc.com
855859-09 04.20
Safety Definitions
These instructions contain information that is very
important to know and understand. This information
is provided for safety and to prevent equipment
problems.
To help recognize this information, observe the
following symbols:
WARNING indicates a potentially hazardous
situation which, if not avoided, could result in
property damage, serious personal injury or even
death.
CAUTION indicates a potentially hazardous sit-
uation which, if not avoided, may result in proper-
ty damage, or minor or moderate personal injury.
ATTENTION
ATTENTION indicates a note of special impor-
tance regarding a potential fit issue of which you
should be aware.
NOTE
Refers to important information and is placed in
italic type. It is recommended that you take special
notice of these items.
Don’t lift the trailer by the axles. Doing so
could adversely affect the alignment of the axles
or result in a bent or otherwise damaged axle.
For ease of installation, the shock absorbers
are shipped with restraining bands to hold them
at a specific length (Figure 1). Don’t remove the
restraining bands until instructed to do so.
Prepare the Trailer
NOTE
If installing a Comfort Ride slipper leaf spring sys-
tem with a Comfort Ride shock absorber system,
don’t follow these instructions. Instead, follow the
instructions included with the Comfort Ride slipper
leaf spring system.
If you’re a professional installer, please give these
instructions to the customer once the kit is installed.
Shock Kit Axle Diameter Axle Circumference
2450 2 3/8” Approx. 7.5”
2460 3” Approx. 9.5”
2470 3.5” Approx. 11”
Refer to the chart below to ensure that you
have the correct shock kit for your application.
• Park the trailer on level ground and chock the
tires.
• Make sure that the
trailer is at the correct
ride height, with both
of the equalizer spring
shackles pointed in the
correct direction (Figure
2).
• Ensure that the U-bolts
attaching the trailer’s leaf
springs to the axles have
at least ½" of thread show-
ing beyond the nut.
• Check for any under-vehicle obstructions in and
around the trailer’s suspension (such as plumbing,
wiring or other trailer components) that may prevent
the installation of the product.
It may be necessary to modify or relocate com-
ponents in order to install this product.
continued on next page
Figure 2
No!
Yes!
Figure 1
The first shock must be installed with the trail-
er suspension loaded, i.e., bearing the weight of
the trailer. Do this with the trailer on level ground.
If the trailer’s axles are above the leaf springs,
support the frame with jackstands without taking
any weight off the tires. Otherwise, the trailer
could drop, which may cause property damage,
personal injury or even death.

Install the Tie Plates
ATTENTION
In the following steps, you will be installing a
single shock only, beginning on the driver’s side
rear. The final location of the shock will inform
you on the positioning of the other three.
1. On the driver’s side rear, remove the U-bolt
and its nuts. If necessary, soak the nuts in a quality
penetrating oil.
2. Remove the OEM tie plate and replace it with
the supplied tie plate (#11). Position it so that the
locating pin on the leaf spring engages the center
hole in the tie plate, and with the mounting flange
(Figure 3) on the tie plate facing toward the center
of the trailer, positioned between the axles.
3. Reinstall the U-bolts and nuts. Torque them
using the axle manufacturer’s specifications. (see
last page)
Figure 3
If the
axle is on top of
the spring, use the
two middle holes.
If the
axle is underneath
the spring, use the
two holes at the end
of the extension
bracket.
Figure 4
A
B
Install the Extension Plates
4. If the axle is underneath the leaf spring: bolt
the extension plate (#8) to the tie plate’s mounting
flange using the two holes at the end of the extension
plate (Figures 3, 4A). Insert two bolts (#3) into the
two holes in the extension plate, bolt through the
mounting flange and finish with two nuts (#4). Torque
to 57 ft-lb.
If the axle is on top of the leaf spring: use the
same hardware but bolt through the the two middle
holes of the extension plate instead (Figure 4B).
Mount the Shock to the
Frame Bracket
6. Position a washer (#5) over a bolt (#6) and bolt
through the center hole of the frame bracket (#10),
spacer (#9) and the top of the shock (Figure 5).
7. Finish with a washer (#5) and nut (#7). Fin-
ger-tighten for now.
Determine the Shock Angle
8. At this point, the restraining band on the shock
should still be in place, retaining its fixed length of
14½” from eye-to-eye. Its length dictates where the
frame bracket is to be positioned on the trailer’s
frame.
The shocks must be restrained at a 14½” length,
as described above, in order to position the frame
brackets correctly. Otherwise the shocks will
break. Other consequential, non-warranty dam-
age may also occur.
If the restraining bands on the shock absorbers
have been damaged or cut, restrain the shock ab-
sorbers at a 14½” length.
Figure 5
continued on next page
Make sure the extension plate doesn’t extend
below the level of the wheel rim. If it does, the
plate or the shock could be damaged in the event
of a flat tire. Other consequential, non-warranty
damage may also occur.
Mount the Shock to the
Extension Plate
5. Place a washer (#5) over the bolt (#6) and then
bolt through the extension plate (#8), spacer (#9),
and the smaller end of the shock (#1). Finish with a
washer (#5) and nut (#7). Finger-tighten for now.
#8
MOUNTING
FLANGE
#1
#11
#10

9. Swing the shock and frame bracket up to the bot-
tom of the frame and measure the angle at which the
shock is now sitting.
Optimum trailer handling is achieved when the shock
is at approximately a 30-degree angle. On some trail-
ers, due to design characteristics, you may not be able
to achieve this exact angle. Any angle between 20-40
degrees from vertical is acceptable (Figure 6).
If the angle is approximately 30 degrees, and the
travel path of the shock is completely unobstruct-
ed: Proceed to step 10.
If not, use the following adjustments to ensure that
the shock angle is within 20-40 degrees.
Figure 7
c. Drill a new hole in the extension plate to accom-
modate the bottom of the shock. Choose a location for
this hole that will achieve the desired angle.
Mount the Frame Bracket
10. Temporarily position the frame bracket on the
bottom of the frame and mark the four frame holes.
Lower the shock and frame bracket, and then use a
punch to mark the center of each hole.
Before drilling, ensure that critical components
on the top side of the frame are not in the drilling
path. You must also ensure that no components
underneath the trailer (such as piping, under-
belly material or wiring) will prevent bolting the
frame bracket flush to the frame.
30°
20° 40°
Figure 6
Options to Attain Desired Shock Angle
a. Bolt the shock to the frame bracket using the
hole that best achieves the desired angle.
b. Remove the extension plate and attach the bot-
tom of the shock directly to the mounting flange on the
tie plate. Use whichever hole on the tie plate will result
in the desired angle.
11. Use a 5/16” drill bit that is 12” long to drill through
the punched holes and the frame (Figure 7).
NOTE
If it is necessary to trim underbelly material, use
a utility knife and apply repair tape or other sealing
product approved by the trailer manufacturer to
seal the cut.
12. Use Blue threadlocker on the four supplied
self-tapping screws (#2) to secure the frame bracket to
the frame. Torque the screws to 40 lb-ft.
Do not over torque the screws or they may fail,
causing the frame bracket to separate from the
frame. This may cause severe non-warranty dam-
age if the trailer is being towed; other consequen-
tial, non-warranty damage may also occur.
The remaining bolts will be torqued in a later step.
Remove Shock Restraint
13. Cut the shock restraining strap to allow for full
range of motion.
Remove the Wheels and Tires
14. At this point, removing the wheels and tires
will simplify the rest of the installation.
Don’t lift the trailer by the axles. Doing so could
adversely affect the alignment of the axles or re-
sult in a bent or otherwise damaged axle.
continued on next page

Mount the Remaining
Frame Brackets
15. The positioning of the frame bracket on the
first corner of the vehicle informs us as to the loca-
tion for the three remaining corners.
16. Measure the distance from the installed frame
bracket to the equalizer hanger (Figure 8). Now,
replicate those measurements on the other three
corners. Install the remaining three frame brackets
on the bottom of the frame by repeating steps 10
and 11 on each corner.
Figure 8
Mount the Remaining Shocks
18. With the trailer suspended, the distance be-
tween the frame bracket and the tie plate will be sig-
nificantly different. As such, it is necessary to cut the
bands on the three remaining shocks now in order
to adequately span the distance between the frame
brackets and the extension plates.
19. Secure the bottom of each shock to its respec-
tive extension plates by repeating step 5.
20. Repeat steps 6 and 7 to secure the shock to
the frame bracket on each corner.
Torque the Bolts
Fastener Size Torque Value
3/8” screws (#2) 40 lb-ft
1½” bolts (#3) 57 lb-ft
100mm bolts (#6) 55 lb-ft
18. Now, make certain that all of the fasteners
have been torqued. Refer to the torque chart below
for each set of fasteners used in this installation.
Note: For U-bolt specifications, see the last
page of these instructions.
measure this
distance
equalizer
hanger
frame
bracket
Mount the Remaining Tie Plates
and Extension Plates
17. Repeat steps 1 through 4 to install the three
remaining tie plates and extension plates on each
corner.
Reinstall the Wheels and Tires
21. Now, replace the wheels and tires and test
drive the vehicle.
22. Recheck the fasteners after the test drive.

Torque Values for U-Bolts
These torque charts are furnished by the manufac-
turers of the most common axles in production. While
these charts were correct at the time of publication,
specifications may change without notice.
Dexter Axles
Item Torque Range (ft-lb)
3/8" U-bolt .........................................................30-50
7/16" U-bolt ............................... .........................45-70
½" U-bolt with hex nut .......................................45-70
½" U-bolt with flange nut ...................................70-80
9/16" U-bolt .......................................................65-95
Lippert Axles
2,000- to 8,000-pound capacity axles
Bolt Type
Torque Specification (ft-lb)
U-bolts (2,000 lb axle) .........................................35
U-bolts (3,500 lb axle with ½" U-bolts) ................50
U-bolts (5,000 lb axle) .........................................65
U-bolts (6,000-8,000 lb axles) .............................90
Rockwell American Axles
Bolt Type Torque (ft-lb)
3/8” U-bolt .......................30-50
7/16” U-bolt ......................45-70
½” U-bolt ..........................45-70
9/16” U-bolt......................60-85
/