BETCO Stealth ASD26BT Operating instructions
- Category
- Floor Machine
- Type
- Operating instructions

1
E87026-00
E88064-00
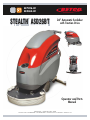
STEALTH
™
ASD26BT
26” Automatic Scrubber
with Traction Drive
Operator and Parts
Manual
400 Van Camp • Bowling Green, Ohio 43402
Customer Service: 888-GO-BETCO • Fax: 800-445-5056 • Technical Service: 877-856-5954 • www.betco.com

2
TABLE OF CONTENTS
RECEIVING THE MACHINE........................................3 - 4
GENERAL SAFETY REGULATIONS ................................. 5
MACHINE PREPARATION ........................................6 - 12
OPERATION ..........................................................13 - 14
TURNING OFF THE MACHINE ...................................... 15
DAILY MAINTENANCE ............................................16 -17
WEEKLY MAINTENANCE .............................................. 18
TROUBLESHOOTING ................................................... 19
BRUSH AND SELECTION USE...................................... 19
PARTS DIAGRAMS AND LISTINGS .......................20 - 41
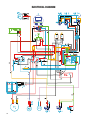
ELECTRICAL SYSTEM...........................................42 - 44
BATTERY CHECK CARD – HOUR METER ..................... 45
WATER PLANT INSPECTIONS ..................................... 45
BRAKE ADJUSTMENT .................................................. 46
VACUUM SYSTEM INSPECTION .................................. 46
BRUSH ADJUSTMENT ................................................. 47
SQUEEGEE ADJUSTMENT ........................................... 48
CHECK LIST ................................................................. 49
MAINTENANCE SCHEDULE.......................................... 50
WEAR ITEMS ............................................................... 51
WARRANTY ................................................................. 52

3
Immediately check, when receiving the machine, that all the materials indicated on delivery documents have been received and
also that the machine has not been damaged in transit. If it has been damaged, this damage must be immediately reported to
the shipper and also to our customer’s service department. Only acting promptly in this manner will make it possible to receive
missing material and to be compensated for damage.
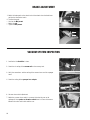
INTRODUCTION
This is an automatic scrubber which, via the mechanical action of
the rotating brush and the chemical action of a water/detergent so-
lution, can clean many types of hard flooring. As it advances, it also
collects the dirt removed and the detergent solution not absorbed
by the floor.
The machine must be used only for this purpose. Even the best
machines will only work well if used correctly and kept in good
working order. We therefore suggest you read this instruction book-
let carefully and re-read it whenever difficulties arise while using the
machine. Please contact our technical service department or your
dealers if you have any questions about the machine.
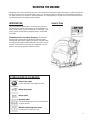
RECEIVING THE MACHINE
Serial # Plate
SYMBOLS USED ON THE MACHINE
Solution valve symbol
Used to indicate the water regulation switch
Battery charge gauge
Battery symbol
Open book symbol
Used to tell the operator to read the manual before
using the machine
Maximum solution temperature gauge
Located near the solution tank inlet

4
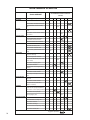
Rated power HP (W) 1.7 (1260)
Working width In (mm) 26 (660)
Rear squeegee width In (mm) 37.3 (948)
Work capacity ft2/h (m2/h) 31,970 (2970)
Brush & Pad (diameter) in (mm) 13 (330)
Brush RPM RPM 225
Brush pressure lb. (Kg) 99.2 (45)
Brush motor V / HP (V / W) 24 / 0.75 (24 / 560)
Drive Type Automatic
Traction motor V / HP (V / W) 24 / 0.20 (24 / 150)
Forward movement speed mph (km/h) 0 - 1.9 (0 - 3)
Maximum grade 10%
Vacuum motor V / HP (V / W) 36 / 0.74 (36 / 550)
Vacuum motor suction inches of water (mbar) 75.6 (192)
Solution tank capacity Gal (l) 16 (60)
Recovery tank capacity Gal (l) 19 (72)
Weight of machine (excluding batteries) lb. (Kg) 253.5 (115)
Batteries V / Ah 12 / 155 (2)
Charger V / A 24 / 12
Battery compartment dimensions (Length / Height / Width) in x in x in 13.8 x 12.0 x 14.2
(mm/mm/mm) (350 /305 /360)
Machine dimensions (Length / Height / Width) in x in x in 54.3 x 41.5 x 26.8
(mm/mm/mm) (1380 / 1053 / 680)
Noise level dBA 58
TECHNICAL DESCRIPTION Measurement Unit Stealth
™
ASD26BT

5
The regulations below must be carefully followed in order to avoid harm to the operator and damage to the machine.
• Read all labels on the machine carefully. Do not cover them for any reason and replace them immediately if they become
damaged.
• The machine must be used exclusively by authorized and trained personnel.
• When operating the machine be careful of other people.
• The machine is not designed for cleaning carpets.
• The power cable outlet must be provided with a proper ground.
• Avoid damaging the power cable of the battery charger by crushing, bending, cutting or stressing it.
• Whenever the power cable of the battery charger is damaged, immediately contact a BETCO service center.
• Do not mix different types of detergent as this may produce harmful gases.
• Do not set containers on the machine.
• Machine storage temperature is between -10°F and 130°F, never store outside under humid conditions.
• Operating conditions: room temperature between 33°F and 100°F with relative humidity between 30% to 95%.
• Only use the machine in closed areas and do not expose it directly to rain.
• Never use the machine in an explosive environment.
• Do not use the machine as a means of transport.
• Never use acidic chemicals which could damage the machine.
• Avoid running the brushes with the machine stopped; this could damage the floor.
• Never vacuum up flammable liquids.
• Never use the machine to gather dangerous powders.
• Use a powder fire extinguisher in case of fire. Do not use water.
• Do not hit against shelving or scaffolding. The operator must always be equipped with the appropriate safety device
(gloves, shoes, helmet, glasses, etc.)
• Do not use the machine on surfaces with an inclination greater than the one shown on the serial plate.
• The machine is designed to wash and dry floors simultaneously. Signal the presence of wet floors with suitable signs.
• If the machine does not work properly, perform routine maintenance. Otherwise, request the assistance of the BETCO tech-
nical service.
• When replacing parts ask for ORIGINAL spare parts from your Authorized BETCO Dealer and/or Retailer.
• Always turn off the machine and disconnect the battery connector whenever maintenance is performed.
• Never remove guards that require tools for removal.
• Never wash the machine with direct or pressurized jets of water or with corrosive substances.
• Have your BETCO service center check the machine once a year.
• To prevent the formation of scale in the solution tank filter, do not store the machine with detergent solution in the tanks.
• Before using the machine make sure that all doors and covers are positioned as shown in this operating and maintenance
manual.
• When your BETCO machine is ready to be retired, the machine must be disposed of properly. It contain oils and electronic
components. The machine was built using totally recyclable materials.
• Use only brushes furnished with the machine or those specified in the user's manual. Use of other brushes can compro-
mise safety.
• When removing the battery, unplug the battery connection, unplug the charger and disconnect the battery terminals.
• Before recycling the machine, remove the battery.
GENERAL SAFETY REGULATIONS

6
1. HANDLING THE PACKED MACHINE
The machine is contained in specific packaging.
It is not possible to place more than two packages on top of each other.
The total weight is 253.5 lbs. (115 kg).
The overall dimensions of the package are:
A : 49.6 in (1260 mm)
B : 28.4 in (720 mm)
C : 65.4 in (1660 mm)
2. HOW TO UNPACK THE MACHINE
A. Remove the outer packaging.
B. The machine is attached to the pallet with wedges which block the wheels.
C. Remove these wedges.
D. Use a ramp to get the machine down from the pallet, pulling it backwards.
E. Keep the pallet for any future transport needs.
MACHINE PREPARATION

7
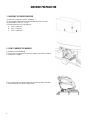
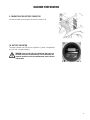
3. BATTERY INSTALLATION
The machine will be supplied with a battery charger and either two 12 V Wet or
AGM batteries. The batteries must be housed in the battery tray in the battery
compartment beneath the recovery tank.
To insert the batteries you must:
A. Lower the squeegee and base.
B. Open the rear latch that secures the tank (2).
C. Rotate the recovery tank as far as it will go, using the side handle (3).
WARNING: To avoid acid spillage you can use sealed batteries.
WARNING: Perform one battery charging cycle before using the
machine.
4. TYPE OF BATTERY
To power the machine you can use:
• Wet batteries
• AGM batteries
• Gel batteries
OTHER TYPES MUST NOT BE USED.
The maximum dimensions and weight are:
Width 6.8 in. (172 mm)
Length 14.2 in. (360 mm)
Height 11.2 in. (285 mm)
Weight 97 lb. (44 kg)
WARNING: Your charger must be set according to the type of bat-
tery you install. Call BETCO customer service to ensure correct
charger setting after replacement batteries are installed.
• The batteries must be handled using lifting and transportation means suitable
for the weight and dimensions.
• They must be lifted by the handles on the upper part.
• They must be connected together in series, to obtain an overall voltage of 24
V on the lugs.
• The electrical connection operations must be carried out by certified trained
personnel.
MACHINE PREPARATION

8
5. BATTERY MAINTENANCE
For maintenance and recharging, follow the instructions provided by the battery
manufacturer.
6. BATTERY DISPOSAL
When the battery reaches the end of its life, it must be disconnected by certi-
fied professional, then lifted (using the handles and suitable lifting device) to
remove it from the battery compartment.
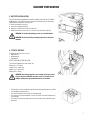
7. CONNECTING THE BATTERY CHARGER
Beneath the recovery tank there is the battery connector (7), the battery charger
connector must be plugged into. Disconnect the battery plug and plug the
charger into the machine plug.
WARNING: This process must be carried out by qualified person-
nel. The incorrect or imperfect connection of the cables to the
connector can seriously harm people and damage objects.
8. RECHARGING THE BATTERIES
Perform one complete battery charge cycle before using the machine.
Avoid totally discharging the batteries! This can cause permanent damage.
Recharge as soon as the battery discharged signal light starts to flash.
WARNING: Never leave the batteries completely discharged, not
even if the machine is not being used. This can cause perma-
nent damage to them. While recharging, keep the recovery tank
raised.
Danger of inhalation of gas and leakage of corrosive liquids.
Danger of fire.
MACHINE PREPARATION

9
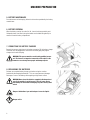
9. CONNECTING THE BATTERY CONNECTOR
Connect the battery connector (2) to the machine connector (1)
10. BATTERY INDICATOR
The battery indicator uses LEDs and has 8 positions (7 yellow - charged batter-
ies, and 1 red - run down batteries).
WARNING: A few seconds after the red indicator light comes on,
the brush motor turns off automatically. The vacuum motor will
remain in operation so that the remaining water can be removed
from the floor.
MACHINE PREPARATION

10
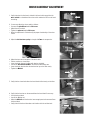
11. INSTRUMENT PANEL COMPONENTS
The instrument panel components are identified as follows:
A. Paddles to activate brushes / traction (located beneath the grip)
B. ON/OFF key switch
C. Battery level / hour meter
12. REAR COMPONENTS
The rear components are identified as follows:
A. Pedal to raise the brushes
B. Water level tube
C. Solution tank water inlet cap
D. Drain hose of recovery tank
E. Latch to lock down the recovery tank
F. Storage compartment
H. Lever to raise the squeegee
I. Brake lever
J. Solution filter
13. SIDE COMPONENTS
The side components are identified as follows:
A. Solution flow control valve
B. Handle to raise the recovery tank
C. Handle to raise the vacuum unit
D. Upper storage compartment
14. ASSEMBLING THE SQUEEGEE
For packaging reasons, the squeegee is supplied disassembled from the ma-
chine, and must be assembled as shown in the figure, inserting the small pin of
the squeegee into the coupling mechanism until it locks into place.
Install the squeegee vacuum hose over the squeegee shoe adapter and be cer-
tain that the vacuum hose in to the right of the squeegee lift cable.
MACHINE PREPARATION

11
MACHINE PREPARATION
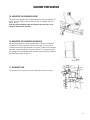
15. ADJUSTING THE SQUEEGEE HEIGHT
The height of the squeegee must be adjusted based on wear of the squeegee. To
do this, turn the knob (2) counter clockwise to raise the squeegee, and clock-
wise to lower it.
Note: the right and left wheels must be adjusted to the same level, so the
squeegee works parallel to the floor.
16. ADJUSTING THE SQUEEGEE INCLINATION
During working operation, the rear squeegee blade is slightly bent backwards
(by about 0.2 in (5 mm)) uniformly over its entire length. If it’s necessary to
increase the bend of the squeegee blade in the center, you must tilt the squeegee
backwards, rotating the adjuster (1) counter clockwise. To increase the bend of
the squeegee at the outside edges of the squeegee, rotate the adjuster clockwise.
After adjustment, tighten the jam nut.
17. RECOVERY TANK
Check the drain hose cap (on the rear of the machine) to ensure it’s closed.

12
18. SOLUTION TANK
Remove the front inlet cap and check the solution filter is correctly installed.
Check the solution filter cover (beneath the tank) is correctly closed.
19. SOLUTION TANK
• Fill the tank with clean water in the front fill location (1) or at the rear fill
location (2) at a temperature not exceeding 120°F (50°C).
• You can check the level of solution in the tank by means of the rear sight
gauge (3).
• Add the liquid detergent into the tank, in the concentration and manner
specified by the manufacturer. The formation of excess foam could damage
the vacuum motor, so be sure to use only the correct amount of detergent.
WARNING: Always use low-foam detergent. Introduce a small
amount of defoaming liquid in the recovery tank before starting
to work to prevent foam from being generated.
WARNING: Never use pure acids.
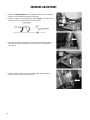
20. ATTACHING THE BRUSHES
A. With the brush deck up, insert the brushes in the brush housing beneath the
deck base, turning them until the three pins enter the notches in the clutch
plate; turn the brush until the pin is pushed towards the coupling spring and
is locked into place. The figure shows the brush rotation direction for the
right-hand brush; the left-hand brush rotates in the opposite direction.
WARNING: Make sure there are no objects or people in the vicin-
ity of the brush when doing this operation.
B. Swap the right and left-hand brushes every day. If the brushes are used and
have deformed bristles, it is better to reassemble them in the same position
(the right-hand one on the right, and the left-hand one on the left), to pre-
vent the deformed bristles overloading the brush motor as well as excessive
vibration.
21. REGULATING THE SOLUTION
Regulate the quantity of water with the solution control valve (1).
MACHINE PREPARATION

13
1. PREPARING TO WORK
A. Connect the battery plug (1) to the machine plug
B. Turn the key (1) of the main switch to the "ON" position (clockwise). The bat-
tery charge level indicator lights will immediately come on.
C. Turn on the solution control valve (2) (solution dispenses automatically while
the brushes are turning).
D. Release the foot lever (3) and lower the brush deck. If the floor is particularly
dirty, you can apply additional pressure to the brush deck by raising the foot
lever (3) until the lock down is engaged.
E. Lower the squeegee, turning the lever (4) counter clockwise. The vacuum
motor will switch on.
F. Check that the brake (5) is released.
G. Pulling the switch levers (1), activates the brushes and the machine begins to
move forward. During the first few feet, check that the amount of solution is
correct, and that the squeegee dries the floor.
H. The machine will now start to scrub and dry until the solution tank is empty
or recovery tank is full.
OPERATION

14
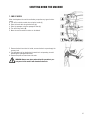
2. REVERSE MOVEMENTS
To move in the reverse direction, push the switch levers (1) forward.
WARNING: When making reverse movements, raise the squeegee.
3. OVERFLOW DEVICE
The machine has a float in the filter basket that activates when the recovery tank
is full and stops airflow into the vacuum.
You must empty the recovery tank by removing the cap of the rear drain hose.
WARNING: Always wear gloves when doing this
operation to protect yourself from contact with hazardous
chemicals.
OPERATION

15
1. END OF WORK
When shutting down the machine and before you perform any type of mainte-
nance:
A. Turn off the solution control valve using the handle (1)
B. Raise the brush deck using the foot lever (2)
C. Raise the squeegee using the squeegee lift lever (3)
D. Turn off the key switch (4)
E. Move the machine where the tanks can be drained.
F. Remove the drain hose from its holder, unscrew the drain cap and empty the
recovery tank.
G. The squeegee must be raised when the machine is not operating, to avoid
deforming the squeegee blade blades.
H. Remove the pads and clean them with water.
WARNING: Always wear gloves when doing this operation to pro-
tect yourself from contact with hazardous chemicals.
SHUTTING DOWN THE MACHINE

16
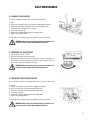
1. CLEANING THE RECOVERY TANK
A. Raise the vacuum unit (1).
B. Remove the drain hose (2) and empty the tank.
C. Rinse the inside of the tank with water.
D. Close the vacuum unit on the machine and replace the drain hose cap and
drain hose.
WARNING: Always wear gloves when doing this operation to pro-
tect yourself from contact with hazardous chemicals.
2. CLEANING THE VACUUM FILTER
A. Raise the vacuum unit.
B. Remove the vacuum filter cover by rotating it clockwise.
C. Pull the filter straight down from the lid to remove it.
D. Use water to clean the walls and base of the filter.
E. Reassemble all the components.
WARNING: Always wear gloves when doing this operation to pro-
tect yourself from contact with hazardous chemicals.
3. CLEANING THE VACUUM HOSE FILTER
A. Raise the vacuum unit.
B. Rotate the inner filter (1) and remove it.
C. Use water to clean the walls and base of the filter.
D. Reassemble all the components.
WARNING: Always wear gloves when doing this operation to pro-
tect yourself from contact with hazardous chemicals.
DAILY MAINTENANCE

17
4. CLEANING THE SQUEEGEE
Ensure the squeegee is always clean, to improve drying results.
To clean:
A. Remove the squeegee vacuum hose from the squeegee shoe adapter.
B. Remove the cotter pins that attach the pins of the squeegee shoe.
C. Disassemble the squeegee from its support.
D. Loosen the wing nuts (1).
E. Remove the squeegee band clamp and squeegee blade.
F. Replace the squeegee blades.
To reassemble the squeegee, repeat the operations in the reverse order.
WARNING: Always wear gloves when doing this operation to pro-
tect yourself from contact with hazardous chemicals.
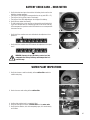
5. REMOVING THE PAD DRIVERS
A. Turn the key to the “off” position.
B. Raise the brush deck using the foot lever.
C. Rotate the brush until it comes out of the clutch as shown in the figure. The
figure shows the rotation direction to release the right-hand brush; for the
left-hand one, rotate in the opposite direction.
WARNING: Always wear gloves when doing this operation to pro-
tect yourself from contact with hazardous chemicals.
6. REPLACING THE SQUEEGEE BLADES
Check the state of wear of the squeegee blades and, if necessary, replace them.
To replace:
A. Remove the squeegee hose from the squeegee shoe adapter.
B. Push the release lever and release the right hand stud.
C. Remove the squeegee vacuum from the squeegee yoke.
D. Loosen the wing nuts.
E. Remove the squeegee band clamp and squeegee blade.
F. Replace the squeegee blades.
To reassemble the squeegee, repeat the operations in the reverse order.
WARNING: Always wear gloves when doing this operation to pro-
tect yourself from contact with hazardous chemicals.
DAILY MAINTENANCE

18
1. CLEANING THE SQUEEGEE HOSE
Every week, or whenever vacuum seems to be unsatisfactory, check the squee-
gee hose for obstructions. To clean:
A. Remove the hose from the squeegee shoe adapter on the squeegee shoe.
B. Remove the other end from the recovery tank.
C. Wash the inside of the hose with water from the end of the hose which is
connected to the recovery tank.
D. Reassemble the hose.
WARNING: Always wear gloves when doing this operation to pro-
tect yourself from contact with hazardous chemicals.
2. CHECKING THE BRAKE
Every week, check the distance between the brake pads and the wheels. If neces-
sary, adjust them, so the pads are 0.12 inches away from the transport wheels at
a distance of 0.12 in (3 mm) when released.
3. CLEANING THE SOLUTION TANK
A. Loosen the solution tank cap.
B. Rinse with water.
C. Loosen the drain cap (1) located on the filter, and empty the tank.
WARNING: Always wear gloves when doing this operation to pro-
tect yourself from contact with hazardous chemicals.
WEEKLY MAINTENANCE

19
INSUFFICIENT WATER ON THE PAD
1. Verify that the solution control valve – located beneath the symbol – (1) is
turned on.
2. Verify that there is water in the solution tank.
THE MACHINE DOES NOT CLEAN WELL
1. Check the state of wear of the scrubbing pad and, if necessary, replace it.
2. Use a different kind of scrubbing pad.
THE SQUEEGEE DOES NOT DRY THE FLOOR
1. Ensure that the squeegee blades are clean.
2. Adjust the inclination of the squeegee.
3. Ensure the vacuum hose is correctly installed.
4. Check the inner filter of the recovery tank to ensure it is not dirty and, if neces-
sary, clean it thoroughly.
5. Disassemble the entire vacuum unit and clean it.
6. Replace the squeegee blades, if worn.
7. Ensure the vacuum motor is turned on.
8. Check squeegee wheel adjustment.
TOO MUCH FOAM IS GENERATED
Check that low-foam detergent is being used. If necessary add a small amount of defoamer liquid to the recovery tank.
Remember that more foam is generated when the floors are not very dirty. Dilute the detergent more when cleaning floors that
are not very dirty.
TROUBLESHOOTING GUIDE
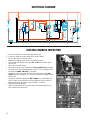
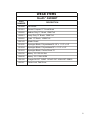
POLYPROPYLENE BRUSH (PPL)
Used on all types of floors. Good resistance to wear and tear, and hot water (no greater than 140°F (60°C)).
NYLON BRUSH
Used on all types of floors. Excellent resistance to wear and tear and hot water (even over 140°F (60°C)).
ABRASIVE BRUSH
The bristles of this type of brush are coated with highly aggressive abrasives. It is used to clean very dirty floors. To avoid floor
damage work only with the brush pressure necessary.
THICKNESS OF THE BRISTLES
Thicker bristles are more rigid and are therefore used on smooth floors or floors with small joints. On uneven floors or those with
deep joints, it is advisable to use softer bristles which can enter the gaps easier. When the bristles are worn and too short, they
will become rigid and are no longer able to penetrate and clean deep down and the brushes tends to jump.
PAD DRIVER
Pad Holders and scrub pads are recommended for cleaning smooth surfaces. There are two types of pad holder:
1. The traditional pad holder has a series of anchor points that allow the abrasive floor pad to be held and dragged while work-
ing.
2. The CENTER LOCK type pad holder not only has anchor points, but also a snap-type central locking system made of plastic
that allows the abrasive floor pad to be centered and held without any risk of it becoming detached. This type of pad driver is
recommended above all for machines with more than one brush.
CHOOSING AND USING THE BRUSHES

20
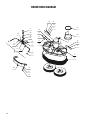
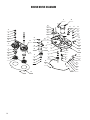
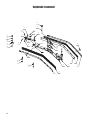
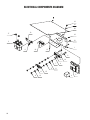
BRUSH DECK DIAGRAM
22
20
5
3
8
15
26
13
21
10
14
9
12
11
15
8
15
16
11
8
A
18
19
7
25
6
17
1
2
27
24
23
4
19
A
Page is loading ...
Page is loading ...
Page is loading ...
Page is loading ...
Page is loading ...
Page is loading ...
Page is loading ...
Page is loading ...
Page is loading ...
Page is loading ...
Page is loading ...
Page is loading ...
Page is loading ...
Page is loading ...
Page is loading ...
Page is loading ...
Page is loading ...
Page is loading ...
Page is loading ...
Page is loading ...
Page is loading ...
Page is loading ...
Page is loading ...
Page is loading ...
Page is loading ...
Page is loading ...
Page is loading ...
Page is loading ...
Page is loading ...
Page is loading ...
Page is loading ...
Page is loading ...
-
 1
1
-
 2
2
-
 3
3
-
 4
4
-
 5
5
-
 6
6
-
 7
7
-
 8
8
-
 9
9
-
 10
10
-
 11
11
-
 12
12
-
 13
13
-
 14
14
-
 15
15
-
 16
16
-
 17
17
-
 18
18
-
 19
19
-
 20
20
-
 21
21
-
 22
22
-
 23
23
-
 24
24
-
 25
25
-
 26
26
-
 27
27
-
 28
28
-
 29
29
-
 30
30
-
 31
31
-
 32
32
-
 33
33
-
 34
34
-
 35
35
-
 36
36
-
 37
37
-
 38
38
-
 39
39
-
 40
40
-
 41
41
-
 42
42
-
 43
43
-
 44
44
-
 45
45
-
 46
46
-
 47
47
-
 48
48
-
 49
49
-
 50
50
-
 51
51
-
 52
52


BETCO Stealth ASD26BT Operating instructions
- Category
- Floor Machine
- Type
- Operating instructions
Ask a question and I''ll find the answer in the document
Finding information in a document is now easier with AI
Related papers
-
BETCO Stealth ASC20BT Owner's manual
-
-
-
-
-
-
-
-
-
Other documents
-
ANZZI L-AZ189ORB Installation guide
-
-
-
Viper 50000398 Quick start guide
-
 Triple S Ace 20T User manual
-
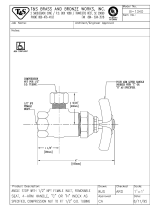 T & S Brass & Bronze Works B-1340 Datasheet
-
Viper AS4335C Use And Maintenance
-
Powr-Flite PAS26R Owner's manual
-
PACIFIC ScrubMaster 210 Owner's manual
-
 T & S Brass & Bronze Works BL-4750-08 Datasheet


