Page is loading ...


ii
www.dell.com/supplies | support.dell.com
Order ink cartridges
Dell™ ink cartridges are available only through Dell. You can order ink
cartridges online at www.dell.com/supplies or by phone.
USA 877-465-2968
(877-Ink2You)
Canada 877-501-4803
Mexico 001-800-210-7607
Puerto Rico 800-805-7545
UK 0870 907 4574
Ireland 1850 707 407
France 0825387247
Italy 800602705
Spain 902120385
Germany 0800 2873355
Austria 08 20 - 24 05 30 35
Netherlands 020 - 674 4881
Belgium 02.713 1590
Sweden 08 587 705 81
Norway 231622 64
Denmark 3287 5215
Finland 09 2533 1411
Switzerland 0848 801 888


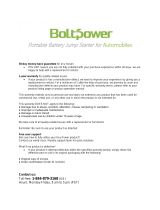
iv Understanding your printer
Accessing your User’s Guide
To access your User’s Guide:
Click Start →Programs →Dell Printers → Dell Inkjet Printer J740 →View User’s Guide.
Use the: To:
Paper guide Make sure paper feeds correctly into the printer.
Paper support Load paper in the printer.
Power button Turn the printer on or off, or cancel a print job.
Front cover Open to change cartridges.
Paper exit tray Stack paper as it exits the printer.
Paper feed button Feed paper into the printer.
Power supply Supply power to the printer.
USB cable Connect your printer to a computer.

Notes, Notices, and Cautions v
Notes, Notices, and Cautions
NOTE: A NOTE indicates important information that helps you make better use of your printer.
NOTICE: A NOTICE indicates either potential damage to hardware or loss of data and tells you how to avoid the
problem.
CAUTION: A CAUTION indicates a potential for property damage, personal injury, or death.
____________________
Information in this document is subject to change without notice.
© 2003 Dell Computer Corporation. All rights reserved.
Reproduction in any manner whatsoever without the written permission of Dell Computer Corporation is
strictly forbidden.
Trademarks used in this text: Dell and DELL logo are trademarks of Dell Computer Corporation; Microsoft
and Windows are registered trademarks of Microsoft Corporation.
Other trademarks and trade names may be used in this document to refer to either the entities claiming the
marks and names of their products. Dell Computer Corporation disclaims any proprietary interest in
trademarks and trade names other than its own.
____________________
UNITED STATES GOVERNMENT RESTRICTED RIGHTS
This software and documentation are provided with RESTRICTED RIGHTS. Use, duplication or disclosure
by the Government is subject to restrictions as set forth in subparagraph (c)(1)(ii) of the Rights in Technical
Data and Computer Software clause at DFARS 252.227-7013 and in applicable FAR provisions: Dell
Computer Corporation, One Dell Way, Round Rock, Texas, 78682, USA.

vi Caution: SAFETY INFORMATION
www.dell.com/supplies | support.dell.com
Caution: SAFETY INFORMATION
Use the following safety guidelines to help ensure your own personal safety and to help protect your
computer and working environment from potential damage.
• Use only the power supply provided with this product or the manufacturer’s authorized
replacement power supply.
• Connect the power cord to an electrical outlet that is near the product and easily accessible.
• Refer service or repairs, other than those described in the user documentation, to a professional
service person.
CAUTION: Do not set up this product or make any electrical or cabling connections, such as the
power supply cord, during a lightning storm.

Contents vii
Contents
Understanding your printer . . . . . . . . . . . . . . . . . . . . iii
Notes, Notices, and Cautions
. . . . . . . . . . . . . . . . . . . . v
Caution: SAFETY INFORMATION
. . . . . . . . . . . . . . . . . vi
1 Learning about your printer
Setting up the printer . . . . . . . . . . . . . . . . . . . . . . . 2
Understanding the printer software
. . . . . . . . . . . . . . . . 2
Print Properties
. . . . . . . . . . . . . . . . . . . . . . . . . 2
Dell Printer Solution Center
. . . . . . . . . . . . . . . . . . . 3
Understanding the paper type sensor
. . . . . . . . . . . . . . . 5
2 Using the printer
Loading paper . . . . . . . . . . . . . . . . . . . . . . . . . . . . 7
Printing
. . . . . . . . . . . . . . . . . . . . . . . . . . . . . . . 9
Basic printing
. . . . . . . . . . . . . . . . . . . . . . . . . . 9
Printing photos
. . . . . . . . . . . . . . . . . . . . . . . . . 9
Printing envelopes
. . . . . . . . . . . . . . . . . . . . . . . . 10
Printing cards
. . . . . . . . . . . . . . . . . . . . . . . . . . 10
Printing banners
. . . . . . . . . . . . . . . . . . . . . . . . 10
Printing mirror images and iron-on transfers
. . . . . . . . . . 10
Print transparencies
. . . . . . . . . . . . . . . . . . . . . . . 11
Printing posters
. . . . . . . . . . . . . . . . . . . . . . . . . 11
Printing on both sides of the paper
. . . . . . . . . . . . . . . 11
See more printing projects
. . . . . . . . . . . . . . . . . . . 12

viii Contents
Sharing printers . . . . . . . . . . . . . . . . . . . . . . . . 12
3 Maintenance
Ordering supplies . . . . . . . . . . . . . . . . . . . . . . . . . 16
Replacing an ink cartridge
. . . . . . . . . . . . . . . . . . . . 16
Aligning the ink cartridges
. . . . . . . . . . . . . . . . . . . . 17
Cleaning the ink cartridge nozzles
. . . . . . . . . . . . . . . . 18
4 Troubleshooting
Setup troubleshooting . . . . . . . . . . . . . . . . . . . . . . . 20
General troubleshooting
. . . . . . . . . . . . . . . . . . . . . . 20
Paper misfeeds or multiple sheets feed
. . . . . . . . . . . . . 20
Envelopes do not feed properly
. . . . . . . . . . . . . . . . . 21
Document does not print
. . . . . . . . . . . . . . . . . . . . 21
Printer is not communicating with computer
. . . . . . . . . . 21
More troubleshooting
. . . . . . . . . . . . . . . . . . . . . . . 22
Error messages
. . . . . . . . . . . . . . . . . . . . . . . . 22
Removing and reinstalling the printer software
. . . . . . . . . 25
Other help sources
. . . . . . . . . . . . . . . . . . . . . . . . . 26
5 Regulatory notices
6 Appendix
Contacting Dell . . . . . . . . . . . . . . . . . . . . . . . . . . 32
Limited Warranties and Return Policy
. . . . . . . . . . . . . . 42
Limited Warranty for the U.S.
. . . . . . . . . . . . . . . . . 42
"Total Satisfaction" Return Policy (U.S. Only)
. . . . . . . . . . 45

Contents ix
Limited Warranty Terms for Canada . . . . . . . . . . . . . . 45
"Total Satisfaction" Return Policy (Canada Only)
. . . . . . . . . 48
One-Year End-User Manufacturer Guarantee (Latin America and the
Caribbean Only)
. . . . . . . . . . . . . . . . . . . . . . . . . 50
Dell Computer Corporation Ink and Toner Cartridges Limited
Warranty (U.S. and Canada Only)
. . . . . . . . . . . . . . . . 51
Dell Software License Agreement
. . . . . . . . . . . . . . . . . 52
Index . . . . . . . . . . . . . . . . . . . . . . . . . . . . . . . . . . . 55

x Contents


2 Learning about your printer
www.dell.com/supplies | support.dell.com
Setting up the printer
If you have not already done so, follow the instructions on your setup diagram to install
the hardware and software. For setup troubleshooting, see page 20.
Understanding the printer software
The printer software includes the:
• Print Properties—helps you adjust print settings.
NOTE: Print Properties is available from almost every application that prints.
• Dell Printer Solution Center—provides maintenance and troubleshooting help.
Print Properties
You can change your printer settings in Print Properties. To open Print Properties:
1 With your document open, click File →Print.
2 In the Print dialog box, click Properties, Preferences, Options, or Setup (depending
on your program or operating system).
The Print Properties screen appears.

Learning about your printer 3
Dell Printer Solution Center
The Dell Printer Solution Center is a guide you can refer to for printer help and to check
the current printer status.
To open the Dell Printer Solution Center, click Start →Programs →
Dell Printers →Dell Inkjet Printer J740 →Dell Printer Solution Center.
The Dell Printer Solution Center appears.

4 Learning about your printer
www.dell.com/supplies | support.dell.com
The following table describes the Dell Printer Solution Center tabs.
From this tab: You can:
Printer Status (the tab
that appears when you
open the Dell Printer
Solution Center)
• Check the current printer status.
• See what type of paper is in the printer.
• View ink levels.
How To • Receive information about basic features.
• Receive printing instructions.
• Receive project information.
• Search the electronic guide.
Troubleshooting • View tips for common printing problems.
• View recommended Help topics.
• View common troubleshooting topics.
• Search for more specific troubleshooting topics.
• Visit the support area online.
Maintenance • Learn how to install a new ink cartridge.
• View information about how to purchase new ink
cartridges.
• Print a test page.
• Clean the ink cartridge nozzles.
• Align the ink cartridges.
• Solve other problems.
• Visit the supplies area online.
NOTE: Some links will not work while a job is in
progress.
Contact Information • View information about ordering ink or supplies.
• View information about contacting Dell Customer
Support.
• View a list of phone numbers.
• Visit the Dell Web site.
Advanced • Change printing status appearance options.
• View software version information.

Learning about your printer 5
Understanding the paper type sensor
Your printer has a paper type sensor that detects these paper types:
• Plain paper
• Coated paper
• Glossy/photo paper
• Transparencies
If you load one of these paper types, the printer detects the paper type and automatically
adjusts the paper type settings and print resolution.
NOTE: Your printer cannot detect the paper size.
To choose the paper size:
1 With your document open, click File →Print.
2 In the Print dialog box, click Properties, Preferences, Options, or Setup (depending
on your program or operating system).
The Print Properties screen appears.
3 Click the Paper Setup tab, and then select the paper size you are using.
4 Click OK.
The paper type sensor is on unless you turn it off. If you want to turn it off:
1 With your document open, click File →Print.
2 In the Print dialog box, click Properties, Preferences, Options, or Setup (depending
on your operating system).
The Print Properties screen appears.
3 From the Paper Type section on the Quality/Copies tab, select Use my choice.
4 Click OK.
NOTE: To temporarily override the paper type sensor for a particular print job, specify a
paper type in the GUI (graphical user interface) under Specialty paper.


Using the printer 7
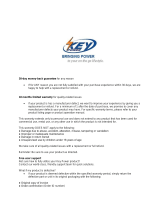
Loading paper
To load most types of paper:
1 Place the paper against the right side of the paper support with the print side facing
you and the top of the paper feeding into the paper support.
2 Squeeze and slide the paper guide to the left edge of the paper.
NOTE: Do not force paper into the printer.
NOTE: To avoid smearing ink, remove each transparency or photo from the paper exit tray
before the next one exits the printer. Transparencies and photos may require up to 15 minutes
to dry.

8 Using the printer
www.dell.com/supplies | support.dell.com
To load other paper types, follow these guidelines.
Load up to: Make sure:
150 sheets of plain paper The paper is designed for use with inkjet printers.
• The envelopes are loaded vertically against the right side of the
paper support.
• The stamp location is in the upper left corner.
• The envelopes are designed for use with inkjet printers.
• You squeeze and slide the paper guide to the left edge of the
envelope.
10 envelopes
25 sheets of labels The labels are designed for use with inkjet printers.
50 sheets of card stock • The card stock is designed for use with inkjet printers.
• The thickness does not exceed 0.025 inches.
10 greeting cards, index cards,
postcards, or photo cards
The cards are loaded vertically against the right side of the paper
support.
50 sheets of coated, photo, or
glossy paper
The glossy or coated side faces you.
10 transparencies • The transparencies are designed for use with inkjet printers.
• The rough side faces you.
100 sheets of custom size
paper
Your paper size fits within these dimensions:
Width
– 76 to 216 mm
– 3.0 to 8.5 in.
Length
– 127 to 432 mm
– 5.0 to 17.0 in.
10 iron-on transfers • You follow the loading instructions on the iron-on packaging.
• The blank side faces you.
20 sheets of banner paper The banner paper is designed for use with inkjet printers.

Using the printer 9
Before you begin printing, see the information below about how much paper the printer
exit tray can hold.
The printer paper exit tray can hold:
NOTE: To avoid smearing ink, remove each transparency or photo from the paper exit tray
before the next one exits the printer. Transparencies and photos may require up to 15 minutes
to dry.
Printing
Basic printing
1 Load paper. For help, see page 7.
2 With your document open, click File →Print.
3 To change the printer settings, click Properties, Options, Setup or Preferences
(depending on the program or operating system).
The Print Properties dialog box appears.
4 On the three tabs along the left side of the Print Properties screen (Quality/Copies,
Paper Setup, and Print Layout), confirm the selections.
NOTE: To see details about a setting on the Quality/Copies, Paper Setup, or Print Layout
tabs, right-click the setting on the screen, and then select the What’s This? item.
5
Click OK or Print (depending on the program or operating system).
NOTE: If you are using plain A4 or letter size paper, and you want to print with normal
quality, you do not need to adjust the settings.
If you are using specialty media, follow the steps for your paper type.
Printing photos
1 Click Start →Programs →Dell Printers →Dell Inkjet Printer J740 →Dell Printer
Solution Center.
2 Click the How To tab.
3 From the Projects drop-down dialog box, select Photos.
4 Click View and follow the instructions to print your photograph.
• 150 sheets of paper • 10 envelopes
• 25 sheets of labels • 50 cards
• 1 transparency • 1 sheet of coated, photo, or glossy paper

10 Using the printer
www.dell.com/supplies | support.dell.com
NOTE: To prevent smudging, remove each photo as it exits the printer, and let it dry before
stacking.
Printing envelopes
1 Click Start →Programs →Dell Printers →Dell Inkjet Printer J740 →Dell Printer
Solution Center.
2 Click the How To tab.
3 From the Projects drop-down dialog box, select Envelopes.
4 Click View and follow the instructions to print your envelopes.
Printing cards
1 Click Start →Programs →Dell Printers →Dell Inkjet Printer J740 →Dell Printer
Solution Center.
2 Click the How To tab.
3 From the Projects drop-down dialog box, select Cards.
4 Click View and follow the instructions to print your cards.
Printing banners
1 Click Start →Programs →Dell Printers →Dell Inkjet Printer J740 →Dell Printer
Solution Center.
2 Click the How To tab.
3 From the Projects drop-down dialog box, select Banners.
4 Click View and follow the instructions to print your banner.
NOTE: Loading excess banner paper may cause a paper jam. For help, refer to the
Troubleshooting section in the
User’s Guide
.
Printing mirror images and iron-on transfers
To print a mirror image of your original, or to personalize fabric with pictures, use the
following steps.
NOTE: To create a fabric collage, you can repeat these steps using the same picture multiple
times or using many different pictures.
NOTE: To apply the transfer to a blanket, pillowcase, sheet set, T-shirt or another piece of
fabric, follow the instructions on the iron-on transfer package.
1
Click Start →Programs →Dell Printers →Dell Inkjet Printer J740 →Dell Printer
Solution Center.
/