Page is loading ...

OWNER’S MANUAL ES-500T Series Soundbars

pg.2
www.snapav.com Support: 866.838.5052
ES-500T Series Soundbar Owner's Manual

pg.3
© 2013 Episode
ES-500T Series Soundbar Owner's Manual
OVERVIEW
Welcome to Episode
®
Speakers. We appreciate your purchase and are committed to providing the highest-
quality products possible.
The Episode
®
Soundbar models are a superb choice for almost every type of home theater or home
audio installation. They have been designed with advanced technological components that allow for high
performance and a lifetime of enjoyment.
IMPORTANT INSTRUCTIONS AND CONSIDERATIONS
Read and understand all instructions.
Before beginning installation, carefully plan location accounting for potential electrical, plumbing or other
obstacles.
RECOMMENDED AMPLIFIER POWER
To get the best performance from the Soundbar, an amplier or receiver with the following power rating is
recommended:
ES-500T-SNDBR-40 – between 20 and 100 Watts RMS per channel
ES-500T-SNDBR-50 – between 20 and 100 Watts RMS per channel
SPEAKER WIRE
To connect the Soundbar to an AV Receiver or Amplier, high-quality 14 to 16 gauge stranded speaker wire
is recommended. The wire may be connected directly to the speaker’s removable screw-down terminals.
Remember that you will need 3 runs of speaker wire to the Soundbar location as it contains the left, center,
and right speaker. A special wire management channel has been included in the rear of the speaker so that a
wall mounted speaker can sit ush on the wall.
FEATURES
• Replaces Left, Center, and Right channels in one convenient speaker
• Extremely Low-Prole, Extruded Aluminum Cabinet
• Knockout for Hidden IR Receiver
• Flexible Mounting Options
–Cabinet Top or Shelf Placement with included kickstands
–On-Wall with included mounting plate
–Flat-Screen with optional accessory that attaches to TV mount
WHAT’S INCLUDED
(1)ES-500T-SNDBR-40
or ES-500T-SNDBR-50
(2) Kickstands for Cabinet placement
(2) Shoulder bolts for Kickstand and Wall Plates
(2) Large Flat Washers for Kickstands
(4) Rubber Feet
(1) Wall Plate Bracket
(4) Wood Screws for Wall Plate
(4) Small Flat Washers for Wall Plate
(1) IR Receiver Spacer

pg.4
www.snapav.com Support: 866.838.5052
ES-500T Series Soundbar Owner's Manual
INSTALLATION
SPEAKER PLACEMENT
The ES-500T-SNDBR is designed to be the Left, Center, and Right speakers of a home theater surround
system. For most applications, placement should be below a at screen TV on a cabinet top or shelf. Other
options for placement include On-Wall using the included bracket, or attached to a Flat Panel mount using
the optional Strong mount bracket.
Installing On or In a Cabinet
Considerations for Placement
When placing the Soundbar on a cabinet shelf, the front edge of the speaker should be ush with
the front of the shelf. Placing the speaker further back on the shelf will degrade the sound quality of
the speaker.
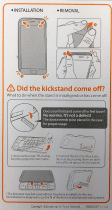
Attaching the Kickstand
The kickstand for the Soundbar allows for the angle of the Soundbar to be adjusted to maintain proper
audio performance. When placing the Soundbar, adjust the kickstand height to angle the Soundbar
towards the listener’s ears. See Adjusting the Kickstand for more information.
1. Place the included Kickstands on the rear of Soundbar as shown.
2. Using a shoulder bolt and washer for each Kickstand,
tighten to secure the Kickstand to the Soundbar.

pg.5
© 2013 Episode
ES-500T Series Soundbar Owner's Manual
Attaching the Feet
To ensure that the Soundbar will not slip when using the
kickstands, (2) rubber feet have been included. The feet
must be installed when using the kickstand. Place the feet
3” from the left and right outer edge, and ¼” from the front
edge of the Soundbar.
Note: When using the kickstand in the inverted position,
the feet should be placed at the front edge of the speaker
Adjusting the Kickstand
After installing the kickstand and placing the Soundbar, adjust the angle of the speakers towards the
listener’s ears. If the speakers point away from the listener’s ears, slide the kickstand up or down to achieve
the proper angle. Note that the kickstand can be inverted when the Soundbar is pointing down.
Considerations for Wall Mounting
To maintain a high level listening experience, the Soundbar should be as close to the TV as possible. Placing
To maintain a proper listening experience, the Soundbar should be as close to the TV as possible. Placing
the Soundbar more than 3" from the screen will separate the audio from the video and provide a poor viewing
and listening experience, keep this in mind when locating the Soundbar.
Mounting on a Wall
.25"
Front Edge
Non-Inverted
Kickstand
Inverted
Kickstand
8
°
0°
11°
15°

pg.6
www.snapav.com Support: 866.838.5052
ES-500T Series Soundbar Owner's Manual
Attaching the Wall Bracket
Note: For ease of installation of the bracket and the Soundbar, we recommend that the TV be removed from the
mount. This allows for the Soundbar to be placed properly.
Before Installing the Mount
• Locate and install the TV mount.
• With the TV on the mount
· Mark the position of the bottom of the TV.
· Mark the position of the TV's Center Point.
• Remove the TV from the mount
Installing the Mount
1. Locate wall studs using a stud nder (not included).
2. Place the Bracket on the wall with the at side towards the wall and the notched center mark facing
up. The Soundbar Center mark should be located at the center point of the installed television.
3. Position the Bracket Vertical Center (C) v groove 2 ¼ ” from the bottom of the TV. This will place
the Soundbar ush with the bottom of the TV when installed.
Tip: To allow for some extra clearance, position the Bracket Vertical Center (C), 2 5/16” from the
bottom of the TV. This will provide an extra 1/16” clearance (recommended for Tilt Mounts)
allowing for the any tolerance differences that may occur.
4. Level the bracket and attach it to the wall studs using the horizontal screwhole slots. All 4 screws
should be used, making sure to keep the bracket at to the wall and securely attached.
Note: If wall studs cannot be used, wall mollies or anchors with the appropriate weight rating for the
Soundbar can be used.
5. Attach the Soundbar to the bracket by placing
the bracket’s mounting bolts into the keyhole
slots on the rear of the soundbar and dropping
the Soundbar into place.
Up
B
C
16" Stud Center
Bracket Vertical Center
Soundbar
Center
A A

pg.7
© 2013 Episode
ES-500T Series Soundbar Owner's Manual
Installing an IR Receiver
The ES-500T-SNDBR has the option of installing an optional IR Receiver directly into the speaker behind the grille
cloth, eliminating the need to surface mount a stick-on receiver. Simply punch out the center of the pass-through
and slide the IR Receiver through the exposed hole.
Note: Due to the extremely low prole of the ES-500T soundbars, most IR tube receivers will protrude through the
rear of the Soundbar. An opening in the wall may be needed for clearance.
Front Rear
IR Receiver
Pass-through
To maintain accurate IR reception, a spacer has been included
to allow for the front edge of the IR receiver to be ush with the
back of the grille cloth. This will ensure that IR reception is at its
maximum level.
TIP: With some IR receivers, a layer of electrical tape around the threads can create
a more snug t within the Soundbar
Installing on a Flat Panel Mount
The ES-500T-SNDBR can be mounted directly to a Flat Panel Mount with the Strong™ SM-SBAR-BKT (available
separately). Using the Flat Panel mount bracket allows for the speaker to move with the TV when mounted to
articulating arm mounts. This provides an optimum listening experience for these installations.

pg.8
www.snapav.com Support: 866.838.5052
ES-500T Series Soundbar Owner's Manual
Connecting and Calibrating
Proper Connections are important to the performance of any loudspeaker within an audio system.
Performing the following steps will ensure proper connections for optimum speaker performance:
1. At each loudspeaker connection, ensure that the outer jacket is separated by at least 2 inches.
2. Strip the insulation on each conductor approximately ¼” and insert into the speaker terminals.
A. Ensure that there are no stray strands of wire protruding from the connectors.
B. Observe proper polarity (+ to + and – to – ) for each speaker and at the amplier).
3. Turn on the home theater receiver and calibrate all loudspeakers in the system according to the receiver
(or surround processor) manufacturer’s instructions.
Verifying Phase
When proper polarity is not maintained, the speakers play at the opposite ‘time’ from each other, or out of
phase. The result is audio with lack of bass and vocals that sound thin or distant. If during or after calibrating
your receiver you suspect the sound is not right and you cannot see any markings on the wire to verify polarity
is correct, try this simple test:
1. Sit in the normal listening position for the system.
2. Play some music with your receiver set to Mono.
3. Listen to the music and observe the audio.
A. Does the bass sound full and even with the other audio?
B. Do the vocals sound centered and even in volume?
If either of the answers are YES, follow steps 3 and 4 with the other loudspeakers in the system.
4. Turn off your receiver and reverse the connections for one of the speakers.
5. Repeat your test at the same volume level. When the sound has the loudest and best sounding
bass, and vocals are centered and clear, your connections are correct and in-phase.
GENERAL MAINTENANCE
INSTALLING AND REMOVING THE GRILLE
•The grill is held by pins. To remove the grill, pull gently around the edge away from the speaker, slowly
working your way from one end of the speaker to the other .
•To re-install, align the grill pins with the cups in the speaker and push into place.
CLEANING
• Use a dampened soft cloth or paper towel to clean the cabinet. The grill is best cleaned by brushing it off
with a lint-free cloth.
WARRANTY
Limited Lifetime Warranty
Episode Soundbar Speakers have a Lifetime Limited Warranty. This warranty includes parts and labor
repairs on all components found to be defective in material or workmanship under normal conditions
of use. This warranty shall not apply to products which have been abused, modied or disassembled.
Products to be repaired under this warranty must be returned to SnapAV or a designated service center
with prior notication and an assigned return authorization number (RA).

pg.9
© 2013 Episode
ES-500T Series Soundbar Owner's Manual
SPECIFICATIONS
Model ES-500T-SNDBR-40 ES-500T-SNDBR-50
Woofer Construction 4" anodized aluminum cone w/
High Temp Voice Coil
4" anodized aluminum cone w/
High Temp Voice Coil
Woofer Magnet Diameter 35mm OD Neo magnet 35mm OD Neo magnet
Voice Coil Size 35mm (1.25") 35mm (1.25")
Tweeter Construction 1" Titanium Dome
Neodymium, ferrouid cooled
1" Titanium Dome
Neodymium, ferrouid cooled
Passive Radiators N/A 4" anodized aluminum cone
# of Woofers 4 4
# of Tweeters 3 3
# of Passive Radiators 0 4
Power Handling RMS (w) 20-100W RMS 20-100W RMS
Power Handling Peak (w) 250W 250W
Recommended
Amplier Power
6 ohms 6 ohms
Nominal Impedance (Ω) 6 ohms 6 ohms
Frequency Response 110 - 22kHz 100 - 22kHz
Sensitivity (2.83v @ 1m) 88dB 88dB
Crossover Type 12dB / octave woofer and
tweeter sections
12dB / octave woofer and
tweeter sections
Crossover Frequency 2.5kHz 2.5kHz
Product Weight 10.8lbs 12.3lbs
Grill Type Acoustically Transparent Cloth Acoustically Transparent Cloth
Finished Dimensions 40.56''L x 5.17''H x 1.83''D 48.92''L x 5.17''H x 1.83''D
1/2" IR Knockout Yes Yes
Mounting Options Wall-Mount, Table-Top, TV
Mount (optional)
Wall-Mount, Table-Top, TV
Mount (optional)
Connector Type Removable Screw-down
terminal
Removable Screw-down
terminal
Wire Size Accepted Up to 14AWG Up to 14AWG


© 2013 Episode
130121-1350
/