page | 3
© 2019 Episode®
OVERVIEW
Welcome to Episode® Speakers. We appreciate your purchase and are committed to providing the highest-quality
products possible.
The Episode® Soundbar models are a superb choice for almost every type of home theater or home audio installation.
They have been designed with advanced technological components that allow for high performance and a lifetime
of enjoyment.
IMPORTANT INSTRUCTIONS AND CONSIDERATIONS
Read and understand all instructions.
Before beginning installation, carefully plan location accounting for potential electrical, plumbing or other obstacles.
RECOMMENDED AMPLIFIER POWER
To get the best performance from the Soundbar, an amplifier or receiver with the following power rating is
recommended:
ES-350-SNDBAR-30-BLK – between 20 and 100 Watts RMS per channel
ES-350-SNDBAR-40-BLK – between 20 and 100 Watts RMS per channel
ES-350-SNDBAR-50-BLK – between 20 and 100 Watts RMS per channel
ES-350-SNDBAR-60-BLK – between 20 and 100 Watts RMS per channel
ES-550-SNDBAR-40-BLK – between 20 and 110 Watts RMS per channel
ES-550-SNDBAR-50-BLK – between 20 and 110 Watts RMS per channel
ES-550-SNDBAR-60-BLK – between 20 and 110 Watts RMS per channel
ES-550T-SNDBR-40-BLK – between 20 and 100 Watts RMS per channel
ES-550T-SNDBR-50-BLK – between 20 and 100 Watts RMS per channel
ES-550T-SNDBR-60-BLK – between 20 and 100 Watts RMS per channel
SPEAKER WIRE
To connect the Soundbar to an AV Receiver or Amplifier, high-quality 14 to 16 gauge stranded speaker wire is
recommended. The wire may be connected directly to the speaker’s removable screw-down terminals. Remember
that you will need 3 runs of speaker wire to the Soundbar location as it contains the left, center, and right speaker.
A special wire management channel has been included in the rear of the speaker so that a wall mounted speaker
can sit flush on the wall.
FEATURES
• Replaces Left, Center, and Right channels in one convenient speaker
• Extremely Low-Profile, Extruded Aluminum Cabinet
• Knockout for Hidden IR Receiver
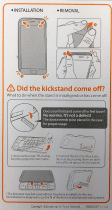
• Flexible Mounting Options
• Cabinet Top or Shelf Placement with included kickstands
• On-Wall with included mounting plate
• Flat-Screen with optional accessory that attaches to TV mount
WHAT’S INCLUDED
• (1) ES-350-SNDBAR-XX, ES-550-SNDBAR-XX, or ES-550T-SNDBR-50
• (2) Kickstands for Cabinet placement
• (2) Shoulder bolts for Kickstand and Wall Plates
• (2) Large Flat Washers for Kickstands
• (2) Rubber Feet
• (1) Wall Plate Bracket with adjustable knobs
• (4) Wood Screws for Wall Plate
• (4) Small Flat Washers for Wall Plate
• (1) IR Receiver Spacer