Page is loading ...

LT-37S60BU
LT-32S60BU LT-32S60SU
LT-26S60BU LT-26S60SU
ENGLISH
WIDE LCD PANEL TV INSTRUCTIONS
16:9 LCD TV BEDIENUNGSANLEITUNG
TELEVISEUR A ECRAN LCD PANORAMIQUE MANUEL D’INSTRUCTIONS
BREEDBEELD LCD TV GEBRUIKSAANWIJZING
TELEVISOR CON PANEL LCD PANORÁMICO MANUAL DE INSTRUCCIONES
TV LCD WIDESCREEN ISTRUZIONI
TELEVISOR COM ECRÃ PANORÂMICO DE INSTRUÇÕES
CRISTAL LÍQUIDO
DEUTSCH
FRANÇAIS
NEDERLANDS
CASTELLANO
ITALIANO
PORTUGUÊS
LCT1848-001B-U
LCT1848-001B-U_Cover.fm Page 1 Wednesday, June 1, 2005 1:26 PM

1
Expanding the world of
LCT1848-001A-U_EN_v7.fm Page 1 Monday, April 18, 2005 1:45 PM

2
ENGLISH
IMPORTANT! PREPARE USE
SETTINGS
TROUBLE?
Enjoy rich multi-media with JVC
VHF/UHF
Digital camera
Video camera
Game console
Audio components
VCR DVD player
DVD recorder
Personal
Computer
beautiful images
Contents
First things fi rst!
· Registering channels
Warning 3
Getting started
Names of all the parts
Basic connections
Initial settings
Editing channels
5
7
9
11
· TV / Teletext / Video / etc.
Let's try it out
Enjoying your new TV! 15
Watching TV
Viewing teletext
Watching videos / DVDs
· Take a snapshot
· View and search in multi-picture mode
· Sleep timer / Child lock
Try the advanced features
Useful functions 23
·
Reduce noise / Watch a more natural picture
· Set the aspect ratio, etc.
Just the way you like it
Customising your TV
Advanced picture adjustment
25
27
When you have trouble
Troubleshooting
Technical information
CH/CC List
Specifi cations
29
32
33
34
17
19
21
Connecting external devices 13
LCT1848-001A-U_EN_v7.fm Page 2 Monday, April 18, 2005 1:45 PM

3
Never cut or damage
the power cord!
Follow this manual
regarding setup!
Unplug the power cord
when going out!
Never insert objects
into the cabinet
openings!
Never place anything
on the TV!
Never try to repair
the TV yourself!
Please follow all the guidelines below
Warning
For more details on installation, usage and safety
Consult your retailer
Connect only to a 110-240V, 50/60Hz AC
outlet.
The power buttons on
the remote control and
the TV unit cannot
completely turn off the
TV. (Make appropriate
arrangements for
bedridden people.)
It may cause a
fatal electric
shock.
Take care when
children are near.
Placing liquids, naked
fl ames, cloths, paper,
etc. on the TV may
cause a fi re.
If the problem cannot be solved in
"Is it broken?" (P. 29), unplug
the power cord and contact
your retailer.
If the AC plug is not the right shape,
or the power cord is not long enough,
use an appropriate plug adapter
or extension cable.
(Consult your retailer.)
LCT1848-001A-U_EN_v7.fm Page 3 Monday, April 18, 2005 1:45 PM

4
ENGLISH
IMPORTANT! PREPARE USE
SETTINGS
TROUBLE?
Never dismantle the
rear panel!
If the TV is damaged
or behaving strangely,
stop using it at once!
Unplug the power cord and contact
your retailer.
It may cause an electric shock.
Never obstruct the
ventilation holes!
It may cause overheating or a fi re.
Handle LCD panel
with care!
Use a soft, dry cloth when cleaning.
Never expose to rain
or moisture!
To prevent fi re or
electric shock, never
allow liquids to enter
the unit.
Hold the TV so as not to
scratch the screen!
Do not touch the screen when carrying the
TV.
Do not carry the
TV on your own!
In order to prevent accidents,
ensure that the TV is carried
by two or more people.
Consult a qualifi ed technician.
See the included manual on mounting
procedures.
JVC assumes no responsibility for damage
due to improper mounting.
When attaching the TV to
the wall, use the optional
JVC wall mounting unit!
Do not allow the TV
to fall!
Do not rest your elbows on, or allow children
to hang from the TV.
There is a risk that the TV will fall and cause
injuries.
Never listen to
headphones at high
volume!
It may damage your hearing.
LCT1848-001A-U_EN_v7.fm Page 4 Monday, April 18, 2005 1:45 PM

5
Check accessories
Remove the terminal covers
Change the direction of TV
P
MENU
/OK
TV/AV
Change channel / page
Volume
Names of all the parts
Remote control
(RM-C1811H)
AA/R6 Batteries
For confi rming
the TV works
Power On/Off
Remote control
sensor
Power lamp
ON: Lit (Blue)
OFF: Unlit
To headphones
Display on-screen
menu / set
Switch between
TV / AV devices
(P. 13)
Illumination lamp
If the cover cannot be closed due to the cables being in the way
Do not force the cover to close (leave it open).
Connecting terminals on the back of the TV Connecting External devices (P. 13)
Press to
remove.
Press to
remove.
Illumination lamp lights
while the TV is on.
“ILLUMINATION” (P.26)
LT-32S60BU/SU, LT-26S60BU/SU LT-37S60BU
Press to
remove.
Press to
remove.
LCT1848-001B-U_EN_v7.fm Page 5 Wednesday, June 1, 2005 11:24 AM

6
ENGLISH
IMPORTANT! PREPARE USE
SETTINGS
TROUBLE?
When watching TV
When operating a JVC VCR
or DVD
Change the aspect ratio (P. 17)
Turn on 3D sound (P. 17)
Take a snapshot of the
screen (P. 23)
View in multi-picture
mode (P. 23)
Hold the current page
(P. 19)
Bookmark pages
Reveal hidden pages
Enlarge the text
Switch briefl y
between teletext and TV
To index page
(P. 17)
Return to TV
Power On / Off
Change the channel / page
Watch video, etc.
(P. 21)
Select and
confi rm settings in menus
To the previous channel
To teletext
(P. 19)
Volume
Change the channel / page
Switch between VCR / TV / DVD
(P. 21)
(P. 21)
When watching TV / Video
Mute
When viewing teletext
Insert the batteries
Use two AA/R6 dry cell batteries.
Insert the batteries from the
end, making
sure the and polarities are correct.
Channel information
(P. 17)
To menu
(P. 25)
(P. 19)
When viewing teletext
LCT1848-001A-U_EN_v7.fm Page 6 Monday, April 18, 2005 1:45 PM

7
Care when setting
Connect the aerial
Basic connections
Please read the user manuals of each device carefully before setup.
It is necessary to connect an aerial to watch TV.
Connect with other devices
"Connecting external devices" (P. 13)
200mm
50mm150mm 150mm 50mm
Right side of back surface
After all the connections have been made, insert the plug into an AC outlet.
AERIAL
Power requirements
Connect the power cord only to a 110-240V,
50/60Hz AC outlet.
When attaching the TV to the wall, use the
optional JVC wall mounting unit
Consult a qualifi ed technician.
See the included manual on mounting procedures.
JVC assumes no responsibility for damage due to
improper mounting.
Installation requirements
To avoid overheating, ensure the unit has ample
room.
LCT1848-001A-U_EN_v7.fm Page 7 Monday, April 18, 2005 1:45 PM

8
ENGLISH
IMPORTANT! PREPARE USE
SETTINGS
TROUBLE?
Connect a VCR / DVD recorder
AERIAL
VCR / DVD recorder
EXT-1
After all the connections have been made, insert the plug into an AC outlet.
Connect T-V LINK compatible recording device to EXT-2.
T-V LINK "What is T-V LINK?" (P. 9)
EXT-2
Right side of
back surface
Left side of
back surface
LCT1848-001A-U_EN_v7.fm Page 8 Monday, April 18, 2005 1:45 PM

9
Initial settings
Set the menu language, installation location and automatically register the TV channels.
These channels can be edited later in "Editing channels" (P. 11).
(Channel data on the TV can be sent to a connected recording device that is compatible with T-V LINK.)
To the previous screen
If the "JVC" logo does not appear or
if you wish to make changes later
"LANGUAGE" and "AUTO PROGRAM"
(P. 26)
Exit
MENU
BACK
TV
What is "T-V LINK"?
Connecting the TV to a T-V LINK
compatible device allows :
“T-V LINK” (JVC) “Q-LINK” (Panasonic)
“Megalogic” (Grundig) “Data Logic” (Metz)
“SMARTLINK” (Sony) “Easy Link” (Philips)
T-V LINK variations
Channels on the TV to be instantly
registered on the device.
The "DIRECT REC" function to
be used.
"Technical information" (P. 32)
LCT1848-001A-U_EN_v7.fm Page 9 Monday, April 18, 2005 1:45 PM

10
ENGLISH
CH 28
>> AUTO PROGRAM
14%
> LANGUAGE
> COUNTRY
>EDIT
01
AV
PR
02
03
04
05
06
07
08
09
ID
CH/CC
BBC1 CH
21
CH
22
CH
23
CH
24
CH
25
CC
02
CC
03
CC
04
CC
05
DOWNLOAD TV RECORDING DEVICE
T-V LINK
IMPORTANT! PREPARE USE
SETTINGS
TROUBLE?
Begin
Select a language
Select the country of installation
Automatically register channels
Check what was registered
select
select
For the next page (Yellow)
Shown only when
powering on for the fi rst time.
The power on the remote control can also be used.
Edit channels
When not using T-V LINK When using T-V LINK
If "FEATURE NOT
AVAILABLE" appears :
Is the T-V LINK compatible
device connected to EXT-2?
Is the device turned on?
If "ACI START" appears, select
and start settings. (This will set up
cable television channels.)
"What is ACI (Automatic
Channel Installation)?" (P. 32)
Finish
1
3
2
4
5
6
set
Confi rm
in "Editing channels"
(P. 11)
LCT1848-001A-U_EN_v7.fm Page 10 Monday, April 18, 2005 1:45 PM

11
DOWNLOAD TV RECORDING DEVICE
T-V LINK
SET UP
SET UP
AUTO PROGRAM
DECODER(EXT-2)
COMPONENT AUTO SELECT
HDMI SETTING
ON
OFF
EXT SETTING
EDIT/MANUAL
LANGUAGE
>EDIT
01
AV
PR
02
03
04
05
06
07
08
09
ID
CH/CC
BBC1 CH
21
CH
22
CH
23
CH
24
CH
25
CC
02
CC
03
CC
04
CC
05
Display the menu bar
Select "SET UP"
Select "EDIT / MANUAL"
Confi rm settings
Finish
When coming from "Initial settings" (P. 9), skip to .
Select a row
Edit
Move a
channel's
position
MOVE
Editing channels
Edit the channels registered with "AUTO PROGRAM" in "Initial settings" (P. 9).
To the previous
screen
Exit
1
2
3
4
5
6
7
If "FEATURE NOT
AVAILABLE" appears :
Is the T-V LINK
compatible device
connected to EXT-2?
Is the device turned on?
When not using
T-V LINK
When using
T-V LINK
Edit a
channel
name
ID
Insert
a channel
INSERT
Delete
a channel
DELETE
Register a
new channel
MANUAL
4
T-V LINK (P. 9)
select
next
select
next
select
LCT1848-001A-U_EN_v7.fm Page 11 Monday, April 18, 2005 1:45 PM

12
ENGLISH
>EDIT
01
AV
PR
02
03
04
05
06
07
08
09
ID
CH/CC
BBC1 CH
21
CH
22
CH
23
CH
24
CH
25
CC
02
CC
03
CC
04
CC
05
>EDIT
01
AV
PR
02
03
04
05
06
07
08
09
ID CH/CC
BBC1 CH
21
CH
22
CH
23
CH
24
CH
25
CC
03
CC
04
CC
05
>EDIT
01
AV
PR
02
03
04
05
06
07
08
09
ID
CH/CC
BBC1 CH
21
CH
22
CH
23
CH
24
CH
25
CC
02
CC
03
CC
04
CC
05
A
>EDIT
01
AV
PR
02
03
04
05
06
07
08
09
ID
CH/CC
BBC1 CH
21
CH
22
CH
23
CH
24
MBC
M6
ID LIST
MCM
MDR
MOVIE
MTV
MTV3
CH
25
CC
02
CC
03
CC
04
CC
05
M
>EDIT
01
AV
PR
02
03
04
05
06
07
08
09
ID
CH/CC
BBC1 CH
21
CH
22
CH
23
CH
24
CH
25
CC
02
CC
03
CC
04
CC
05
JVC
>EDIT
01
AV
PR
02
03
04
05
06
07
08
09
ID
CH/CC
BBC1 CH
21
CH
22
CH
23
CH
24
CH
25
CC
02
CC
**
CC
03
CC
04
>EDIT
01
AV
PR
02
03
04
05
06
07
08
09
ID
CH/CC
BBC1 CH
21
CH
22
CH
23
CH
24
CH
25
CC
02
CC
CC
03
CC
04
12
>EDIT
01
AV
PR
02
03
04
05
06
07
ID
CH/CC
CH
22
CH
23
CH
24
CH
25
CC
02
CC
03
CC
04
>MANUAL
11
10
PR
12
13
14
15
16
17
ID
CH/CC
CH
02
(
B/G
)
CC
06
ID
>MANUAL
11
10
PR
12
13
14
15
16
17
CH/CC
CH
08
(
B/G
)
CC
06
ID
>EDIT
11
10
PR
12
13
14
15
16
17
CH/CC
CH
08
CC
06
ID
>MANUAL
11
10
PR
12
13
14
15
16
17
CH/CC
CH
08
(
I
)
CC
06
IMPORTANT! PREPARE USE
SETTINGS
TROUBLE?
move out move in
select
enter
the fi rst
character
next
column
From high
frequencies
or
/
select a system
When selecting a preset name from the ID LIST
When manually naming a channel
Set
4
Receives the
broadcast
signal.
If necessary, press
to change the broadcasting system.
Auto-search begins,
and the nearest
frequency is imported.
Repeat the previous
steps until the
desired channel is
displayed
From low
frequencies
CH/CC List (P. 33)
Begin Select a destination Finish
Begin Enter a channel name
Begin Select a CH / CC Enter a number
Delete
Begining channel search
Begin
Set
select
set
enter
set
select
set
Adjust
Picture fi ne tuning
Sound fi ne tuning
next
column
“Receivable broadcast systems”
(P.32)
LCT1848-001A-U_EN_v7.fm Page 12 Monday, April 18, 2005 1:45 PM

13
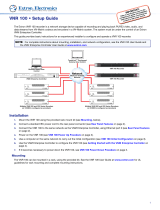
Connecting external devices
You can connect many different devices to the rear panel of the TV.
Please read the user manuals of each device before setting up.
(Connecting cables are not supplied with this TV.)
Amplifi er
(L) (R)
VCR / DVD recorder
(T-V LINK compatible)
AUDIO
OUT
Satellite broadcast /
Digital broadcast tuner
Game consoles
Check for PC compatibility
"Technical information" (P. 32)
DVD player
PC IN
PC
Video camera
EXT-1
EXT-2
(T-V LINK)
EXT-3
EXT-4
(Y)
(Pb)
(L)
(L)
(L)
To EXT-3 R/L (PC IN)
Headphone
(Pr)
(R)
(R)
(R)
Headphone
LCT1848-001A-U_EN_v7.fm Page 13 Monday, April 18, 2005 1:45 PM

14
ENGLISH
IMPORTANT! USE
SETTINGS
TROUBLE?
AERIAL
DVD player
(HDMI compatible)
VCR / DVD / other devices
EXT-5
(HDMI)
: signal direction
· Sound L / R
Output
AUDIO OUT
Listening to the TV on external speakers
Connect DVI devices
T-V LINK
(P. 9)
(P. 32)
·
Component signal
(P. 34)
· Sound L / R
Input
Output
EXT-4
Watching DVDs
COMPONENT AUTO SELECT (P. 26)
EXT-5
· HDMI signal
(P. 34)
Output
Input
Connecting
HDMI devices
HDMI SETTING (P. 26)
· Composite
signal / S-VIDEO
· Sound L / R
Output
Input
EXT-3
Watching videos
EXT-1
·
Composite signal /
RGB / S-VIDEO
· Sound L / R
Output
Input
· Composite
signal
· Sound L / R
Watching videos
Use S-VIDEO "S-IN" (P. 22)
·
Composite signal /
RGB / S-VIDEO
· Sound L / R
Output
Input
· Composite
signal
· Sound L / R
· T-V LINK
EXT-2
Dubbing videos
Using T-V LINK
Use S-VIDEO "S-IN" (P. 22)
Select dubbing sources
"DUBBING" (P. 22)
Connect a decoder
"DECODER (EXT-2)" (P. 26)
PREPARE
LCT1848-001A-U_EN_v7.fm Page 14 Monday, April 18, 2005 1:45 PM

15
TV mode TV and Text mode
Text mode
Watching TV
17
PAGE
Viewing teletext
19
PAGE
Enjoying your new TV!
View channel information
Change the aspect ratio
Enjoy 3D sound
Register your favourite channels
Enlarge the text
To the index page
Hold the current page
Switch briefl y between teletext and TV
Bookmark your favourite pages
LCT1848-001A-U_EN_v7.fm Page 15 Monday, April 18, 2005 1:45 PM

16
ENGLISH
PICTURE
IMPORTANT! PREPARE USE
SETTINGS
TROUBLE?
Watching
videos / DVDs
21
PAGE
25
PAGE
Personal preferences
Watch high quality video (S-VIDEO)
Name connected devices
Dub videos
Adjust the picture
Adjust the sound
(channel settings / anti-burn, etc.)
Basic settings
(sleep-timer / child lock, etc.)
Advanced settings
LCT1848-001A-U_EN_v7.fm Page 16 Monday, April 18, 2005 1:45 PM

17
P
MENU
/OK
TV/AV
P
Select a channel
up
down
Power on
1
The blue
power lamp
on the TV lights
2
INFORMATION
Channel
information and
clock
Watching TV
Mute
Note
To completely turn off the TV, unplug
the AC plug.
Press again to turn the screen off
and put the TV into standby mode.
Move up or down a channel
Switch between stereo / mono /
bilingual broadcasting
"STEREO / · " ( P. 26)
Volume
ZOOM
Change the aspect
ratio
3D SOUND
Enjoy ambient
sound
FAVOURITE CHANNEL
Register a
channel to a button
To the previous channel
Basic operations using
the side buttons
Power on
Change
the channel
Volume
1
2
LCT1848-001A-U_EN.fm Page 17 Monday, April 18, 2005 9:56 AM

18
ENGLISH
BBC1
12 : 00
16 : 9 ZOOM
HIGH3D SOUND
SET 1 - 4? PROGRAMMED!
FAVOURITE 1 - 4?
1
BBC1
PR ID
AV
02
03
04
05
06
07
08
09
PR LIST
01
BBC1
AUTO
PANORAMIC
14:9 ZOOM
16:9 ZOOM
16:9 ZOOM SUBTITLE
FULL
ZOOM
REGULAR
FAVOURITE SETTING
1
PR 01
2
PR 03
4
PR 07
3
PR
05
FAVOURITE SETTING
1
PR 01
2
PR 03
4
PR 07
3
IMPORTANT! PREPARE USE
SETTINGS
TROUBLE?
select
view
PR LIST
Channel information
Time
(
No indication)
HIGH
: For stereo sound
LOW
: For stereo sound (when the sound distorts in HIGH mode)
MONO
: For mono sound (emulates a stereo-like sound)
OFF
: Turns off 3D SOUND
Press the number
to register it on
Hold down
for 3 seconds
Disappears after
a few seconds
Press the
number you
registered
select delete
select
Select a page
Channels
registered
in "Initial settings"
will appear here.
Select and view a channel
When set to AUTO, the aspect ratio
will turn to the ratio obtained from
the information the TV received.
Without receiving aspect information,
it will be the setting in “4:3 AUTO
ASPECT” (P.27)
Not available in PC mode /
1080i (1125i) / 720p (750p)
signals.
Move the picture with
or while this bar is
displayed
Customisations
(P. 26) to the picture
of a favourite
channel get saved
as well.
Recall the favourite channel
Check your favourite channels
Press and confi rm that the channels
you have registered have a
beside them
Delete a favourite channel
MENU" " " "FEATURES" "FAVOURITE SETTING"
While the channel
is displayed
select
set
(
in case of having viewed teletext)
LCT1848-001A-U_EN_v7.fm Page 18 Monday, April 18, 2005 1:45 PM

19
Enter a teletext page
up
down
When watching TV
TV
TEXT
Display your
favourites list
1
(RED) (
GREEN
) (
YELLOW
) (
BLUE
)
Select a coloured button to save your page to
Enter the number of the page to save
Save
2
3
4
TEXT
This TV can display TV broadcasts and teletext on the same channel in two windows.
to
sub-page
1
Viewing teletext
Move up or down a page
Bookmark
your favourite
page
LIST MODE
Recall your favourite page
Press the coloured button as in step 2
2
View sub-pages
.....
LCT1848-001A-U_EN_v7.fm Page 19 Monday, April 18, 2005 1:45 PM
/