Page is loading ...


1
Important Safety Instructions
1. Read these instructions before use.
2. Keep these instructions for reference.
3. Heed all warnings.
4. Follow all instructions.
5. Cleaning devices: before cleaning, turn off
the power and disassemble all the units.
Clean with dry soft cloth.
6. Only use attachments/accessories specified
by the manufacturer.
7. Do not expose the equipment to rain or
moisture to avoid damage or risk.
8. Do not place the equipment on any uneven or
unstable stand; original product package or
appropriate package should be used to
avoid damage caused by strong impacts
during transportation.
9. Maintain indoor air flow to prolong the service
life of equipment
10. Power supply voltage:
America, Japan: AC 110V-120V 60Hz
Asia, Europe,
Africa: AC 220V-240V 50Hz
11. If the provided plug does not fit into your
outlet, consult a qualified electrician for a
technically correct matching of socket and
plug.
12. Protect the power cord from being walked
on or pinched, particularly at plugs,
convenience receptacles, and the point
where they exit from the apparatus.
13. All the conference units should be
connected according to system requirement
to avoid abnormal system running. For any
special requirement and technical support,
please contact GONSIN service centre at
+86 757 22360959.
14. Without our permission, do not open the
device body, or leave any substances into
the device such as rigid conductors or liquid
residues.
15.Do not try to assemble the devices for repair
and maintaince. Please contact GONSIN
service centre at 400-883-1138 for service
and support.
16. All GONSIN products are guaranteed for 3
years excluding the following cases:
A. All damage or malfunction caused by
human negligence;
B. Damage or malfunction caused by
improper operating by operator;
C. Parts damage or loss caused by
disassembling the product by non-authorized
personnel.
D. Damage caused by natural disaster.
17. Use ONLY specified connection cable to
connect the system equipment.
18. Unplug the equipment during lightning
storms or when unused for long periods of time.
19. Upon receipt of the product, please keep the
Warranty Card enclosed for future use.
CAUTION: DO NOT OPEN. RISK OF
ELECTRIC SHOCK.
CAUTION: Before connecting, operating or
adjusting this product, please read the
instructions completely.
This label appears on the rear of the unit due to
space limitations.
The lightning flash with an arrowhead
symbol, with an equilateral triangle, is intended
to alert the user to the presence of uninsulated
‘dangerous voltage’ within the products
enclosure that may be of sufficient magnitude to
constitute a risk of electric shock to persons.

2
The exclamation mark within an
equilateral triangle is intended to alert the user
to the presence of important operating and
maintenance (servicing) instructions in the
literature accompanying the appliance.
WARNING: To reduce the risk of fire or electric
shock, DO NOT expose units to rain or
moisture.
Attention: Installation should be
performed by qualified service personnel only
Power Disconnect: Units with or without
ON – OFF switch have power supplied to the
unit whenever the power cord is inserted into
the power source; however, the unit is
operational only when the ON – OFF switch is in
the ON position. The power cord is the main
power disconnect for all units
WARNING: The apparatus should be connected
to a mains socket outlet with a protective
earthing connection.

3
TABLE OF CONTENTS
Chapter 1. System Overview ............................................................................................................ 4
Chapter 2. Digital conference systems unit ...................................................................................... 6
2.1 Central unit ........................................................................................................................... 6
2.1.1 Functions and indicators for central unit ................................................................................. 6
2.1.2 Mounting Units on rack ................................................................................................................. 7
2.1.3 Connection of central unit ......................................................................................................... 8
2.2 ZJ-KR Extension Unit ........................................................................................................ 16
2.2.1 Functions and indicators ...................................................................................................... 16
2.2.2 Mounting extension unit on rack ............................................................................................ 17
2.2.3 Connection of extension unit .................................................................................................. 17
Chapter 3. Conference Unit TL-3300 ............................................................................................. 19
3.1 Overview ............................................................................................................................ 19
3.2 Functions and indicators of TL-3300 ................................................................................. 19
3.3 TL-3300 System installation and connection................................................................... 20
3.3.1 Connection with T-type cable ................................................................................................. 20
3.3.2 Connection to unit .................................................................................................................... 20
3.4 TL-3300 microphone operation ......................................................................................... 21
Chapter 4. Accessories and cables .................................................................................................. 22
4.1 Cables ................................................................................................................................. 22
4.1.1 T-type Connection Cable 8P-T3 .......................................................................................... 22
4.1.2 Extension Cable 8PS-03/05/10/15/20/40 .......................................................................... 22
4.2.4 Expander Cable 8P2-01 ....................................................................................................... 22
Chapter 5. System connection and basic setting ............................................................................. 23
5.1 System connection ............................................................................................................. 23
5.1.1 Use of 8P-T3 cable ..................................................................................................................... 23
5.2 Use of extension cable ....................................................................................................... 24
Chapter 6. Technical Specifications ................................................................................................ 27
6.1 Technical Specifications of Central Unit .............................................................................. 27
6.3 Technical Specifications of Conference Units ................................................................... 28
6.3.1 TL-3300 Conference Unit ........................................................................................................ 28
Chapter 7. Environment and Maintenance ...................................................................................... 29
7.1 System requirement............................................................................................................ 29
7.2 Requirement for public environment ................................................................................. 29
7.2.1 Technical Requirement for Public Environment ................................................................... 29
7.2.2 Interpreter booth requirements ............................................................................................... 29
7.2.3 System operation requirements ............................................................................................. 30
7.2.4 Requirements for control computer and other devices ......................................................... 30
Chapter 8. Frequently Asked Questions .......................................................................................... 31
Appendix: ........................................................................................................................................... 33

4
Chapter 1. System Overview
GONSIN conference system offers high performance solution for conferences of large, medium or small
size. Conference units are easy to operate. Delegate can simply push MIC key to speak, REG key to
attend and voting keys to vote, and select a channel to hear the interpreted language, and use volume
keys to adjust volume level for built-in loudspeaker. No special skills are required for system
maintainance, and technicians can do the job after short term training.
System components:
Central unit, conference unit (chairman unit, delegate unit, voting unit, channel selection unit,
loudspeaker, etc.), computer (optional), software (optional), high speed dome camera (optional)
and external sound equipment and display equipment.

5
This user manual is used for the following components parts:
Units
TL-Z4
Central unit for discussion, camera tracking
ZJ-KR
Extension Unit to expand the system to support more conference units
Conference Units
3300 series: tabletop conference units
TL-VX3300/ TL-VD3300
Chairman/delegate unit for discussion and camera tracking.

6
Chapter 2. Digital conference systems unit
2.1 Central unit
The central unit features AUTO/FIFO/VOX microphone mode, automatic video tracking.
Model Numbers:
TL-Z4
Central unit for discussion, video tracking
TL-ZB4
Central unit for discussion, voting, video tracking
TC-Z4
Central unit for discussion, interpretation, video tracking
TC-ZB4
Central unit for discussion, voting, interpretation, video tracking
2.1.1 Functions and indicators for central unit
(TL-Z4 front view)
①
②
③
④
⑤
⑥
⑦

7
(TL-Z4 rear view)
Front view
1. Power ON/OFF switch with red LED indicator
2. USB recording interface
3. OLED display
4. Rotary code switch
5. Bass level control
6. Treble level control
7. Volumn level control
Rear view
1. RS-485 communication interface (RS-485 TO CAMERA), used to control HD CAMERA tracking
matrix;
2. RJ-45 communication interface (ETHERNET), which is used to connect to a computer or IP switch.
3. RS-232 communication interface for central controller control or third party device control
4. 4×1+1 video matrix
5. Simultaneous Interpretation communication interface, used for Interpreter unit connection, as well as
infrared homology or wireless communication system expansion.
6. Power interface (AC100~240V, 50/60hz);
7. Audio output interface, one XLR interfaces (balance), two RCA interfaces (unbalance)
8. 8-pin female socket, four-way connection interface (DELEGATES), used to connect to unit; One
Extended interface (ROUTE) for connecting Extension Unit;
9. Alarm audio input port for access to external alarm audio signals.
10. 13-pin female socket, four-way connection interface (DELEGATES), used to connect to unit; One
Extended interface (ROUTE) for connecting Extension Unit
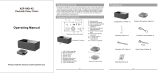
2.1.2 Mounting Units on rack
a) Open the packed carton and check the accessories.
b) Central unit and extension unit can be mounted on standard 19" rack, with 2U housing. Put the unit
in the rack and fasten the screws into 4 holes as indicated in the picture below.
c) Connect the power cord and the cables for other equipment.

8
2.1.3 Connection of central unit
2.1.3.1 Connecting with conference units
Central unit has four 8P DIN sockets and four 13P DIN sockets. Conference unit has a 8P or
13P-DIN female socket. You can first connect the male connector of 8P/13P T-type cable to female
socket of the first conference unit, and then connect 8P/13P-DIN female socket of unit.
8PS-03/05/10/15/20/40 or 13PS-03/05/10/15/20 extension cables can be used for longer distance
between unit and conference units. Connect the 8P/13P-DIN female connnector of extension cable to
8P/13P-DIN female socket of conference unit, and 8P/13P-DIN male connector of extension cable to
8P/13P-DIN female socket of unit.

9
2.1.3.2 Connecting with computer
Using ETHERNET communication mode between computer and controller, the function of the
system can be extended the external system software by using the network line from the RJ-45 of
controller TO PC network.
2.1.3.3 Connecting with power amplifier
The controller has a caron balance audio output connector (LINE OUT1) and One set of RCA
unbalance audio output connectors (LINE OUT2).Connect to the power amplification system to amplify
the speaker's voice.The connection only needs to output the "LINE OUT1" or a set of unbalanced
recording output "LINE OUT2", and the other port is connected to input of power amplifier.

10
2.1.3.4Connecting with RS-485 repeater
RS-485 repeater is required when system communications are not stable due to long cable length
or large quantity of conference units in the cable line. It is normally connected between extension cable
of cen 00000000tral unit and the first conference unit of the cable line.
How to connect repeater: male connector of extension cable is connected to female socket of unit.
Use a 8P2-01/13P2-01 expansion cable (1 metre) to connect extension cable and repeater. Another
female socker of repeater is connected with T-type cable and conference unit.
LED indicators:
POWER: Long light ON for normal status, and OFF for no power.
MXD: Long light ON for short circuit or other malfunction. Blink light for normal communications.
RXD: Long light ON for signal receiving problem. Blink light for normal communications.
TXD: Long light ON for signal transmission problem. Blink light for normal communications.
2.1.3.5 Connecting with interpreter console
Use a 25-pin cable to connect DB25 socket (INTERPRETER UNIT) of central unit to INPUT socket of
interpreter console, throught OUTPUT socket to INPUT socket of the next interpreter console, and so on.
Multiple interpreter consoles are connected to centraol units in a daisy chain.

11
2.1.3.6 Connecting with transmitter
Connect the 25-pin male socket(TO LANGOAGE DISTRIBBUTION SYSTEM)of central unit to the
25-pin INTERPRETER UNIT socket of transmitter for seamless interface between wired and wireless
interpretation system.
For more detailed instructions, please check the user manual for IR interpretation system and DSSS
interpretation system.

12
2.1.3.7 Connecting with wireless microphone system
The receiver unit of wireless microphone system can be connected to MIC socket on the central
unit using audio cable to offer seamless interface with the interpreter consoles as an audio source.
2.1.4 Settings and Operation of Central Unit
1. Startup
Clock interface can be seen when CCU is turned on.
2. Current State
Current Status is shown after initial startup, including active microphones, operation mode.

13
3. Setting Menus
There are 3 interfaces which can be used to set active mic, mic mode, FSC/DSP, unit vol, ID No. writing,
language selection and contrast.
▲ ▼ ◄ ►◆symbols are used to indicate upward, downward, leftware, rightward, page up, page
down.
① Active mic is used to set 1/2/3/4 microphones which can be active simultaneously. Up to 4 delegate units
can be activated at the same time, excluding chairman and vice-chairman units.

14
② Mode menu is used to select microphone mode VOX, FIFO, AUTO, OPERATOR.
AUTO – Any microphone can be active within the preset number limit.
FIFO – First active microphone will be switched off automatically when active microphone is more than
the preset number limit.
OPERATOR – Any microphone more than the preset number limit needs to request to talk, and can be
activatec automatically when any active microphone is turned off.
VOX – 3 levels High/Mid/Low of sentitivity can be set. Sensitivity can be adjusted for single unit No.
0002-9999. Mic time-out (mic off time) is the time limit for 2, 30, 60, 120, 180 seconds. When no audio input is
detected, microphone will be off automatically.
③ Recordin menu is used to turn ON or OFF the function for record.
④ Unit Vol menu is used to adjust the volume level 00-31 for all units or single unit. Choose the unit
number and then adjust the setting.
⑤ ID No. Writing menu is used to rewrite the unit number or add a new number, with the range
0002-9999 excluding the numbers of 250-257 and 500-514.

15
Use up/down (▲/▼) button to select the unit number and press SET to confirm. Any unwritable
number will skip to the next writable number. Use leftward (◄) button to exit “confirmation waiting”
screen when the unit number is not confirmed. “ID No. writing successful” screen can be seen when it
is confirmed.
Unit number will add 1 automatically for writing the next number.
⑥ Language menu is used to choose a display language for CCU and all the conference units. EN for
English and CN for Chinese can be selected. Select the unit number and then choose a language for the unit.
⑦ Contrast menu is used to adjust the LCD contract for CCU or any conference unit.

16
CCU contrast setting range is 00-32. Choose Reset and press Set to adjust the CCU contrast as the
default setting.
Unit menu is to adjust the contrast for any single unit. Choose un unit number 0002-9999 and + or -,
press Set to adjust the contrast setting. Choose Reset and press Set to adjust the unit contrast as the
default setting.
4. Time selection menu
Set the controller specific time by this menu.
2.2 ZJ-KR Extension Unit
2.2.1 Functions and indicators

17
Front view
1. Power ON/OFF switch, with red LED indicator
Rear view
2. Route B IN: expansion input socket 8PS/13PS to connect central unit or previous extension unit.
3. Route B OUT: expansion output socket 8PS/13PS to connect conference unit or next extension
unit.
4. DELEGATES: output sockets 8PS/13PS to connect conference units in 3 lines
5. Power input socket
2.2.2 Mounting extension unit on rack
The extension unit can be mounted on standard 19" rack (2U). Put the extension unit in the rack and
fasten the screws into 4 holes as indicated in the picture.
2.2.3 Connection of extension unit
ZJ-KR extension unit (ROUTE IN) can be connected to central unit (ROUTE OUT) using a 8P2-01
or 13P2-01 expansion cable. Additional extension units allows the central unit to support up to 200
conference unit in one system. Multiple extension units can be cascaded for system expansion, with
ROUTE OUT socket to connect the next extension unit.

18
(8-pin cable connection)

19
Chapter 3. Conference Unit TL-3300
3.1 Overview
The TL-3300 conference unit provides basic functions: including speaking, listening, attendance
registration and automatic camera tracking.
The conference units include chairman unit and delegate unit. The only difference between them is that
the chairman unit has an extra priority (PRIO) key. By using software, the delegate unit can be set as
vice chairman unit, which will not be limited by the preset number of active microphones and speaking
mode. Up to 10 vice chairmen can be set.
3.2 Functions and indicators of TL-3300
TL-VX3300
Front panel:
1. Switch (MIC ON/OFF)
2. Red priority key exclusive for chairman unit
(PRIOR); press this key to close all active
delegate
units
Note: Delegate unit doesn't have PRIOR
function,
thus does not have this key.
3.Built-in loudspeaker (4Ω3W)
/