Metra 107-UN02 Installation guide
- Category
- Car kits
- Type
- Installation guide
This manual is also suitable for
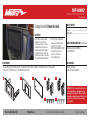
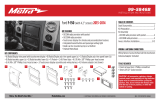
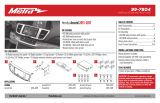
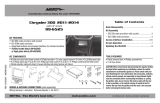
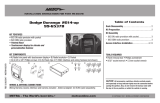
Metra 107-UN02 is a universal mount designed to float Pioneer 6.8-inch screens in front of a vehicle's original radio location. It allows for easy mounting of the radio's chassis into the radio/pocket location of over 250 existing Metra Double-DIN kits for various vehicle applications. The kit includes an assembly mount, display housing, display trim ring, display brackets, and mounting hardware. It features a patent-pending design and is compatible with Pioneer modular 6.8” radios like the DMH-C2550NEX and DMH-C2500NEX.
Metra 107-UN02 is a universal mount designed to float Pioneer 6.8-inch screens in front of a vehicle's original radio location. It allows for easy mounting of the radio's chassis into the radio/pocket location of over 250 existing Metra Double-DIN kits for various vehicle applications. The kit includes an assembly mount, display housing, display trim ring, display brackets, and mounting hardware. It features a patent-pending design and is compatible with Pioneer modular 6.8” radios like the DMH-C2550NEX and DMH-C2500NEX.


-
 1
1
-
 2
2
-
 3
3
-
 4
4


Metra 107-UN02 Installation guide
- Category
- Car kits
- Type
- Installation guide
- This manual is also suitable for
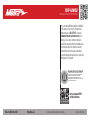
Metra 107-UN02 is a universal mount designed to float Pioneer 6.8-inch screens in front of a vehicle's original radio location. It allows for easy mounting of the radio's chassis into the radio/pocket location of over 250 existing Metra Double-DIN kits for various vehicle applications. The kit includes an assembly mount, display housing, display trim ring, display brackets, and mounting hardware. It features a patent-pending design and is compatible with Pioneer modular 6.8” radios like the DMH-C2550NEX and DMH-C2500NEX.
Ask a question and I''ll find the answer in the document
Finding information in a document is now easier with AI
Related papers
-
Metra 107-TO7HG Operating instructions
-
Metra 107-KI1HG Installation guide
-
-
-
-
Metra 107-FD1B Installation guide
-
-
Metra 107-GM5B Operating instructions
-
-
Other documents
-
Pioneer DMH-W4660NEX In-Dash AV Receivers Operating instructions
-
iBeam TE-5MSC User manual
-
Pioneer DMH-C2550NEX Owner's manual
-
-
 Metra Electronics 99-5846B User manual
-
 Metra Electronics 99-7804HG Installation guide
-
Axxess 99-7523S Installation guide
-
 Metra Electronics 99-6525B User manual
-
 Metra Electronics 99-6537B User manual
-


