
Installation guide
For workITdesk interactive
table for
®
BrightLink
®
Epson P/N V12 H 893020
Conen P/N WID-DL74 BLP
Designed for
®
BrightLink
®

2
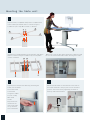
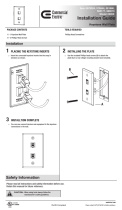
Mounting the table unit
Unpack boxes 1 of 4 (Mobile base) and 2 of 4 (Motorized
center column) and attach base to column using the
4 x M8 x 40 (1/3" x 1.6") Allen screws + 4 washers.
Unpack box 3 of 4 (Board frame w. tilt actuator) and attach
frame to column using the 4 x M8 x 40 (1/3" x 1.6") Allen
screws + 4 washers.
Make sure to run the two cables exiting the column through
the cut out of the board frame before securing the 4 bolts.
1
2
Unpack box 4 of 4 (50" x 67" table top) and hang the
board onto the frame.
Secure the board
to the frame
using the 4 x M6 x
70 (0.23" x 2.75")
Allen head
screws.
They need to be
inserted in the
outer most holes
on top and bot-
tom of the frame.
Release the two bolts on the brackets on the back of
the board and slide in the projector arm to its lowest
position. Secure the arm by tightening the bolts on
both top and bottom bracket.
3 4
6.5"

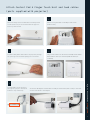
workITdesk interactive table
3
Attach Control Pad & Finger Touch Unit and feed cables
(parts supplied with projector)
Feed the cable, which links FTU to the projector, through
the opening in the board and plug in the connector.
Plug in both cables into the Control Pad (AC Power Cable
Cat6 network cable (not included) USB-B cable (not
included).
7 8
Attach the finger touch module with 2 x Phillips head
screws (0.14" x 1.4") to the board surface at approx. 7"
from top of the board.
Attach touch panel with 4 x Phillips head screws
(0.165" x 0.63").
5 6
Feed all cables to the projector
through the projector arm (from
bottom to top of the arm).
9
Secure the AC adapter bracket with 4 x Phillips head screws (0.16" x 0.63") to the back
of the board. Slide in the adapter.

4
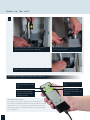
Use of the remote control
For moving the unit up or down just press the buttons on
the control unit. Releasing the button will immediately stop the
movement. In case of emergency just unhand the control unit
(watch dog switch). For further information your dealer will be
at your disposal.
Plug in the remote control into the
remaining connector.
Put the plug of the external actuator into the
connector marked with the yellow dot.
Power up the unit
10
User guide for electrical height adjustable unit
Pressing knob raises lift
unit
Pressing knob moves
frame unit to the hori-
zontal position
Pressing knob lowers lift
unit
Pressing knob moves
frame unit to the vertical
position
Note the different numbers of pins on both plugs!

workITdesk interactive table
5
13
Mount the projector
11
Mount the projector plate to the
projector.
Start by placing the 0.5" rubber
spacers over the 4 mounting holes.
Place the metal washers on top.
4 x rubber buffer 13 mm
4 x washer 8 mm
Adjust the projector
Picture is too small or too big:
To increase picture size loosen the adapter
E
and slide it
over the tube away from the board. To decrease picture
size move the projector towards the board. Tighten all
screws securely afterwards.
Horizontal keystone correction:
Loosen the adapter
E
and turn the projection to the right side if the picture is too small in the
right side. Turn the projector the other way around, if the picture is too small in the left side.
Vertical keystone correction:
If the picture is bigger at the top than at the bottom, secure the screws
C
and
D
or loosen the
screws
A
and
B
at the same time. If the picture is smaller in the top than in the bottom, tighten
A
and
B
or loosen
C
and
D
.
Picture is not centered:
Loosen the screws
A
,
B
,
C
and
D
. Move the projector in the right direction.
Tighten all screws again.
Picture is not straight:
If the picture does fall down the left side, tighten the screws
A
and
C
and loosen the screws
B
and
D
. If the picture does fall down the right side, tighten the screws
B
and
D
or loosen the
screws
A
and
C
.
14
B
A
C
D
E
The clamp below (attached with
blue-circled screws) should be
shifted all the way to the RIGHT
position.
Do not tighten the screws yet.
Move projector out to the farthest
distance from the table.
12

6
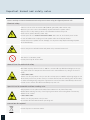
Please carefully read the below hazard and safety notes before using the hight adjustment unit.
Electrical safety
Connect unit to a free accessible 110 V/ 60 Hz grounded power outlet only.
Make sure, the unit can be immediately separated from the power outlet.
Only use unit in dry rooms, protect unit from water and other liquids.
Clean center column with dry cloth only.
Do not open lift unit. RISK OF ELECTRIC SHOCK. There are no serviceable parts inside.
In case of malfunction unplug unit from power outlet and call your dealer.
Do not overrun the power cord or damage it in any other way. Replace damaged power
cord immediately.
Ensure easy access of wall socket and power strip attached to the unit.
The device is not water proof.
Do not place liquids on the table.
General hints for mechanical safety
Max. load capacity of the lift unit is 300 lbs. Do not add any additional weight to the sys-
tem, other than the components described in this manual.Do not sit, hang or lie on the
table!
! VERY HEAVY UNIT.
Severe risk of injury when unit tips over due to improper use.Before adjusting height or tilt
of the table, ensure no person or object is within 20 cm from the moving parts of the table,
in order to avoid getting trapped or squeezed. In case of accident immediately release the
button on the remote. This will immediately stop the unit.
Special hints for moveable und free standing units
Only operate unit on plane and stable floors. Move unit on plane floors only.
Beware when moving the unit; risk of tipping over when overrunning floor unevenness,
wdoor sils or similar.
! VERY HEAVY UNIT.
Severe risk of injury when unit tips over.
Lock brakes of front wheels when operating unit.
I
nstructions for disposal
Do not dispose to consumer waste.
Important hazard and safety notes

workITdesk interactive table
7
Conen limited warranty
Conen Produkte GmbH warrants its products to be free of defects in material or workmanship for three (3) years
from the date of original purchase. For warranty service a proof of date of original purchase must be provided.
If any product is found to exhibit defects during the limited warranty period, Conen Produkte GmbH will, at its
sole discretion, repair or replace defective product at no charge to the original purchaser, subject to the condi-
tions and exceptions described below.
To make a warranty claim, promptly notify Conen Produkte GmbH within the warranty period described abo-
ve by contacting the Conen Produkte GmbH Support Center at support@conenmounts.com or 562-912-3458.
No Products may be returned for credit, exchange, or service without prior authorization from Conen Produkte
GmbH . The purchaser is responsible for securely packaging the defective unit and returning it to Conen Produk-
te GmbH or a Conen Produkte GmbH Authorized Servicer via prepaid shipping. Repaired or replaced Products
and parts supplied under this warranty shall be covered only by the unexpired portion of the warranty on the
original purchase.
This warranty does not cover any damages caused by using improper packaging materials or improper packa-
ging & shipping to or from Conen Produkte GmbH . Conen Produkte GmbH will not be liable for any damage
caused by misuse, abuse, accidental damage, modification, improper repair or installation or adverse environ-
mental factors including fire, flood, lightning or incorrect electrical currents. Conen Produkte GmbH shall have
no liability if the Product has been used in an application or environment other than that for which it was
intended. All electrical mechanisms are intended for indoor use only. Conen Produkte GmbH is not responsib-
le for any damages from services performed by other than Conen Produkte GmbH or a Conen Produkte GmbH
Authorized Servicer.
DISCLAIMER OF WARRANTIES: THE WARRANTY AND REMEDY PROVIDED ABOVE ARE EXCLUSIVE AND IN LIEU OF
ALL OTHER EXPRESSED OR IMPLIED WARRANTIES INCLUDING, BUT NOT LIMITED TO, THE IMPLIED WARRANTIES OF
MERCHANTABILITY, FITNESS FOR A PARTICULAR PURPOSE AND NONINFRINGEMENT. UNLESS STATED HEREIN, ANY
STATEMENTS OR REPRESENTATION MADE BY ANY OTHER PERSON OR FIRM ARE VOID.
This warranty shall be the sole and exclusive remedy to the original purchaser. Conen Produkte GmbH ’ entire
liability for a material breach of this Agreement shall never exceed the purchase price of the Product covered
by this Agreement. Conen Produkte GmbH is not liable for performance delays or for nonperformance due to
causes beyond its reasonable control. Except as provided in this written warranty, neither Conen Produkte GmbH
nor its affiliates shall be liable for any loss, inconvenience, or damage, including direct, special, incidental or
consequential damages, including lost profits, cost of substitute equipment, downtime, claims of third parties,
including customers, or injury to property, resulting from the use or inability to use the Conen Produkte GmbH
Product, whether resulting from a breach of warranty or any other legal theory. Some jurisdictions do not allow
limits on warranties or remedies for breach in certain transactions. In such jurisdictions, the limits in this para-
graph and the preceding paragraph may not apply.
Any dispute arising out of or relating to this Agreement will be settled by arbitration before a single arbitrator in
Los Angeles County, California, in accordance with the Commercial Arbitration Rules of the American Arbitration
Association. Judgment on the arbitrator’s award may be entered in any court having jurisdiction. This Agreement
shall be construed in accordance with the internal laws of the State of California; provided that this arbitration
clause shall be construed in accordance with the Federal Arbitration Act.

MANUFACTURER
Conen Produkte GmbH
Conenstr. 4
54497 Morbach-Gonzerath
Germany
Designed for
®
BrightLink
®
T +49 6533 75 -100
F +49 6533 75 -600
E info@conenmounts.com
www.conenmounts.com
-
 1
1
-
 2
2
-
 3
3
-
 4
4
-
 5
5
-
 6
6
-
 7
7
-
 8
8


Epson Motorized Interactive Table Installation guide
- Type
- Installation guide
- This manual is also suitable for
Ask a question and I''ll find the answer in the document
Finding information in a document is now easier with AI
Related papers
-
Epson V12H893020B7 Installation guide
-
-
-
Epson BrightLink 697Ui Installation guide
-
Epson BrightLink 710Ui Installation guide
-
Epson BrightLink 695Wi User manual
-
Epson BrightLink 1485Fi User manual
-
Epson BrightLink 696Ui User manual
-
Epson BrightLink 735Fi User manual
-
Other documents
-
 Commercial Electric 5003-WH Operating instructions
-
 CONEN LAP4-SM Owner's manual
-
Electro-Voice 480 Owner's manual
-
-
HP CalcPad 100 User manual
-
-
Electrolux EFC60246X User manual
-
Magnavox 42MF230A/37B User manual
-
Dynamite DYNR0101 Owner's manual
-
 CONEN WMB-SCETS Owner's manual


