HP DesignJet 30 Printer series User guide

Type
User guide

HP DesignJet 30 Printer series offers exceptional printing capabilities for professional and personal use. With its advanced technology, you can create stunning prints with vivid colors and sharp details. From high-quality photos to detailed technical drawings, this printer is a versatile tool for various projects. Its compact design saves space, making it ideal for home offices or small businesses. Additionally, the intuitive control panel and user-friendly software ensure easy operation. Unleash your creativity and bring your ideas to life with the HP DesignJet 30 Printer series.

HP DesignJet 30 Printer series offers exceptional printing capabilities for professional and personal use. With its advanced technology, you can create stunning prints with vivid colors and sharp details. From high-quality photos to detailed technical drawings, this printer is a versatile tool for various projects. Its compact design saves space, making it ideal for home offices or small businesses. Additionally, the intuitive control panel and user-friendly software ensure easy operation. Unleash your creativity and bring your ideas to life with the HP DesignJet 30 Printer series.

HP LF Printing Knowledge Center
Proof the output on the monitor
Application: QuarkXPress 6.5
Printer: HP Designjet 30/90/130 series
Software: EFI Designer Edition for HP
Operating System: Mac OS X
1. First recommendations:
See the
Media type functionality & features and choose the most appropriate media.
It is essential that you have the media type correctly calibrated with the printer and print
mode, consult the
Calibrate my printer document.
In order to get the correct display, it’s also essential that you have the monitor calibrated,
consult the
Profile my monitor document.
2. Open the EFI Designer Edition RIP.
3. EFI Designer Edition RIP settings, Preferences:
General: In order to see the print preview in the RIP before printing, uncheck the
Automatic start printing after spooling checkbox.
Color:
o Uncheck the Active Color Management checkbox.
o Paper name: Select the paper type that is loaded on the printer (always
calibrated) and “Best” print quality.
o Print resolution: 600 x 600.
Click OK.
4. Open QuarkXpress.
2
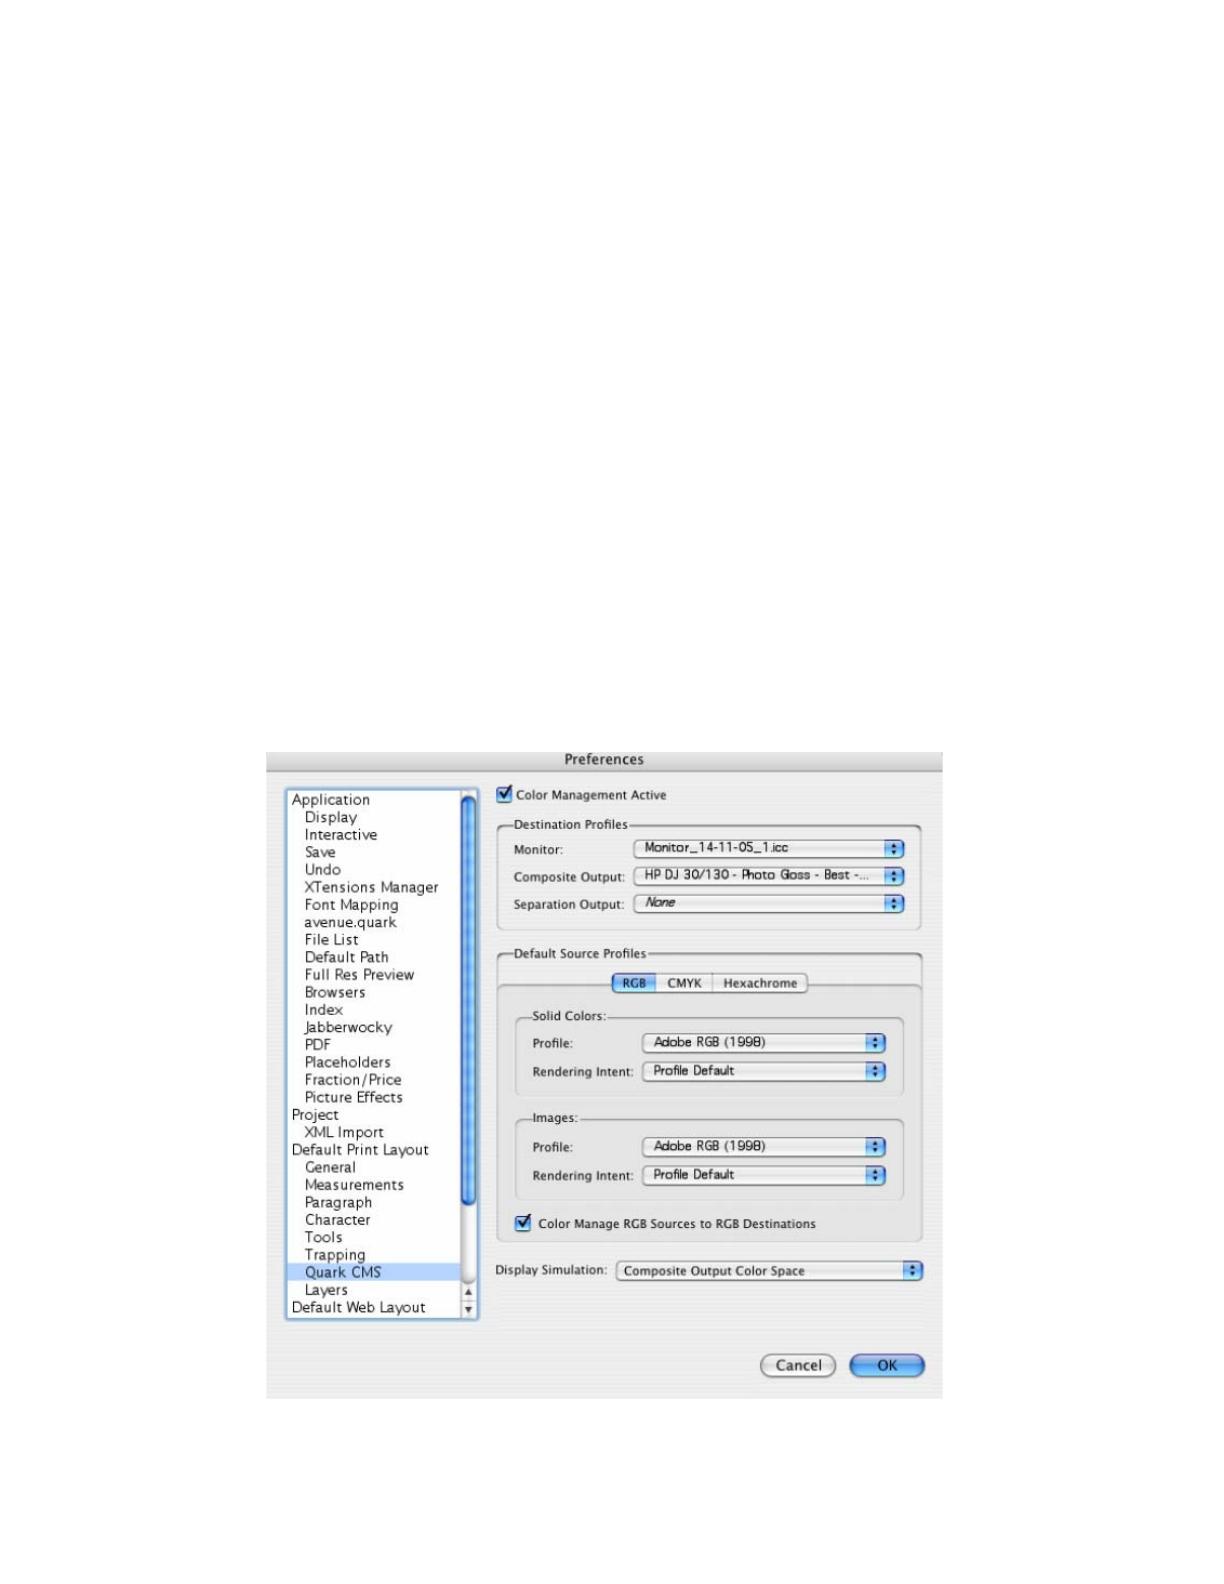
5. Configure the color Preferences, QuarkXPress menu > Preferences… > Quark CMS
(left hand menu):
Check the Color Management Active checkbox.
Destination Profiles:
o Monitor: Select the monitor profile you have created.
o Composite Output: Select the profile of the output device you want to proof on the
monitor; the printer profile generally depends on the printer model and the media
type. If you don’t have it on the list, you should copy it in the next folder:
/Library/ColorSync/Profiles
Default Source Profiles > RGB tab:
o Profile (Solid Colors/Images): Adobe RGB (1998).
o Rendering Intent (Solid Colors/Images): Profile Default.
o Check Color Manage RGB Sources to RGB Destinations.
Default Source Profiles > CMYK tab:
o Profile (Solid Colors/Images): SWOP Press.
o Rendering Intent (Solid Colors/Images): Profile Default.
o Check Color Manage CMYK Sources to CMYK Destinations.
Display simulation: Select Composite Output Color Space to emulate the output
device on the monitor.
Click OK.
3
6. Open your project, File menu > Open..., and browse it. To insert images, draw a box with the
Rectangle Picture Box and insert the image, File menu > Get Picture...:
Browse to the file.
Color Management tab:
o Profile: If the image has an Embedded profile, preserve it, if not, select Default.
o Rendering Intent: Profile Default.
o Check Color Manage to RGB/CMYK Destinations.
Click Open.
7. So that you get a good display select the image, and then, Item menu > Preview
Resolution: Full Resolution.
8. Now, you can retouch your image and the monitor will show you how it’s going to look once
you’ve printed it.
9. Print settings, File menu > Print...:
Printer... button:
Printer: Select the printer (ex. EFISoftwarePrinter).
o Printer Features in the drop dawn:
Paper Size: Setup.
Select RIP’s Default on the others settings.
o Click Print.
4
Page Setup… button:
o Format for: Select the printer RIP.
o Paper Size: Select the paper size of the media loaded on the printer.
o Orientation: Select the orientation of your image on the paper.
o Click OK.
QuarkXPress print settings:
o Layout tab: Uncheck Separations.
o Setup tab:
Printer Description: Select the printer RIP.
Paper size: Select the paper size you have already selected on the Page Setup
window.
Reduce or Enlarge: Select the scaling factor you need.
Page Position: Select the page position you need if the image is smaller than
the paper size.
o Output tab > Print Colors: Composite CMYK.
o Preview tab: Check the preview of your image on the paper.
o Profiles tab > Composite: Select the output device you want to emulate on the
monitor (the profile of the printer and media type you have selected on the printer
RIP).
Click Print.
10. To see the print preview go to the EFI Designer Edition RIP, select the file you have just sent from
QuarkXPress and press the Preview button, if it is ready click Print.
5
For more information on HP Designjet products
www.hp.com/go/designjet
6
© 2005 Hewlett-Packard Development Company, L.P. The information contained
herein is subject to change without notice. The only warranties for HP products and
services are set forth in the express warranty statements accompanying such
products and services. Nothing herein should be construed as constituting an
additional warranty. HP shall not be liable for technical or editorial errors or
omissions contained herein.
Adobe Photoshop and PostScript are trademarks of Adobe Systems Incorporated.
PANTONE is Pantone, Inc.'s check-standard trademark for color.
Rev. 1.0, 09/2005
  • Page 1 1
  • Page 2 2
  • Page 3 3
  • Page 4 4
  • Page 5 5
  • Page 6 6

HP DesignJet 30 Printer series User guide

Type
User guide

HP DesignJet 30 Printer series offers exceptional printing capabilities for professional and personal use. With its advanced technology, you can create stunning prints with vivid colors and sharp details. From high-quality photos to detailed technical drawings, this printer is a versatile tool for various projects. Its compact design saves space, making it ideal for home offices or small businesses. Additionally, the intuitive control panel and user-friendly software ensure easy operation. Unleash your creativity and bring your ideas to life with the HP DesignJet 30 Printer series.

Ask a question and I''ll find the answer in the document

Finding information in a document is now easier with AI