Kodak EASYSHARE ZD710 User manual

Category
Bridge cameras
Type
User manual
www.kodak.com/go/zd710support 1
ENGLISH
Installing the software
Attaching the lens cap and strap
Before connecting any cables, install the
software that was included with your camera.
Follow the on-screen instructions.
After installing the software, return to this
Getting Started Guide.
urg_00741.book Page 1 Monday, July 23, 2007 10:27 AM
2 www.kodak.com/go/easysharecenter
ENGLISH
Loading the battery
Kodak lithium digital camera
battery CRV3 (non-rechargeable)
AA batteries (rechargeable
or non-rechargeable)
Kodak Ni-MH rechargeable
digital camera battery (KAA2HR)
urg_00741.book Page 2 Monday, July 23, 2007 10:27 AM
www.kodak.com/go/zd710support 3
ENGLISH
Turning on the camera
Setting the language and date/time
NOTE: To change the date/time and language in the future, use the Menu button.
2
1
to change.
for previous/next field.
OK
to accept.
OK
At the prompt, press OK.
2
1
to change.
OK
to accept.
Language:
Date/Time:
urg_00741.book Page 3 Monday, July 23, 2007 10:27 AM
4 www.kodak.com/go/easysharecenter
ENGLISH
Taking a picture/video
3
Press the Shutter button halfway
to focus and set exposure.
When the AF/AE indicator turns
green, press the Shutter button
completely down.
Pictures Videos
Press the Shutter button
completely down and release.
To stop recording, press the
Shutter button again.
1
3
1
EVF
LCD
EVF
LCD
AF/AE indicator
Press the EVF/LCD button to turn on
LCD or EVF (electronic viewfinder).
2
urg_00741.book Page 4 Monday, July 23, 2007 10:27 AM
www.kodak.com/go/zd710support 5
ENGLISH
Reviewing pictures/videos
Transferring pictures/videos
Press Review.
(Press again to exit.)
1
2
View previous/next.
Videos:
Play/Pause.
Adjust the volume.
2X, 4X reverse
2X, 4X forward
Press and hold for 4 seconds to jump to a bookmark
1
2
USB cable Kodak EasyShare printer
dock or camera dock
(May be sold separately.)
For dock compatibility, visit
www.kodak.com/go/dockcompatibility.
To purchase accessories, visit
www.kodak.com/go/zd710accessories.
To use an EasyShare dock, see its
Getting Started Guide.
urg_00741.book Page 5 Monday, July 23, 2007 10:27 AM
6 www.kodak.com/go/easysharecenter
ENGLISH
Keep learning about your camera!
Congratulations!
You have:
• set up your camera
• taken pictures
• transferred pictures to your computer
Visit www.kodak.com/go/zd710support and
www.kodak.com/go/easysharecenter for:
• the extended user’s guide
• interactive troubleshooting and repairs
• interactive tutorials
• FAQs
• downloads
• accessories
• printing information
• product registration
Keep learning!
Finish reading this book, so you can take and share your best pictures!
urg_00741.book Page 6 Monday, July 23, 2007 10:27 AM
www.kodak.com/go/zd710support 7
ENGLISH
Front view
1 Low-light assist, Self-timer light 8 Flash
2 Shutter button 9 Open Flash switch
3 Flash button 10 Neck strap post
4 Focus (Close-up/Landscape) button 11 Microphone
5 Drive (Self-timer/Burst) button 12 Lens
6 Power/Favorites switch 13 DC-In (3V) for optional AC adapter
7 Speaker
3
2
7 964 5
10
11
12
13
1
8
urg_00741.book Page 7 Monday, July 23, 2007 10:27 AM
8 www.kodak.com/go/easysharecenter
ENGLISH
Back view
1 Review button 9 EVF/LCD button
2 Menu button 10 Zoom (Wide Angle/Telephoto)
3 Delete button 11 Share button
4 Tripod socket 12 Joystick/OK button
5 Dock connector 13 Mode dial
6 LCD 14 USB, A/V Out
7 Help/Info button 15 Optional SD card
8 EVF (Electronic viewfinder) 16 Battery compartment
4
5
6
7
8 9
3
2
1
10
11
12
13
14
15
16
urg_00741.book Page 8 Monday, July 23, 2007 10:27 AM
www.kodak.com/go/zd710support 9
1 Doing more with your camera
Storing pictures on an SD card
Your camera has internal memory. You can purchase SD cards to store more pictures
and videos.
NOTE: When using the card for the first time, format it in this camera before taking pictures.
CAUTION:
A card can only be inserted one way; forcing it may cause damage.
Inserting or removing a card while it is being accessed by the
camera may damage pictures, card, or camera.
1
Turn off the camera.
2
Insert or remove the
optional card.
3
Turn on the camera.
urg_00741.book Page 9 Monday, July 23, 2007 10:27 AM
Doing more with your camera
10 www.kodak.com/go/easysharecenter
Using optical zoom
Use optical zoom to get up to 10X closer to your subject. (You can use optical zoom
before taking a video, but you can’t zoom while recording.)
1 Use the EVF or LCD to frame your subject.
2 Press Telephoto (T) to zoom in. Press Wide Angle (W)
to zoom out.
The zoom indicator shows zoom status.
3 Take the picture or video.
NOTE: To get a focused picture every time, remember:
Always use the auto focus framing marks.
If you are using no zoom (1X, wide angle), you
can be as close as 24 in. (60 cm) to your subject.
(For Close-up/Macro mode, see
page 12).
As you zoom in, you need to move further from
your subject.
Use digital zoom in any Still mode to get up to 5X magnification beyond optical zoom.
1 Press the Telephoto (T) button past the optical zoom limit (10X).
2 Take the picture or video.
NOTE: You cannot use digital zoom for video recording. You may notice decreased image quality when using
digital zoom. The blue slider on the zoom indicator pauses and turns red when the picture quality
reaches the limit for an acceptable 4 x 6-in. (10 x 15 cm) print.
Zoom indicator
WT
D
Digital
zoom
range
Optical
zoom
range
urg_00741.book Page 10 Monday, July 23, 2007 10:27 AM
Doing more with your camera
www.kodak.com/go/zd710support 11
Using the Flash button
Mode Icon The flash fires
Auto Flash
When the lighting conditions require it.
Off
Never
Fill
Every time you take a picture, regardless of the lighting conditions. In
low light, hold the camera steady or use a tripod.
Red Eye
The flash fires once so the eyes become accustomed to the flash, then
fires again when the picture is taken.
Zoom position Flash distance
Wide angle
2–17.4 ft (0.6–5.3 m)
Telephoto
6.6–18.7 ft (2–5.7 m)
Turn on the camera to open the flash.
2
1
Press the flash button repeatedly to scroll through flash
modes. The current flash mode appears on the LCD/EVF.
NOTE:
To open the flash anytime, use the Open Flash switch.
urg_00741.book Page 11 Monday, July 23, 2007 10:27 AM
Doing more with your camera
12 www.kodak.com/go/easysharecenter
Using the Focus button
Press the Focus button to have more control over camera focusing.
1 Turn the Mode dial to P, A, S, or M mode (see
page 16).
2 Press the Focus button repeatedly until or
appears in the status bar.
3 Take a picture.
NOTE: After you take the picture, the camera stays in the Close-up/Macro or Landscape setting. To exit,
either press the
button until the icon turns off or turn off the camera.
Close-up/
Macro,
Landscape
Mode Icon Purpose Details
Close-up/
Macro
To gain sharpness
and detail in
pictures at close
range
Use available light instead of flash if possible.
Camera automatically sets the focus distance
depending on the zoom position:
Wide angle: 4.7–27.6 in. (12–70 cm)
Telephoto: 3.9–6.9 ft (1.2–2.1 m)
Landscape
To gain sharpness
of distant scenes
Camera uses infinity auto-focus. Auto-focus framing
marks are not available in Landscape.
Normal (none)
Auto focus The camera focuses when the Shutter button is
pressed halfway down.
urg_00741.book Page 12 Monday, July 23, 2007 10:27 AM
Doing more with your camera
www.kodak.com/go/zd710support 13
Using the Drive button
Using the self-timer
Use the same procedure to take a video, but:
Turn the Mode dial to Video .
Press the Shutter button completely down.
NOTE: Only the 2- and 10-second options are available in video mode.
Mode Icon(s)
Self-timer
Burst
Normal (none)
10
2X
2
1
2
3
4
Place camera on a tripod or flat surface.
Compose the scene.
Press the Shutter button halfway, then completely down.
The picture is taken after the delay.
• Once for a 10-sec. delay (so you have time to get into the scene)
• Again for a 2-sec. delay (for a steady, shutter release on a tripod)
• Again for 2 pictures (after a 10- and 18-second delay)
In any Still mode, press the Drive button.
urg_00741.book Page 13 Monday, July 23, 2007 10:27 AM
Doing more with your camera
14 www.kodak.com/go/easysharecenter
Capture modes
Capture mode For
Smart Scene
General picture taking—offers an excellent balance of image quality
and ease of use. When the Shutter button is pressed halfway, faces
are detected, the scene is analyzed, and the best settings are applied.
P, A, S, M
More creative control. (See page 16.) Program, Aperture priority,
Shutter priority, and Manual mode.
Video Video with sound.
Scene
Point-and-shoot simplicity when taking pictures under special
conditions.
High-ISO People in low-light scenes.
Digital
Image
Stabilization
Minimizing the effects of camera shake and subject movement.
Panorama
“Stitching” 2 or 3 pictures into 1 panoramic scene.
Choose the mode that best suits your
subjects and surroundings.
ISO
view single picture.
urg_00741.book Page 14 Monday, July 23, 2007 10:27 AM
Doing more with your camera
www.kodak.com/go/zd710support 15
Using the Help/Info button
What the capture icons mean
Capture modes—no buttons pressed
Repeatedly press info In To turn on/off
picture-taking mode status icons, histogram
review mode status icons, histogram, and
picture/video information
any menu Help (Press to scroll.)
Picture size
Pictures/time remaining
Storage location
AF control
setting
AF zone
Exposure metering
ISO
White Balance
Low battery
Exposure compensation
PASM setting
Shutter speed
Mode
Album name
Focus
Flash
Date stamp
Zoom
Drive
Aperture
urg_00741.book Page 15 Monday, July 23, 2007 10:27 AM
Doing more with your camera
16 www.kodak.com/go/easysharecenter
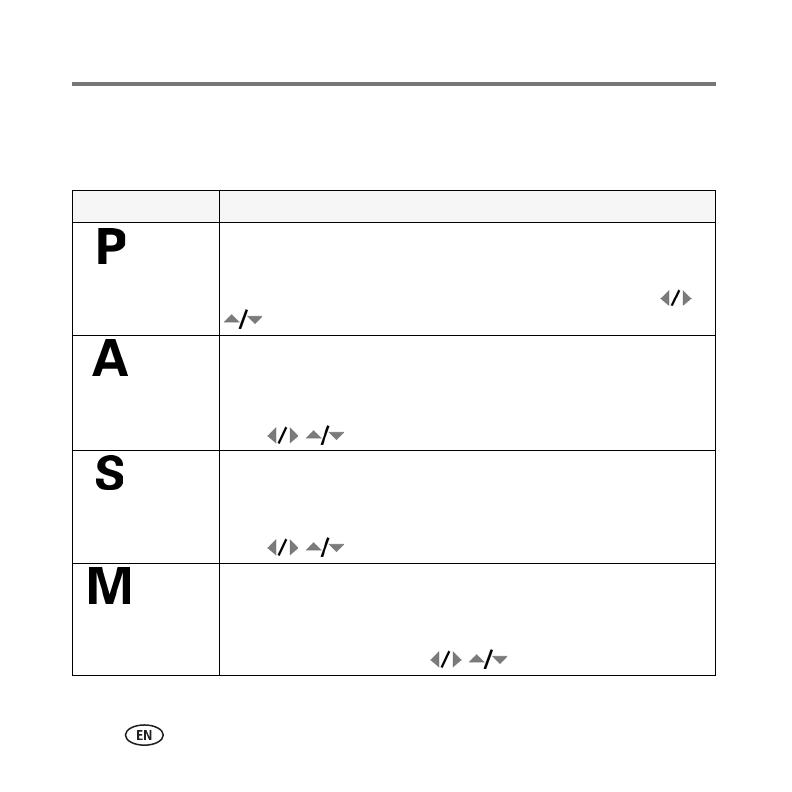
P, A, S, and M modes
PASM modes control the aperture (f-number, also known as f-stop), shutter speed,
exposure compensation, and ISO. Use the Menu button to control all other settings.
Use this mode For
Program Controlling exposure compensation (how much light enters the camera)
and ISO speed. The camera automatically sets the shutter speed and
aperture (f-stop) based on the scene lighting. Program mode offers the
ease of auto shooting with full access to all menu options. Press
to select settings.
Aperture
Priority
Controlling aperture, exposure compensation, and ISO speed. Aperture
priority mode is primarily used to control depth of field (the range of
sharpness).
NOTE: The aperture setting may be affected when using optical zoom.
Press
to select settings.
Shutter
Priority
Controlling the shutter speed, exposure compensation, and ISO speed.
The camera automatically sets the aperture for proper exposure. Shutter
priority mode is primarily used to prevent blur when your subject is
moving. To prevent camera shake, use a tripod for slow shutter speeds.
Press
to select settings.
Manual The highest level of creative control. You set the aperture, shutter speed,
and ISO speed. Exposure compensation acts as an exposure meter,
recommending the proper combination of aperture and shutter speed to
produce an acceptable exposure. To prevent camera shake, use a tripod
for slow shutter speeds. Press
to select settings.
urg_00741.book Page 16 Monday, July 23, 2007 10:27 AM
Doing more with your camera
www.kodak.com/go/zd710support 17
Changing P, A, S, or M mode settings
1 Turn the Mode dial to PASM.
2 Press to choose P, A, S, or M.
3 Press to move between settings, open a setting, or change a setting.
Aperture—(also known as f-stop) control the size of the lens opening, depth of field.
Smaller f-stop numbers indicate a larger lens opening; for portraits and low-light.
Larger f-stop numbers indicate a smaller lens opening; keeps main subject sharp.
Shutter speed—control how long the shutter stays open. A shaking hand icon
warns of slow shutter speeds. (Use a tripod for slow shutter speeds.)
Exposure Compensation—adjust the exposure; for controlling backlit or
non-standard scenes. If a picture is light, decrease the setting; if it’s dark, increase it.
ISO speedcontrol sensitivity to light. If you can’t use a flash, increase the ISO. 3200
available only at 1.2, 2.1, and 2.2 MP. Higher ISO can produce unwanted “noise.
Aperture
Shutter speed
Exposure compensation
White—selectable
Grey—non-selectable
Yellow—changeable value
Red—out of range
ISO
PASM Options
PASM mode
urg_00741.book Page 17 Monday, July 23, 2007 10:27 AM
18 www.kodak.com/go/easysharecenter
2 Working with pictures/videos
Magnifying a picture
Deleting pictures and videos
Using the undo delete feature
If you accidentally delete a picture/video, you may be able to use Undo Delete to
retrieve it. This feature is only available immediately after you delete a single
picture/video.
Magnify 1X - 8X.
W/T
View other parts of the picture.
Return to 1X.W
1
2
View previous/next.
Press Review.
1
2
4
3
Follow the screen prompts.
Press Delete.
View previous/next.
Press Review.
urg_00741.book Page 18 Monday, July 23, 2007 10:27 AM
Working with pictures/videos
www.kodak.com/go/zd710support 19
What the review icons mean
Mode indicator
Scroll arrows
Email tag
Favorite tag
Print tag/number of prints
Sound tag
Picture number
Image storage location
Perfect Touch tech.
Album
Battery level
Protected
Mode indicator
Video length
Video number
Image storage location
Protected
Scroll arrows
Email tag
Favorite tag
Album
urg_00741.book Page 19 Monday, July 23, 2007 10:27 AM
20 www.kodak.com/go/easysharecenter
3 Solving camera problems
For step-by-step product support, visit www.kodak.com/go/zd710support and select
Interactive Troubleshooting & Repairs.
If Try one or more of the following
Camera does not
turn on
Insert a new or charged battery.
If practical, connect the camera to a Kodak 3-volt AC adapter (sold
separately), then try again.
Camera does not turn
off and the lens does
not retract
Camera buttons and
controls do not function
Lens does not extend
when camera turns on
or does not retract
Confirm that the battery in camera is charged.
Turn camera off, then on again. (Lens does not extend in Favorites
mode.)
If problem still exists, get help. Visit www.kodak.com/go/contact.
EVF/LCD is black or
does not turn on
Remove the lens cap.
Push the EVF/LCD button to change the display.
Battery life is short
Make sure the correct battery type is installed (see page 2).
Wipe the contacts with a clean, dry cloth before inserting a battery
in the camera.
Insert a new or charged battery (see page 2).
urg_00741.book Page 20 Monday, July 23, 2007 10:27 AM
  • Page 1 1
  • Page 2 2
  • Page 3 3
  • Page 4 4
  • Page 5 5
  • Page 6 6
  • Page 7 7
  • Page 8 8
  • Page 9 9
  • Page 10 10
  • Page 11 11
  • Page 12 12
  • Page 13 13
  • Page 14 14
  • Page 15 15
  • Page 16 16
  • Page 17 17
  • Page 18 18
  • Page 19 19
  • Page 20 20
  • Page 21 21
  • Page 22 22
  • Page 23 23
  • Page 24 24
  • Page 25 25
  • Page 26 26

Kodak EASYSHARE ZD710 User manual

Category
Bridge cameras
Type
User manual

Ask a question and I''ll find the answer in the document

Finding information in a document is now easier with AI