Page is loading ...

INSTALLATION GUIDELINES
PAGE 1 OF 2 | UPDATED ON 7.4.2023
PRODUCT SUPPORT | 800.927.2120 | WATERWORKS.COM
STYLE No. HNTW03
Henry Multi Rail Towel Warmer
23” x 21 1/2” x 5 1/2“
TECHNICAL DETAILS:
DETAIL
SPECIFICATION
DIAMETER OF TUBES
1 1/4” [32mm]
PRIMARY MATERIAL
Brass
WEIGHT
14lbs [6KG]
APPROXIMATE POWER OUTPUT
60W
IP RATING
IP67
APPROXIMATE TEMPERATURE (AT NORMAL ROOM TEMP)
110 °F [45°C]
STANDARD CABLE LENGTH
8Ft [2.4m]
VOLTAGE
110V
AMPS
0.55A
IMPORTANT:
➢ To ensure this product is installed properly, you must read and follow these guidelines.
➢ The owner/user of this product must keep this information for future reference.
➢ Install adequate blocking or position over a stud to properly secure the fixture.
➢ Inspect this product, upon receiving, to ensure it is the correct model and you have all
parts required for proper installation.
➢ This product must be installed by a professional licensed contractor. Be sure your
installation conforms to all federal, state, and local codes.
➢ Take all necessary precautions to ensure that this product is protected during installation.
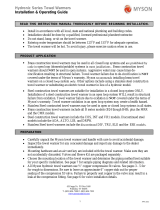
Method of Installation
1. Remove the Wall Escutcheon from the Rail by removing the set screw
underneath.
2. Drill holes for the Wall Screw / Wall Plug at the appropriate centers. Check they
are level using a spirit level.
3. After feeding the ground cable and power cable through the wall, push the Rail
into Wall Escutcheon and secure with the set screws. CARE SHOULD BE TAKEN not
to scratch the towel warmer with the hex key.
4. Commence making the electrical connections. Recommended to be protected by
a GFCI Circuit, refer to local and national code requirements.
5. Test by turning on the power and check the temperature after 1 hour.
Wall Escutcheon
Wall Anchor
Wall Screw
Set Screw

PAGE 2 OF 2 | UPDATED ON 7.4.2023
PRODUCT SUPPORT | 800.927.2120 | WATERWORKS.COM
INSTALLATION GUIDELINES
STYLE No. HNTW03
Henry Multi Rail Towel Warmer
23” x 21 1/2” x 5 1/2“
POSITIONING:
The towel warmer is IP67 rated (as supplied) and if installed in-line with these guidelines is suitable
for all areas (Zone 1 & 2) of the bathroom. Measure the center distances of your towel warmer
for the correct positioning. The ‘Safe Zone’ is outside of Zones 1 and 2 and as per controller
installation requirements.
CABLE ROUTING:
The towel warmer power cable should be routed through the wall to the domestic power supply.
To maintain the IP67 protection, DO NOT cut the supply cord short to make the connection to the
power supply within the ‘Safe Zone’. Feed the continuous cable through the wall cavity to make
the connection at the controller or junction box inside a safe zone unless measures are taken to
keep the connections free from moisture. The cable should be run through a suitable conduit that
comply with local and national code requirements (cable should not be hard plastered into the
wall). If a cable needs to be prepared before receiving the towel warmer (first fix) then a
tracer/dummy cable should be in place to then pull the hardwired towel warmer cable through
when installing. Avoid aggressively pulling the power cable during installation as this can damage
the element inside.
TEMPERATURE CONTROL:
The towel warmer is low powered and reach a surface temperature of 110°F. In most cases they
do not need to be altered from the default temperature and can be wired directly to the switch
which is protected by an GFCI Circuit. If temperature control is still needed, a leading-edge dimmer
switch is recommended. Although other manufacturers timers / smart home systems can also be
installed in conjunction with the towel warmer if compatible (refer to suppliers’ documentation).
As the towel warmer is not a room heater, thermostats are not required.
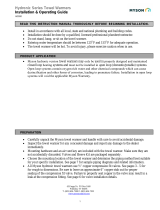
Secondary Earth Cable
Power Cable. Containing:
Live (Black),
Neutral (White)
& Ground (Green)
Screw Hole
Cable Outlet Slot
CABLE OUTLET SIDE
10mm [3/8”]
20mm [3/4”]
/