
BEFORE YOU BEGIN
Read these instructions completely
and carefully.
IMPORTANT – Save these instruc-
tions for local inspector’s use.
IMPORTANT – Observe all governing
codes and ordinances.
Note to Installer – Be sure to leave these
instructions with the Consumer.
Note to Consumer – Keep these instructions
with your Owner’s Manual for future
reference.
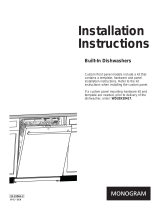
Installation
Instructions
DOOR AND ACCESS PANEL
COLOR CHANGE KIT
GPF310 and GPF410 Series Kits
GPF310A, GPF410A – Almond panels
GPF310B, GPF410B – Black panels
GPF310C, GPF410C – Bisque panels
GPF310W, GPF410W – White panels
GPF410S – Stainless Steel
WARNING:
To prevent electric shock, disconnect electri-
cal power supply to dishwasher before
changing panels. Do not operate dishwasher
while changing panels or when lower access
panel assembly is removed.
TOOLS AND MATERIALS
REQUIRED:
• 1/4" socket driver
• Phillips screwdriver
• Safety Glasses
• Gloves to protect against sharp edges
The GPF310 and GPF410 series trim kit is
designed to provide a color change or to
conceal minor damage to original dishwasher
door and access panels.
The new door panel cover provided in this kit
is designed to completely cover the existing
dishwasher door. Do not remove the original
door panel. 2 screws are provided for easy
installation.
This kit also provides a replacement access
panel assembly. The original access panel
assembly should be removed, discarded and
replaced with this piece.
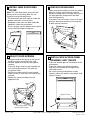
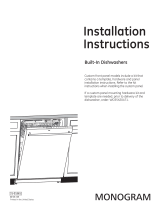
1 REMOVE LOWER ACCESS PANEL
ASSEMBLY
• Remove the two screws below the access
panel. Retain screws.
• Loosen the two screws located between the
door and the access panel.
• Remove the access panel assembly from the
dishwasher and discard.
• Remove the toekick and set aside.
Note: Do not remove the insulation behind the
toekick.
STOP
Loosen 2 Screws
Escutcheon
Door
Panel
Access Panel
Toekick
Loosen 2 Screws
Escutcheon
Door
Panel
Access Panel
Toekick

5 INSTALL NEW ACCESS PANEL
ASSEMBLY AND TOEKICK
• Place the toekick against the bottom of the
dishwasher.
• Place the new access panel assembly
against the dishwasher and tighten the
attached screws.
• Re-install two original bottom screws
loosely. Adjust the toekick up or down and
tighten screws.
Pub. No. 31-30541 SPECIFICATIONS SUBJECT TO CHANGE WITHOUT NOTICE DWG. NO. 206C1559P081
N.D. 923-13 2/04
4 CHECK DOOR BALANCE
• Open and close the door to check for proper
balance. Correct spring tension should
prevent the door from rising by itself from a
full open position and prevent the door
from falling heavily.
• If the door rises on its own, from a full open
position, decrease tension by moving one
or both springs forward.
3 ADJUST DOOR SPRINGS
• Grasp the end of the spring at the rear of
the dishwasher and release the hook.
• Release opposite end of the spring and
remove.
• Place the long end of the spring hook into
the link and place plastic link onto the
hinge arm hook.
• Stretch the short end of the spring and
hook into the 4
th
hole from the front of the
channel.
• Repeat the same procedure for the
opposite side.
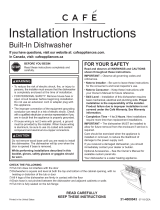
2 INSTALL NEW DOOR PANEL
COVER
Note: The new door panel cover will com-
pletely cover the existing door. Do not
remove the original door panel.
• Tip door panel and slide up and under the
bottom and sides of escutcheon.
• Snap door panel over the door and slide
upwards, under the escutcheon.
• Drive 2 screws into the bottom of the panel
using a Phillips head screwdriver.
New Door
Panel Cover
Plastic
Link
Insert Spring Hook
Through Inside of Frame
Less Tension
Tighten 2 Screws
Page is loading ...

Loosen 2 Screws
Escutcheon
Door
Panel
Access Panel
Toekick
Apriete los 2 tornillos
M
enos tensi
ón
Nueva cubierta del
panel de puerta
Eslabón de
plástico
Inserte el gancho del
resorte a través de la
parte interior del bastidor
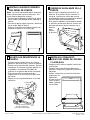
5 INSTALE EL CONJUNTO
NUEVO DEL PANEL DE ACCESO
Y LA REJILLA
• Ponga la rejilla contra la parte inferior del
lavavajillas.
• Ponga el conjunto del panel de acceso
contra el lavavajillas y apriete los tornillos
adjuntos.
• Vuelva a atornillar los tornillos inferiores
originales, sin
apretarlos.
Ajuste la rejilla
hacia arriba o
abajo y apriete
los tornillos.
Pub. No. 31-30541 ESPECIFICACIONES SUJETAS A CAMBIO SIN PREVIO AVISO DWG. NO. 206C1559P081
N.D. 923-13 2/04
4 VERIFIQUE EL BALANCE DE LA
PUERTA
• Abra y cierre la puerta para verificar su
balance. Si la tensión de los resortes es
correcta, la puerta no subirá por cuenta
propia desde la posición totalmente abierta
y evitará que caiga pesadamente.
• Si la puerta sube por cuenta propia, desde
la posición totalmente abierta, mueva uno
o ambos extremos de los resortes hacia
delante
para
reducir
la tensión.
3 AJUSTE LOS RESORTES DE LA
PUERTA
• Sujete el extremo del resorte en la parte
posterior del lavavajillas y suelte el gancho.
• Suelte el otro extremo del resorte y retírelo.
• Introduzca el extremo largo del gancho en
el eslabón e introduzca el eslabón de
plástico en el gancho del brazo articulado.
• Estire el extremo corto del resorte y
engánchelo en el cuarto orificio del frente
del canal.
• Repita el mismo procedimiento en el lado
contrario.
2 INSTALE LA NUEVA CUBIERTA
DEL PANEL DE PUERTA
Nota: La nueva cubierta del panel de puerta
cubrirá totalmente la puerta existente. No
retire el panel de puerta original.
• Incline el panel de puerta y deslice la pieza
hacia arriba y por debajo de los lados de la
lámina.
• Presione el panel sobre la puerta y deslícelo
hacia arriba, bajo la lámina.
• Atornille 2 tornillos en el panel inferior con
un destornillador en cruz (Phillips).
-
 1
1
-
 2
2
-
 3
3
-
 4
4


Ask a question and I''ll find the answer in the document
Finding information in a document is now easier with AI
in other languages
- español: GE GPF410S Guía de instalación
Related papers
-
GE GPF325W Installation guide
-
-
-
-
-
-
-
-
-
GE ZICP360NHRH Installation guide
Other documents
-
Monogram ZIR360NNLH Installation guide
-
-
Haier HDBC100AFS Installation Instructions Manual
-
-
 GE Monogram ZDT975SPJSS DL baa64a09c955faa48ffb35ce0d93
-
 GE Monogram ZDT975SPJSS Installation guide
-
 Cafe CDT866P3MD1 Installation guide
-
GE Profile PDT845SMJES Installation View
-
Kenmore 66516641891 Installation guide
-
Yes ZDT985SPNSS Installation guide


