9www.aeg.com
GB
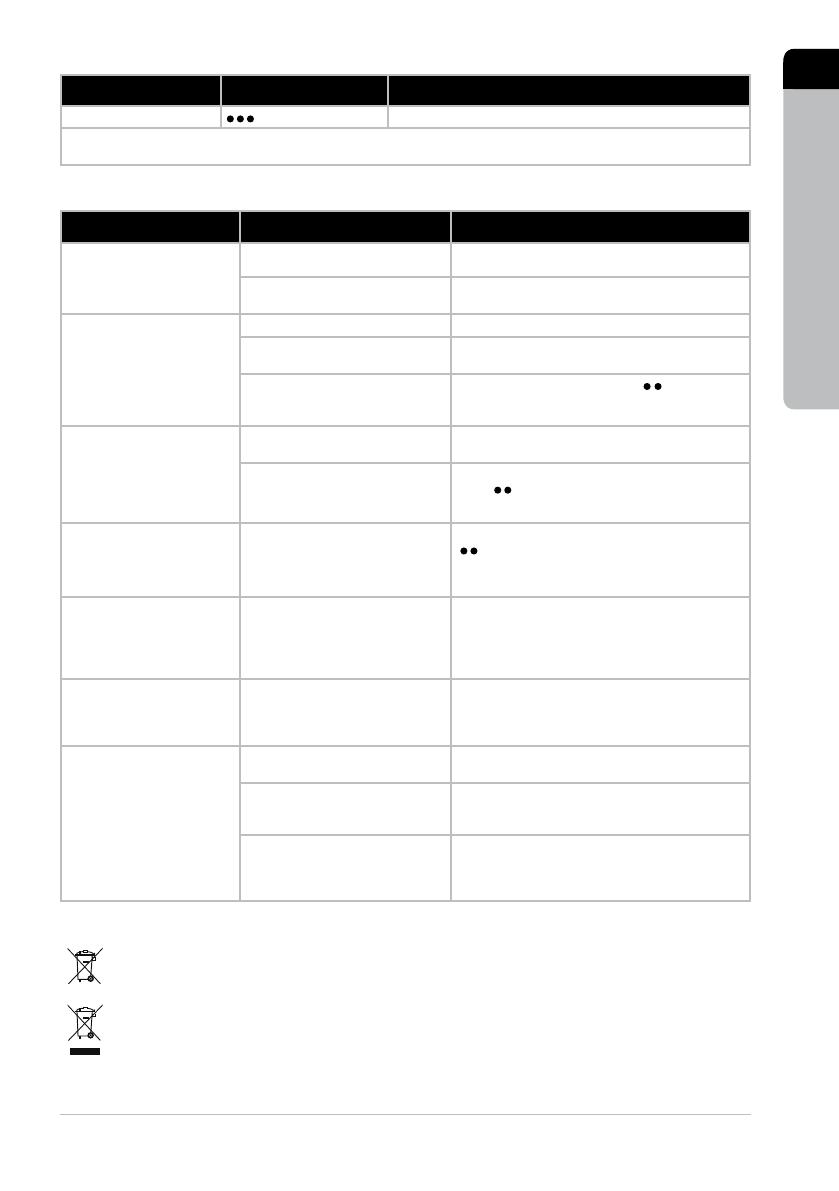
FABRIC TEMPERATURE SETTING IRONING RECOMMENDATION
Denim to “MAX” Use maximum steam.
Varied ironing speed and fabric dampness might cause optimal setting to dier from that recommended in the
table!
TROUBLESHOOTING
PROBLEM POSSIBLE CAUSE SOLUTION
Soleplate is not heating even
though iron is turned on.
Connection problem Check main power supply cable, plug and outlet.
Temperature control is in MIN
position.
Select adequate temperature.
Iron does not produce
steam.
Not enough water in tank. Fill water tank (see “Getting started”, no 2).
Steam control is selected in non-
steam position.
Set steam control between positions of minimum
steam and maximum steam (see “Ironing chart”).
Selected temperature is lower
than that specified to use with
steam.
Increase temperature to at least
.
Steam jet and vertical steam
jet function does not work.
Steam jet function was used very
frequently within a short period.
Put iron on horizontal position and wait before
using steam jet function.
Iron is not hot enough. Adjust the proper temperature to steam ironing
(up to
). Put iron in vertical position and wait
until temperature indicator light turns o.
Water leaks from the
soleplate during ironing.
The iron is not hot enough. Set the temperature dial to a temperature
(
to maximum) suitable for steam ironing. Put
the iron on its heel and wait until the light has
gone out before you start ironing.
Flakes and impurities come
out of the soleplate during
ironing.
You have used hard water, which
has caused scale akes to develop
in the water tank.
Press and hold the steam button for about one
minute to get steam. Then hold one more minute
in order to clean the steam generating system.
Iron an old towel, to ensure that any residues
inside the iron are not transferred to the laundry.
Water leaks from the
soleplate while the iron is
cooling down or after it has
been stored.
The iron has been put in
horizontal position while there is
still water in the water tank.
Empty the water tank and set the steam control
to position o before storing the iron.
Brown streaks come out of
the soleplate while ironing
and stain the linen.
You have used chemical descaling
agents.
Do not use any descaling agents.
Fabric bres have accumulated in
the holes of the soleplate and are
burning.
Clean the soleplate with a damp soft cloth.
Fabrics might not be properly
rinsed or the garments are new
and have not been washed before
ironing.
Please rinse the laundry properly again.
DISPOSAL
This symbol on the product indicates that this product contains a battery which shall not be disposed with
normal household waste.
This symbol on the product or on its packaging indicates that the product may not be treated as household
waste. To recycle your product, please take it to an ocial collection point or to an AEG service center that
can remove and recycle the battery and electric parts in a safe and professional way. Follow your country’s
rules for the separate collection of electrical products and rechargeable batteries.
AEG reserves the right to change products, information and specications without notice.


