Page is loading ...

D Anleitung ..............................4–22
Vor der ersten Benutzung des
Bügeleisens lesen Sie bitte die
Sicherheitshinweise auf Seite 4 sorg-
fältig durch.
GR Βιβλίο οδηγιών
....................
4–22
Πριν χρησιμοποιήσετε για πρώτη
φορά το σίδερο, παρακαλούμε
διαβάστε τις υποδείξεις ασφαλείας
στη σελίδα 5.
GB Instruction book ............23–29
Before using the appliance for the
rst time, please read the safety
advice on page 18 carefully.
NL Gebruiksaanwijzing .......4–22
Lees, voordat u het strijkijzer voor
de eerste keer gebruikt, zorgvuldig
het veiligheidsadvies op pagina 6.
F Mode d’emploi ..................4–22
Avant d'utiliser le fer pour la
première fois, veuillez lire attentive-
ment les consignes de sécurité
en page 7.

23
d
GR
NL
F
GB
F
E
d
C
B
A
M
L
K
J
I
H
N O
R S T
P
Q
G
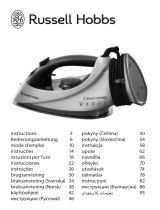
Components
A. Steam button
B. Soft handle
C. Temperature alignment
mark
D. Temperature selector
E. Temperature indicator
light
F. Hot water pipe
G. Mains cable
H. Base unit
I. Anti-calc cartridge
J. Water tank
K. Maximum water level
indicator
L. Stainless steel soleplate
M. Iron rest
N. Power indicator light
O. Descaling indicator light
P Low level water indicator
light
Q. Steam level indicator light
(Low, Medium, High)
R. Rell reset button
S. Power button
T. Steam level control button
GB

24
GB
Read the following instruction carefully before using machine for
the rst time.
• Thisappliancecanbeusedbychildrenagedfrom8yearsandabove
and persons with reduced physical, sensory or mental capabilities or
lack of experience and knowledge if they have been given supervision
or instruction concerning use of the appliance in a safe way and
understand the hazards involved.
• Childrenshallnotplaywiththeappliance.
• Cleaningandusermaintenanceshallnotbemadebychildrenwithout
supervision.
• Keeptheironanditscordoutofreachofchildrenlessthan8yearsof
age when it is energized or cooling down.
• Thesurfacesareliabletogethotduringuse
.
• Thisproductisappropriateforusewithtapwater.Itisrecommended
to use destilled water or a mix of 50% destilled, 50% tap water.
• Theappliancemayonlybeconnectedtoapowersupplywhose
voltage and frequency comply with the specications on the rating
plate!
• Theironisnottobeusedifithasbeendropped,iftherearevisible
signs of damage on the iron or its cord or if it is leaking.
• Theappliancemustonlybeconnectedtoanearthedsocket.If
necessaryanextensioncablesuitablefor10Acanbeused.
• Iftheapplianceorthesupplycordisdamaged,itmustbereplaced
by the manufacturer, its service agent or similarly qualied person, in
order to avoid hazard.
• Theironmustbeusedandrestedonastablesurface.Whenplacing
the iron on its stand, ensure that the surface on which the stand is
placed is stable.
• Neverleavetheapplianceunattendedwhileconnectedtothesupply
mains.
• Theappliancemustbeswitchedoandthemainsplugwithdrawn
each time after use, before cleaning and maintenance.
• Theplugmustberemovedfromthesocketoutletbeforethewater
reservoir is lled with water.
• Themainscablemustnotcomeintocontactwithanyhotpartsofthe
appliance.
• Donotimmersetheapplianceinwateroranyotherliquid.
• Donotexceedthemaximumllingvolumeasindicatedonthe
appliances.
• Thisapplianceisintendedfordomesticuseonly.Themanufacturer
cannot accept any liability for possible damage caused by improper or
incorrect use.

25
d
GR
NL
F
GB
GB
Ironing chart
Fabric Temperature setting Ironing recommendation
Acrylic
Dry iron on wrong side.
Acetate
Dry iron on wrong side while still damp or use spray to dampen.
Nylon & Polyester
Iron on wrong side while still damp or use spray to dampen.
Rayon
Iron on wrong side of fabric.
Viscose
Mainly dry iron. Steam can be used under manufacturer’s instructions.
Silk
Iron on wrong side. Use an ironing cloth to prevent shine marks.
Cotton blends
Check label and follow manufacturer’s instructions. Use setting fo the bre
requiring lowest setting.
Wool & wool blends
Steam iron on wrong side or use ironing cloth.
Cotton
Dry iron while still damp or use spray to dampen. Use steam medium to
high.
Corduroy
Steam iron on wrong side or use ironing cloth.
Linen
to “max”
Iron on wrong side or use ironing cloth to prevent shine marks, especially
with dark colours. Dry iron while still damp or use spray to dampen. Use
steam medium to high.
Denim
to “max”
Use maximum steam.
Varied ironing speed and fabric dampness might cause optimal setting to dier from that recommended in the table!
Anti-scale cartridge
Hardness To signicantly reduce the built-up of lime scale in your
steam station, we recommend to change the lter:
Hard water Every10tanks
Medium water Every 20 tanks
Soft water Every 40 tanks
For the best performance we recommend cartridge from our range, reference number AEL06

26
1. Before rst use. Remove all adhesive
remains and gently rub with a
dampened cloth. Position the steam
generator iron horizontally on the
ironing-board or on a heat resistant,
secure surface at the same height
as an ironing-board. Unwind and
straighten the power cord and the
steam cord. When turned on for the
rst time, temporary vapours/odours
may occur.
2. Remove the water tank by gripping
the slot on the underside and pulling
it gently away from the base unit (A).
Detach the anti-calc cartridge and
then immerse it in water for more
than one minute (B). Insert the anti-
calc catridge back. Fill the water tank
using cold water. It is recommended
to use destilled water or a mix of 50%
destilled, 50% tap water. Empty the
water tank to rinse out any foreign
particles which may remain from the
manufacturing process.
3. Always rell the water tank to MAX
level using cold water. (A). Insert the
water tank into the base unit (B).
It is recommended to use destilled
water or a mix of 50% destilled, 50%
tap water. Ensure that the water tank
latches securely into place.
4. Connect the steam generator iron
to the mains supply. Press the power
button (A). Turn the temperature
selector clockwise to maximum
setting (B). The temperature indicator
light on the iron will illuminate. Then,
select a steam level on the control
panel, from low - medium - high
steam.
5. When the temperature indicator light
turns on, the steam station is pre-
heating. When the light turns o, it is
ready to be used. Press and hold the
steam button for about one minute
to get steam. Then hold one more
minute in order to clean the steam
generating system.
6. Iron an old towel, to ensure that
any residues inside the iron are not
transferred to the laundry.
If necessary, wipe the sole plate with a
slightly damp cloth.
GB
B
B
A
A
B
A
Getting started

27
d
GR
NL
F
GB
B
A
GB
Operating instructions
1. Connect the steam generator
iron to the mains supply. Press the
power button. When the power
switch is pressed, the power
indicator will illuminate. Wait for
one to two minutes, until the steam
lamp lluminates. Select the steam
level between Low - Medium and
High. See Ironing chart for ironing
recommendation.
2. if the lower water level indicator is
illuminated (A) (followed with two
beep sounds), rell the water tank.
After relling the water tank, press and
hold the rel reset button (B) for about
6 seconds. The rell reset button will
be extinguished. Steam can now be
used again.
3. To activate the steam, press the
steam button. When releasing the
button, use up the steam before
putting it back on the iron rest of the
steam station.
4. To turn o the iron by pressing
the power button for a while, until
a beep will sound. If the iron is left
unattended on the iron rest, it turns
automaticallyoafter10minutes.
5. Always cool the iron fully on the iron
rest before stowing away. Once the
iron is cool, empty the water tank.
Store the steam generator iron
6. Always store the cord winded safely
by the side of the iron. NEVER wind the
power cord around the iron

28
1. Always store iron on its heel rest.
To clean exterior surfaces, use a damp
soft cloth and wipe dry.
Caution: Do not use any chemical
solvents, as these will damage the
surface.
2. Replacing the de-calc box: If the
descaling indicator is illuminated
detach the water tank. Remove the
de-calc box by pulling it upwards.
Immerse a new de-calc box in water
for more than one minute, then
place it inside the water tank. Ensure
the new de-calc box is correctly
positioned, if not, the descaling
indicatorwillkeepashing.
For the best performance we
recommend cartridge from our range,
reference number AEL06.
3. When nished using the appliance,
turn the temperature dial to the OFF
(“0“) position. Store the iron on the
iron rest.
Note: Do not store the iron with water
in the tank.
GB
Cleaning (do not use any detergent)

29
d
GR
NL
F
GB
GB
Troubleshooting
Disposal
Recycle the materials with the symbol
. Put the packaging in applicable
containers to recycle it.
Help protect the environment and human
health and to recycle waste of electrical
and electronic appliances.
Do not dispose appliances marked with
the symbol
with the household
waste. Return the product to your
local recycling facility or contact your
municipal oce.
Problem Possible cause Solution
Soleplate is not heating even though
iron is turned on.
Connection problem Check main power supply cable, plug
and outlet.
Temperature control is in MIN position. Select adequate temperature.
Iron does not produce steam. Not enough water in tank. Fill water tank (see “Getting started”,
no 2).
Steam control is selected in non-steam
position.
Set steam control between positions of
minimum steam and maximum steam
(see “Ironing chart”).
Selected temperature is lower than that
specified to use with steam.
Increase temperature to at least
.
Steam jet and vertical steam jet
function does not work.
Steam jet function was used very
frequently within a short period.
Put iron on horizontal position and
wait before using steam jet function.
Iron is not hot enough. Adjust the proper temperature to
steam ironing (up to
). Put iron
in vertical position and wait until
temperature indicator light turns o.
Water leaks from the soleplate during
ironing.
The iron is not hot enough. Set the temperature dial to a
temperature
(
to maximum) suitable for steam
ironing. Put the iron on its heel and
wait until the light has gone out before
you start ironing.
Flakes and impurities come out of the
soleplate during ironing.
You have used hard water, which has
causedscaleakestodevelopinthe
water tank.
Press and hold the steam button for
about one minute to get steam. Then
hold one more minute in order to
clean the steam generating system.
Iron an old towel, to ensure that
any residues inside the iron are not
transferred to the laundry.
Water leaks from the soleplate while
the iron is cooling down or after it has
been stored.
The iron has been put in horizontal
position while there is still water in the
water tank.
Empty the water tank and set the
steam control to position o before
storing the iron.
Brown streaks come out of the
soleplate while ironing and stain the
linen.
You have used chemical descaling
agents.
Do not use any descaling agents.
Fabric bres have accumulated in the
holes of the soleplate and are burning.
Clean the soleplate with a damp soft
cloth.
Fabrics might not be properly rinsed or
the garments are new and have not been
washed before ironing.
Please rinse the laundry properly
again.

3485 A DBS3350 02011013
Printed on recycled paper
www.aeg-home.com
Electrolux Hausgerate Vertriebs GmbH
Further Strasse 246
D-90429 Nurnberg
Germany
/