Page is loading ...

ENGLISH
• Please refer to the Installation, Care & Use manual packaged with your hot water dispenser for additional Important Safety
Information and dispenser installation instructions.
For your satisfaction and safety, read all instructions, cautions and warnings before installing or using this tank.
• This particular unit is not for commercial/industrial use.
WHAT YOU SHOULD KNOW BEFORE YOU BEGIN
SYSTEM REQUIREMENTS (HOT WATER TANK, DISPENSER AND OPTIONAL FILTRATION SYSTEM):
ADDITIONAL CONSIDERATION WHEN UTILIZING FILTRATION SYSTEM:
Welcome and thank you for purchasing this InSinkErator instant hot water tank.
• Make sure that all electrical, plumbing and connections conform to local codes.
• A standard, earthed (grounded) electrical outlet, with continuous supplied power, is required under the sink for the tank.
• This outlet must be fused and should not be controlled by the same wall switch that operates the disposer, unless you have a
SinkTop Switch™ from InSinkErator
®
. Fuse/circuit breaker required is 15 amp for 120 volt.
• Do not install on hot water supply lines. The maximum operating water temperature of this system is 100 °F (38 °C). Attach to
cold water supply only.
• It is recommended that a dedicated control valve be installed on the cold water line supplying water to this system.
• To prevent damage or unit not operating properly, the water pressure must be between 15 psi - 80 psi
(1.0 bar - 5.5 bar; 103 kPa - 550 kPa). Ambient (room) temperature between 40 °F (4 °C) and 110 °F (43 °C).
• If your water pressure exceeds 80 psi (550 kPa), you must install a pressure limiting valve.
• The use of a water lter should NOT result in the water pressure dropping below 15 psi (103 kPa).
• Do not install where water hammer conditions occur. If water hammer conditions exist you must install a water hammer
arrester.
• The exible vent and outlet tubes must be correctly connected to the dispenser supplied by the manufacturer. They must not be
obstructed or connected to a normal type faucet or any other type.
• Protect from freezing, shut off water supply, remove lter cartridge, drain hot water tank and tubing when temperatures are
expected to drop below 40 °F (4 °C); see Seasonal Storage/Drainage section.
• Do not use a torch or other high temperature sources near system, cartridges, plastic ttings or plastic plumbing.
• Do not install near water pipes which will be in path of a drilling tool when selecting the position to mount the bracket.
• Mount system in such a position as to prevent it from being struck by other items used in the area of installation.
• Ensure that the location and fasteners will support the weight of the system when installed and full of water.
• When mounting tank and lter, screws provided are for use in wood studs or cabinets only. Use wall anchors (not supplied) for
installation into plasterboard.
• Ensure all tubing and ttings are secure and free of leaks.
• Do not install using rigid piping. System intended for use with plastic water lines (such as PEX tubing, PE tubing, PP tubing).
• Do not install this system if any of the quick connect collets are missing from the lter head or Y-Quick Connector. Contact
InSinkErator if collets are missing from any ttings.
• For systems using two handle HC model dispensers, operate only one handle at a time.
• Important: Do not allow the unit to continuously boil.
• Regularly inspect the system. If there are signs of water leakage, turn off the water supply and contact InSinkErator.
• A drain pan, plumbed to an appropriate drain or outtted with a leak detector, should be used in those applications where any
leakage could cause property damage.
• If you suspect elevated levels of chlorine in your water, or your water has a rusty appearance before the installation of this unit,
use of our water ltration system is recommended.
• This product contains stainless steel. The manufacturer cannot guarantee against rusty water because of the number of factors
that are involved beyond the manufacturer’s control. However, the sudden appearance of rusty water discharged from the hot
water dispenser may indicate the need for service or replacement of this product.
• Moving parts inside the tank causing a rattling noise is normal.
• For questions or concerns, please contact InSinkErator (see back page for contact information).
• The disposable lter cartridge MUST be replaced every 6 months, at the rated capacity or sooner if a noticeable reduction in
ow rate occurs.
• Failure to replace the disposable lter cartridge may lead to reduced lter performance and cracks in the lter housing, causing
water leakage or ooding.
• Protect from freezing, remove lter cartridge when temperatures are expected to drop below 40 °F (4 °C).
• Do not install systems in areas where ambient temperatures may go above 110 °F (43 °C).
• Do not install in direct sunlight or outdoors.
!
2
A potentially hazardous situation, which, if not avoided,
could result in death or serious injury.
A potentially hazardous situation, which, if not avoided,
may result in minor or moderate injury.
Notice is used to address practices not related to personal
injury.
NOTICE
!
!
!
!
WARNING: To reduce the risk associated with choking: Do not allow children under 3 years of age to have access to
small parts during the installation of this product.
WARNING: Electric Shock Hazard. To reduce the risk of electric shock, do not immerse or expose the product,
exible cord or plug to rain, moisture or any liquid or when standing in or on damp or wet surfaces. If any electrical
product falls into water, UNPLUG it immediately. DO NOT REACH INTO THE WATER. Important: Prior to reconnecting
to the power supply, the product should be inspected by a qualied technician.
WARNING: Personal Injury/Property Damage. To reduce the risk associated with hazardous voltage due to an
installer drilling through existing electric wiring in the area of installation: Do not install near electric wiring or water
pipes which may be in path of a drilling tool when selecting the position to mount the system bracket.
WARNING: Electric Shock Hazard Using an ungrounded (no earth ground) or improperly connected appliance can result
in serious injury or death from electrical shock.
• Use this water heater only for its intended use as described in this manual.
• This product is not intended for use by persons (including children) with reduced physical, sensory or mental capabilities, or
lack of experience and knowledge, unless they have been given supervision or instruction concerning use of the appliance
by a person responsible for their safety. Children should be supervised to ensure that they do not play with the appliance.
• Do not operate this product if it has been or appears to be damaged in any manner or after the product malfunctions, or is
dropped. Return the complete product immediately to your retailer or dealer for inspection.
• If the supply cord is damaged, it must be replaced by the manufacturer, its service agent or similarly qualied persons in
order to avoid a hazard.
Important: Always arrange the power cord so that it cannot come in contact with hot surfaces.
• Do not disconnect the product from the power supply by pulling on the cord.
• The use of accessory attachments other than those recommended by the manufacturer may cause safety hazards.
Save these Instructions.
IMPORTANT SAFETY INFORMATION
!
*
!
!
!
!
CAUTION: Personal Injury/Property Damage. This tank is a non-pressurized tank. DO NOT modify this system. DO NOT
close vent tube or connect other types of dispensers or valves to the tank. Use only the InSinkErator dispenser supplied.
Use only parts provided. Contact InSinkErator for repairs or replacement components.
NOTICE: Property Damage. To reduce the risk associated with property damage due to water leakage or ooding, and to
ensure optimal performance:
WARNING: To reduce the risk associated with the ingestion of contaminants: Do not use with water that is
microbiologically unsafe or of unknown quality without adequate disinfection before or after the system.
WARNING: Fire Hazard. To minimize possibility of re,
DO NOT store ammable items such as rags, paper or aerosol cans near the tank. DO NOT store or use gas or other
ammable vapors and liquids in the vicinity of this or any other appliance.
WARNING: Leak Hazard. Regularly inspect dispenser and plumbing ttings for leaks, which can cause property damage
and could result in personal injury.
• Read and follow all instructions before installation and use of this system.
• Installation and use MUST comply with all state and local plumbing codes.
• Change the disposable lter cartridge; the disposable lter cartridge MUST be replaced every 6 months or sooner.
This appliance must be earthed (grounded). This hot water tank is equipped with a cord that has a grounding conductor and
earth ground pin. The plug must be connected to an appropriate outlet that is properly installed and earthed (grounded) in
accordance with all local codes and ordinances. Do not modify the plug provided with the appliance – if it will not t the outlet,
have a proper outlet installed by a qualied electrician. Check with a qualied electrician or tradesman if you are in doubt as to
whether the hot water tank is properly earthed (grounded).
A hot water tank, like any water heater, has a limited life and will eventually fail. To avoid possible property damage and personal
injury, this hot water tank should be regularly examined for leakage and/or corrosion and replaced when necessary. A drain pan,
plumbed to an appropriate drain or outtted with a leak detector, should be used in those applications where any leakage could
cause property damage.
3
!
CAUTION: HOT! This system can dispense near boiling water. Care and supervision should be taken to avoid scalding.
Expose only items capable of safely withstanding the selected near boiling water settings.

8
9
1 2 (HWT200-F1000S)
4
3
+
6
Hot Water Tank and Filtration Components
Componentes del tanque de agua caliente y sistema de filtración
Composants du réservoir d’eau chaude et du système de filtration
E BC
A
D
5A (HWT200-F1000S)
5B (HWT200)
ENGLISH
A. InSinkErator Hot Water Dispenser
B. White Hot Water Outlet Tube
C. Clear Vent Tube
D. Copper or Braided Tubes
E. Aspirator Tube
ESPAÑOL
A. Dispensador de agua caliente
B. Tubo blanco de salida de
agua caliente
C. Tubo de ventilación transparente
D. Tubos de cobre o trenzados
E. Tubo de aspiración
FRANÇAIS
A. Robinet d’eau chaude
B. Tube de sortie d’eau
chaude blanc
C. Tube d’aération transparent
D. Tuyaux en cuivre ou tressés
E. Tube d’aspiration
ENGLISH
1. Hot Water Tank
2. Filter Head and Cartridge
3. 3/4" (
19mm
) Screws (4)
4. Y-Quick Connector
5A. Angle Stop Valve
5B. Connector(s) and Fittings
6. Filter Tubes (2)
ESPAÑOL
1. Tanque de agua caliente
2. Cabezal de ltro y cartucho
3. Tornillos de 19mm (¾") (4)
4. Conector rápido en “Y”
5A. Válvula de paso angular
5B. Conector(es) y acoples
6. Tubos del ltro (2)
FRANÇAIS
1. Réservoir d’eau chaude
2. Tête de ltre et cartouche
3. Vis de 19 mm (¾ po) (4)
4. Raccord rapide en Y
5A. Robinet d’arrêt d’équerre
5B. Accessoires et raccords
6. Tubes de ltre (2)
InSinkErator Hot Water Dispenser Options (sold separately, various models available)
Opciones del dispensador de agua caliente InSinkErator (se venden por separado)
Éléments optionnels pour le robinet d’eau chaude InSinkErator (vendus séparément)

10
11
Overview of Complete Setup
Descripción general de la configuración completa
Présentation générale de l’installation complète
ENGLISH
• Drill
• Adjustable wrench
• Phillips screwdriver
• Pencil
• Tape measure
• Level
WHAT YOU NEED TO GET STARTED
Equipment Required:
Equipment You May Need:
• Anchors for plasterboard
• Basin wrench
• Tubing cutter
ESPAÑOL
• Taladro
• Llave ajustable
• Destornillador Philips
• Lápiz
• Cinta métrica
• Nivel
QUÉ NECESITA PARA COMENZAR
Equipo necesario:
Equipo que puede necesitar:
• Soportes para muro
• Llave de lavabo
• Cortatubos
FRANÇAIS
• Une perceuse
• Une clé à molette
• Un tournevis cruciforme
• Un crayon
• Un ruban à mesurer
• Un niveau
CE DONT VOUS AVEZ BESOIN POUR COMMENCER
Matériel requis :
• Dispositifs d’ancrage pour
cloison sèche
• Clé à robinet
• Coupe-tubes
Le matériel dont vous pourriez avoir besoin :
1
2
!
*
2
≤ 30" (760 mm)
< 15.7" (400 mm)
!
*
3
NOTICE:
Property Damage. Do not plug in hot
water tank. Tank must be located within 15.7"
(400mm) of dispenser and within 30" (760 mm)
or less of a standard earth (grounded) outlet. DO
NOT extend plumbing or electrical lines.
NOTICE:
Property Damage. Do not pinch or
break copper or braided tubing. Do not
distort the last 1" (25 mm) of tubing.
Note: Install InSinkErator hot water dispenser.
See dispenser Installation, Care and Use manual
(not included) for details.
*
*
Nota: Instale el dispensador de agua caliente
InSinkErator. Consulte los detalles sobre el
dispensador en el manual de Instalación,
mantenimiento y uso (no incluido).
AVISO:
Daños materiales. No conecte el tanque
de agua caliente. El tanque se debe ubicar a
400mm (15,7") del dispensador y a 760 mm (30")
o menos del tomacorriente estándar con
conexión a tierra. NO extienda las tuberías ni
las líneas eléctricas.
AVISO:
Daños materiales. No apriete ni quiebre la
tubería de cobre o trenzada. No deforme el último
tramo de 25 mm (1") de la tubería.
*
*
Remarque : Installez le robinet d’eau chaude
InSinkErator. Consultez le manuel d’installation,
d’entretien et d’utilisation (non fourni) pour plus
d’informations.
AVIS :
Dommages matériels. Ne branchez pas
le réservoir d’eau chaude.
Le réservoir doit se trouver à une distance de
400 mm (15,7 po) ou moins du robinet et à une
distance de 760 mm (30 po) ou moins d’une
prise standard mise à la terre. NE prolongez PAS
les conduites de plomberie ou d’électricité.
AVIS :
Dommages matériels. Évitez de pincer
ou de casser les tuyaux en cuivre ou tressés. Ne
déformez pas les derniers 2,5 cm du tuyau.
*
*
ENGLISH
ESPAÑOL
FRANÇAIS

13
¼"
(3mm)
₈
4
¼"
(6.4mm)
½
5
!
*
E
B
C
6
ENGLISH
NOTICE:
Property Damage. Pinched or
blocked water lines may cause damage to
the water tank. Check to make sure tubes
are connected correctly and are pushed
down as far as possible, approximately
1/2" (12 mm). Hose clamps are not
needed for connections and may
damage the tubing.
*
ESPAÑOL
AVISO:
Daños materiales.
Las líneas de
agua comprimidas o bloqueadas pueden
provocar daños en el depósito de agua.
Compruebe que los tubos estén conectados
correctamente y que estén lo más
presionados hacia abajo que sea posible,
aproximadamente 12 mm (1/2 pulgada). No
es necesario colocar abrazaderas en las
mangueras de conexión, ya que podrían
dañar las tuberías.
*
FRANÇAIS
AVIS :
Dommages matériels. Des
conduites d’eau coincées ou bloquées
peuvent causer des dommages au
réservoir d’eau.
Vériez que les tubes
sont correctement raccordés et insérés au
maximum, sur environ 12 mm (1/2 po). Des
colliers de serrage des tuyaux ne sont pas
nécessaires pour effectuer les raccordements.
Ils peuvent même endommager les tubes.
*
12
≤ 760mm (30")
!
(3mm)
¼"
8
!
7
¼"
(6.4 mm)
8
9
ENGLISH
ESPAÑOL
FRANÇAIS
WARNING. (Personal Injury) Do not locate
lter above an outlet or other electrical
device. Install head and bracket so that
connections require no stretching, kinking
or pinching of tubing.
!
ADVERTENCIA. (Lesiones personales) No
coloque el ltro encima de un tomacorriente
u otro dispositivo eléctrico. Instale la cabeza
y el soporte de manera que no se necesite
estirar, enroscar ni apretar la tubería para
las conexiones.
!
AVERTISSEMENT (Blessure) Ne placez pas
le ltre au-dessus d’une prise de courant ou
d’un autre dispositif électrique. Installez la
tête et le support de manière à ce que les
connexions ne causent pas l’étirement, des
pliures ou un pincement du tube.
!

15
ENGLISH
ESPAÑOL
FRANÇAIS
10
1/4"
(6.4 mm)
1/4"
()
1/4
11
!
*
D
4
!
*
D
4
12
NOTICE:
Property Damage. Top surface
of cartridge will be ush with bottom of the
lter and lter-label will face forward when
fully engaged.
*
NOTICE
: Property Damage. Do not extend
the lines farther than the 16” (400 mm )
provided. Ensure tube(s) and “Y” connector
t securely.
*
AVISO:
Daños materiales. La supercie
superior del cartucho quedará rasante con
el fondo de la cabeza del ltro cuando esté
completamente encajado.
*
AVISO:
Daños materiales. No extienda
las líneas más allá de los 400 mm (16”)
establecidos. Cerciórese de que los tubos y
el conector en “Y” estén bien ajustados.
*
AVIS :
Dommages matériels. La surface
supérieure de la cartouche sera au même
niveau que le fond du ltre lorsqu’elle est
complètement enclenchée.
*
AVIS :
Dommages matériels. Ne
prolongez pas les conduites au-delà des
400 mm (16 po) fournis. Assurez-vous
que le(s) tube(s) et le connecteur Y
sont bien assemblés.
*
14
ENGLISH
ESPAÑOL
FRANÇAIS
14
!
*
5A
13
HWT200-
F1000S
!
*
5B
5B
HWT200
NOTICE:
Property Damage. Tube runs need
to form to the cabinet’s contours to allow
storage space with no sharp bends. Tubes need
clean, perpendicular, burr-free cuts to ensure
a true t. Join remaining tube to cold water
supply only.
*
Note: Check all connections to ensure they are
tight and that there are no leaks.
*
AVISO:
Daños materiales. Los tramos de
tubo deben formar el contorno del gabinete
para dejar espacio de almacenaje sin curvas
agudas. Los tubos necesitan cortes limpios,
perpendiculares y sin rebabas, para asegurar
un ajuste adecuado.
Acople el tubo restante sólo
al suministro de agua fría.
Nota: Verique que todas las conexiones
estén ajustadas y que no haya fugas.
*
AVIS :
dommages matériels. La course des
tubes doit épouser les contours de l’armoire pour
laisser de l’espace de rangement sans coude.
Les tubes doivent avoir des coupes propres,
perpendiculaires, sans bavure pour obtenir un
ajustement parfait. Raccordez le tube restant à
l’alimentation en eau froide seulement.
Remarque : Vérier toutes les connexions
pour vous assurer qu’elles sont bien serrées
et qu’il n’y a pas de fuite.

17
ENGLISH
ESPAÑOL
FRANÇAIS
NOTICE:
Property Damage. Tank must be
located within 15.7” (400 mm) of dispenser
and within 30” (760 mm) or less of a
standard earth (grounded) outlet. DO NOT
extend plumbing or electrical lines.
*
Note: The indicator around the dial
turns red to indicate that the tank is
heating. The indicator around the dial
then turns white to indicate that the
tank has reached the set temperature.
Nota: El indicador alrededor del botón
selector se vuelve rojo para indicar que
el tanque se está calentando. Luego, el
indicador alrededor del botón selector
se vuelve blanco para indicar que el
tanque ha alcanzado la temperatura
establecida.
Note: The indicator around the dial turns
white to indicate that the tank has turned on.
AVISO:
Daños materiales. El depósito
se debe ubicar a 400 mm (15.7 pulgadas)
del dispensador y a 760 mm (30 pulgadas)
o menos del tomacorriente estándar con
conexión a tierra (descarga a tierra). NO
extienda tuberías o líneas eléctricas.
*
Nota: El indicador alrededor del botón
selector se vuelve blanco para indicar que el
tanque se ha encendido.
AVIS :
Dommages matériels. Le réservoir
doit se trouver à une distance de 400
mm (15,7 po) ou moins du robinet et à une
distance de 760 mm (30 po) ou moins d’une
prise standard mise à la terre. N’utilisez
AUCUNE rallonge pour les conduites de
plomberie ou les ls électriques.
*
Remarque : L’indicateur autour du cadran
devient blanc pour indiquer que le réservoir est
en marche.
12
6
1
4
11
210
48
57
39
15
!
*
16
16
ENGLISH
ESPAÑOL
FRANÇAIS
!
19
18
!
12
6
1
2
11
210
48
57
39
20
WARNING: Scalding Hazard. The
tank dispenses steaming hot
(max 98ºC/210ºF) water which can
instantly cause scalds or burns. Use
care when operating this appliance.
!
!
!
!
ADVERTENCIA: Riesgo de escaldaduras
(quemaduras). El depósito suministra
agua caliente (a 98 ºC/210 ºF como
máximo), que puede provocar
instantáneamente escaldaduras o
quemaduras. Tenga especial cuidado
cuando use este artefacto.
!
AVERTISSEMENT : danger de brûlure.
Le réservoir dispense de l’eau chaude
(max 98 ºC/210 ºF) qui peut provoquer
instantanément des brûlures.
!
CAUTION: If the water in the tank
continuously boils or steam/spitting
comes out of the spout turn the
temperature control down until the
boiling and/or steam/spitting stops.
PRECAUCIÓN: Si el agua en el tanque
hierve continuamente o sale vapor
del surtidor, reduzca el control de
temperatura hasta que se detengan el
hervor o el vapor.
MISE EN GARDE : Si l’eau dans le
réservoir bout continuellement ou si
le bec crache de l’eau ou de la vapeur,
diminuez le réglage de température
jusqu’à ce que l’ébullition ou la
production d’eau ou de vapeur s’arrête.
Remarque : L’indicateur autour du
cadran devient rouge pour indiquer
que le réservoir est en cours de
réchauffement. L’indicateur autour
du cadran devient ensuite blanc pour
indiquer que le réservoir a atteint la
température sélectionnée.

18
19
ENGLISH
!
!
!
CARE AND USE
ADDITIONAL CONSIDERATION WHEN UTILIZING FILTRATION SYSTEM:
CAUTION: Electric Shock Hazard. To prevent electrical shock, disconnect power before servicing unit. Use only a
properly earthed (grounded) and polarized electric outlet.
WARNING: Scalding Hazard. Do not allow water to boil. May result in severe burns.
CAUTION: Personal Injury.
ADJUSTING THE THERMOSTAT
For ideal performance adjust the tank temperature to the setting two steps down
(approximately 205°F, 96°C) from the maximum setting. Turn the dial on front of the tank
clockwise or counter clockwise to raise or lower the water temperature. After adjusting, depress
or twist the dispenser handle for 20 seconds for water to re-heat to the new setting.
CLEANING THE DISPENSER AND TANK
SEASONAL STORAGE/DRAINAGE
Anytime the unit is not used for extended periods of time, unplug and drain unit. If it is below freezing you will
need to unplug the unit and drain it.
FILTER GUIDE AND REPLACEMENT
To reduce the risk of water leakage or flooding, and to ensure optimal filter performance:
Change the disposable filter cartridge; the disposable filter cartridge MUST be replaced every 6 months or sooner.
Replace filter cartridge when there is an obvious decrease in water flow to the dispenser or if there is an
objectionable taste or odor to the water.
Filter replacement instructions:
• Disconnect power from unit (unplug unit).
• Depress or twist hot water dispenser lever and allow
water to flow until it is cool.
• Shut the cold water dispenser off at the valve.
• Disconnect tubes from the tank.
• Unhook tank from wall.
• Hold tank upside down and drain the water
into the sink.
• Towel dry any water drippings from tank area.
• Reinstall tank to wall and reconnect tubes.
• Remove and discard filter cartridge,
if applicable.
• To put back into working order, install new filter
cartridge (if applicable) and turn on cold water supply
at valve. Depress or twist the hot water dispenser
faucet lever and hold until water flows from the spout.
Plug in the tank.
• Flush filter for 4 minutes, 3 gal (11.4 L) before first use for F-1000, F-2000.
• Recommended water flow: .75 gpm (2.84 Lpm)
• F-1000, F-2000 filter capacity: 500 gal (1,893 L)
• Only use mild cleaners to clean the dispenser and
plastic components.
• Cleaners with acids, abrasives, alkaline, and organic
solvents will result in deterioration of the plastic
components and void the warranty.
• Regularly check for signs of corrosion by
examining the appearance of the dispensed water
every three (3) months.
• If there is any discoloration or rusty appearance,
unplug and drain unit as described in the
Seasonal Storage/Drainage section on this page
of the manual.
• If the water discoloration remains after
draining and refilling unit, discontinue use
and contact InSinkErator.
• When the inlet and outlet ports have been
closed and the filter’s internal pressure has
been relieved, water about 1/4 cup (60ml) will
discharge from vent line.
• It is recommended that carbon filters be replaced
every 6 months.
• If the new filter cartridge cannot be inserted, insert
the old one and turn counterclockwise until it stops,
remove it and then retry the new cartridge.
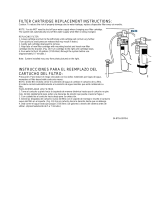
1. Replace with an InSinkErator
®
filter.
2. Place pan or dish towel under the filter to catch
water drainage during change.
3. Slowly turn the cartridge counterclockwise
completely until it stops (1/4 turn).
4. Pull cartridge straight down and discard.
5. Insert new cartridge into filter head.
6. Top surface of cartridge will become flush with the
bottom of the filter head when fully engaged.
7. Turn the cartridge clockwise until it stops (1/4 turn).
8. Align the in/out arrow on the head and bracket
assembly to the in/out arrow on the cartridge.
9. Open dispenser to expel trapped air.
10. Run water for 4 minutes before usage.
Continuous boiling sounds
in the tank or water and
steam spits forcefully from
spout without turning on
the dispenser.
Water taste or odor.
Water is not hot.
New lter does not t.
Water is too hot or not
hot enough.
Indicator lights on dial
on front of tank do not
illuminate.
The lter leaks.
Water comes out of the
vent instead of spout.
No water ow or low
water ow.
Water is dripping
from the spout/vent
intermittently.
Water is dripping
from the spout/vent
constantly.
Water discoloration/
rusty appearance.
Divided stream.
• Unit is boiling.
May be normal during initial set-up.
• Filter water ow direction is wrong.
• Filter needs to be ushed out.
• Life of lter has expired.
• The unit is unplugged.
• The electric outlet is inoperative.
• Head and bracket not fully rotated.
• Filter O-ring breach.
• Thermostat is not adjusted to
your needs.
• The unit may not be plugged in.
• The electric outlet is inoperative.
• Head and bracket not fully rotated.
• Filter O-ring breach.
• Outlet tube is blocked.
• Life of lter has expired.
• The expansion chamber is not
draining properly due to low water
pressure.
• The spout is blocked.
• Debris in the water line may be in
the dispenser valve seat, causing a
slow water leak.
• Corrosion of unit.
• Debris in the end piece.
• Depress or twist hot water dispenser handle to
release some water from the tank.
• Adjust water temperature by turning the dial on the
front counter clockwise.
• Remember that at higher altitudes, water boils at
lower temperatures.
• Review lter tube connection instructions.
• Depress or twist the dispenser and run until the water is cold.
• If there is no change, replace lter cartridge.
• Make sure the unit is connected to a correctly
earthed electric outlet.
• Make sure the circuit breaker or fuses are
functioning correctly.
• Check that the outlet is not switched off.
• Take out the new lter, put in old lter.
• Remove, inspect, reinstall lter cartridge.
• Adjust the thermostat, then depress or twist hot
water dispenser handle for 20 seconds to bring in
fresh water to be heated at the new setting. Allow
5-7 minutes for water to reach new temperature.
• Make sure that the circuit breaker or fuses are
functioning properly.
• Check that the outlet is not switched off.
• Test unit by reinstalling old lter and rotating to
full stop. Check for leaks.
• Check that outlet tube is not kinked, twisted
or pinched.
• Unscrew spout end piece and clean out any debris.
• Replace lter cartridge. See Care and Use section
of this manual.
• Unplug the unit. If the dripping does not stop after a
few minutes, check the supply valve to ensure that it
is fully open and there are no obstructions in the
water line reducing the pressure below 15 psi (103 kPa)
(ie, a poorly mounted saddle valve, a clogged water
lter or a partially opened shut-off valve).
• Unscrew spout end piece and clean out any debris.
• Unscrew spout end piece and clean out any debris.
• Depress or twist hot water dispenser handle 7-10
times to ush dispenser and lines.
• Unplug and drain unit as described in the Care
and Use section of this manual. If the water
discoloration remains after draining and relling the
unit, discontinue use and contact InSinkErator.
• Unscrew spout end piece and clean out any debris.
TROUBLESHOOTING
PROBLEM
PROBLEM
POSSIBLE CAUSE
POSSIBLE CAUSE
WHAT TO DO
WHAT TO DO
FILTRATION ISSUES
The HWT200-F1000S is certified by IAPMO R&T
against NSF/ANSI Standard 42 for the reduction of
claims specified on the Performance Data Sheet The
HWT200 tank is certified against NSF/ANSI Standard
58 for materials safety only.

20
This limited warranty is provided by InSinkErator, a business unit of Emerson Electric Co., (“InSinkErator” or “Manufacturer” or
“we” or “our” or “us”) to the original consumer owner of the InSinkErator product with which this limited warranty is provided
(the “InSinkErator Product”), and any subsequent owner of the residence in which the InSinkErator Product was originally
installed (“Customer” or “you” or “your”).
InSinkErator warrants to Customer that your InSinkErator Product will be free from defects in materials and workmanship, subject
to the exclusions described below, for the “Warranty Period”, commencing on the later of: (a) the date your InSinkErator Product
is originally installed, (b) the date of purchase, or (c) the date of manufacture as identified by your InSinkErator Product serial
number. You will be required to show written documentation supporting (a) or (b). If you are unable to provide documentation
supporting either (a) or (b), the Warranty Period commencement date will be determined by Manufacturer, in its sole and absolute
discretion, based upon your InSinkErator Product serial number.
Permitted Uses
You may use your InSinkErator Product hot/cold water tank and filter system in combination with any genuine InSinkErator
Product instant hot water dispensers and component parts and/or Authorized OEM Products. “Authorized OEM Products”
mean those hot or hot/cold water dispensers and component parts that have been manufactured by an Authorized InSinkErator
original equipment manufacturer (“Authorized OEM”) and which have documentation expressly stating that such Authorized OEM
Products are compatible with the InSinkErator Product(s). Authorized OEMs may change from time to time. A list of Authorized
OEMs is available to you upon request or at: www.insinkerator.com/oem. Use of your InSinkErator Product in combination with any
products other than Authorized OEM Products will void this warranty.
What is Covered
This limited warranty covers defects in materials or workmanship, subject to the exclusions below, in InSinkErator Products
used by a consumer Customer for residential use only, and includes all replacement parts and labor costs. YOUR SOLE AND
EXCLUSIVE REMEDY UNDER THIS LIMITED WARRANTY SHALL BE LIMITED TO REPAIR OR REPLACEMENT OF THE
INSINKERATOR PRODUCT, PROVIDED THAT IF WE DETERMINE IN OUR SOLE DISCRETION THAT NEITHER REMEDY
IS PRACTICABLE, WE MAY PROVIDE YOU A REFUND OF YOUR PURCHASE PRICE OR A CREDIT TOWARDS ANOTHER
INSINKERATOR PRODUCT.
What is not Covered
This limited warranty does not extend to and expressly excludes:
• Losses or damages or the inability to operate your InSinkErator Product resulting from conditions beyond the Manufacturer’s
control including, without limitation, accident, alteration, misuse, abuse, neglect, negligence (other than Manufacturer’s),
failure to install, maintain, assemble, or mount the InSinkErator Product in accordance with Manufacturer’s instructions or
local electrical and plumbing codes.
• Wear and tear expected to occur during the normal course of use, including without limitation, cosmetic rust, scratches, dents
or comparable and reasonably expected losses or damages.
• Losses or damages caused by any product or component part used with the InSinkErator Products, including both Authorized
OEM Products and other products and components.
In addition to the above exclusions, this warranty does not apply to InSinkErator Products installed in a commercial or
industrial application.
No Other Express Warranty Applies
This limited warranty is the sole and exclusive warranty provided to the Customer identified above. No other express warranty,
written or verbal, applies. No employee, agent, dealer, or other person is Authorized to alter this limited warranty or make any
other warranty on behalf of Manufacturer. The terms of this limited warranty shall not be modified by the Manufacturer, the
original owner, or their respective successors or assigns.
What we will do to Correct Problems
If your InSinkErator Product does not operate in accordance with the documentation provided to you, or you have questions concerning your
InSinkErator Product or how to determine when service is needed, please contact the Authorized InSinkErator Service Center for your area
as identified on back cover of this manual, or visit our website at www.insinkerator.com. You may also notify us at: InSinkErator Service
Center, 1250 International Drive, Mount Pleasant, WI 53177 USA or InSinkErator Canada, 66 Leek Crescent, Richmond Hill, ON L4B 1H1.
The following information must be provided as part of your warranty claim: your name, address, phone number, your InSinkErator
Product model and serial number, and if necessary, upon request, written confirmation of either: (a) the date shown on your
installation receipt, or (b) the date shown on your purchase receipt.
Manufacturer or its Authorized service representative will determine, in its sole and absolute discretion, if your InSinkErator
Product is covered under this warranty. You will be given the contact information for your closest Authorized InSinkErator Service
Center. Please contact your InSinkErator Service Center directly to receive in home warranty repair or replacement service. Only
an Authorized InSinkErator service representative may provide warranty service. InSinkErator is not responsible for warranty
claims arising from work performed on your InSinkErator Product by anyone other than an Authorized InSinkErator
service representative.
If a covered claim is made during the Warranty Period, Manufacturer will, through its Authorized service representative, either
repair or replace your InSinkErator Product. Cost of replacement parts or a new InSinkErator Product, and cost of labor for repair
or installation of the replacement InSinkErator Product are provided at no cost to you. Repair or replacement shall be determined
by Manufacturer or its Authorized service representative in their sole discretion. All repair and replacement services will be
provided to you at your home. If Manufacturer determines that your InSinkErator Product must be replaced rather than repaired,
the warranty on the replacement InSinkErator Product will be limited to the unexpired term remaining in the original
Warranty Period.
This instant hot water dispenser is covered by Manufacturer’s limited warranty. This limited warranty is void if you attempt to
repair the InSinkErator Product. For service information, please visit www.insinkerator.com or contact the Authorized InSinkErator
Service Center for your area as identified on back cover of this manual.
Limitation of Liability
TO THE EXTENT PERMITTED BY LAW, IN NO EVENT SHALL MANUFACTURER OR ITS AUTHORIZED SERVICE REPRESENTATIVES
BE LIABLE FOR ANY INCIDENTAL, SPECIAL, INDIRECT, OR CONSEQUENTIAL DAMAGES, INCLUDING ANY ECONOMIC LOSS,
WHETHER RESULTING FROM NONPERFORMANCE, USE, MISUSE OR INABILITY TO USE THE INSINKERATOR PRODUCT OR THE
MANUFACTURER’S OR ITS AUTHORIZED SERVICE REPRESENTATIVE’S NEGLIGENCE. MANUFACTURER SHALL NOT BE LIABLE FOR
DAMAGES CAUSED BY DELAY IN PERFORMANCE AND IN NO EVENT, REGARDLESS OF THE FORM OF THE CLAIM OR CAUSE OF
ACTION (WHETHER BASED IN CONTRACT, INFRINGEMENT, NEGLIGENCE, STRICT LIABILITY, OTHER TORT OR OTHERWISE), SHALL
MANUFACTURER’S LIABILITY TO YOU EXCEED THE PRICE PAID BY THE ORIGINAL OWNER FOR THE INSINKERATOR PRODUCT.
The term “consequential damages” shall include, but not be limited to, loss of anticipated profits, business interruption, loss of use
or revenue, cost of capital or loss or damage to property or equipment.
Some states do not allow the exclusion or limitation of incidental or consequential damages, so the above limitation may not apply
to you. This limited warranty gives you specific legal rights and you may also have other rights which vary from area to area.
HWT200-F1000S: 3-year warranty
HWT200 (tank used without filter): 3-year warranty
Filtration System (excluding replaceable filtration cartridge): 1-year warranty
Dispenser (See dispenser ICU for warranty period)
21
ESPAÑOL
!
!
!
CUIDADO Y USO
PRECAUCIÓN: Riesgo de descarga eléctrica. Para prevenir descargas eléctricas, desconecte la corriente
eléctrica antes de reparar la unidad. Utilice solamente un tomacorriente eléctrico debidamente polarizado y
con conexión a tierra (puesta a tierra).
ADVERTENCIA: Riesgo de escaldado. No deje que el agua hierva. Ello podría ocasionar quemaduras graves.
PRECAUCIÓN: Lesiones personales.
AJUSTE DEL TERMOSTATO
Para un funcionamiento ideal, ajuste la temperatura del tanque a la configuración dos niveles
por debajo (aproximadamente 205 °F, 96 °C) de la configuración máxima. Gire el botón selector
que se encuentra en el frente del tanque en sentido horario o en sentido antihorario para subir
o bajar la temperatura del agua. Después de ajustar, presione o gire la perilla del dispensador
durante 20 segundos para que el agua recaliente al nuevo ajuste.
LIMPIEZA DEL DISPENSADOR Y DEL DEPÓSITO
ALMACENAMIENTO TEMPORAL/DRENAJE
Cada vez que la unidad no se utilice por períodos prolongados, desenchufe y drene la unidad. Si la temperatura
está por debajo de los cero grados, deberá desenchufar la unidad y drenarla.
GUÍA DE FILTRO Y REEMPLAZO
Para reducir el riesgo asociado con las fugas o los desbordes de agua, y para garantizar el funcionamiento
óptimo del filtro:
Cambie el cartucho desechable del filtro; el cartucho desechable del filtro se DEBE reemplazar cada 6 meses o antes.
Reemplace el cartucho del filtro cuando haya una disminución evidente en el flujo de agua del dispensador o si
hay un sabor u olor desagradable en el agua.
Instrucciones para reemplazo de filtro:
• Desconecte la energía de la unidad (desconecte
la unidad).
• Empuje o gire la palanca del dispensador de agua
caliente y deje que el agua fluya hasta que esté fría.
• Cierre el dispensador de agua fría en la válvula.
• Desconecte los tubos del depósito.
• Desenganche el depósito de la pared.
• Sostenga el depósito volteado hacia abajo y drene el
agua dentro del fregadero.
• Seque con una toalla los restos de agua del área del
depósito.
• Reinstale el depósito en la pared y reconecte los tubos.
• Retire y deseche el cartucho del filtro, si corresponde.
• Para colocar nuevamente en perfecto funcionamiento
la unidad, instale el nuevo cartucho del filtro (si
corresponde) y abra el suministro de agua fría en
la válvula. Oprima o gire la palanca del grifo del
dispensador de agua caliente y manténgala así hasta
que el flujo de agua salga por el surtidor. Enchufe el
depósito.
• Utilice sólo limpiadores suaves para limpiar el
dispensador y los componentes plásticos.
• Los limpiadores con ácidos, abrasivos, solventes
alcalinos y orgánicos dañan los componentes plásticos
y anulan la garantía.
• Verifique cada tres (3) meses que no haya señales
de corrosión en el aspecto del agua que sale del
dispensador.
• Si hay decoloración o un aspecto ferroso,
desconecte y drene la unidad tal como se
describe en la sección Almacenamiento/Drenado
de temporada en esta página del manual.
• Si luego de drenar y llenar la unidad persiste
la coloración del agua, no utilice el artefacto y
comuníquese con InSinkErator.
• Una vez que haya cerrado los orificios de entrada
y salida, y que la presión interna del filtro haya
disminuido, el agua (cerca de 60 ml [2 onzas]) fluirá
desde la tubería de ventilación.
• Es recomendable que los filtros de carbón se
reemplacen cada 6 meses.
• Si no se puede colocar el nuevo cartucho del filtro,
introduzca el anterior y gírelo hasta que se asiente,
a continuación, retírelo y vuelva a insertar el
cartucho nuevo.
1. Reemplace con un filtro InSinkErator
®
.
2. Coloque una cacerola o un secador de platos debajo
del filtro para contener el drenaje del agua durante el
cambio.
3. Gire lentamente el cartucho en sentido antihorario
completamente hasta que se detenga (1/4 de giro)
4. Jale del cartucho en línea recta y hacia abajo,
y deséchelo.
5. Introduzca el nuevo cartucho en la cabeza del filtro.
6. Cuando el cartucho esté completamente encajado, la
superficie superior de éste quedará a ras de la parte
inferior de la cabeza del filtro.
7. Gire el cartucho en sentido horario hasta que se
detenga (1/4 de giro).
8. Alinee la flecha de entrada/salida de la cabeza y el
ensamblado del soporte con la flecha de entrada/salida
del cartucho.
9. Abra el dispensador para expulsar el aire contenido.
10. Deje correr el agua durante 4 minutos antes de usarla.
REQUISITOS DEL SISTEMA (TANQUE DE AGUA CALIENTE, SISTEMA DE FILTRACIÓN Y DISPENSADOR):
• Para F-1000, F-2000, haga correr 3 galones (11.4 L) por el filtro durante 4 minutos antes del primer uso.
• Recomendación de flujo de agua: 2.84 lpm (0.75 gpm)
• Capacidad del filtro F-1000, F-2000: 1,893 litros (500 galones)

45527 REV A
34-8725-0801-4
InSinkErator
Emerson Electric Co.
1250 International Drive
Mount Pleasant, WI 53177
Tel: 800-558-5700
www.insinkerator.com
InSinkErator Canada
Emerson Electric Co.
66 Leek Crescent
Richmond Hill, ON L4B 1H1
Tel: 1-800-561-1700
www.insinkerator.ca
The Emerson logo is a trademark and a service mark of Emerson Electric Co.
InSinkErator may make improvements and/or changes in the specifications
at any time, in its sole discretion, without notice or obligation, and further
reserves the right to change or discontinue models.
©2020 InSinkErator, a business unit of Emerson Electric Co. All Rights Reserved.
El logotipo Emerson es una marca registrada y una marca de servicio de Emerson Electric Co.
InSinkErator puede realizar mejoras o modificaciones en las especificaciones en cualquier
momento, bajo su exclusivo criterio, sin previo aviso ni obligación; además, se reserva
el derecho de cambiar o suspender los modelos.
©2020 InSinkErator es una unidad comercial de Emerson Electric Co. Todos
los derechos reservados.
Le logo Emerson est une marque de commerce et de service d’Emerson Electric Co.
InSinkErator se réserve le droit, à son entière discrétion, d’apporter en tout temps
des améliorations ou des modifications aux spécifications, et ce, sans préavis
ou obligation de sa part, ou de modifier ou de supprimer des modèles.
©2020 InSinkErator, une unité commerciale d’Emerson Electric Co. Tous droits réservés.
/