Techno line Model Owner's manual

Category
Table clocks
Type
Owner's manual

This manual is also suitable for

WS
WS
WS
WS 6750
6750
6750
6750 weather
weather
weather
weather station
station
station
station user
user
user
user manual
manual
manual
manual
Please read the operating instructions carefully to familiarize yourself with the features and modes
of operation before using the instrument.
Technical
Technical
Technical
Technical Details
Details
Details
Details
Six keys : MODE,
MODE,
MODE,
MODE, +,
+,
+,
+, -
-
-
- ,
,
,
, HISTORY,CHANNEL
HISTORY,CHANNEL
HISTORY,CHANNEL
HISTORY,CHANNEL ,SNOOZE/
,SNOOZE/
,SNOOZE/
,SNOOZE/ LIGHT.
LIGHT.
LIGHT.
LIGHT.
Radio controlled clock
Automatic receiving of time signal DCF77 to display exactest time
Automatically switches to/from daylight saving time ( summer/winter time )
Time display in 12/24 format
+/-12 total 24 adjustable time zones
Continuous perpetual calendar up to 2099
Display of D ate , Month and Day of week
Day of week display available in 7 languages, i.e. German, English, Italian, French, Dutch
Spanish , Danish .
Weeks display
Dual alarm with s nooze function (5 minutes alarm interruption)
5 weather forecast: sunny, partly sunny, cloudy, rainy, storm , weather symbol can be selected
manually.
Barometer and bar and data of 12 hours history for air pressure
Altitude-setting for calculation of air p ressure
Indoor /outdoor temperature and humidity with trend
Max./min. of temperature and humidity
Thermometer measuring range inside:0 ° C to +50 ° C , outside -20 ° C ~60 ° C
T
emperature display elective in ° C or ° F
Temperature alert
Moon phase
Sun rise and sun set / moon rise and moon set for 150 cities.
Low battery indication
B lue b ackground illumination LED.
Battery: 2 x A A, LR 6 , 1.5V
Outdoor sensor:
F requency: 433 MHz
Battery: 2 x AAA, LR3, 1.5V
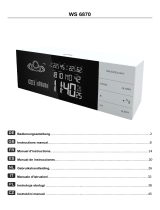
1. 12 hour history of pressure 2. Air pressure data 3. Freeze 4. Weather 5. Bar of air
pressure
6. Air pressure trend 7. Indoor low battery 8.Outdoor low battery 9. Channel 10. RF
symbol
11. Temperature alert 12. Outdoor temperature trend 13. Indoor temperature trend
14. Outdoor humidity trend 15. Feel-good indicator 16. Indoor humidity trend 17. Week 18. Day
of Week
19. Alarm 20. Month 21. Time 22. Summer time 23. Date 24. Moon set 25. Moon Rise 26. Moon
Phase
27. Cities 28. Sun set 29. Sun rise A. MODE B. UP C. DOWN D. HISTORY E. CHANNEL
F.
SNOOZE/LIGHT G. RESET
Initial
Initial
Initial
Initial Operation
Operation
Operation
Operation
Open the battery compartment located on the rear side of the devices . Place the batteries in
the battery compartment. Observe the shown polarity.
The altitude flashing , please use +
+
+
+
,
,
,
,
-
-
-
- to set the altitude of your position, then press
HISTORY
HISTORY
HISTORY
HISTORY
, weather symbol flashing, pls use + ,
,
,
, - to choose the weather .
The station is now connecting to the outdoor sensor . This process takes about 3 minutes.
Then t he display shows the outdoor temperature and humidity, in case of failure of reception ,
pls press
CHANNEL
CHANNEL
CHANNEL
CHANNEL
for more than 3 seconds to receive again.
the automatic receiving of the DCF radio signal begins after 3 minutes of outdoor reception.
This RCC reception p rocess is going on,t he flashing symbol radio tower appears in the time
display area at the same time.
Once radio signal receiving is successful, the display shows the symbol radio
tower continuously. No flashing.
If, due to bad reception, or no RCC automatic time reception is possible, follow the steps below
manually .
Recep
Recep
Recep
Recep tion
tion
tion
tion of
of
of
of radio
radio
radio
radio controlled
controlled
controlled
controlled signal
signal
signal
signal
DCF radio signal search starts automatically about 3 minutes after battery exchange. The
radio tower signal is flashing.
Press + - for more than 3 seconds to enter or quit the Radio controlled signal reception
The clock synchroni z es with the DCF radio signal automatically and daily from AM 1:00 to
3:00 to correct potential time deviations each hour . If the synchroni z ation is unsuccessful
( radio tower symbol disappears), a further synchroni z ation attempt is made From 4:00 and
5:00 unt il success. This process is repeated up until 5:00 AM . If still not success, daily
reception stop.
Information
Flashing radio tower symbol stands for DCF radio signal reception started.
Continuous radio tower symbol stands for DCF radio signal reception successful.
Please observe a minimal distance of 2.5m to sources of interference such as televisions or
computer screens.
The radio signal reception is weaker in rooms with concrete walls (e.g. in the basement) and in
office buildings. For extreme cases, please put the clock near a window.
There are less atmospheric disturbances at night.
A
radio time signal reception is usually
possible at that time. One synchronisation per day is sufficient to keep the time display
accuracy at 1 second.
Tip
Tip
Tip
Tip
You can adjust the time manually in case the clock cannot receive the DCF radio signal (due to
interferences, large distance to the sender, obstructions like mountains, etc.) As soon as the radio
signal can be received, the clock will be adjusted automatically.
Radio signal sender coverage up to 1500km distance to Frankfurt/Main.
Manual
Manual
Manual
Manual time
time
time
time set-up
set-up
set-up
set-up (the
(the
(the
(the most
most
most
most important
important
important
important is
is
is
is to
to
to
to quit
quit
quit
quit the
the
the
the reception
reception
reception
reception of
of
of
of radio
radio
radio
radio controlled
controlled
controlled
controlled signal
signal
signal
signal by
by
by
by
holding
holding
holding
holding together
together
together
together
+
+
+
+
and
and
and
and
-
-
-
-
for
for
for
for 3
3
3
3 seconds
seconds
seconds
seconds in
in
in
in case
case
case
case of
of
of
of the
the
the
the
radio
radio
radio
radio tower
tower
tower
tower
symbol
symbol
symbol
symbol flashing
flashing
flashing
flashing
before
before
before
before set-up
set-up
set-up
set-up )
)
)
)
Press and hold key MODE
MODE
MODE
MODE for 3 seconds.
The display for the year is flashing. Use + and - to select the year .
Press MODE
MODE
MODE
MODE to confirm.
The display for the month is flashing. Use + and - to select the month.
Press MODE
MODE
MODE
MODE to confirm.
The display for the date is flashing. Use + and - to select the date .
Press MODE
MODE
MODE
MODE to confirm.
The display for the time zone is flashing. Use + und - to select the time zone
(-12 to +12).
Press MODE
MODE
MODE
MODE to confirm.
The language selection for the display of the weekdays is flashing. Use + and - to select
the language.
Press MODE
MODE
MODE
MODE to confirm.
The 12/24 hour flashing. Use + and - to select
Press MODE
MODE
MODE
MODE to confirm
The display for the hour is flashing. Use + and - to select the hour .
Press MODE
MODE
MODE
MODE to confirm.
The display for the minutes is flashing. Use + and - to select the minutes .
Press MODE
MODE
MODE
MODE to confirm.
The country /city flashing. Use + and - to select the city of Sunrise/Sunset and Moonrise
/Moonset .
Press MODE
MODE
MODE
MODE to confirm.
Information:
Information:
Information:
Information:
The clock automatically changes from set-up mode to time display mode if no keys are
pressed for 20 seconds.
Explanation for the time zone display:
You can manually adjust the clock to the time zone of a country (up to 1500km distance to
Frankfurt/Main) where
where
where
where the
the
the
the clock
clock
clock
clock receives
receives
receives
receives the
the
the
the DCF
DCF
DCF
DCF signal
signal
signal
signal but where the actual time differs
from the time received.
If, e.g. the time in a given country is 1 hour ahead of the German time, set the time zone
display to 01. The clock is now DCF controlled but the time is one hour ahead.
Daily
Daily
Daily
Daily alarm
alarm
alarm
alarm set-up
set-up
set-up
set-up
Press
MODE
MODE
MODE
MODE
to switch from time display to A1 display
Press and hold the key
MODE
MODE
MODE
MODE
for 3 seconds , the flashing alarm time are shown
The hour display of the alarm time is flashing. Use + und - to select the hour .
Press
MODE
MODE
MODE
MODE
to confirm.
The minute display of the alarm time is flashing. Use + und - to select the minute .
Press
MODE
MODE
MODE
MODE
to confirm.
Then press
MODE
MODE
MODE
MODE
to switch from A1 display to A2 display
The same setting as for A1.
Daily
Daily
Daily
Daily alarm
alarm
alarm
alarm on/off
on/off
on/off
on/off
When showing A1 alarm time, press - to activate the alarm 1 with alarm symbol showing.
Press
MODE
MODE
MODE
MODE
again cancel the alarm
When showing A2 alarm time, press - to activate the alarm 2 with alarm symbol showing.
Press
MODE
MODE
MODE
MODE
again cancel the alarm
A1 for alarm from Monday to Friday, A2 for alarm from Saturday to Sunday.
Information:
Information:
Information:
Information:
The clock automatically changes from set-up mode to time mode if no keys are pressed for 20
seconds.
The alarm sounds for 2 minutes if no key is pressed to stop it.
Snooze
Snooze
Snooze
Snooze function
function
function
function
To
activate the snooze function, follow the steps below
Press the key SNOOZE/LIGHT
SNOOZE/LIGHT
SNOOZE/LIGHT
SNOOZE/LIGHT , while the alarm sounds, to activate the snooze function.
If the snooze function is activated, alarm symbol is flashing.
The alarm repeat after 5 minutes .
The snooze function can be stopped by pressing any key.
12/24
12/24
12/24
12/24 hours
hours
hours
hours mode
mode
mode
mode
The time display can be in 12 AM/PM or 24 hours mode.
°
°
°
° C/
C/
C/
C/ °
°
°
° F
F
F
F temperature
temperature
temperature
temperature display
display
display
display
The temperature display can be in ° C or °
F.
Press the key
-
-
-
-
to switch between the mode.
Max./
Max./
Max./
Max./ Min.
Min.
Min.
Min. for
for
for
for the
the
the
the indoor/outdoor
indoor/outdoor
indoor/outdoor
indoor/outdoor temperature
temperature
temperature
temperature and
and
and
and humidity
humidity
humidity
humidity
Press
+
+
+
+
for displaying of indoor/outdoor max./min. of temperature and humidity.
Temperature
Temperature
Temperature
Temperature alert
alert
alert
alert set-up
set-up
set-up
set-up
Press Channel
Channel
Channel
Channel to select the channel (CH1, CH2, CH3) if more than one outdoor sensor
are within reach.
Press and hold the key -
-
-
- in the area of outdoor , select ON/OF when flashing.
Press MODE , the upper limit temperature is flashing, use + , - to set the maximum alert
temperature.
Press MODE , the lower limit temperature is flashing, use + , - to set the minimum alert
temperature.
When the alert is activated, the alert symbol will be shown.
.
Temperature
Temperature
Temperature
Temperature alert
alert
alert
alert on/off
on/off
on/off
on/off
Press and hold the key -
-
-
- to set the temperature alert on or off.
Alert on: Temperature alert symbol shown in display
Alert off: Temperature alert symbol goes out.
Information
Information
Information
Information
A
temperature alert can be set-up for each channel.
The set-up process cannot be completed if the maximum temperature selected is lower than
the minimum selected temperature.
The minimum temperature selected must at least be 1 ° C below the maximum selected
temperature.
Sunrise
Sunrise
Sunrise
Sunrise /Sunset
/Sunset
/Sunset
/Sunset and
and
and
and Moonrise
Moonrise
Moonrise
Moonrise /Moonset
/Moonset
/Moonset
/Moonset
There will be 150 cities
time for Sunrise /Sunset and Moonrise /Moonset
5
5
5
5 Weather
Weather
Weather
Weather forecast
forecast
forecast
forecast
Sunny Slightly cloudy Cloudy Rain y
Storm
Remarks
Remarks
Remarks
Remarks as
as
as
as the
the
the
the weather
weather
weather
weather is
is
is
is forecasted
forecasted
forecasted
forecasted by
by
by
by temperature,
temperature,
temperature,
temperature, humidity
humidity
humidity
humidity and
and
and
and air
air
air
air press
press
press
press only,
only,
only,
only,
.
.
.
. The
The
The
The display
display
display
display will
will
will
will have
have
have
have discrepancy
discrepancy
discrepancy
discrepancy with
with
with
with the
the
the
the actual
actual
actual
actual weather
weather
weather
weather sometime.
sometime.
sometime.
sometime.
Barometer
Barometer
Barometer
Barometer and
and
and
and bar
bar
bar
bar and
and
and
and data
data
data
data of
of
of
of history
history
history
history for
for
for
for the
the
the
the past
past
past
past 12
12
12
12 hour
hour
hour
hour of
of
of
of air
air
air
air press.
press.
press.
press.
Air pressure can be in hPa and inHg ,can check the past 12 hour air press by pressing
HISTORY
HISTORY
HISTORY
HISTORY
Illumination
Illumination
Illumination
Illumination
Press the key SNOOZE/LIGHT
SNOOZE/LIGHT
SNOOZE/LIGHT
SNOOZE/LIGHT to activate the display illumination for 5 seconds.
Moon
Moon
Moon
Moon phase
phase
phase
phase display
display
display
display
1 : New moon 2 : increasing crescent 3 : increasing 1/3 4 : First
half
5 : increasing 2/3 6.increasing 5/6 7 : Full moon
8 : decreasing 5/6
9 : decreasing 2/3 10 : last half
11
: decreasing crescent
12: de creasing crescent
Living
Living
Living
Living space
space
space
space humidity
humidity
humidity
humidity
The weather station uses saved data to determine the humidity in the living space and shows the
respective symbols.
comfortable, dry, humid
Low
Low
Low
Low b
b
b
b attery
attery
attery
attery condition
condition
condition
condition display
display
display
display
The weather station displays the low battery condition symbol to remind the batteries of the
weather station or the outdoor sensor need to be exchanged.
Weather station low battery condition display: within indoor area of the display
Outdoor sensor low battery condition display: in the out door area of the display
Wireless
Wireless
Wireless
Wireless connection
connection
connection
connection to
to
to
to the
the
the
the outdoor
outdoor
outdoor
outdoor sensor
sensor
sensor
sensor
Press the key CHANNEL
CHANNEL
CHANNEL
CHANNEL to select a channel. You can read the data of up to 3 sensors at
one weather station.
Press and hold the key CHANNEL
CHANNEL
CHANNEL
CHANNEL for 3 seconds to search for outdoor sensor .
- English -
Precautions
Precautions
Precautions
Precautions
This main unit is intended to be used only indoors.
Do not subject the unit to excessive force or shock.
Do not expose the unit to extreme temperatures, direct sunlight, dust or humidity.
Do not immerse in water.
Avoid contact with any corrosive materials.
Do not dispose this unit in a fire as it may explode.
Do not open the inner back case or tamper with any components of this unit.
Batteries
Batteries
Batteries
Batteries safety
safety
safety
safety warnings
warnings
warnings
warnings
Please read all instructions carefully before use.
Use only alkaline batteries, not rechargeable batteries.
Install batteries correctly by matching the polarities (+/-).
Always replace a complete set of batteries.
Never mix used and new batteries.
Remove exhausted batteries immediately.
Remove batteries when not in use.
Do not recharge and do not dispose of batteries in fire as the batteries may explode.
Ensure batteries are stored away from metal objects as contact may cause a short circuit.
Avoid exposing batteries to extreme temperature or humidity or direct sunlight.
Keep all batteries out of reach from children. They are a choking hazard.
Consideration
Consideration
Consideration
Consideration of
of
of
of duty
duty
duty
duty according
according
according
according to
to
to
to the
the
the
the battery
battery
battery
battery law
law
law
law
Old
Old
Old
Old batteries
batteries
batteries
batteries do
do
do
do not
not
not
not belong
belong
belong
belong to
to
to
to domestic
domestic
domestic
domestic waste
waste
waste
waste because
because
because
because they
they
they
they could
could
could
could cause
cause
cause
cause damages
damages
damages
damages
of
of
of
of health
health
health
health and
and
and
and environment.
environment.
environment.
environment. You
You
You
You can
can
can
can return
return
return
return used
used
used
used batteries
batteries
batteries
batteries free
free
free
free of
of
of
of charge
charge
charge
charge to
to
to
to your
your
your
your
dealer
dealer
dealer
dealer and
and
and
and collection
collection
collection
collection points.
points.
points.
points. As
As
As
As end-user
end-user
end-user
end-user you
you
you
you are
are
are
are committed
committed
committed
committed by
by
by
by law
law
law
law to
to
to
to bring
bring
bring
bring back
back
back
back
needed
needed
needed
needed batteries
batteries
batteries
batteries to
to
to
to distributors
distributors
distributors
distributors and
and
and
and other
other
other
other collecting
collecting
collecting
collecting points!
points!
points!
points!
1
CITIES OR STATE DESIGNATION
No.
Country/Cities
Abb.
No. Country/Cities Abb.
1
Germany
Aachen
AC 39
Spain
Las Palmas LPA
2
Berlin
B 40
Madrid MAD
3
Dusseldorf
D 41
Malaga MAL
4
Dresden
DD 42
palma de mallorca
LPM
5
Erfurt
EF 43
Salamanca SAL
6
Frankfurt
F 44
Sevilla SEV
7
Flensburg
FL 45
Valencia VAL
8
Freiburg
FR 46
Zaragoza ZAR
9
Hannover
H 47
French
Besancon BES
10
Bremen
HB 48
Biarritz
BIA
11
Hamborg
HH 49
Bordeaux
BOR
12
Roslock
HRO 50
Brest BRE
13
Stralsund
HST 51
Cherbourg CHE
14
Koeln
K 52
Clermferrand CMF
15
Kiel
KI 53
Lyon LYO
16
Kassel
KS 54
Marseille MAR
17
Leipzig
L 55
Monaco
MCO
18
Muenchen
M 56
Metz MET
19
Magdeburg
MD 57
Nantes NAN
20
Nuernberg
N 58
Nice NIC
21
Regensburg
R 59
Orleans ORL
22
Stungart
S 60
Paris PAR
23
Saarbruecken
SB 61
Perpignan PER
24
Scnwerin
SN 62
Lille LIL
25
Danmark
Alborg
ALB 63
Rouen ROU
26 Arhus ARH 64
Strasbourg STR
27 Copenhagen CPH 65
Toulouse TOU
28
Odense
ODE 66
Finland
Helsinki HEL
29
Spain
Alicante ALI 67
England
Aberdeen ABD
30
Andorra
AND 68
Belfast BEL
31 Badajoz BAD 69
Birmingham BIR
32 Barcelona BAR 70
Bristol BRI
33
Bilbao
BIL 71
Edinburgh EDH
34 Cadiz CAD 72
Glasgow GLW
35
Cordoba
COR 73
London LON
36 Ibiza IBZ 74
Manchester MAN
37
La Coruna
LCO 75
Plymouth PLY
38 Leon LEO 76 Hungary
Budapest BUD
2
No. Country/Cites Abb. No. Country/Cities Abb.
77
Croatia Zagreb
ZAG 115
Portugal
Lisbon LIS
78
Italy
Ancona
ANC 116
Porto POR
79
Bari
BAI 117
Poland
Gdansk GDZ
80
Bologna
BOL 118
Krakow
KKW
81
Cagliari
CAG 119
Poznan POZ
82
Catania
CAT 120
Szczecin SCZ
83
Firenze
FIR 121
Warsaw WAW
84
Foggia
FOG 122
Russia
St Petersburg PET
85
Genova
GEN 123
Sweden
Goteborg GOT
86
Lecce
LEC 124
Malmo
MLO
87
Messina
MES 125
Stockholm
STO
88
Milano
MIL 126
Slovakia Bratislava BRV
89
Napoli
NAP 127
Slovenia Ljubljana LJU
90
Palermo
PAL 128
Yugoslavia Berigrade BEO
91
Parma
PAR 129
Austria
Graz GRZ
92
Perugia
PER 130
Innsbruck INN
93
Rome
ROM 131
Linz
LNZ
94
Torino
TOR 132
Salzburg SLZ
95
Trieste
TRI 133
Vienna VIE
96
Venezia
VEN 134
Belgium
Antwerp ANT
97
Verona
VER 135
Brugge BRG
98
Ventimiglia
VTG 136
Brussels BRU
99
Ireland Dublin
DUB 137
Charleroi CHA
100 Luxembourg Luxemburg LUX 138 Liege LIE
101
Norway
Bergen BGN 139
Switzerland
Basel BAS
102 Oslo OSL 140 Bern BER
103 Stavanger STA 141 Chur CHR
104
Netherlands
Amsterdam AMS 142 Geneva GNV
105 Arnheim ARN 143 Locarno LOC
106 Eindhoven EIN 144 Lucerne LUC
107 Enschede ENS 145 St Moritz MOR
108 Groningen GRO 146 St Gallen SEL
109 Den haag HAA 147 Sion SIO
110 Rotterdam ROT 148 Vaduz VDZ
111
Portugal
Evora AVO 149 Zurich ZUR
112 Coimbra COI 150 Czech Prague PRG
113 Faro FAR
114 Leiria LEI
  • Page 1 1
  • Page 2 2
  • Page 3 3
  • Page 4 4
  • Page 5 5
  • Page 6 6
  • Page 7 7
  • Page 8 8
  • Page 9 9
  • Page 10 10
  • Page 11 11
  • Page 12 12
  • Page 13 13
  • Page 14 14
  • Page 15 15
  • Page 16 16
  • Page 17 17
  • Page 18 18
  • Page 19 19
  • Page 20 20
  • Page 21 21
  • Page 22 22
  • Page 23 23
  • Page 24 24
  • Page 25 25
  • Page 26 26
  • Page 27 27
  • Page 28 28
  • Page 29 29
  • Page 30 30
  • Page 31 31
  • Page 32 32
  • Page 33 33
  • Page 34 34
  • Page 35 35
  • Page 36 36
  • Page 37 37
  • Page 38 38
  • Page 39 39
  • Page 40 40
  • Page 41 41
  • Page 42 42
  • Page 43 43
  • Page 44 44
  • Page 45 45
  • Page 46 46
  • Page 47 47
  • Page 48 48
  • Page 49 49
  • Page 50 50
  • Page 51 51
  • Page 52 52
  • Page 53 53
  • Page 54 54
  • Page 55 55
  • Page 56 56
  • Page 57 57
  • Page 58 58
  • Page 59 59
  • Page 60 60
  • Page 61 61
  • Page 62 62
  • Page 63 63
  • Page 64 64
  • Page 65 65
  • Page 66 66
  • Page 67 67
  • Page 68 68
  • Page 69 69
  • Page 70 70
  • Page 71 71
  • Page 72 72
  • Page 73 73
  • Page 74 74
  • Page 75 75
  • Page 76 76
  • Page 77 77
  • Page 78 78
  • Page 79 79
  • Page 80 80
  • Page 81 81
  • Page 82 82

Techno line Model Owner's manual

Category
Table clocks
Type
Owner's manual
This manual is also suitable for

Ask a question and I''ll find the answer in the document

Finding information in a document is now easier with AI