BE QUIET! Efficient Power F1 400W User manual
- Category
- Power supply units
- Type
- User manual
This manual is also suitable for
Page is loading ...

2 3
DEUTSCH
1. Einleitung ......................................................................................................................................................... 4
2. Warnungen und Sicherheitshinweise ............................................................................................................... 4
3. Kompatibilität ................................................................................................................................................... 5
4. Vorteile und Besonderheiten ihres neuen Netzteils .......................................................................................... 5
5. Installation ihres neuen Netzteils ..................................................................................................................... 6
6. Fehlerbehebung ............................................................................................................................................... 6
7. Zubehör............................................................................................................................................................ 7
8. Entsorgungshinweise ....................................................................................................................................... 8
9. Garantie, Herstellerangaben ........................................................................................................................... 8
10. Rechtliche Hinweise, Copyright......................................................................................................................9
ENGLISH
1. Introduction ................................................................................................................................................... 10
2. Warnings and safety instructions ................................................................................................................... 10
3. Compatibility .................................................................................................................................................. 11
4. Benefits and special features of your new power supply ...................................................11
5. Installing your new power supply ...................................................................................................................12
6. Troubleshooting ............................................................................................................................................. 12
7. Attachements.................................................................................................................................................13
8. Disposal instructions ..................................................................................................................................... 14
9. Warranty, manufacturer‘s data ......................................................................................................................14
10. Legal notice, Copyright ............................................................................................................15
FRANÇAISE
1. Introduction ................................................................................................................................................... 16
2. Avertissements et consignes de securite ....................................................................................................... 16
3. Compatibilite .................................................................................................................................................. 17
4. Avantages et particularites de votre nouveau bloc d’alimentation .................................................................17
5. Installation de votre nouveau bloc d’alimentation .......................................................................................... 18
6. Depistage des pannes .................................................................................................................................... 19
7. Accessoires .................................................................................................................................................... 20
8. Consignes pour la gestion des dechets ..........................................................................................................20
9. Garantie constructeur .................................................................................................................................... 20
10. Indications legales, Copyright ..................................................................................................................... 21
POLSKI
1. Introducción ................................................................................................................................................... 29
2. Advertencias e indicaciones de seguridad .....................................................................................................29
3. Compatibilidad ............................................................................................................................................... 30
4. Ventajas y particularidades de su nueva fuente de alimentación ................................................................... 30
5. Instalación de su nueva fuente de alimentación .............................................................................................31
6. Solución de errores ........................................................................................................................................ 32
7. Accesorios ..................................................................................................................................................... 33
8. Indicaciones para su retirada ......................................................................................................................... 33
9. Garantía, datos del fabricante ........................................................................................................................ 33
10. Nota legal, Copyright ..................................................................................................................................34
ESPAÑOL
1. Wprowadzenie ................................................................................................................................................22
2. Ostrzeżenia i wskazówki dotyczące bezpieczeństwa ...................................................................................... 22
3. Kompatybilność ............................................................................................................................................. 23
4. Zalety oraz właściwości państwa nowego zasilacza .......................................................................................23
6. Usuwanie usterek ..........................................................................................................................................25
7. Akcesoria ....................................................................................................................................................... 26
8. Wskazówki dotyczące utylizacji ......................................................................................................................26
9. Gwarancja, dane producenta .........................................................................................................................26
10. Informacje prawne, Prawa autorskie ........................................................................................................... 28
INDEX
1. Label .............................................................................................................................................................. 35
2. Voltage regulation .......................................................................................................................................... 36
3. Operating conditions ...................................................................................................................................... 36
4. Minimal load .................................................................................................................................................. 36
5. Power Supply Dimensions ..............................................................................................................................36
6. Distribution and pin assignment .................................................................................................................... 37
7. Connectivity and cable lengths ...................................................................................................................... 38
TECHNICAL DATA
Page is loading ...
Page is loading ...
Page is loading ...

10 11
1. INTRODUCTION
We are delighted that you have chosen to use a be quiet! power supply of the EFFICIENT POWER
Series in your PC. Please read and follow all the information contained in these instructions
carefully prior to installation. The power supply is only guaranteed to function properly if the
instructions are followed thus providing you with maximum satisfaction with this product. Should
you have any further question, please contact our customer service. See contact information
under item 9.
2. WARNINGS AND SAFETY INSTRUCTIONS
Never unscrew the power supply. It may hold elements containing high voltages after long
periods of disuse and which could cause serious injury.
A power supply must only be opened by an authorised technician!
The warranty shall lapse if opened by an unauthorised technician and if the warranty seal is
broken.
Never handle the power supply with wet or damp hands when in operation.
Never insert objects into the openings/fans of the power supply.
Operation is only permitted indoors! Outdoor use may lead to severe damage.
Do not carry out works on the power supply if it is connected to the mains. Always turn the mains
switch to „0“ and pull out the mains plug.
In the event of a short circuit in the device, remove the mains cable and do not use the device.
If there are traces of smoke, damaged cables or exposure to liquids, the power supply must
immediately be disconnected from the mains and must not be used.
This power supply is covered for a voltage range between 100 – 240 V~ and can be used
universally.
Do not operate the PC directly next to a heater or another source of heat, as this reduces the
lifespan of all components and may lead to failures. Ensure that there is sufficient ventilation in
the PC case, for example by adding additional fans.
Should you want to clean your power supply, disconnect it completely from the mains and do
not use damp cloths or cleaning detergent. Clean the power supply from the outside using a
dry cloth.
Only use the power supply after one hour in an ambient air environment, as otherwise
condensation water could accumulate in the power supply.
3. COMPATIBILITY
be quiet! EFFICIENT POWER power supplies are compatible with current power supply and
motherboard specification, such as: Intel ATX12V Power Supply Design Guide Version 2.3 (and
downward compatible to V 2.01 / V 2.0). ATX System Design Guide Version 2.2 und Version 2.1,
BTX Version 1.0a and the Intel C6 status of the current CPU generation.
4. BENEFITS AND SPECIAL FEATURES OF YOUR NEW POWER SUPPLY
TÜV tested safety:
be quiet! EFFICIENT POWER power supplies are TÜV certified. They fulfill the demands made on
electrical safety pursuant to the Equipment and Product Safety Act (EN60950). Documents can
be viewed on www.tuv.com and by entering the 10 digit ID No.
Economical through high efficiency:
The power supplies of the EFFICIENT POWER Series are highly efficient (80plus Gold certification).
This helps reduce electricity costs.
Voltage stability:
The EFFICIENT POWER Series has first class stability in its voltage supply. This is guaranteed by
the high quality of its component parts. Output voltages are therefore maintained at the optimal
set value, which is particularly important with high performance specifications.
Fuse functions:
be quiet! EFFICIENT POWER power supplies offer high safety with many fuse functions. The
power supply automatically switches off if limits are exceeded or not reached.
OCP (over-current protection), UVP (under-voltage protection), SCP (short circuit protection),
OPP (over power protection), OTP (over temperature protection), OVP (overvoltage protection).
If the power supply is operated at an excessively high temperature, it will automatically switch
off. It can then be switched on after cooling off. Please ensure that the PC is equipped with
sufficient cooling.

12 13
5. INSTALLING YOUR NEW POWER SUPPLY
You must read the item „Warnings/safety instructions“ before beginning installation.
You will need a screwdriver to fit the power supply in your PC.
Only use the screws supplied with the power supply, as these have the suitable thread.
First remove your old power supply. To do this, proceed as follows:
1. Carefully disconnect your PC from any power sources and pull out all cables connected to
the PC.
2. Open the PC case also following the manufacturer‘s instructions.
3. Disconnect all plugs from the motherboard and all other components, such as FDD, HDD or
optical drives. Ensure that there are no plugs from the old power supply connected to any of
the components.
4. Now remove the screws on the rear of the power supply and take it out carefully. Make
especially sure that no cables get caught in the components and damage them.
Installing your new be quiet! EFFICIENT POWER power supply:
1. Place the new power supply in the space provided in the case and screw it to the rear with the
four screws provided. Do not use excessive force.
2. Plug the 24 pin connector into the socket provided on the motherboard.
3. If required, connect the 4 pin / 8 pin connector, into the socket provided on the motherboard.
This connector is going to supply your PC with additional power.
4. If required, plug the PCIe connector into your graphic card.
6. TROUBLESHOOTING
Please note:
In ATX systems, the power supply receives a signal from the motherboard when switched on,
without which it cannot run. For this reason, please ensure that the power switch connector
(usually located on the front panel) is correctly connected to the motherboard using either the
motherboard or case manual. If this is the case, check the power (on/off) switch, as it may be
faulty which means the power supply cannot be started. You can use the reset switch instead of
the power switch in order to avoid such faults.
Careful!
Working on power sources could lead to serious injury. You must read item 2 – „Warnings and
safety instructions“ carefully. Repairs must only be carried out by authorized technicians!
If the system does not function properly with the power supply installed, first check the following
possible sources of faults:
1. Check that the power supply cable is correctly and firmly connected to the power supply and
to the socket. Ideally, use a separate power outlet for the computer power supply.
2. Check whether all connections are correctly connected and make any adjustments required,
such as incorrect polarity.
3. Examine the connection of the on/off switch from the case to the motherboard. Have the
motherboard manual on hand if needed! Switch the power supply on by turning the switch to
position „I“ and press the on/off switch on the case. If the power supply still does not turn on,
continue to the next item.
4. Check your system for possible short circuits or faulty hardware, making sure you switch off
the computer and disconnect all devices not required for the computer to start. Switch it on
again. Repeat this process and switch on one of the devices you have found likely to be faulty
upon each restart. If the power supply does not react due to a short circuit, wait at least 5
minutes after the restart as the device is equipped with over power protection.
Important:
If the power supply does not work, check that you have read these instruction thoroughly and
have excluded the problems mentioned. If the problem persists, contact our customer service
department immediately.
All returns are examined by our RMA service. If a power supply is found to be faultless, it shall be
returned to the customer. A testing fee may be charged for the expense incurred.
7. ATTACHEMENTS
This item is delivered with: Power cables, operating instructions, cable ties, and screws to attach
power supply.

14 15
8. DISPOSAL INSTRUCTIONS
Used electronic equipment may no longer be disposed of in unsorted household waste pursuant
to European guidelines*. It must be disposed of separately. Waste electronic and electric
equipment must be transferred to a special collection point (e.g. recycling centre). This is usually
free.
* Directive 2002/96/EC of the European Parliament the European Council of 27 January
2003 on Waste Electronic and Electric Equipment (WEEE). Act Governing the Sale, Return and
Environmentally Sound Disposal of Electronic and Electrical Equipment (Electrical and Electronic
Equipment Act - ElektroG) of 16 March 2005.
9. WARRANTY, MANUFACTURER‘S DATA
2 year manufacturer‘s warranty for end consumers (only first purchase from authorised Listan
dealers), from date of purchase receipt.
Your original purchase receipt will be required before warranty performance is rendered. Please
keep it in a safe place.
Listan GmbH & Co.KG . Biedenkamp 3a . 21509 Glinde . Germany
For further information, you can contact us in Germany
Mon – Fri 09:00 – 17:30
Phone +49 40 736 7686-44 Fax + 49 40 7367686-69
e-mail: [email protected] www.be-quiet.com
Our General Warranty Conditions apply, which can be viewed on the Internet on www.be-quiet.
net/service/en/warranty. The following numbers will have to be provided in the event of service.
You will find them on the power supply name plate:
10. LEGAL NOTICE, COPYRIGHT
Copyright © Listan GmbH & Co. KG 2011. All rights reserved.
Please note the following:
1. The content of this documentation may not be copied, transmitted, distributed or stored in any
form, whether in whole or in part, without the prior written approval of Listan.
2. be quiet! is a registered trademark of Listan GmbH & Co. KG. Other product and company
names mentioned in this documentation may be trademarks or trade names of their respective
owners.
3. In accordance with its policy, Listan continually develops its products further. Listan therefore
reserves the right to make changes and improvements to any of the products described in this
documentation without prior notice.
4. Listan is under no circumstances responsible for the loss of data and income or for any
specific, incidental, indirect or direct damage, however this may be incurred.
5. The content of this documentation is presented in its most updated form. Listan neither
expressly nor implicitly assumes any liability for the accuracy or completeness of the content
of this documentation, including, but not limited to the implicit guarantee of market suitability
and the appropriateness for a certain purpose, unless applicable laws or case law prescribe
such liability. Listan reserves the right to make changes to this documentation or to withdraw
the documentation at any time without prior notice.
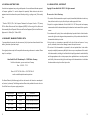
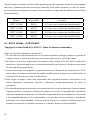
Model description Article Number Serial Number
BQT F1-350W BN185 S/N (see nameplate for number)
BQT F1-400W BN186 S/N (see nameplate for number)
BQT F1-500W BN187 S/N (see nameplate for number)
BQT F1-600W BN188 S/N (see nameplate for number)
Page is loading ...
Page is loading ...
Page is loading ...
Page is loading ...
Page is loading ...
Page is loading ...
Page is loading ...
Page is loading ...
Page is loading ...
Page is loading ...
Page is loading ...

35
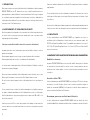
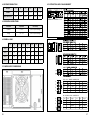
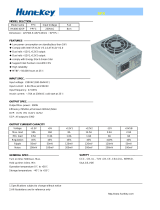
1. LABEL
AC Input
DC Output
Max. Current
Max. Combined
Power
BQT F1
600W
600W
100 - 240Vac 8 - 4A50 - 60Hz
12V1
18A
12V2
18A
12V3
18A
12V4
18A
5V
24A
3,3V
24A
-12V
0,5A
5VSB
3,5A
45A
17,5W6W540W140W
AC Input
DC Output
Max. Current
Max. Combined
Power
BQT F1
500W
500W
100 - 240Vac 8 - 4A50 - 60Hz
12V1
18A
12V2
18A
5V
24A
3,3V
24A
-12V
0,3A
5VSB
3,5A
36A
17,5W3,6W432W130W
AC Input
DC Output
Max. Current
Max. Combined
Power
BQT F1
400W
400W
100 - 240Vac 6 - 3A50 - 60Hz
12V1
18A
12V2
18A
5V
22A
3,3V
24A
-12V
0,3A
5VSB
3A
32A
15W3,6W384W120W
AC Input
DC Output
Max. Current
Max. Combined
Power
BQT F1
350W
350W
100 - 240Vac 6 - 3A50 - 60Hz
12V1
16A
12V2
16A
5V
15A
3,3V
21A
-12V
0,3A
5VSB
3A
28A
15W3,6W336W103W
TECHNICAL DATA

36 37
Yellow
Yellow
+12VDC
+12VDC
Yellow
+12VDC
Pin Color Signal Pin Color Signal
1
Black COM
4
2
Black COM
5
3
Black COM
6
Black COM
7
Black COM
8
PCI EXPRESS VGA CONNECTOR
2
3
1
5
6
4
87
6
5
2
1
8
7
4
3
Yellow +12VDC
Yellow +12VDC
Yellow
Yellow
+12VDC
+12VDC
Pin Color Signal Pin Color Signal
1
Black
COM
4
2
Black
COM
5
3
Black
COM
Black
COM
6
7
8
EPS +12 V POWER CONNECTOR
Yellow
Yellow
+12VDC
+12VDC
Yellow
+12VDC
Pin Color Signal Pin Color Signal
1
Black COM
4
2
Black COM
5
3
Black COM
6
Black COM
7
Black COM
8
PCI EXPRESS VGA CONNECTOR
2
3
1
5
6
4
87
6
5
2
1
8
7
4
3
Yellow +12VDC
Yellow +12VDC
Yellow
Yellow
+12VDC
+12VDC
Pin Color Signal Pin Color Signal
1
Black
COM
4
2
Black
COM
5
3
Black
COM
Black
COM
6
7
8
EPS +12 V POWER CONNECTOR
6. DISTRIBUTION AND PIN ASSIGNMENT
DC Output
3.3V 5V 12V1 12V2 -12V 5VSB
Tolerance
+/- 5% +/- 5% +/- 5% +/- 5% +/- 10% +/- 5%
Ripple/Noise (max.)
50mV 50mV 120mV 120mV 200mV 50mV
Environment Temperature Rel. Humidity
Operation 0 ~ 40°C up to 85% (non-condensing)
Storage -40 ~ 70°C up to 95% (non-condensing)
3. OPERATING CONDITIONS
2. VOLTAGE REGULATION
5. POWER SUPPLY DIMENSIONS
4. MINIMAL LOAD
3,3V 5V 12V1 12V2 12V3 12V4 -12V 5VSB
350W 0,1 0,2 0,1 0 0 0 0 0
400W 0,1 0,2 0,1 0 0 0 0 0
500W 0,1 0,2 0,1 0 0 0 0 0
600W 0,1 0,2 0,1 0 0 0 0 0

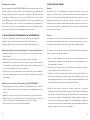
38 39
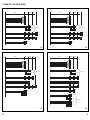
FDD
24-pin
PCIe (6+2-pin)
S-ATA S-ATA S-ATA
HDD HDD HDD
S-ATA
12V P4-connector
12V P4-connector
12V P8-connector
500 mm
100 mm 100 mm 100 mm
FDD
12V P4-connector
12V P4-connector
24-pin
PCIe 2 (6-pin)
PCIe 1 (6+2-pin)
PCIe 4 (6-pin)
PCIe 3 (6+2-pin)
12V P8-connector
S-ATA S-ATA
HDD HDD
HDD
HDD
SLI / Cross Fire
S-ATA
S-ATA S-ATA
S-ATA
500 mm
100 mm 100 mm
400W
600W
7. CONNECTIVITY AND CABLE LENGTHS
FDD
24-pin
PCIe (6+2-pin)
S-ATA S-ATA S-ATA
HDD HDD HDD
S-ATA
12V P4-connector
12V P4-connector
12V P8-connector
500 mm
100 mm 100 mm 100 mm
FDD
12V P4-connector
12V P4-connector
24-pin
12V P8-connector
S- ATA S- ATA
HDD HDD HDD
S- ATA
S- ATA
S- ATA
PCIe 2 (6-pin)
PCIe 1 (6+2-pin)
500 mm
100 mm 100 mm 100 mm
350W
500W
Page is loading ...
-
 1
1
-
 2
2
-
 3
3
-
 4
4
-
 5
5
-
 6
6
-
 7
7
-
 8
8
-
 9
9
-
 10
10
-
 11
11
-
 12
12
-
 13
13
-
 14
14
-
 15
15
-
 16
16
-
 17
17
-
 18
18
-
 19
19
-
 20
20
-
 21
21
-
 22
22
-
 23
23


BE QUIET! Efficient Power F1 400W User manual
- Category
- Power supply units
- Type
- User manual
- This manual is also suitable for
Ask a question and I''ll find the answer in the document
Finding information in a document is now easier with AI
in other languages
Related papers
-
BE QUIET! BQT L7-430W User manual
-
BE QUIET! Pure Power L8 CM 630W User manual
-
BE QUIET! BN133 User manual
-
BE QUIET! BQT L7-730W User manual
-
-
BE QUIET! Dark Power Pro P8 User manual
-
-
BE QUIET! Straight Power E9 700W User manual
-
BE QUIET! STRAIGHT POWER E7 Cable Managment 680W User manual
-
BE QUIET! Be-Quiet Straight Power E7 550W User manual
Other documents
-
be quiet SFX POWER 3 Power Supply User manual
-
be quiet SFX3-450W User manual
-
 Huntkey HK400-42SP Datasheet
-
Cougar CMX700 User manual
-
Hama 00049174 Owner's manual
-
-
NesteQ XZ-400 User manual
-
NesteQ XS-750 User manual
-
-
 bequiet Straight Power 11 Platinum User manual

