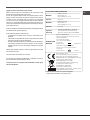
Indesit FK 61 (AN)/HA S User guide
- Category
- Microwaves
- Type
- User guide
This manual is also suitable for

English
Operating Instructions
OVEN
Français
Mode d’emploi
FOUR
Español
Manual de instrucciones
HORNO
Italiano
Istruzioni per l’uso
FORNO
Portuges
Instruções para a utilização
FORNO
Sommario
Istruzioni per l’uso,1
Avvertenze,2
Assistenza,5
Descrizione dell’apparecchio,7
Descrizione dell’apparecchio,9
Installazione,10
Avvio e utilizzo,12
Programmi,12
Precauzioni e consigli,14
Manutenzione e cura,15
Contents
Operating Instructions,1
Warnings,2
Assistance,5
Description of the appliance,7
Description of the appliance,9
Installation,16
Start-up and use,18
Modes,18
Precautions and tips,20
Maintenance and care,21
Sommaire
Mode d’emploi,1
Avertissements,3
Assistance,5
Description de l’appareil,7
Description de l’appareil,9
Installation,22
Mise en marche et utilisation,24
Programmes,24
Précautions et conseils,26
Nettoyage et entretien,27
Sumario
Manual de instrucciones,1
Advertencias,3
Asistencia,6
Descripción del aparato,8
Descripción del aparato,9
Instalación,28
Puesta en funcionamiento y uso,30
Programas,30
Precauciones y consejos,32
Mantenimiento y cuidados,33
Índice
Instruções para a utilização,1
Advertências,4
Assistência,6
Descrição do aparelho,8
Descrição do aparelho,9
Instalação,34
Início e utilização,36
Programas,36
Precauções e conselhos,38
Manutenção e cuidados,39
FK 61 /HA S
FKQ 61 /HA S
FKQ 616 J /HA S
FKS 610 X/HA S
Ελληνικά
Οδηγίες χρήσης
ΦΟΎΡΝΟΣ
Περιεχόμενα
Οδηγίες χρήσης,1
Προειδοποίηση,4
Τεχνική υποστήριξη,6
Περιγραφή της συσκευής,8
Περιγραφή της συσκευής,9
Εγκατάσταση,40
Εκκίνηση και χρήση,42
ΠΡΟΓΡΑΜΜΑΤΑ,42
Προφυλάξεις και συμβουλές,44
Συντήρηση και φροντίδα,45

2
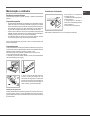
Avvertenze
ATTENZIONE: Questo apparecchio e le sue parti
accessibili diventano molto caldi durante l’uso.
Bisogna fare attenzione ed evitare di toccare gli
elementi riscaldanti. Tenere lontani i bambini inferiori
agli 8 anni se non continuamente sorvegliati. Il
presente apparecchio può essere utilizzato dai
bambini a partire dagli 8 anni e da persone con
ridotte capacità siche, sensoriali o mentali oppure
con mancanza di esperienza e di conoscenza se
si trovano sotto adeguata sorveglianza oppure se
sono stati istruiti circa l’uso dell’apparecchio in modo
sicuro e se si rendono conto dei pericoli correlati. I
bambini non devono giocare con l’apparecchio. Le
operazioni di pulizia e di manutenzione non devono
essere effettuate dai bambini senza sorveglianza.
Non utilizzare prodotti abrasivi né spatole di
metallo taglienti per pulire lo sportello in vetro del
forno in quanto potrebbero grafare la supercie,
provocando, così, la frantumazione del vetro.
Non utilizzare mai pulitori a vapore o ad alta pressione
per la pulizia dell’apparecchio.
ATTENZIONE: Assicurarsi che l’apparecchio sia
spento prima di sostituire la lampada per evitare la
possibilità di scosse elettriche.
! Quando si inserisce la griglia assicurarsi che il
fermo sia rivolto verso l’alto e nella parte posteriore
della cavità.
Warnings
WARNING: The appliance and its accessible parts
become hot during use. Care should be taken to
avoid touching heating elements. Children less than 8
years of age shall be kept away unless continuously
supervised. This appliance can be used by children
aged from 8 years and above and persons with
reduced physical, sensory or mental capabilities or
lack of experience and knowledge if they have been
given supervision or instruction concerning use of the
appliance in a safe way and understand the hazards
involved. Children shall not play with the appliance.
Cleaning and user maintenance shall not be made
by children without supervision.
Do not use harsh abrasive cleaners or sharp metal
scrapers to clean the oven door glass since they can
scratch the surface, which may result in shattering of
the glass.
Never use steam cleaners or pressure cleaners on
the appliance.
WARNING: Ensure that the appliance is switched
off before replacing the lamp to avoid the possibility
of electric shock.
! When you place the rack inside, make sure that the
stop is directed upwards and in the back of the cavity.
Page is loading ...
Page is loading ...
Page is loading ...
Page is loading ...

7
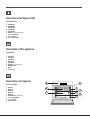
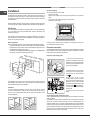
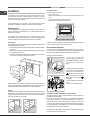
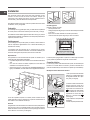
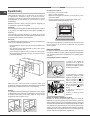
Descrizione dell’apparecchio
Vista d’insieme
1 POSIZIONE 1
2 POSIZIONE 2
3 POSIZIONE 3
4 POSIZIONE 4
5 POSIZIONE 5
6 GUIDE di scorrimento dei ripiani
7 Ripiano LECCARDA
8 Ripiano GRIGLIA
9 Pannello di controllo
Description of the appliance
Overall view
1 POSITION 1
2 POSITION 2
3 POSITION 3
4 POSITION 4
5 POSITION 5
6 GUIDES for the sliding racks
7 DRIPPING PAN
8 GRILL
9 Control panel
Description de l’appareil
Vue d’ensemble
1 NIVEAU 1
2 NIVEAU 2
3 NIVEAU 3
4 NIVEAU 4
5 NIVEAU 5
6 GLISSIERES de coulissement
7 Support LECHEFRITE
8 Support GRILLE
9 Tableau de bord
7
8
9 6
1
2
3
4
5
Page is loading ...

9
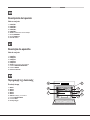
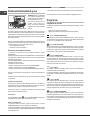
Descrizione dell’apparecchio
Pannello di controllo
1 Manopola PROGRAMMI
2 Spia TERMOSTATO
3 Manopola TERMOSTATO
4 Manopola CONTAMINUTI
Description of the appliance
Control panel
1 SELECTOR knob
2 THERMOSTAT indicator light
3 THERMOSTAT knob
4 TIMER knob*
Description de l’appareil
Tableau de bord
1 Bouton PROGRAMMES
2 Voyant THERMOSTAT
3 Bouton THERMOSTAT
4 Bouton MINUTEUR*
1
2
4
3
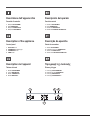
Descripción del aparato
Panel de control
1 Mando de PROGRAMAS
2 Piloto TERMOSTATO
3 Mando del TERMOSTATO
4 Mando del CONTADOR DE MINUTOS*
Descrição do aparelho
Painel de comandos
1 Selector PROGRAMAS
2 Indicador luminoso do TERMOSTATO
3 Selector do TERMOSTATO
4 Selector do CONTADOR DE MINUTOS*
Περιγραφή της συσκευής
Πίνακας ελέγχου
1 Επιλογέας ΠΡΟΓΡΑΜΜΑΤΩΝ
2 Ενδεικτικό φωτάκι ΘΕΡΜΟΣΤΑΤΗ
3 Επιλογέας ΘΕΡΜΟΣΤΑΤΗ
4 Επιλογέας ΧΡΟΝΟΜΕΤΡΟΥ*
Page is loading ...
Page is loading ...
Page is loading ...
Page is loading ...
Page is loading ...
Page is loading ...

16
GB
Installation
! Please keep this instruction booklet in a safe place for future reference. If
the appliance is sold, given away or moved, please make sure the booklet is
also passed on to the new owners so that they may benet from the advice
contained within it.
! Please read this instruction manual carefully: it contains important information
concerning the safe operation, installation and maintenance of the appliance.
Positioning
! Do not let children play with the packaging material; it should be disposed
of in accordance with local separated waste collection standards (see
Precautions and tips).
! The appliance must be installed by a qualied professional in accordance
with the instructions provided. Incorrect installation may damage property or
cause harm to people or animals.
Built-in appliances
Use an appropriate cabinet to ensure that the appliance operates properly:
• The panels adjacent to the oven must be made of heat-resistant material.
• Cabinets with a veneer exterior must be assembled with glues which can
withstand temperatures of up to 100°C.
• To install the oven under the counter (see diagram) or in a kitchen unit,
the cabinet must have the following dimensions:
590 mm.
595 mm.
22,5 mm.*
20,5 mm.
550 mm.
570 mm.
20 mm.
575-585 mm.
45 mm.
560 mm.
550 mm.
min.
! The appliance must not come into contact with electrical parts once it has
been installed. The indications for consumption given on the data plate have
been calculated for this type of installation.
Ventilation
To ensure adequate ventilation, the back panel of the cabinet must be
removed. It is advisable to install the oven so that it rests on two strips of
wood, or on a completely at surface with an opening of at least 45 x 560
mm (see diagrams).
560 mm.
45 mm.
Centring and xing
Secure the appliance to the cabinet:
• Open the oven door.
• Remove the 2 rubber plugs covering the xing holes on the perimeter
frame.
• Fix the oven to the cabinet using the 2 wood screws.
• Replace the rubber plugs.
! All parts which ensure the safe operation of the appliance must not be
removable without the aid of a tool.
Electrical connection
Ovens equipped with a three-pole power supply cable are designed to operate
with alternating current at the voltage and frequency indicated on the data
plate located on the appliance (see below).
Fitting the power supply cable
1. Open the terminal board by
inserting a screwdriver into the side
tabs of the cover. Use the screwdriver
as a lever by pushing it down to open
the cover (see diagram).
2. Install the power supply cable by
loosening the cable clamp screw
and the three wire contact screws
L-N- .
Connect the wires to the
corresponding terminals: the Blue
wire to the terminal marked (N), the
Brown wire to the terminal marked
(L) and the Yellow/Green wire to the
terminal marked (see diagram).
3. Secure the cable by fastening the
clamp screw.
4. Close the cover of the terminal
board.
Connecting the supply cable to the mains
Install a standardised plug corresponding to the load indicated on the data
plate (see table).
The appliance must be directly connected to the mains using an omnipolar
switch with a minimum contact opening of 3 mm installed between the
appliance and the mains. The switch must be suitable for the charge indicated
and must comply with current electrical regulations (the earthing wire must not
be interrupted by the switch). The supply cable must be positioned so that it
does not come into contact with temperatures higher than 50°C at any point
(the back panel of the oven, for example).
L
N
N
L

GB
17
! The installer must ensure that the correct electrical connection has been
performed and that it is fully compliant with safety regulations.
Before connecting the appliance to the power supply, make sure that
• The appliance is earthed and the plug is compliant with the law.
• The socket can withstand the maximum power of the appliance, which is
indicated on the data plate.
• The voltage is in the range between the values indicated on the data plate.
• The socket is compatible with the plug of the appliance. If the socket is
incompatible with the plug, ask an authorised technician to replace it. Do
not use extension cords or multiple sockets.
! Once the appliance has been installed, the power supply cable and the
electrical socket must be easily accessible.
! The cable must not be bent or compressed.
! The cable must be checked regularly and replaced by authorised technicians
only (see Assistance).
! The manufacturer declines any liability should these safety measures
not be observed.
APPLIANCE SPECIFICATIONS
Dimensions*
width 43.5 cm
height 32,4 cm
depth 41.5 cm
Volume*
59 l
Dimensions**
width 45.5 cm
height 32,4 cm
depth 41.5 cm
Volume**
62 l
Electrical
connections
voltage: 220 - 240 V~ 50/60 Hz
(see data plate)
maximum power absorbed
2800 W
* Only for models with drawn rails.
** Only for models with wire rails.
ENERGY
LABEL
Directive 2002/40/EC on the label of
electric ovens. Standard EN 50304
Energy consumption for Natural
convection – heating mode:
Traditional mode
Declared energy consumption for
Forced convection Class – heating
mode: Baking
This appliance conforms to the
following European Economic
Community directives: 2006/95/EEC
dated 12/12/06 (Low Voltage) and
subsequent amendments –
2004/108/EEC dated 03/05/89
(Electromagnetic Compatibility) and
subsequent amendments -
93/68/EEC dated 22/07/93 and
subsequent amendments.
2012/19/EEC
and subsequent
amendments.
- 1275/2008 standby/off mode

18
GB
Start-up and use
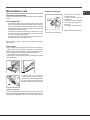
WARNING! The oven is provided
with a stop system to extract the
racks and prevent them from
coming out of the oven (1).
As shown in the drawing, to extract
them completely, simply lift the
racks, holding them on the front
part, and pull (2).
! The rst time you use your appliance, heat the empty oven with its door closed
at its maximum temperature for at least half an hour. Make sure that the room
is well ventilated before switching the oven off and opening the oven door. The
appliance may emit a slightly unpleasant odour caused by protective substances
used during the manufacturing process burning away.
Some models are equipped with a system of hinges which allows the door to
close slowly, without the user having to follow the movement through with his/
her hand. To use the system correctly, before closing the door:
• Open the door fully.
• Do not force the closing movement manually.
Starting the oven
1. Select the desired cooking mode by turning the SELECTOR knob.
2. Select the desired temperature using the THERMOSTAT knob. A list
detailing cooking modes and suggested cooking temperatures can be found
in the Cooking advice table (see Cooking modes).
3. The THERMOSTAT indicator light indicates that the oven is heating up to
the temperature set.
4. During cooking it is always possible to:
- change the cooking mode by turning the SELECTOR knob;
- adjust the temperature by turning the THERMOSTAT knob;
- stop cooking by turning the SELECTOR knob to the “0” position.
! Never put objects directly on the bottom of the oven; this will prevent the
enamel coating from being damaged.
! Always place cookware on the rack(s) provided.
Cooling ventilation
In order to cool down the external temperature of the oven, a cooling fan
blows a stream of air between the control panel and the oven door, as well
as towards the bottom of the oven door.
! Once cooking has been completed, the cooling fan continues to operate
until the oven has cooled down sufciently.
Oven light
When selecting with the SELECTOR knob the oven light goes on. It
remains lit when a cooking mode is selected.
How to use the minute minder
1. To set the buzzer, turn the MINUTE MINDER knob clockwise almost one
complete revolution.
2. Turn the knob anticlockwise to set the desired time: align the minutes
shown on the MINUTE MINDER knob with the indicator on the control panel.
3. The minute minder when the selected time has elapsed, a buzzer will sound.
! The minute minder does not turn the oven on or off.
Modes
Cooking modes
! A temperature value between 60°C and MAX can be set for all cooking
modes except the following:
• GRILL (recommended: set only to MAX power level)
• GRATIN (recommended: do not exceed 200°C).
TRADITIONAL OVEN mode
Both the top and bottom heating elements will come on. When using this
traditional cooking mode, it is best to use one cooking rack only. If more than
one rack is used, the heat will be distributed unevenly.
MULTILEVEL mode
All the heating elements (top, bottom and circular) switch on and the fan
begins to operate. Since the heat remains constant throughout the oven, the
air cooks and browns food in a uniform manner. A maximum of two racks may
be used at the same time.
PIZZA OVEN mode
The circular heating elements and the elements at the bottom of the oven are
switched on and the fan is activated. This combination heats the oven rapidly
by producing a considerable amount of heat, particularly from the element
at the bottom. If you use more than one rack at a time, switch the position of
the dishes halfway through the cooking process.
GRILL mode
The top heating element and the rotisserie (where present) come on.
The high and direct temperature of the grill is recommended for food which
requires a high surface temperature. Always cook in this mode with the oven
door closed.
GRATIN mode
The top heating element and the rotisserie (where present) are activated
and the fan begins to operate. This combination of features increases the
effectiveness of the unidirectional thermal radiation provided by the heating
elements through forced circulation of the air throughout the oven. This helps
prevent food from burning on the surface and allows the heat to penetrate right
into the food. Always cook in this mode with the oven door closed.
BAKING mode
The rear heating element and the fan are switched on, thus guaranteeing the
distribution of heat in a delicate and uniform manner throughout the entire
oven. This mode is ideal for baking temperature sensitive foods (such as
cakes, which need to rise) and for the preparation of “bitesize pastries” on 3
shelves simultaneously.

GB
19
Practical cooking advice
! Do not place racks in position 1 or 5 during fan-assisted cooking. Excessive
direct heat can burn temperature sensitive foods.
! In the GRILL and GRATIN cooking modes, place the dripping pan in position
1 to collect cooking residues (sauce and/or grease).
MULTILEVEL
• Use positions 2 and 4, placing the food which requires more heat on the
rack in position 2.
• Place the dripping pan on the bottom and the rack on top.
GRILL
• Place the rack in position 3 or 4. Make sure the food is in the centre of the
rack.
• We recommend that the power level is set to maximum. The top heating
element is regulated by a thermostat and may not always operate
constantly.
PIZZA OVEN MODE
• Use a lightweight aluminium pizza pan. Place it on the rack provided.
For a crispy crust, do not use the dripping pan as this extends the total
cooking duration and prevents the crust from forming.
• If the pizza has a lot of toppings, we recommend adding the mozzarella
cheese to the top of the pizza halfway through the cooking process.
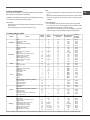
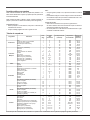
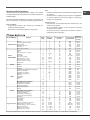
Modes Foods
Weight
(in kg)
Rack
position
Preheating time
(minutes)
Recommended
temperature
Cooking
duration
(minutes)
Traditional
Duck
Roast veal or beef
Roast pork
Biscuits (shortcrust pastry)
Tarts
1
1
1
-
1
3
3
3
3
3
15
15
15
15
15
200
200
200
180
180
65-75
70-75
70-80
15-20
30-35
Multilevel
Pizza (on 2 racks)
Lasagne
Lamb
Roast chicken + potatoes
Mackerel
Sponge cake made with yoghurt
Cream puffs (on 2 racks)
Biscuits (on 2 racks)
Sponge cake (on 1 rack)
Sponge cake (on 2 racks)
Savoury pies
1
1
1
1+1
1
1
0.5
0.5
0.5
1
1.5
2 and 4
3
2
2 and 4
2
2
2 and 4
2 and 4
2
2 and 4
3
15
10
10
15
10
10
10
10
10
10
15
230
180
180
200
170-180
170
190
180
170
170
200
15-20
30-35
40-45
60-70
30-35
40-50
20-25
10-15
15-20
20-25
30-40
Pizza
Pizza
Focaccia bread
0.5
1
3
2 or 3
15
10
220
200
15-20
15-20
Grill
Sole
Squid and prawn kebabs
Cod fillet
Grilled vegetables
Veal steak
Cutlets
Hamburgers
Mackerel
Toast
1
1
1
1
1
1
1
1
no. 4
4
4
4
3 or 4
4
4
4
4
4
5
5
5
5
5
5
5
5
5
MAX
MAX
MAX
MAX
MAX
MAX
MAX
MAX
MAX
8-10
6-8
10
10-15
15-20
15-20
7-10
15-20
2-3
With rotisserie spit (where present)
Spit-roast veal
Spit-roast chicken
Spit-roast lamb
1.0
1.5
1.0
-
-
-
-
-
-
100%
100%
100%
80-90
70-80
70-80
Gratin
Grilled chicken
Cuttlefish
1.5
1.5
2
2
5
5
200
200
55-60
30-35
With rotisserie spit (where present)
Spit-roast veal
Spit-roast lamb
Chicken (on the spit) + potatoes (on
the dripping pan)
1.5
1.5
1.5
-
-
-
-
2
10
10
10
10
200
200
200
200
70-80
70-80
70-75
70-75
Baking
Tarts
Fruit cakes
Sponge cake made with yoghurt
Sponge cake
Stuffed pancakes (on 2 racks)
Small cakes (on 2 racks)
Cheese puffs (on 2 racks)
Cream puffs (on 3 racks)
Biscuits (on 3 racks)
Meringues (on 3 racks)
0.5
1
0.7
0.5
1.2
0.6
0.4
0.7
0.7
0.5
3
2 or
3
3
3
2 and 4
2 and 4
2 and 4
1, 3 and 5
1, 3 and 5
1, 3 and 5
15
15
15
15
15
15
15
15
15
15
180
180
180
160
200
180-190
200-210
180
180
90
20-30
40-45
40-50
25-35
30-35
20-25
15-20
20-25
20-25
180
! The cooking times listed above are intended as guidelines only and may be modified according to personal tastes.
Cooking advice table

20
GB
Precautions and tips
! This appliance has been designed and manufactured in compliance with
international safety standards. The following warnings are provided for safety
reasons and must be read carefully.
General safety
• The appliance was designed for domestic use inside the home and is
not intended for commercial or industrial use.
• The appliance must not be installed outdoors, even in covered areas. It is
extremely dangerous to leave the appliance exposed to rain and storms.
• When moving or positioning the appliance, always use the handles
provided on the sides of the oven.
• Do not touch the appliance while barefoot or with wet or damp hands and
feet.
• The appliance must be used by adults only for the preparation of
food, in accordance with the instructions provided in this booklet.
Any other use of the appliance (e.g. for heating the room) constitutes
improper use and is dangerous. The manufacturer may not be held
responsible for any damage caused as a result of improper, incorrect
and unreasonable use of the appliance.
• Do not touch the heating elements or certain parts of the oven door
when the appliance is in use; these parts become extremely hot.
Keep children well away from the appliance.
• Make sure that the power supply cables of other electrical appliances do
not come into contact with the hot parts of the oven.
• The ventilation and heat dispersal openings must never be obstructed.
• Always grip the oven door handle in the centre: the ends may be hot.
• Always use oven gloves when placing cookware in the oven or when
removing it.
• Do not use aluminium foil to line the bottom of the oven.
• Do not place ammable materials in the oven: if the appliance is switched
on accidentally, the materials could catch re.
• Contrôler toujours que les boutons sont bien dans la position “●”/“○” quand
l’appareil n’est pas utilisé.
• When unplugging the appliance, always pull the plug from the mains
socket; do not pull on the cable.
• Do not perform any cleaning or maintenance work without having
disconnected the appliance from the electricity mains.
• If the event of malfunctions, under no circumstances should you attempt
to perform the repairs yourself. Contact an authorised Service Centre (see
Assistance).
• Do not rest objects on the open oven door.
• Do not let children play with the appliance.
• The appliance should not be operated by people (including children)
with reduced physical, sensory or mental capacities, by inexperienced
individuals or by anyone who is not familiar with the product. These
individuals should, at the very least, be supervised by someone who
assumes responsibility for their safety or receive preliminary instructions
relating to the operation of the appliance.
• The appliance is not intended to be operated by means of an external
timer or separate remote-control system.
Disposal
• When disposing of packaging material: observe local legislation so that
the packaging may be reused.
• The European Directive 2012/19/EC on Waste Electrical and
Electronic Equipment (WEEE), requires that old household electrical
appliances must not be disposed of in the normal unsorted municipal
waste stream. Old appliances must be collected separately in order
to optimise the recovery and recycling of the materials they contain
and reduce the impact on human health and the environment.
The crossed out “wheeled bin” symbol on the product reminds you of your
obligation, that when you dispose of the appliance it must be separately
collected.
Consumers should contact their local authority or retailer for information
concerning the correct disposal of their old appliance.
Respecting and conserving the environment
• You can help to reduce the peak load of the electricity supply network
companies by using the oven in the hours between late afternoon and
the early hours of the morning.
• Always keep the oven door closed when using the GRILL and
GRATIN modes: this will achieve improved results while saving energy
(approximately 10%).
• Check the door seals regularly and wipe them clean to ensure they are
free of debris so that they adhere properly to the door, thus avoiding the
dispersal of heat.

GB
21
Maintenance and care
Switching the appliance off
Disconnect your appliance from the electricity supply before carrying out
any work on it.
Cleaning the appliance
• The stainless steel or enamel-coated external parts and the rubber seals
may be cleaned using a sponge that has been soaked in lukewarm water
and neutral soap. Use specialised products for the removal of stubborn
stains. After cleaning, rinse and dry thoroughly. Do not use abrasive
powders or corrosive substances.
• The inside of the oven should ideally be cleaned after each use, while it is
still lukewarm. Use hot water and detergent, then rinse well and dry with
a soft cloth. Do not use abrasive products.
• All accessories - with the exception of the sliding racks - can be washed
like everyday crockery, and are even dishwasher safe.
! Never use steam cleaners or pressure cleaners on the appliance.
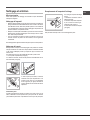
Cleaning the oven door
Clean the glass part of the oven door using a sponge and a non-abrasive
cleaning product, then dry thoroughly with a soft cloth. Do not use rough
abrasive material or sharp metal scrapers as these could scratch the surface
and cause the glass to crack.
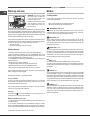
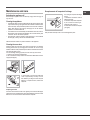
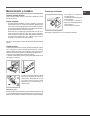
For more thorough cleaning purposes, the oven door may be removed:
1. Open the oven door fully (see diagram).
2. Use a screwdriver to lift up and turn the small levers F located on the two
hinges (see diagram).
F
3. Grip the door on the two outer sides and
close it approximately half way. Pull the
door towards you, lifting it out of its slot (see
diagram). To replace the door, reverse this
sequence.
Inspecting the seals
Check the door seals around the oven regularly. If the seals are damaged,
please contact your nearest Service Centre (see Assistance). We recommend
that the oven is not used until the seals have been replaced.
Remplacement de l’ampoule d’éclairage
Pour changer l’ampoule d’éclairage
du four:
1. Dévissez le couvercle en verre du
boîtier de la lampe.
2. Dévissez l’ampoule et remplacez-
la par une autre de même type :
puissance 25 W, culot E 14.
3. Remontez le couvercle à sa place
(voir gure).
! Ne pas utiliser la lampe du four comme éclairage de la pièce.
Page is loading ...
Page is loading ...
Page is loading ...
Page is loading ...
Page is loading ...
Page is loading ...
Page is loading ...
Page is loading ...
Page is loading ...
Page is loading ...
Page is loading ...
Page is loading ...
Page is loading ...
Page is loading ...
Page is loading ...
Page is loading ...
Page is loading ...
Page is loading ...
Page is loading ...
Page is loading ...
Page is loading ...
Page is loading ...
Page is loading ...
Page is loading ...
Page is loading ...
Page is loading ...
Page is loading ...
-
 1
1
-
 2
2
-
 3
3
-
 4
4
-
 5
5
-
 6
6
-
 7
7
-
 8
8
-
 9
9
-
 10
10
-
 11
11
-
 12
12
-
 13
13
-
 14
14
-
 15
15
-
 16
16
-
 17
17
-
 18
18
-
 19
19
-
 20
20
-
 21
21
-
 22
22
-
 23
23
-
 24
24
-
 25
25
-
 26
26
-
 27
27
-
 28
28
-
 29
29
-
 30
30
-
 31
31
-
 32
32
-
 33
33
-
 34
34
-
 35
35
-
 36
36
-
 37
37
-
 38
38
-
 39
39
-
 40
40
-
 41
41
-
 42
42
-
 43
43
-
 44
44
-
 45
45
-
 46
46
-
 47
47
-
 48
48


Indesit FK 61 (AN)/HA S User guide
- Category
- Microwaves
- Type
- User guide
- This manual is also suitable for
Ask a question and I''ll find the answer in the document
Finding information in a document is now easier with AI
in other languages
- italiano: Indesit FK 61 (AN)/HA S Guida utente
- français: Indesit FK 61 (AN)/HA S Mode d'emploi
- español: Indesit FK 61 (AN)/HA S Guía del usuario
- português: Indesit FK 61 (AN)/HA S Guia de usuario
Related papers
-
HOTPOINT/ARISTON FK 63 X/HA S User guide
-
Indesit FH 51 IX CN S User guide
-
-
Whirlpool IFG 63 K.A (TD) User guide
-
Hotpoint-Ariston EHS 51 I X/HA Owner's manual
-
-
Whirlpool IF 63 K.A (AN) Owner's manual
-
-
-
Other documents
-
Whirlpool FMR 54 K.A (RA) User guide
-
-
Ariston FB 51.2 IX CN Operating instructions
-
-
-
-
-
-
-
Hotpoint Ariston EHS 53 KX/HA User guide