Page is loading ...

1
EN
TABLE OF CONTENTS
Introduction ............................................................................ 3
Key Features ........................................................................... 4
Watch ................................................................................... 4
LCD Display ......................................................................... 5
Getting Started ....................................................................... 8
Unpacking the Watch .......................................................... 8
Turning On the Watch (First-Time Use Only) ...................... 8
Batteries ............................................................................... 8
Wearing the Chest Belt and Watch ................................... 11
Transmission Signal .......................................................... 12
Signal Search .................................................................... 14
Setting the Keypad Tone / Light Mode .............................. 14
Activating the Backlight ...................................................... 15
Activating the Keypad Lock ............................................... 15
Switching Between Operation Modes ................................ 15
Using the Clock .................................................................... 16
Using the Alarm(s) ................................................................ 17
Setting the Alarm(s) ........................................................... 17
Turning the Alarm Sound Off ............................................. 17
Activating / Deactivating the Alarm .................................... 18
Exercise Profile .................................................................... 18
Target Activity .................................................................... 20
Maximum / Lower / Upper Heart Rate Limit ....................... 20
Heart Rate Alert ................................................................. 21
User Profile ........................................................................... 21
Activity Level ...................................................................... 23
About the Fitness / Body Mass Index ................................ 23
Fitness Index ..................................................................... 23
Body Mass Index (VIBRA Trainer Fit Pro Only) ................. 24
VIBRA Trainer Fit /
VIBRA Trainer Fit Pro
Model: SE211 / SE232
USER MANUAL
SE211 English R9 OP_OK 2006.1.5, 9:41 PM1

2
EN
View Fitness / Body Mass Index ........................................ 25
About the SMART TRAINING PROGRAM .......................... 26
Using the SMART TRAINING PROGRAM ........................ 26
View Data while SMART TRAINING PROGRAM is Running .. 27
View SMART TRAINING PROGRAM Memory Records ... 28
Recovery Heart Rate (VIBRA Trainer Fit Pro Only) ........... 28
Stopwatch ............................................................................. 29
View Data while Stopwatch / Lap is Running .................... 29
View Stopwatch or Lap Memory Records ......................... 30
Training Information ............................................................. 31
How the Heart Rate Monitor Helps You ............................ 31
Training Tips ...................................................................... 31
Care Instructions ................................................................. 32
Aquatic and Outdoor Activities ........................................... 32
Tips for Keeping Your Watch Fit ........................................ 33
Specifications ....................................................................... 33
Warnings ............................................................................... 34
About Oregon Scientific ...................................................... 35
EU-Declaration of Conformity ............................................. 36
SE211 English R11 OP_OK.p65 2006.1.12, 3:00 PM2

3
EN
INTRODUCTION
Thank you for selecting the Oregon Scientific
TM
VIBRA Trainer Fit
(SE211) / VIBRA Trainer Fit Pro (SE232) watch as your sports
fitness product of choice. This precision device includes the
following features:
• Heart rate monitor with cordless transmission between watch
and chest belt.
• Digital coding system to reduce environmental interference.
• Heart rate monitoring system when you go above or below
your upper and lower heart rate limit.
•Vibration, visual or sound alert for heart rate thresholds during
training.
• Memory stores heart rate figures during exercise.
• SMART TRAINING PROGRAM enables you to complete
exercise cycles effectively.
• Calorie consumption and percent fat burn display during and
after exercise.
• Exercise profile - to calculate your personal heart rate limit for
training.
• User profile - to calculate your fitness index and body mass
index (BMI - VIBRA Trainer Fit Pro only).
• Stopwatch.
• 99 lap memory storage showing average heart rate and
maximum heart rate. (VIBRA Trainer Fit Pro only.)
• Dual alarms with a choice of daily, weekday or weekend
settings.
• Mounting bracket, chest belt and carrying case included.
•Watch - up to 50 metres water resistant.
• Chest belt - splash proof.
The use of the SE211 or SE232 watch is for sport
purposes only and it is not meant to replace any medical advice.
This manual contains important safety and care information, and
provides step-by-step instructions for using this product. Read
the manual thoroughly, and keep it in a safe place in case you
need to later refer to it.
IMPORTANT
SE211 English R9 OP_OK 2006.1.5, 9:41 PM3

4
EN
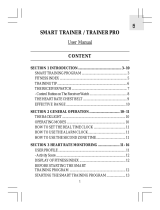
KEY FEATURES
WATCH
SE211 - VIBRA Trainer Fit
4
5
6
1
2
3
2
SE232 - VIBRA Trainer Fit Pro
1. LCD display.
2. - VIBRA Trainer Fit Pro only - L / MEM / -: Display training
records; decrease setting value; mark a lap.
- VIBRA Trainer Fit only - MEM / -: Display training records;
decrease setting value.
3. MODE: Switch to another display.
4. ST / SP / +: Start / stop timer; increase setting value.
5.
/
: Turn on backlight for 3 seconds; lock / unlock the
keypad.
6. SET: Enter Setting Mode; select another setting option; display
different information during training; reset timer / stopwatch.
SE211 English R9 OP_OK 2006.1.5, 9:41 PM4

5
EN
1.
/
: Alarm 1 and 2 time; waves show when alarm
is activated.
2.
: Cursor highlights the selected alarm in Alarm Mode.
3. WARM: Warm-up timer is shown or running.
4. TTL: Total exercise time is displayed.
5. SPLIT: Shows and calculates split time (VIBRA Trainer Fit
Pro only).
6.
: Stopwatch is shown or running.
7. LAP: Shows current lap time or memory lap time (VIBRA
Trainer Fit Pro only).
8. TIMER: SMART TRAINING PROGRAM is shown or running.
9. REST: Recovery timer is shown or running.
1
2
3
4
5
7
8
9
6
1
2
3
4
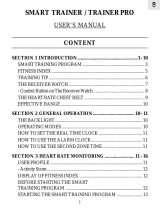
LCD DISPLAY
1. Area 1
2. Area 2
3. Area 3
4. Area 4
Area 1
SE211 English R9 OP_OK 2006.1.5, 9:41 PM5

6
EN
1. Date: MM:DD or DD:MM and day of the week; stopwatch time.
2. kcal: Calorie unit.
3.
: Keypad tone is disabled.
4.
: Light Mode is enabled.
5.
: Keypad lock is enabled.
Area 3
1
2
3
4
5
Area 2
1. Time: HH:MM.
2.
/ : Flash in Timer / Stopwatch Mode when the heart rate
is above or below the upper and lower zone.
3. kg / lb: Body weight unit.
4. % FAT: Percentage of fat burn.
5. cm: Height unit.
6. LAP: Take lap; lap number (VIBRA Trainer Fit Pro only).
7. MEM: Stopwatch or timer memory is shown.
8. Yr: Year of user's birth.
1
2
3
4
5
6
7
8
SE211 English R9 OP_OK 2006.1.5, 9:41 PM6

7
EN
1. AVG: Average heart rate is displayed.
2. AM / PM: Appears when the 12-hour clock / alarm is being
used.
3. MAX: Maximum heart rate is displayed (VIBRA Trainer Fit
Pro only).
4.
: Heart rate is above or below limit; sound alert is activated.
5.
: Flashes when receiving heart rate signal.
6. VIBRO: Battery is too low for vibrate function.
7.
: Battery status.
8.
: Heart rate alert is set to vibrate.
1
3
4
5
8
6
7
2
Area 4
SE211 English R9 OP_OK 2006.1.5, 9:41 PM7

8
EN
GETTING STARTED
UNPACKING THE WATCH
When you unpack your VIBRA Trainer Fit / VIBRA Trainer Fit Pro
watch, make sure to keep all the packing materials in a safe place,
in case you need to later transport or return the product for
servicing.
In this box, you will find:
•Watch
• Heart rate chest belt
• Mounting bracket
• Carry case
•2 x CR2032 lithium batteries - already installed
TURNING ON THE WATCH (FIRST-TIME USE ONLY)
Press any key for 2 seconds to activate the LCD display.
BATTERIES
The VIBRA Trainer Fit / VIBRA Trainer Fit Pro uses two CR2032
lithium batteries, one for the watch and another for the heart rate
chest belt. Both are already installed. See the table below for
battery warnings.
LOW BATTERY ICON DESCRIPTION
The battery is too low to run the
backlight
The battery is too low to run the
vibration alert
The batteries typically last one year. We highly recommend that
you contact the retailer or our customer service department if you
need to replace them.
The watch battery is low; the
vibration alert and backlight cannot
be used
The chest belt battery is nearly too
low to send a signal to the watch
SE211 English R9 OP_OK 2006.1.5, 9:41 PM8

9
EN
To replace the watch battery:
1. Turn the watch over so that you are looking at the back plate.
2. Disconnect the watchstrap as shown above.
3. Using a small screwdriver, remove the four screws that hold
the back plate into position.
4. Remove the back plate and set it aside.
5. Using a thin blunt instrument, hook the release catch and lift
the clip.
6. With your finger, remove the old battery and set it aside.
7. Slide the new battery into the battery compartment with the +
side upwards.
8. Replace the battery clip.
9. Replace the back plate and screws.
SE211 English R9 OP_OK 2006.1.5, 9:41 PM9

10
EN
To replace the chest belt battery:
1. Locate the battery compartment on the back of the chest belt.
2. Using a coin, as shown above, twist the compartment lid
counter-clockwise until it clicks out of place.
3. Set the battery compartment lid aside.
4. With your finger, remove the old battery and set it aside.
5. Insert the new battery with the + side upwards.
6. Replace the battery compartment lid by twisting it clockwise
until it is firmly in place.
IMPORTANT
•
Non-rechargeable and rechargeable batteries must be
disposed of properly. For this purpose, special containers are
provided for non-rechargeable and rechargeable battery
disposal at communal collection centres.
• Batteries are extremely dangerous when swallowed!
Therefore, keep batteries and the article away from infants. If
a battery has been swallowed seek immediate medical advice.
• The batteries supplied must not be recharged, reactivated by
any other means, dismantled, put into fire or short-circuited.
SE211 English R9 OP_OK 2006.1.5, 9:41 PM10

11
EN
TIPS
• The position of the chest belt affects its performance. Move
the chest belt along the strap so that it falls above your heart.
•Avoid areas with dense chest hair.
• In dry, cold climates, it may take several minutes for the chest
belt to function steadily. This is normal and should improve
with several minutes of exercise.
If the watch is kept idle without receiving a heart rate signal
for 5 minutes, the Heart Rate Mode will quit and return to Clock Mode.
WATCH
You can wear the receiver watch on your wrist or strap it to a bike
or exercise machine, as shown below.
NOTE
WEARING THE CHEST BELT AND WATCH
CHEST BELT
The heart rate chest belt is used to count your heartbeat and
transmit the data to the watch. To wear the chest belt:
1. Wet the conductive pads on the underside of the chest belt
with a few drops of water or a conductive gel to ensure solid
contact.
2. Strap the heart rate chest belt across your chest. To ensure
an accurate heart rate signal, adjust the strap until the belt
sits snugly below your pectoral muscles.
SE211 English R9 OP_OK 2006.1.5, 9:41 PM11

12
EN
TRANSMISSION SIGNAL
The heart rate chest belt and watch have a maximum transmission
range of about 62.5 centimetres (25 inches). They are equipped
with the latest digital coding system to reduce signal interference
from the environment, as well as analog technology. For more
accurate readings use the digital transmission signal. You should
only switch to the analog transmission signal if the situation in point
2 occurs (see below). Your watch will advise you which system it is
using and the signal status by displaying the following icons:
Whenever the watch is searching for the chest belt signal
(manual or automatic search), make sure that the chest belt is no
further than 10 cm (4 inches) from the watch.
To switch from digital to analog or analog to digital system,
press the chest belt button for more than 4 seconds and then
force a signal search.
If the heart icon does not appear on the display or
is not flashing because no signal has been found, force a signal
search. See "Signal Search" section for how to do this.
In the event that you experience a weak signal or your signal is
disrupted by interference in the environment, follow the instructions
below to identify and resolve the situation.
1. The signal is weak - the watch heart rate monitor will only show "0":
• Shorten the distance between the heart rate chest belt and watch.
• Re-adjust the position of the heart rate chest belt.
• Check the conductive pads are moist enough to ensure solid
contact.
• Check the batteries. If they are low or exhausted, the range
may be less.
ICON DESCRIPTION
Outside heart is flashing Searching for a signal
Inside heart is flashing A signal has been found and
the digital system is being
used
Heart is flashing A signal has been found and
the analog system is being
used
No signal has been found
No signal has been found
NOTE
NOTE
IMPORTANT
SE211 English R9 OP_OK 2006.1.5, 9:41 PM12

13
EN
3. Interference from another person's heart rate monitor - their
heart rate readings appear on your watch, or the heart rate
monitor shows "0":
• Press the chest belt button to get the watch to receive your
chest belt signal. Do not press and hold the chest belt button,
as it will change the transmission signal from digital to
analog.
•Take the chest belt off for 12 seconds to automatically
change your User ID. (The watch has 4 User ID's. When
the watch receives the chest belt signal it will tell you which
User ID it has selected. Only products with a digital coding
system have User ID capability.)
4. The signal is jammed - the heart rate reading on your watch is
flashing:
• There is too much interference in the environment for your
heart rate monitor to function. Move to an area where the
heart rate reading stops flashing.
Signal interference in the environment can be due to
electromagnetic disturbances. These may occur near high voltage
power lines, traffic lights, overhead lines of electric railways, electric
bus lines or trams, televisions, car motors, bike computers, some
motor driven exercise equipment, cellular phones or when you
walk through electric security gates. Under interference, the heart
rate reading may become unstable and inaccurate.
WARNING
• Force a signal search (see "Signal Search" section).
2. The gym equipment does not seem to work with your chest
belt and the
digital icon
is displayed:
• Most gym equipment is compatible with the analog system
. Press and hold the chest belt button for more than 4
seconds. from digital to analog. Then force a signal search
(see "Signal Search" section).
SE211 English R9 OP_OK 2006.1.5, 9:41 PM13

14
EN
To set these features:
1. Press MODE to navigate to the Real-Time Clock Mode.
• Light Mode ON or OFF - see "Activating the Backlight" section.
SIGNAL SEARCH
To force a signal search:
1. Press MODE to navigate to the SMART TRAINING
PROGRAM or Stopwatch Mode.
2. Press and hold MODE for 2 seconds. The signal-searching
icon
with the outside flashing will appear to confirm a signal
search is taking place. Whenever the watch is searching for
the chest belt signal make sure that the chest belt is no further
than 10 cm (4 inches) from the watch.
The signal search will take approximately 10 seconds. If after
10 seconds the heart icon is not flashing, then your signal search has
been unsuccessful and you need to force another signal search.
See the table in the "Transmission Signal" section for more signal
status information.
SETTING THE KEYPAD TONE / LIGHT MODE
You can set the watch to have the:
• Keypad "Beep" tone ON or OFF.
SE211 English R9 OP_OK 2006.1.5, 9:41 PM14

15
EN
2. Press SET until you reach the feature you wish to change.
3. Press ST / SP / + or MEM / - to change the setting.
4. Press SET to confirm the setting and move on to the next one.
ACTIVATING THE BACKLIGHT
When the Light Mode is set to OFF:
• Press
to turn on the backlight for 3 seconds. Press any
other key whilst the light is on and it will extend the light time
by another 3 seconds.
When the Light Mode is set to ON:
• Press any key to turn ON or extend the backlight for 3 seconds.
To help conserve power the Light Mode ON setting will
automatically switch to OFF after 2 hours.
The backlight does not work when the low battery icon is
shown and will return to normal once the batteries are replaced.
ACTIVATING THE KEYPAD LOCK
To turn the keypad lock ON or OFF:
• Press and hold
for 2 seconds. will appear on the
display when the keypad lock is on.
SWITCHING BETWEEN OPERATION MODES
Press MODE to switch between the 5 operation modes:
• Real-Time Clock
• Alarm Clock
• User Profile / Exercise Profile
•Timer - SMART TRAINING PROGRAM
• Stopwatch
The modes are described in the sections that follow.
You can run the SMART TRAINING PROGRAM or stopwatch
in the background as you access other modes. The icon for the mode
that is running will flash until you switch back to that mode.
NOTE
NOTE
SE211 English R9 OP_OK 2006.1.5, 9:41 PM15

16
EN
USING THE CLOCK
The real-time clock is the default display for the VIBRA Trainer Fit /
VIBRA Trainer Fit Pro watch.
To set the real-time clock:
1. Press MODE to switch to Real-Time Clock Mode.
2. Press and hold SET until the first setting flashes.
3. Press ST / SP / + or MEM / - to change the setting. Hold to
speed through the options. Press SET to confirm the setting
and move on to the next one.
4. Repeat step 3 to change other settings for this mode.
The order of the real-time clock settings is:
• 12 / 24 hour clock format
• Hour
• Minute
• Year
• DD:MM or MM:DD date format
•Month
•Day
The clock is programmed with a 50-year auto-calendar,
which means you do not need to reset the days of the week and
dates each month.
NOTE
SE211 English R9 OP_OK 2006.1.5, 9:41 PM16

17
EN
USING THE ALARM(S)
SETTING THE ALARM(S)
Your watch has 2 alarms that can be set to activate daily
(Mon-Sun), on a weekday (Mon-Fri), or on a weekend (Sat / Sun).
To set alarm 1 or alarm 2:
1. Press MODE to navigate to Alarm Clock Mode.
2. Press SET to move the cursor to select alarm 1 or alarm 2
and ST / SP / + to activate or deactivate the alarm.
3. Press and hold SET to enter the setting mode for the chosen
alarm.
4. Press ST / SP / + or MEM / - to change the setting. Hold to
speed through the options. Press SET to confirm the setting
and move on to the next one.
5. Repeat step 4 to change other settings for this mode.
6. The alarm will automatically be activated once you have
finished setting the alarm time.
The order of the alarm clock settings is:
• Select daily, weekday or weekend alarm
• Hour
• Minute
TURNING THE ALARM SOUND OFF
Press any key to turn the alarm sound off. The alarm will
automatically reset itself unless you deactivate it.
SE211 English R9 OP_OK 2006.1.5, 9:41 PM17

18
EN
ACTIVATING / DEACTIVATING THE ALARM
1. Press MODE to navigate to Alarm Clock Mode.
2. Press SET to move to the cursor to select alarm 1 or 2.
3. Press ST / SP / + or MEM / - to activate
or deactivate
the alarm.
EXERCISE PROFILE
To calculate your minimum and maximum heart rate you need to
set the exercise profile.
The VIBRA Trainer Fit watch supports 1 exercise profile, whereas
the VIBRA Trainer Fit Pro watch supports 3 different exercise
profiles.
Different activities exercise the body in different ways and help
you to achieve a variety of fitness goals. To accommodate this the
exercise profile can be set to suit different exercise activities. For
example, if you are running, your exercise profile settings are likely
to differ from those you would use when undertaking a weight
training activity.
Also, the time you require to warm-up and complete an exercise
will vary. That is why you can change the warm-up and exercise
countdown time to suit you.
To set the exercise profile:
1. Press MODE to navigate to Exercise Profile Mode.
2. If this screen appears, press SET to navigate to the Exercise
Profile Mode.
SE211 English R9 OP_OK 2006.1.5, 9:41 PM18

19
EN
3. VIBRA Trainer Fit Pro only - press SET to navigate to 1 of the
3 exercise profiles.
4. Press and hold SET until the first setting flashes.
5. Press ST / SP / + or MEM / - to change the setting. Hold to
speed through the options. Press SET to confirm the setting
and move on to the next one.
6. Repeat step 5 to change other settings for this mode.
The order of the user profile settings is:
•Target activity - 0 to 2
• Lower limit heart rate
• Upper limit heart rate
• Resume vibration mode (only appears when the battery is low,
this warning enables you to resume vibration mode or turn it
OFF to save power)
• Heart rate alert
• Exercise timer - hour
• Exercise timer - minute
•Warm-up timer - set to 5, 10, 15 to activate or 0 mins to
deactivate timer
• Rest timer - ON / OFF (VIBRA Trainer Fit Pro only)
Once you have set your exercise profile your lower and
upper heart rate limit will be set automatically. However, you can
manually change your upper and lower heart rate limit if the
automatic setting does not suit you. If you change the target activity
level, your upper / lower and maximum heart rate will automatically
be updated.
NOTE
SE211 English R9 OP_OK 2006.1.5, 9:41 PM19

20
EN
TARGET ACTIVITY
There are 3 target activity levels:
TARGET ACTIVITY
MHR% DESCRIPTION
0
1
2
Health
Maintenance
Aerobic Exercise
Anaerobic
Exercise
65-78%
65-85%
78-90%
This is the lowest training
intensity level. It is good for
beginners and those who
want to strengthen their
cardiovascular systems.
Generates speed and
power. It works at or above
the body's oxygen intake
capability, builds muscle,
and cannot be maintained
for a long period of time.
Increases strength and
endurance. It works
within the body's oxygen
intake capability, burns
more calories, and can
be maintained for a long
period of time.
MAXIMUM / LOWER / UPPER HEART RATE LIMIT
Before you begin any exercise program and to achieve maximum
health benefits from your workout, it is important to know your:
• Maximum heart rate (MHR)
• Lower heart rate limit
• Upper heart rate limit
To manually calculate your own heart rate limits, follow the
instructions below:
MHR LOWER LIMIT
MHR =
220 - age
MHR x lower target
activity %.
E.g. Target activity is 0
Lower Limit =
MHR x 65%
UPPER LIMIT
MHR x upper target
activity %.
E.g. Target activity is 0
Upper Limit =
MHR x 78%
SE211 English R9 OP_OK 2006.1.5, 9:41 PM20
/