Page is loading ...

CS2000H Operations Manual
For more information on other great Peavey products, go to your local Peavey dealer or online at www.peavey.com
power amplifier

2
Intended to alert the user to the presence of uninsulated “dangerous voltage” within the product’s
enclosure that may be of sufficient magnitude to constitute a risk of electric shock to persons.
Intended to alert the user of the presence of important operating and maintenance (servicing)
instructions in the literature accompanying the product.
CCAAUUTTIIOONN::
Risk of electrical shock — DO NOT OPEN!
CCAAUUTTIIOONN::
To reduce the risk of electric shock, do not remove cover. No user serviceable parts inside.
Refer servicing to qualified service personnel.
WWAARRNNIINNGG::
To prevent electrical shock or fire hazard, do not expose this appliance to rain or moisture.
Before using this appliance, read the operating guide for further warnings.
Este símbolo tiene el propósito, de alertar al usuario de la presencia de “(voltaje) peligroso” sin
aislamiento dentro de la caja del producto y que puede tener una magnitud suficiente como para
constituir riesgo de descarga eléctrica.
Este símbolo tiene el propósito de alertar al usario de la presencia de instruccones importantes sobre la
operación y mantenimiento en la información que viene con el producto.
PPRREECCAAUUCCIIOONN::
Riesgo de descarga eléctrica ¡NO ABRIR!
PPRREECCAAUUCCIIOONN::
Para disminuír el riesgo de descarga eléctrica, no abra la cubierta. No hay piezas útiles
dentro. Deje todo mantenimiento en manos del personal técnico cualificado.
AADDVVEERRTTEENNCCIIAA::
Para evitar descargas eléctricas o peligro de incendio, no deje expuesto a la lluvia o
humedad este aparato Antes de usar este aparato, Iea más advertencias en la guía de operación.
Ce symbole est utilisé dans ce manuel pour indiquer à l’utilisateur la présence d’une tension dangereuse
pouvant être d’amplitude suffisante pour constituer un risque de choc électrique.
Ce symbole est utilisé dans ce manuel pour indiquer à l’utilisateur qu’il ou qu’elle trouvera d’importantes
instructions concernant l’utilisation et l’entretien de l’appareil dans le paragraphe signalé.
AATTTTEENNTTIIOONN::
Risques de choc électrique — NE PAS OUVRIR!
AATTTTEENNTTIIOONN::
Afin de réduire le risque de choc électrique, ne pas enlever le couvercle. Il ne se trouve à
l’intérieur aucune pièce pouvant être reparée par l’utilisateur. Confiez I’entretien et la réparation de
l’appareil à un réparateur Peavey agréé.
AAVVEERRTTIISSSSEEMMEENNTT
: Afin de prévenir les risques de décharge électrique ou de feu, n’exposez pas cet
appareil à la pluie ou à l’humidité. Avant d’utiliser cet appareil, lisez attentivement les avertissements
supplémentaires de ce manuel.
Dieses Symbol soll den Anwender vor unisolierten gefährlichen Spannungen innerhalb des Gehäuses
warnen, die von Ausreichender Stärke sind, um einen elektrischen Schlag verursachen zu können.
Dieses Symbol soll den Benutzer auf wichtige Instruktionen in der Bedienungsanleitung aufmerksam
machen, die Handhabung und Wartung des Produkts betreffen.
VVOORRSSIICCHHTT::
Risiko — Elektrischer Schlag! Nicht öffnen!
VVOORRSSIICCHHTT::
Um das Risiko eines elektrischen Schlages zu vermeiden, nicht die Abdeckung enfernen. Es
befinden sich keine Teile darin, die vom Anwender repariert werden könnten. Reparaturen nur von
qualifiziertem Fachpersonal durchführen lassen.
AACCHHTTUUNNGG::
Um einen elektrischen Schlag oder Feuergefahr zu vermeiden, sollte dieses Gerät nicht dem
Regen oder Feuchtigkeit ausgesetzt werden. Vor Inbetriebnahme unbedingt die Bedienungsanleitung lesen.

3
IIMMPPOORRTTAANNTT SSAAFFEETTYY IINNSSTTRRUUCCTTIIOONNSS
WWAARRNNIINNGG::
When using electrical products, basic cautions should always be followed, including the following:
1. Read these instructions.
2. Keep these instructions.
3. Heed all warnings.
4. Follow all instructions.
5. Do not use this apparatus near water.
6. Clean only with a dry cloth.
7. Do not block any of the ventilation openings. Install in accordance with manufacturer’s instructions.
8. Do not install near any heat sources such as radiators, heat registers, stoves or other apparatus (including amplifiers)
that produce heat.
9. Do not defeat the safety purpose of the polarized or grounding-type plug. A polarized plug has two blades with one
wider than the other. A grounding type plug has two blades and a third grounding plug. The wide blade or third prong is
provided for your safety. If the provided plug does not fit into your outlet, consult an electrician for replacement of the
obsolete outlet.
10. Protect the power cord from being walked on or pinched, particularly at plugs, convenience receptacles, and the point
they exit from the apparatus.
11. Note for UK only: If the colors of the wires in the mains lead of this unit do not correspond with the terminals in your
plug‚ proceed as follows:
a) The wire that is colored green and yellow must be connected to the terminal that is marked by the letter E‚ the earth
symbol‚ colored green or colored green and yellow.
b) The wire that is colored blue must be connected to the terminal that is marked with the letter N or the color black.
c) The wire that is colored brown must be connected to the terminal that is marked with the letter L or the color red.
12. Only use attachments/accessories provided by the manufacturer.
13. Use only with a cart, stand, tripod, bracket, or table specified by the manufacturer, or sold with the apparatus. When a
cart is used, use caution when moving the cart/apparatus combination to avoid injury from tip-over.
14. Unplug this apparatus during lightning storms or when unused for long periods of time.
15. Refer all servicing to qualified service personnel. Servicing is required when the apparatus has been damaged in any
way, such as power-supply cord or plug is damaged, liquid has been spilled or objects have fallen into the apparatus,
the apparatus has been exposed to rain or moisture, does not operate normally, or has been dropped.
16. Never break off the ground pin. Write for our free booklet “Shock Hazard and Grounding.” Connect only to a power
supply of the type marked on the unit adjacent to the power supply cord.
17. If this product is to be mounted in an equipment rack, rear support should be provided.
18. Exposure to extremely high noise levels may cause a permanent hearing loss. Individuals vary considerably in suscep-
tibility to noise-induced hearing loss, but nearly everyone will lose some hearing if exposed to sufficiently intense noise
for a sufficient time. The U.S. Government’s Occupational Safety and Health Administration (OSHA) has specified the
following permissible noise level exposures:
Duration Per Day In Hours Sound Level dBA, Slow Response
890
692
495
397
2100
1
1
⁄
2
102
1105
1
⁄
2
110
1
⁄
4
or less 115
According to OSHA, any exposure in excess of the above permissible limits could result in some hearing loss. Ear plugs or protectors to the
ear canals or over the ears must be worn when operating this amplification system in order to prevent a permanent hearing loss, if exposure
is in excess of the limits as set forth above. To ensure against potentially dangerous exposure to high sound pressure levels, it is
recommended that all persons exposed to equipment capable of producing high sound pressure levels such as this amplification system be
protected by hearing protectors while this unit is in operation.
SSAAVVEE TTHHEESSEE IINNSSTTRRUUCCTTIIOONNSS!!

4
CCSS 22000000HH PPoowweerr AAmmpplliiffiieerr
Congratulations on your purchase of the CS 2000H power amplifier from Peavey—designed for years
of reliable, flawless operation under rigorous use. This amplifier offers the sonic superiority and
unsurpassed reliability for which Peavey is famous, while remaining surprisingly compact. Advanced
technology and extensive protection circuitry allow operation with greater efficiency into difficult
loads and power conditions. The
DDDDTT
™
(Distortion Detection) circuit ensures trouble-free operation
into loads as low as 2 Ohms. The Distortion Detection circuits protect drivers and ensure that sonic
integrity is maintained, even in extreme overload conditions. Peavey’s high-efficiency design uses
tunnel-cooled heat sinks and variable speed DC fans. This cooling topology maintains a lower overall
operating temperature, resulting in longer output transistor life.
Although the Peavey CS 2000H amplifier is quite simple to operate and is housed in ultra-strong steel
chassis, improper use can be dangerous. This amplifier is very high-powered and can put out high
voltages and sizable currents at frequencies up to 30 kHz. Always use safe operating techniques
when operating this amplifier.
FFOORR YYOOUURR SSAAFFEETTYY,, RREEAADD TTHHEE IIMMPPOORRTTAANNTT PPRREECCAAUUTTIIOONNSS SSEECCTTIIOONN,, AASS WWEELLLL AASS IINNPPUUTT,, OOUUTTPPUUTT,, AANNDD
PPOOWWEERR CCOONNNNEECCTTIIOONN SSEECCTTIIOONNSS..
·· 1199"" 22--ssppaaccee‚‚ rraacckk--mmoouunnttaabbllee ddeessiiggnn
·· ttuunnnneell--ccoooolleedd hheeaatt ssiinnkkss wwiitthh vvaarriiaabbllee ssppeeeedd DDCC ffaannss
·· uullttrraa--ssttrreennggtthh sstteeeell cchhaassssiiss
·· RRaammppUUpp
™™
ssiiggnnaall ccoonnttrrooll
·· 33 ooppeerraattiioonnaall mmooddeess:: sstteerreeoo‚‚ ppaarraalllleell oorr bbrriiddggeedd--mmoonnoo
·· ffrroonntt ppaanneell AACC ppoowweerr sswwiittcchh//cciirrccuuiitt bbrreeaakkeerr
·· aammpp ffuunnccttiioonn sswwiittcchh ffoorr ffuullll--rraannggee ooppeerraattiioonn oorr ccrroossssoovveerr hhiigghh//llooww ffrreeqquueennccyy oouuttppuuttss
·· ttwwoo iinnddeeppeennddeenntt‚‚ aaddjjuussttaabbllee ccrroossssoovveerrss
·· ttwwoo iinnddeeppeennddeenntt‚‚ llooww ffrreeqquueennccyy ffiilltteerrss
·· ffiivvee ffrroonntt ppaanneell LLEEDD iinnddiiccaattoorrss ppeerr cchhaannnneell:: AACCTTIIVVEE,, DDDDTT
™™
,, SSIIGGNNAALL‚‚ TTEEMMPP aanndd DDCC
UUnnppaacckkiinngg
Upon unpacking, inspect the amplifier. If you find any damage, notify your supplier immediately. Only
the consignee may institute a claim with the carrier for damage incurred during shipping. Be sure to
save the carton and all packing materials. Should you ever need to ship the unit back to Peavey
Electronics, one of its offices, service centers, or the supplier, use only the original factory packing. If
the shipping carton is unavailable, contact Peavey to obtain a replacement.
MMoouunnttiinngg
The CS 2000H amplifier will mount in standard 19-inch racks. Rear mounting ears are also provided
for additional support, which is recommended in non-permanent installations like mobile or touring
sound systems. Because of the cables and connectors on the rear panel, a right angle or offset
screwdriver or hex key will make it easier to fasten the rear mounting ears to the rails.
CCoooolliinngg RReeqquuiirreemmeennttss
The CS 2000H amplifier uses a forced-air cooling system to maintain a low, even operating
temperature. Air is drawn into the amplifier by fans on the front panel, courses through the cooling
fins of the tunnel-configured channel heat sinks, and then exhausts through the rear and side panel
slots. If either heat sink gets too hot, its sensing circuit will open the output relay, disconnecting the
load from that particular channel. It is important to have an exhaust outlet at the back of the amplifier
and enough space around the sides of the amplifier to allow the cooling air to escape. If the amp is
rack mounted, do not use doors or covers on the front of the rack; the intake air must flow without
resistance. If you are using racks with closed backs, make sure that there is one (1) standard rack
space opening for every three mounted power amplifiers.
EENNGGLLIISSHH
FFeeaattuurreess
DDeessccrriippttiioonn

5
OOppeerraattiinngg PPrreeccaauuttiioonnss
Make sure the mains voltage is correct and is the same as that printed on the rear of the amplifier.
Damage caused by connecting the amplifier to improper AC voltage is not covered by any warranty. See
the Connecting Power section for more information on voltage requirements.
NNoottee:: AAllwwaayyss ttuurrnn ooffff aanndd ddiissccoonnnneecctt tthhee aammpplliiffiieerr ffrroomm mmaaiinnss vvoollttaaggee bbeeffoorree mmaakkiinngg
aauuddiioo ccoonnnneeccttiioonnss.. AAllssoo,, aass aann eexxttrraa pprreeccaauuttiioonn,, hhaavvee tthhee aatttteennuuaattoorrss ttuurrnneedd ddoowwnn
dduurriinngg ppoowweerr--uupp..
Although the CS 2000H amplifier has
RRaammppUUpp
™
circuitry, which raises the signal level gradually after the
output relay closes, it is always a good idea to have the gain controls turned down during power-up to
prevent speaker damage if there is a high signal level at the inputs. Whether you buy or make them, use
good-quality connections, input cables and speaker cables, along with good soldering technique, to
ensure trouble-free operation. Most intermittent problems are caused by faulty cables.
Consult the Wire Gauge Chart (below) to determine proper gauges for different load impedances and
cable lengths. Remember that cable resistance robs amplifier power in two ways: power lost directly to
resistance (I
2
R loss), and by lowering the total load impedance. Also make sure the mode switch is
correctly set for the desired application. See Sections on
SStteerreeoo
,
PPaarraalllleell
and
BBrriiddggeedd MMoonnoo
operation for
more information.
WIRE GAUGE CHART
Cable Length
(In Feet)
Stranded Wire Gauge
(AWG)
Power Loss into
8 Ohms (%)
Power Loss into
4 Ohms (%)
Power Loss into
2 Ohms (%)
5 18 .79 1.58 3.16
16 .50 1.00 2.00
14 .31 .62 1.24
12 .20 .40 .80
10 .125 .25 .50
10 18 1.58 3.16 6.32
16 1.00 2.00 4.00
14 .62 1.25 2.50
12 .40 .80 1.60
10 .25 .50 1.00
40 18 8.00 12.60 25.20
. 16 4.00 8.00 1.60
14 2.50 5.00 10.00
12 1.60 3.20 6.40
10 1.00 2.00 4.00
8 .625 1.25 2.50
80 16 8.00 16.00 32.00
14 5.00 10.00 20.00
12 3.20 6.40 12.80
10 2.00 4.00 8.00

6
CCoonnnneeccttiinngg IInnppuuttss
Input connections are made via the 3-pin XLR (pin 2+) or 6.3 mm plug “Combi” connectors on the
rear panel of the amplifier. The inputs are actively balanced. Pinout and polarity of connection
cables should be configured correctly (refer to the rear panel of the unit). The input overload
point is high enough to accept the maximum output level of virtually any signal source.
CCoonnnneeccttiinngg OOuuttppuuttss
All models have two output (speaker) connections per channel. Cables can be connected with
banana plugs, spade lugs, or bare wire to the 5-way binding posts. The preferred connection
method is via the Speakon connectors. Pin connections are noted on the rear panel of the unit.
CCoonnnneeccttiinngg PPoowweerr
The CS2000H power requirements are rated at 1/8 power (typical music conditions) and 1/3
power (extreme music conditions). The maximum power current draw rating is limited only by the
front panel circuit breaker. Consult the specifications in this manual for figures on the current
that this amplifier will demand. Make sure the mains voltage is correct and is the same as that
printed on the rear of the amplifier. Damage caused by connecting the amplifier to improper AC
voltage is not covered by any warranty. Unless otherwise specified when ordered, Peavey
amplifiers shipped to customers are configured as follows:
North America: 120 VAC/60 Hz
Europe, Asia, Australia: 230/240 VAC/50 Hz
South America: 120 VAC/60 Hz or 240 VAC/50 Hz
SStteerreeoo
For stereo (dual channel) operation, turn the amplifier off and set the mode select switch to the
stereo position. In this mode, both channels operate independently of each other, with their
input attenuators controlling their respective levels. Thus, a signal at Channel A’s input produces
an amplified signal at Channel A’s output, while a signal at Channel B’s input produces an
amplified signal at Channel B’s output.
PPaarraalllleell
For parallel (dual-channel/single input) operation, turn the amplifier off and set the mode switch
in the parallel position; both amplifier channels are then driven by the signal at Channel A’s
input. No jumper wires are needed. Output connections are the same as in the stereo mode. In
the parallel mode, only Channel A’s input is active; Channel B’s is out-of-circuit. Both input
attenuators remain active, allowing you to set different levels for each channel. Power and other
general performance specifications are the same as in the stereo mode.
BBrriiddggeedd MMoonnoo
Both amplifier channels can be bridged together to make a very powerful single-channel
monaural amplifier. Use extreme caution when operating in the bridged mode; potentially lethal
voltage may be present at the output terminals. To bridge the amplifier, set the rear panel mode
select switch to the bridge position. Apply the signal to Channel A’s input and connect the
speakers across the hot outputs (the “+” binding posts of Channels A and B).
Unlike the stereo and parallel modes, in which one side of each output is at ground, in the
bridged mode both sides are hot. Channel A’s side is the same polarity as the input. For proper
operation, both input attenuators must be in the same position. This keeps the load balanced
between the channel outputs. As in the parallel mode, only Channel A’s input is active. If an
output patch panel is used, all connections must be isolated from each other and from the panel.
The recommended minimum nominal load impedance in the bridged mode is 4 Ohms (equivalent
to driving both channels at 2 Ohms). Driving bridged loads of less than 4 Ohms will activate the
DDT circuitry resulting in a loss of power, and may also cause a thermal overload.
OOppeerraattiioonn MMooddeess

7
AACC PPoowweerr SSwwiittcchh//CCiirrccuuiitt BBrreeaakkeerr ((11))
The CS 2000H amplifier has a combination AC switch/circuit breaker on the front panel. If the switch
shuts off during normal use, push it back to the ON position once. If it will not stay on, the amplifier
needs servicing.
IInnppuutt AAtttteennuuaattoorrss ((22))
Whenever possible, set the attenuators fully clockwise to maintain optimum system headroom. The
input attenuator controls (one for channel A, one for channel B) located at the front panel adjust gain
for their respective amplifier channels in all modes. See the specifications at the end of this manual
for standard voltage gain and input sensitivity information.
When operating in the bridged mode, both attenuators must be in the same position so the speaker
load will be equally shared between the channels. See the section on
BBrriiddggeedd MMoonnoo
Operation for
more information and precautions.
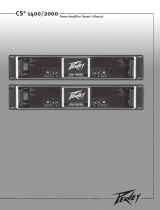
FFrroonntt PPaanneell IInnddiiccaattoorrss
The CS2000H features four front panel discreet LED indicators per channel:
AACCTTIIVVEE
,
DDDDTT
,
TTEEMMPP
and
DDCC
. These LED indicators inform the user of each channel’s operating status and warn of
possible abnormal conditions. This amplifier also features two 10-segment bar graph indicators
per channel:
SSIIGGNNAALL
.
SSIIGGNNAALL LLEEDD ((33))
This LED is at the bottom of the bar graph display and lights when its channel produces an output
signal of greater than 2 Volts RMS or 50 mV input with a 0 dB attenuation of the front panel knobs. It
is useful in determining whether a signal is reaching and being amplified by the amplifier. The 10-
segment graphs indicate the level of signal present.
DDCC LLEEDD ((44))
The DC LED lights to indicate that the channel’s output relay is open, disconnecting the speaker(s)
when the amplifier senses a DC voltage or subsonic high level signal at its output.
TTEEMMPP LLEEDD ((55))
The Temp LED lights to indicate that the channel’s output relay is open, disconnecting the speaker(s)
due to an overheating condition. Once the channel temperature has returned to safe operating
conditions the LED will turn off and the speaker(s) will be reconnected.
2
1
FFrroonntt PPaanneell
4 5 6 73

8
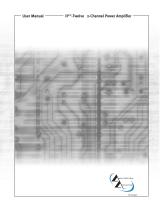
MMOODDEE SSeelleecctt SSwwiittcchh ((88))
The rear panel MODE Select Switch determines whether the amplifier is in stereo, parallel, or
bridged mono mode. Do not operate the Mode Select Switch with the amplifier powered on. See
the sections on Stereo and Bridged Mono Mode for more information.
AAMMPP FFUUNNCCTTIIOONN SSwwiittcchh ((99))
The rear panel AMP FUNCTION Select Switch determines whether the associated channel is
connected for full range operation or to the crossover high frequency or low frequency outputs.
CCRROOSSSSOOVVEERR AAddjjuussttmmeenntt KKnnoobb ((1100))
The CS 2000H is equipped with two independent‚ two-way crossovers adjustable from 40 Hz to
300 Hz. These crossover frequencies are appropriate for use with a subwoofer system. The output
of these crossovers is selected by the MODE switch and connected to the corresponding amplifier
channel. Frequencies above the knob setting will be connected to the corresponding channel
when the MODE switch is in the HIGH PASS position. Frequencies below the knob setting will be
connected to the corresponding channel when the MODE switch is in the LOW PASS position. The
FULL RANGE position bypasses the crossover.
LLOOWW CCUUTT AAddjjuussttmmeenntt KKnnoobb ((1111))
The CS 2000H is equipped with two independent low frequency filters. These filters are adjustable
from 20 Hz to 100 Hz and are designed to reduce frequencies below those capable of being
produced by the loudspeakers, or to reduce room “rumble.” Frequencies below the knob setting
of the corresponding channel will be attenuated.
RReeaarr PPaanneell
8 9 10 11
12
13
DDDDTT LLEEDD ((66))
A channel’s DDT LED will light at the onset of clipping. If the LED’s are flashing quickly and
intermittently, the channel is just at the clip threshold, while a steady, bright glow means the amp
is clip limiting, or reducing gain to prevent severely clipped waveforms reaching the loudspeakers.
See the Distortion Detection section for more information. During initial power up the DDT LED will
light indicating that the RampUp gain reduction circuitry is activated. This will prevent sudden
signal bursts when the speaker relays are closed.
AACCTTIIVVEE LLEEDD ((77))
The ACTIVE LED indicates that its channel’s output relay is closed and the channel is operational. It
lights under normal operation and remains on even when the channel is in Distortion Detection
(DDT) gain reduction. These are protection features which leave the output relay closed. If the
ACTIVE LED goes off, there is no signal at the output connectors.
14

9
LLOOWW CCUUTT SSwwiittcchh ((1122))
The LOW CUT switch is a recessed push switch used to defeat or engage the LOW CUT filter. Pushing the
switch to the in position will engage the filter.
HHIIGGHH PPAASSSS//FFUULLLL RRAANNGGEE OOUUTTPPUUTT CCoonnnneeccttoorr ((1133))
The HIGH PASS/FULL RANGE OUTPUT connector function is dependent on the setting of the
corresponding MODE switch. This connector allows patching the frequencies above the crossover knob
setting to a secondary amplifier. If the MODE switch is in the HIGH PASS position, the high frequency
portion of the crossover will be present at the connector. If the MODE switch is in the FULL RANGE or
LOW PASS position, the crossover will be bypassed and allow patching the full range signal to a
secondary amplifier.
LLOOWW PPAASSSS OOUUTTPPUUTT CCoonnnneeccttoorr ((1144))
The LOW PASS OUTPUT connector allows patching the frequencies below the crossover knob setting to
a secondary amplifier. This output remains at low frequencies independent of the MODE switch setting.
PPrrootteeccttiioonn FFeeaattuurreess
The CS 2000H incorporates several circuits to protect both itself and loudspeakers under virtually any
situation. Peavey has attempted to make the amplifier as foolproof as possible by making it immune to
short and open circuits, mismatched loads, DC voltage, and overheating. If a channel goes into the
Distortion Detection or DDT gain reduction mode, the speaker load remains connected, but clipping
percentage or output power are instantly reduced. When a problem occurs that causes a channel to go
into a protection mode, the TEMP LED or DC LED for that channel will glow. DC voltage on the output,
excessive subsonic frequencies, or thermal overload will cause the channel’s output relay to disconnect
the speaker load until the problem is corrected or the amplifier cools down.
DDiissttoorrttiioonn DDeetteeccttiioonn LLiimmiittiinngg
Any time a channel is driven into hard, continuous clipping, the DDT circuit will automatically reduce
the channel gain to a level just slightly into clipping, guarding the speakers against the damaging high
power continuous square waves that may be produced. Situations that may activate the DDT circuit
include uncontrolled feedback, oscillations, or an improper equipment setting or malfunction upstream
from the amplifier. On the CS 2000H, normal program transients will not trigger DDT; only steady,
excessive clipping will. The DDT LED will glow brightly and continuously when limiting occurs.
LLFFCC IImmppeeddaannccee SSeennssiinngg
The CS 2000H features innovative circuitry that allows safe operation into any load. When an amplifier
sees a load that overstresses the output stage, the Load Fault Correction circuit adjusts the channel
gain to a safe level. This method of output stage protection is far superior to conventional, brute force
type limiting found on other amplifiers. The LFC circuit is sonically transparent in normal use and
unobtrusive when activated.
TThheerrmmaall PPrrootteeccttiioonn
The internal fans will keep the amplifier operating well within its intended temperature range under all
normal conditions. If a channel’s heat sink temperature reaches 85°C which may indicate an obstructed
air supply, that channel will independently protect itself by disconnecting its load and shutting down
until it has cooled. During this time, the channel’s TEMP LED will light. During this time, the ACTIVE LED
will go out, the Temp and DDT LEDs will stay lit and the cooling fans will stay running at high speed.

10
SShhoorrtt CCiirrccuuiitt
If an output is shorted, the LFC and thermal circuits will automatically protect the amplifier. The LFC
circuit senses the short circuit as an extremely stressful load condition and attenuates the signal,
protecting the channel’s output transistors from over current stress. If the short circuit remains, the
channel will eventually thermally protect itself by disconnecting the load.
DDCC VVoollttaaggee PPrrootteeccttiioonn
If an amplifier channel detects DC voltage or subsonic frequencies at its output terminals, its output
relay will immediately open to prevent loudspeaker damage. The channel’s DC LED will light.
TTuurrnn--OOnn//TTuurrnn--OOffff PPrrootteeccttiioonn
At power-up, the amplifier stays in the protect mode, with outputs disconnected, for approximately
four seconds while the power supplies charge and stabilize. While the output relays are open, the DDT
LEDs light. When power is removed, the speaker loads immediately disconnect so that no thumps or
pops are heard.
RRaammppUUpp
™™
SSiiggnnaall CCoonnttrrooll
Whenever amplifier powers up or comes out of a protect mode, the RampUp
™
circuit activates. While
the speakers are disconnected, the RampUp
™
circuit fully attenuates the signal. After the output relay
closes, the signal slowly and gradually raises up to its set level. The RampUp
™
Signal Control circuit
has some important advantages over the conventional instant-on circuits:
If a signal is present during power-up (or when coming out of protect), the speakers are
spared a sudden, potentially damaging burst of audio power.
Because the gain is reduced until after the output relay closes, no arcing occurs at the
contacts, thereby extending their useful life.
SSppeeaakkeerr PPrrootteeccttiioonn
All loudspeakers have electrical, thermal and physical limits that must be observed to prevent
damage or failure. Too much power, low frequencies applied to high frequency drivers, severely
clipped waveforms, and DC voltage can all be fatal to cone and compression drivers. The Peavey
CS2000H amplifier automatically protects speakers from DC voltages and subsonic signals. For more
information, see the section on Protection Features. Mid- and high-frequency speakers, especially
compression drivers, are highly susceptible to damage from overpowering, clipped waveforms, or
frequencies below their rated pass band. Be extremely careful that the low and mid bands of an
electronic crossover are connected to the correct amplifiers and drivers and not accidentally
connected to those for a lower frequency band. The amplifier’s clipping point is its maximum peak
output power, and the high power Peavey CS 2000H amplifier can deliver more power than many
speakers can safely handle. Be sure the peak power capability of the amplifier is not excessive for
your speaker system.
Fuses may also be used to limit power to speaker drivers, although as current-limiting rather than
voltage-limiting devices, they are an imperfect solution, and as the weakest links, they only limit once
before needing replacement. Some poor quality fuses have a significant series resistance that could
degrade the amplifier’s damping of the speaker’s motion and may even deteriorate the system’s
sound quality. If you elect to use fuses, check with the speaker manufacturer to determine the proper
current rating and time lag required.
Do not drive any low-frequency speaker enclosure with frequencies lower than its own tuned
frequency; the reduced acoustical damping could cause a ported speaker to bottom out even at
moderate power. Consult the speaker system specifications to determine its frequency limits.
AAmmpplliiffiieerr MMaaiinntteennaannccee aanndd UUsseerr RReessppoonnssiibbiilliittyy
A CS 2000H amplifier requires no other routine maintenance and should never need any internal
adjustment during its lifetime. Your CS 2000H amplifier is very powerful and can be potentially
dangerous to loudspeakers and humans alike. It is your responsibility to read the Important
Precautions section and to make sure that the amplifier is installed, wired and operated properly as
instructed in this manual. Many loudspeakers can be easily damaged or destroyed by overpowering,
especially with the high power available from a bridged amplifier. Read the Speaker Protection section
and always be aware of the speaker’s continuous and peak power capabilities.

11
+
-
+
-
Output
Relay
Stereo
Bridge
Parallel
/Full Range Thru
CCSS 22000000HH BBlloocckk DDiiaaggrraamm

12
GGlloossssaarryy ooff TTeerrmmss
(Used in Setup Instructions)
SStteerreeoo::
Music with two separate channels‚ usually a left and right channel.
MMoonnoo::
Music with only one channel.
CCrroossssoovveerr::
An electronic device that separates high and low frequencies and sends them to different outputs. The separate
signals are usually sent to a high out and a low out.
BBii--aammpp::
The separation of high and low frequencies with a crossover‚ using separate speakers and power amps for each.
FFuullll RRaannggee::
Both high and low frequencies together in a single channel.
PPrrooggrraamm::
The signal that is plugged into the amplifier.
HHii--ppaassss::
Allows only the high frequencies to pass‚ effectively blocking the low frequencies.
LLooww--ppaassss::
Allows only the low frequencies to pass, blocking the high frequencies.
MMiidd//HHiigghh::
The speaker designed to play everything but the low frequencies.
SSuubb::
The speaker designed for low frequencies only.
PPaarraalllleell::
Both speakers or inputs having the same signal. When referring to speakers‚ this means plugging the second
speaker into the first speaker and so on…

13
SSEETTUUPP IINNSSTTRRUUCCTTIIOONNSS
SStteerreeoo OOppeerraattiioonn
1. Set
AAMMPP MMOODDEE
switch to
SSTTEERREEOO
.
2. Set the A and B channel
AAMMPP FFUUNNCCTTIIOONN
switches and to
FFUULLLL RRAANNGGEE
.
3. Connect the Left and Right program signal to the A and B channel inputs: and .
4. Connect the A and B channel speaker outputs and to the loudspeaker full range inputs.
1
2 3
4 5
6 7
MMoonnoo BBrriiddggee MMooddee OOppeerraattiioonn
1. Set
AAMMPP MMOODDEE
switch to
BBRRIIDDGGEE
.
2. Connect the Mono program signal to the A channel input .
3. Connect the loudspeaker across the two RED banana posts on the amplifier outputs . The A channel is positive
and the B channel is negative.
Caution: The input level controls for both the A and B channels need to be set identically for
the amplifier to operate properly.
1
4
5
TTwwoo CChhaannnneell MMoonnoo——PPaarraalllleell MMooddee
(with single channel input)
1. Set
AAMMPP MMOODDEE
switch to
PPAARRAALLLLEELL
.
2. Connect the Mono program signal to the A channel input .
3. Connect the loudspeakers to both the A and B channel outputs: and .
1
4
6 7
2
4 5 6 78
1 3

14
MMoonnoo BBii--AAmmpp OOppeerraattiioonn
(sub woofer & mid/high enclosure)
1. Set
AAMMPP MMOODDEE
switch to
SSTTEERREEOO
.
2. Set the channel A AMP FUNCTION switch to
HHIIGGHH PPAASSSS
.
3. Turn on the channel A
LLOOWW CCUUTT
.
4. Set channel A
LLOOWW CCUUTT
frequency adjustment knob to match the low frequency cut-off or the -3 dB down point
of the sub woofer. (If you don’t know this specification‚ set it for 40 Hz.)
5. Set the channel A
CCRROOSSSSOOVVEERR
frequency adjustment knob to the desired crossover frequency (usually
100–150 Hz).
6. Set the channel B
AAMMPP FFUUNNCCTTIIOONN
switch to FULL RANGE.
7. Plug a short shielded cable into the high pass/full range output of channel A .
8. Connect the other end of the same cable to the channel B input .
9. Connect the Mono program signal to the channel A input .
10. Connect the sub woofer(s) (in parallel) to the channel A output .
11. Connect the mid/high enclosure(s) (in parallel) to the channel B output .
1
9
2
4
5
6
7
8
9
10
11
3
2 1 6
10 11
5 4 87
3

16
Rated Power:
Bridged 4 ohms:
2000W @ 1kHz @ <0.1% THD
2 x 2 ohms:
1000W per channel @ 1kHz @ <0.1%
THD both channels driven
2 x 4 ohms:
700W per channel @ 1kHz @ <0.05%
THD both channels driven
2 x 8 Ohms:
425W per channel @ 1kHz @ <0.05%
THD both channels driven
1 x 2 Ohms:
1325W per channel @ 1kHz @ <0.1%
THD
1 x 4 Ohms:
825W per channel @ 1kHz @ <0.05%
THD
1 x 8 Ohms:
500W per channel @ 1kHz @ <0.05%
THD
Minimum Load Impedance:
2 Ohms
Maximum RMS Voltage
Swing:
71 V
Frequency Response:
10 Hz–100 kHz; +0‚ -0.5 dB @ 1W
Power Bandwidth:
10 Hz–35 kHz; +0‚ -3 dB @ rated
4 Ohm power
THD (2 x 2 ohms):
<0.2% @ 700W per channel from
20 Hz–20 kHz
THD (2 x 4 ohms):
<0.1% @ 600W per channel from
20 Hz–20 kHz
THD (2 x 8 ohms):
<0.1% @ 400W per channel from
20 Hz–20 kHz
Input CMRR:
-85 dB @ 1 kHz
Voltage Gain:
x40 (32 dB)
Crosstalk:
> -70 dB @ 1 kHz @ rated power
@ 8 Ohms
Crossover:
Third Order State Variable Filters:
18 dB/octave
Frequency Range: 40 Hz–300 Hz
Hum & Noise:
> -108 dB; “A” weighted reference to
rated power @ 8 Ohms
Slew Rate:
> 15V/us
Damping Factor (8 Ohms):
> 500:1 @ 20 Hz–1 kHz
Phase Response:
+5 to -12 degrees from 20 Hz–20 kHz
Input Sensitivity:
1.32V +/- 3% for 1 kHz @ 4 ohm
rated power;
1.12V +/- 3% for 1 kHz @
2 Ohm rated power
Input Impedance:
15 k Ohms‚ balanced
Max Input Power w/typical
music program:
950W @ 2 Ohms
660W @ 4 Ohms
Max Input Power w/severe
music program:
2400W @ 2 Ohms
1650W @ 4 Ohms
Cooling:
Two front panel temperature-
dependent variable speed 80mm high-
output DC fans
Controls:
2 front panel attenuators‚ rear panel
Mode switch‚ Function switch per
channel‚ High Pass adjustable filter
per channel. High Pass filter bypass
switch per channel‚ adjustable
subwoofer crossover per channel.
Indicator LEDs:
2 ACL (clip limiting)‚ 2 Signal
presence‚ 2 Active status‚ 2 DC
protect‚ 2 Temperature limit
Protection:
Thermal‚ DC‚ turn-on bursts‚ subsonic‚
incorrect loads
Connectors:
Combi XLR & 6.3mm phone input;
Speakon and Binding Post speaker
output; 6.3mm High Pass or Full
Range patch connector per channel;
6.3mm Low Pass patch connector per
channel; 15 amp IEC mains connector
Construction:
16 ga. steel with cast aluminum front
panel and cast handles
Dimensions:
88.9mm x 483mm x 441mm (3.5" x
19" x 17.375" over all. 406 mm (16")
inside rack depth
Net Weight:
19.5 kg (43 lbs)
Gross Weight:
20.6 kg (45.5 lbs)
All power measurements made at 120
VAC‚ power transformer cold. 2 ohm
power is time limited by magnetic circuit
breaker.
C S
®®
2 0 0 0 H
SSPPEECCIIFFIICCAATTIIOONNSS

29
Rated Power:
Bridged 4 ohms:
2000W @ 1kHz @ <0.1% THD
2 x 2 ohms:
1000W per channel @ 1kHz @ <0.1%
THD both channels driven
2 x 4 Ohms:
700W per channel @ 1kHz @ <0.05%
THD both channels driven
2 x 8 ohms:
425W per channel @ 1kHz @ <0.05%
THD both channels driven
1 x 2 ohms:
1325W per channel @ 1kHz @ <0.1%
THD
1 x 4 Ohms:
825W per channel @ 1kHz @ <0.05%
THD
1 x 8 ohms:
500W per channel @ 1kHz @ <0.05%
THD
Minimum Load Impedance:
2 Ohms
Maximum RMS Voltage
Swing:
71 V
Frequency Response:
10 Hz–100 kHz; +0‚ -0.5 dB @ 1W
Power Bandwidth:
10 Hz–35 kHz; +0‚ -3 dB @ rated
4 Ohm power
THD (2 x 2 ohms):
<0.2% @ 700W per channel from
20 Hz–20 kHz
THD (2 x 4 ohms):
<0.1% @ 600W per channel from
20 Hz–20 kHz
THD (2 x 8 ohms):
<0.1% @ 400W per channel from
20 Hz–20 kHz
Input CMRR:
-85 dB @ 1 kHz
Voltage Gain:
x40 (32 dB)
Crosstalk:
> -70 dB @ 1 kHz @ rated power
@ 8 Ohms
Crossover:
Third Order State Variable Filters:
18 dB/octave
Frequency Range: 40 Hz–300 Hz
Hum & Noise:
> -108 dB; “A” weighted reference to
rated power @ 8 ohms
Slew Rate:
> 15V/us
Damping Factor (8 Ohms):
> 500:1 @ 20 Hz–1 kHz
Phase Response:
+5 to -12 degrees from 20 Hz–20 kHz
Input Sensitivity:
1.32V +/- 3% for 1 kHz @ 4 ohm
rated power;
1.12V +/- 3% for 1 kHz @
2 Ohm rated power
Input Impedance:
15 k Ohms‚ balanced
Max Input Power w/typical
music program:
950W @ 2 Ohms
660W @ 4 Ohms
Max Input Power w/severe
music program:
2400W @ 2 Ohms
1650W @ 4 Ohms
Cooling:
Two front panel temperature-
dependent variable speed 80mm high-
output DC fans
Controls:
2 front panel attenuators‚ rear panel
Mode switch‚ Function switch per
channel‚ High Pass adjustable filter
per channel. High Pass filter bypass
switch per channel‚ adjustable
subwoofer crossover per channel.
Indicator LEDs:
2 ACL (clip limiting)‚ 2 Signal
presence‚ 2 Active status‚ 2 DC
protect‚ 2 Temperature limit
Protection:
Thermal‚ DC‚ turn-on bursts‚ subsonic‚
incorrect loads
Connectors:
Combi XLR & 6.3mm phone input;
Speakon and Binding Post speaker
output; 6.3mm High Pass or Full
Range patch connector per channel;
6.3mm Low Pass patch connector per
channel; 15 amp IEC mains connector
Construction:
16 ga. steel with cast aluminum front
panel and cast handles
Dimensions:
88.9mm x 483mm x 441mm (3.5" x
19" x 17.375" over all. 406mm (16")
inside rack depth
Net Weight:
19.5 kg (43 lbs)
Gross Weight:
20.6 kg (45.5 lbs)
All power measurements made at 120
VAC‚ power transformer cold. 2 Ohm
power is time limited by magnetic circuit
breaker.
C S
®®
2 0 0 0 H
SSPPEECCIIFFIICCAATTIIOONNSS

42
Rated Power:
Bridged 4 ohms:
2000W @ 1kHz @ <0.1% THD
2 x 2 ohms:
1000W per channel @ 1kHz @ <0.1%
THD both channels driven
2 x 4 ohms:
700W per channel @ 1kHz @ <0.05%
THD both channels driven
2 x 8 Ohms:
425W per channel @ 1kHz @ <0.05%
THD both channels driven
1 x 2 Ohms:
1325W per channel @ 1kHz @ <0.1%
THD
1 x 4 Ohms:
825W per channel @ 1kHz @ <0.05%
THD
1 x 8 Ohms:
500W per channel @ 1kHz @ <0.05%
THD
Minimum Load Impedance:
2 Ohms
Maximum RMS Voltage
Swing:
71 V
Frequency Response:
10 Hz–100 kHz; +0‚ -0.5 dB @ 1W
Power Bandwidth:
10 Hz–35 kHz; +0‚ -3 dB @ rated
4 Ohm power
THD (2 x 2 ohms):
<0.2% @ 700W per channel from
20 Hz–20 kHz
THD (2 x 4 ohms):
<0.1% @ 600W per channel from
20 Hz–20 kHz
THD (2 x 8 ohms):
<0.1% @ 400W per channel from
20 Hz–20 kHz
Input CMRR:
-85 dB @ 1 kHz
Voltage Gain:
x40 (32 dB)
Crosstalk:
> -70 dB @ 1 kHz @ rated power
@ 8 Ohms
Crossover:
Third Order State Variable Filters:
18 dB/octave
Frequency Range: 40 Hz–300 Hz
Hum & Noise:
> -108 dB; “A” weighted reference to
rated power @ 8 Ohms
Slew Rate:
> 15V/us
Damping Factor (8 Ohms):
> 500:1 @ 20 Hz–1 kHz
Phase Response:
+5 to -12 degrees from 20 Hz–20 kHz
Input Sensitivity:
1.32V +/- 3% for 1 kHz @ 4 ohm
rated power;
1.12V +/- 3% for 1 kHz @
2 Ohm rated power
Input Impedance:
15 k Ohms‚ balanced
Max Input Power w/typical
music program:
950W @ 2 Ohms
660W @ 4 Ohms
Max Input Power w/severe
music program:
2400W @ 2 Ohms
1650W @ 4 Ohms
Cooling:
Two front panel temperature-
dependent variable speed 80mm high-
output DC fans
Controls:
2 front panel attenuators‚ rear panel
Mode switch‚ Function switch per
channel‚ High Pass adjustable filter
per channel. High Pass filter bypass
switch per channel‚ adjustable
subwoofer crossover per channel.
Indicator LEDs:
2 ACL (clip limiting)‚ 2 Signal
presence‚ 2 Active status‚ 2 DC
protect‚ 2 Temperature limit
Protection:
Thermal‚ DC‚ turn-on bursts‚ subsonic‚
incorrect loads
Connectors:
Combi XLR & 6.3mm phone input;
Speakon and Binding Post speaker
output; 6.3mm High Pass or Full
Range patch connector per channel;
6.3mm Low Pass patch connector per
channel; 15 amp IEC mains connector
Construction:
16 ga. steel with cast aluminum front
panel and cast handles
Dimensions:
88.9mm x 483mm x 441mm (3.5" x
19" x 17.375" over all. 406 mm (16")
inside rack depth
Net Weight:
19.5 kg (43 lbs)
Gross Weight:
20.6 kg (45.5 lbs)
All power measurements made at 120
VAC‚ power transformer cold. 2 ohm
power is time limited by magnetic circuit
breaker.
C S
®®
2 0 0 0 H
SSPPEECCIIFFIICCAATTIIOONNSS

55
PEAVEY ELECTRONICS CORPORATION LIMITED WARRANTY
Effective Date: July 1, 1998
WWhhaatt TThhiiss WWaarrrraannttyy CCoovveerrss
Your Peavey Warranty covers defects in material and workmanship in Peavey products purchased and serviced in the U.S.A. and Canada.
WWhhaatt TThhiiss WWaarrrraannttyy DDooeess NNoott CCoovveerr
The Warranty does not cover: (1) damage caused by accident, misuse, abuse, improper installation or operation, rental, product modification or neglect; (2) dam-
age occurring during shipment; (3) damage caused by repair or service performed by persons not authorized by Peavey; (4) products on which the serial number
has been altered, defaced or removed; (5) products not purchased from an Authorized Peavey Dealer.
WWhhoo TThhiiss WWaarrrraannttyy PPrrootteeccttss
This Warranty protects only the original retail purchaser of the product.
HHooww LLoonngg TThhiiss WWaarrrraannttyy LLaassttss
The Warranty begins on the date of purchase by the original retail purchaser. The duration of the Warranty is as follows:
Product Category Duration
Guitars/Basses, Amplifiers, Pre-Amplifiers, Mixers, Electronic
Crossovers and Equalizers 2 years *(+ 3 years)
Drums 2 years *(+ 1 year)
Enclosures 3 years *(+ 2 years)
Digital Effect Devices and Keyboard and MIDI Controllers 1 year *(+ 1 year)
Microphones 2 years
Speaker Components (incl. speakers, baskets, drivers,
diaphragm replacement kits and passive crossovers)
and all Accessories 1 year
Tubes and Meters 90 days
[*Denotes additional warranty period applicable if optional Warranty Registration Card is completed and returned to Peavey by original retail purchaser within 90 days of purchase.]
WWhhaatt PPeeaavveeyy WWiillll DDoo
We will repair or replace (at Peavey's discretion) products covered by warranty at no charge for labor or materials. If the product or component must be shipped to
Peavey for warranty service, the consumer must pay initial shipping charges. If the repairs are covered by warranty, Peavey will pay the return shipping charges.
HHooww TToo GGeett WWaarrrraannttyy SSeerrvviiccee
((11))
Take the defective item and your sales receipt or other proof of date of purchase to your Authorized Peavey Dealer or Authorized Peavey Service Center.
OR
((22))
Ship the defective item, prepaid, to Peavey Electronics Corporation, International Service Center, 412 Highway 11 & 80 East, Meridian, MS 39301 or Peavey
Canada Ltd., 95 Shields Court, Markham, Ontario, Canada L3R 9T5. Include a detailed description of the problem, together with a copy of your sales receipt or
other proof of date of purchase as evidence of warranty coverage. Also provide a complete return address.
LLiimmiittaattiioonn ooff IImmpplliieedd WWaarrrraannttiieess
ANY IMPLIED WARRANTIES, INCLUDING WARRANTIES OF MERCHANTABILITY AND FITNESS FOR A PARTICULAR PURPOSE, ARE LIMITED IN DURATION TO THE
LENGTH OF THIS WARRANTY.
Some states do not allow limitations on how long an implied warranty lasts, so the above limitation may not apply to you.
EExxcclluussiioonnss ooff DDaammaaggeess
PEAVEY'S LIABILITY FOR ANY DEFECTIVE PRODUCT IS LIMITED TO THE REPAIR OR REPLACEMENT OF THE PRODUCT, AT PEAVEY'S OPTION. IF WE ELECT TO
REPLACE THE PRODUCT, THE REPLACEMENT MAY BE A RECONDITIONED UNIT. PEAVEY SHALL NOT BE LIABLE FOR DAMAGES BASED ON INCONVENIENCE, LOSS OF
USE, LOST PROFITS, LOST SAVINGS, DAMAGE TO ANY OTHER EQUIPMENT OR OTHER ITEMS AT THE SITE OF USE, OR ANY OTHER DAMAGES WHETHER INCIDENTAL,
CONSEQUENTIAL OR OTHERWISE, EVEN IF PEAVEY HAS BEEN ADVISED OF THE POSSIBILITY OF SUCH DAMAGES.
Some states do not allow the exclusion or limitation of incidental or consequential damages, so the above limitation or exclusion may not apply to you.
This Warranty gives you specific legal rights, and you may also have other rights which vary from state to state.
If you have any questions about this warranty or service received or if you need assistance in locating an Authorized Service Center, please contact the Peavey
International Service Center at (601) 483-5365 / Peavey Canada Ltd. at (905) 475-2578.
Features and specifications subject to change without notice.

Features and specifications subject to change without notice.
Peavey Electronics Corporation • 711 A Street • Meridian • MS • 39301
(601) 483-5365 • FAX (601) 486-1278 • www.peavey.com
©2002 Printed in the U.S.A. 12/02
80304941
/