Page is loading ...

Modelo
Model
❑
RC1800
Por favor lea este instructivo antes de usar el producto
Please Read and Save this Use and Care Book
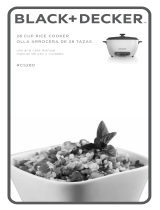
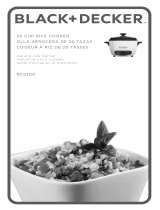
Olla arrocera Multi Uso para 16 tazas
16-Cup Multi-Use Rice Cooker
Accesorios/Partes (EE.UU/Canadá)
Accessories/Parts (USA/Canada)
1-800-738-0245
USA/Canada 1-800-231-9786
Mexico 01-800-714-2503
www.applicaconsumerproductsinc.com
Registre su producto en la Internet en el sitio Web www.prodprotect.com/applica
y tendrá la oportunidad de GANAR $100,000!
Register your product online at www.prodprotect.com/applica,
for a chance to WIN $100,000!
RC1800 2/12/07 11:13 AM Page 1

8
7
When using electrical appliances basic safety precautions should
always be followed including the following:
❑
Read all instructions.
❑
Do not touch hot surfaces. Use handles or knobs.
❑
To protect against electrical shock, do not immerse cord, plug or
base unit in water or other liquid.
❑
Close supervision is necessary when any appliance is used by or
near children.
❑
Unplug from outlet when not in use and before cleaning. Allow to
cool before putting on or taking off parts.
❑
Do not operate appliance with a damaged cord or plug, or after the
appliance malfunctions or has been damaged in any manner. Return
appliance to an authorized service facility for examination, repair or
adjustment.
❑
The use of accessory attachments not recommended by this
appliance manufacturer may cause injuries.
❑
Do not use outdoors.
❑
Do not let cord hang over edge of table or counter, or touch hot
surfaces.
❑
Do not place on or near a hot gas or electric burner, or in a heated
oven.
❑
Extreme caution must be used when moving an appliance
containing hot food, water or other hot liquids.
❑
Plug cord into the wall outlet. To disconnect, turn any control to
“off”, then remove plug from wall outlet.
❑
Do not use appliance for other than intended use.
❑
To reduce the risk of electric shock, cook only in removable
container.
IMPORTANT SAFEGUARDS
SAVE THESE INSTRUCTIONS.
Cuidado y limpieza
El aparato no contiene piezas reemplazables por el consumidor. Para servicio, acuda a
personal de asistencia calificado.
1. Siempre desconecte la olla antes de limpiarla.
2. Jamás sumerja la olla en agua ni en ningún otro líquido.
3. Lave la tapa, la bandeja de vaporizadora, la olla de cocinar, la cuchara de servir
y el medidor de arroz en agua tibia jabonada. No utilice limpiadores abrasivos
ni almohadillas de fibra metálica que puedan rayar las superficies antiadherentes,
y perjudicar el contacto de la olla con la placa de calefacción.
4. Una vez que el aparato se haya enfriado completamente, limpie las superficies
interiores y exteriores con un paño humedecido con agua jabonada y seque bien.
5. Si llegase a caer agua adentro del interruptor o sobre la placa de calefacción, permita
que se sequen bien antes de usar la olla arrocera.
RC1800 2/12/07 11:13 AM Page 8

10
9
POLARIZED PLUG (120V Models Only)
This appliance has a polarized plug (one blade is wider than the other). To reduce
the risk of electric shock, this plug is intended to fit into a polarized outlet only one
way. If the plug does not fit fully into the outlet, reverse the plug. If it still does not fit,
contact a qualified electrician. Do not attempt to modify the plug in any way.
ELECTRICAL CORD
a) A short power-supply cord (or detachable power-supply cord) is to be
provided to reduce the risk resulting from becoming entangled in or tripping
over a longer cord.
b) Longer detachable power-supply cords or extension cords are available
and may be used if care is exercised in their use.
c) If a long detachable power-supply cord or extension cord is used,
1) The marked electrical rating of the detachable power-supply cord or extension
cord should be at least as great as the electrical rating of the appliance,
2) If the appliance is of the grounded type, the extension cord should be a
grounding-type 3-wire cord, and
3) The longer cord should be arranged so that it will not drape over the
countertop or tabletop where it can be pulled on by children or tripped over.
Note: If the power supply cord is damaged, it should be replaced by qualified
personnel or in Latin America by an authorized service center.
Product may vary slightly from what is illustrated.
1. Tempered glass lid with steam vent
2. Cooking bowl with water level marks
3. Cool-touch side handles
4. Rice measure
5. “On” switch
6. Cook indicator light (COCINAR)
7. Warm Indicator light (CALENTAR)
8. Power cord
9. Serving scoop
10. Steaming basket
RC1800 2/12/07 11:13 AM Page 10

12
11
Congratulations on your purchase of the popular Black and Decker
®
16-Cup Multi-Use
Rice Cooker. The Cooker is not only great for making perfect rice, but you’ll find it ideal
for preparing savory soups, stews and other favorite one-pot dishes.
How to Use
This appliance is for household use only.
1. Before first use, wash the cooking bowl, glass lid, serving scoop, steaming basket
and rice measure in warm, soapy water. Rinse and dry well.
2. Place unit on a flat, stable surface.
Important: Always keep the steam vent cover open when cooking.
Note: As the rice expands and cooks, steam will come out of the vent in the lid. Do not
place the rice cooker directly under your cabinets.
3. Measure desired amount of rice with the rice measure provided. Add butter, oil
and/or seasonings as desired.
Note: The rice measure provided is based on 5-1/2 oz. (150 g). Your rice cooker can
handle a maximum of 7 rice measures of dry rice — yielding approximately 16, 8 oz.
(227 g) cups of cooked rice.
Caution: To reduce the risk of electric shock, cook only in removable nonstick cooking
bowl provided.
4. Place rice in the cooking bowl. Add water. Use the water-level markings inside
the cooking bowl as a guide for adding the appropriate amount of water. For
example, for 4 measures of uncooked rice, fill with water to water-level marking 4.
Be careful not to add too much water as it may cause the unit to boil over. Use the
"BROWN RICE" markings when cooking brown rice and "OTHER RICE" for all other
varieties.
Note: Taste/hardness will vary depending on the quality/type of rice and length of time it is
cooked. For softer, fluffier rice, add a little more water. For firmer, crunchier rice, add a
little less water. You may need to experiment to suit your taste.
5. Before placing the cooking bowl into the rice cooker, be sure the heating plate
and outside surface of the cooking bowl are clean and dry. Do not let loose rice
or particles fall into the rice cooker.
6. Insert cooking bowl into the rice cooker. You might have to turn it slightly to the left
and right to ensure proper contact with the heating plate.
7. Place the lid on the rice cooker.
Important: Always keep the steam vent cover open when cooking.
Note: Always keep the tempered glass lid on the cooking bowl while cooking.
8. Plug into a standard electrical outlet. The Warm (CALENTAR) light comes on.
9. Press down the On switch. The Cook (COCINAR) light comes on and cooking begins.
As the rice expands and cooks, steam comes out through the steam vent on the lid.
Caution: Do not put your hand over the steam vent as you may get burned with the hot
steam.
10. Once rice is cooked, the Cook (COCINAR) light turns off, the switch pops up and the
rice cooker automatically switches to the keep Warm (CALENTAR) function.
The Warm (CALENTAR) light comes on and stays on, indicating serving temperature
is maintained.
Note: The unit will stay in the keep warm (CALENTAR) cycle until it is unplugged.
Do not try to prevent the rice cooker from switching to the keep warm (CALENTAR)
cycle. Do not immediately press the On switch again after it has begun the keep warm
(CALENTAR) cycle.
11. After the switch pops up, leave the lid on for at least 15 minutes to further steam the
rice. If holding rice for longer than 30 minutes, stir occasionally to prevent browning
of rice on the bottom of cooking bowl.
12. Remove the lid and stir the rice before serving.
Caution: When removing the lid, lift away from your body as you may get burned with
the hot steam.
13. Unplug the unit when finished.
STEAMING BASKET
1. Fill the cooking bowl with about 1-1/2 cups (12 fl. oz./350 ml) of water using
a standard measuring cup.
2. Place vegetables or other food in the steamer basket, and position the basket on top
of the cooking bowl.
3. Close the lid.
Important: Always keep the steam vent cover open when cooking.
Note: Always keep the tempered glass lid on the cooking bowl while cooking.
4. Plug unit into a standard electrical outlet. The Warm (CALENTAR) light will come on.
5. Press down the On switch. The Cook (COCINAR) light comes on and cooking begins.
6. Steaming times vary according to vegetable or food type. Begin checking for doneness
after initial 5 minutes. You may need to experiment to suit your taste.
7. Unplug the unit when finished.
Note: When steaming vegetables or other foods without rice in the cooking bowl, the unit
will not switch to the Warm (CALENTAR) mode.
Important Tips:
• Do not keep small amounts of rice in the keep warm (CALENTAR) cycle for extended
periods of time.
• During cooking, a thin crust may develop on the rice at the bottom of the bowl. If you
do not like rice with a crust, you can easily peel it off and discard it.
• Use the plastic serving scoop (or a wooden spoon) to stir and remove rice. Do not use
metal utensils that can scratch the nonstick cooking bowl.
HOW TO PREPARE SOUPS AND STEWS
1. Before first use, wash the cooking bowl, glass lid, serving scoop, steaming basket
and rice measure in warm, soapy water. Rinse and dry well.
2. Place unit on a flat, stable surface.
NOTE: Select recipes that will cook in 1 hour or less. Use only boneless meats and poultry
that are cut into cubes no larger than 1
1
⁄
2 inches. It is not necessary to brown the meats
before cooking. As the soup or stew begins to cook, steam will come out of the vent in the
lid. Do not place the cooker directly under your cabinets.
NOTE: When cooking rice or pasta in the soup, allow for additional liquid in the recipe.
Caution: To reduce the risk of electric shock, cook only in removable nonstick cooking
bowl provided.
3. Combine meats, vegetables and liquids in the cooking bowl. Stir with a wooden
or plastic spoon until ingredients are blended well.
NOTE: Since most frozen vegetables cook very quickly, it is best to add them at the end
of the cooking time. Stir them into the soup or stew and allow the mixture to cook an
additional 5 to 10 minutes.
Caution: Do not fill cooking bowl higher than the “Maximum” line on the cooking bowl.
4. Before placing the cooking bowl into the rice cooker, be sure the heating plate and
outside surface of the cooking bowl are clean and dry. Do not let loose particles
fall into the cooker.
5. Insert cooking bowl into the cooker. You might have to turn it slightly to the left
or right to ensure proper contact with the heating plate.
RC1800 2/12/07 11:13 AM Page 12

14
13
6. Place the lid on the cooker.
Important: Always keep the steam vent cover open when cooking.
Note: Always keep the tempered glass lid on the cooking bowl while cooking.
7. Plug into a standard electrical outlet. The Warm (CALENTAR) light comes on.
8. Press down the On switch. The Cook (COCINAR) light comes on and cooking begins.
As the soup or stew cooks, steam may come out through the steam vent on the lid.
Caution: Do not put your hand over the steam vent as you may get burned with the
hot steam.
9. Set your kitchen timer for desired cooking time.
Note: The On switch on the cooker is not intended to be an indicator of cooking time for
soups or stews. Always use a kitchen timer.
10. If desired, stir several times during the cooking process.
Caution: When removing the lid, lift away from your body as you may get burned with
the hot steam.
11. Place lid back on the cooker when stirring is done.
12. If desired, check seasoning level during cooking and add additional seasoning to taste.
13. When cooking is complete, unplug the unit.
CAUTION: Do not keep cooked soups or stews in the Warm (CALENTAR) cycle. Always
unplug the unit after cooking is complete.
FOR BEST RESULTS
1. Choose recipes that will cook in 1 hour or less.
2. Always use a kitchen timer. Do not rely on the On switch on the cooker since it is not
intended to be an indicator of cooking time for soups and stews.
3. Use only boneless meats and poultry that are cut into cubes no larger than 1
1
⁄2 inches.
It is not necessary to brown the meats before cooking.
4. When cooking rice or pasta in the soup, allow for additional liquid in the recipe.
5. Since most frozen vegetables cook very quickly, it is best to add them at the end of the
cooking time. Stir them into the soup or stew and allow the mixture to cook an
additional 5 to 10 minutes.
Care and Cleaning
This product contains no user serviceable parts. Refer service to qualified service
personnel.
1. Always unplug the unit before cleaning.
2. Never immerse the unit in water or other liquid.
3. Wash the lid, the steaming basket, the cooking bowl, serving scoop and rice measure in
warm, soapy water. Do not use abrasive cleaners or metal scouring pads—they may
scratch the nonstick surface or could result in poor contact with the heating plate.
4. After it has thoroughly cooled, clean the unit by wiping the inside and outside surfaces
with a damp soapy cloth and dry thoroughly.
5. If water accidentally gets into the switch area or onto the heating plate, allow to dry
thoroughly before using the rice cooker.
NOTES
RC1800 2/12/07 11:13 AM Page 14

16
15
NEED HELP?
For service, repair or any questions regarding your appliance, call the appropriate
"800" number on the cover of this book. Do not return the product to the place of
purchase. Do not mail the product back to the manufacturer nor bring it to a
service center. You may also want to consult the website listed on the cover of
this manual.
One-Year Limited Warranty
(Applies only in the United States and Canada)
What does it cover?
• Any defect in material or workmanship; provided; however, Applica’s liability
will not exceed the purchase price of the product.
For how long?
• One year after the date of original purchase.
What will we do to help you?
• Provide you with a reasonably similar replacement product that is either
new or factory refurbished.
How do you get service?
• Save your receipt as proof of the date of sale.
• Check our on-line service site at www.prodprotect.com/applica, or call our
toll-free number, 1-800-231-9786, for general warranty service.
• If you need parts or accessories, please call 1-800-738-0245.
What does your warranty not cover?
• Damage from commercial use
• Damage from misuse, abuse or neglect
• Products that have been modified in any way
• Products used or serviced outside the country of purchase
• Glass parts and other accessory items that are packed with the unit
• Shipping and handling costs associated with the replacement of the unit
• Consequential or incidental damages (Please note, however, that some states do
not allow the exclusion or limitation of consequential or incidental damages, so
this limitation may not apply to you.)
How does state law relate to this warranty?
• This warranty gives you specific legal rights, and you may also have other rights
that vary from state to state or province to province.
¿NECESITA AYUDA?
Para servicio, reparaciones o preguntas relacionadas al producto, por favor llame
al número del centro de servicio en el país donde usted compró su producto.
NO devuelva el producto al fabricante. Llame o lleve el producto a un centro de
servicio autorizado.
DOS AÑOS DE GARANTÍA LIMITADA
(No aplica en México, Estados Unidos o Canadá)
¿Qué cubre la garantía?
• La garantía cubre cualquier defecto de materiales o de mano de obra. Applica
no se responsabiliza por ningún costo que exceda el valor de compra del
producto.
¿Por cuánto tiempo es válida la garantía?
• Por dos años a partir de la fecha original de compra.
¿Cómo se puede obtener servicio?
• Conserve el recibo original de compra.
• Por favor llame al número del centro de servicio autorizado.
Esta garantía no cubre:
• Los productos que han sido utilizados en condiciones distintas a las normales
• Los daños ocasionados por el mal uso, el abuso o negligencia.
• Los productos que han sido alterados de alguna manera
• Los daños ocasionados por el uso comercial del producto
• Los productos utilizados o reparados fuera del país original de compra
• Las piezas de vidrio y demás accesorios empacados con el aparato
• Los gastos de tramitación y embarque asociados al reemplazo del producto
• Los daños y perjuicios indirectos o incidentales
RC1800 2/12/07 11:13 AM Page 16

Copyright © 2007 Applica Consumer Products, Inc.
Fabricado en la República Popular de China
Impreso en la República Popular de China
Importado por:
Applica de México S. de R.L. de C.V.
Blvd. Manuel Avila Camacho 2900-902, Fracc Los Pirules
Tlalnepantla, Edo. de México. C.P. 54040
Teléfono: (55) 1106-1400
Del interior marque sin costo
01 (800) 714 2503
Made in People’s Republic of China
Printed in People’s Republic of China
2006/8-4-19S/E
Date Code
700 W 120 V 60 Hz
700 W 220 V 50 Hz
700 W 220 V 60 Hz
Marca registrada de The Black & Decker Corporation, Towson, Maryland, E.U.
is a trademark of The Black & Decker Corporation, Towson, Maryland, USA
RC1800 2/12/07 11:13 AM Page 20
/