HOTPOINT/ARISTON HS MR 2A ZU B User guide
- Category
- Vacuum cleaners
- Type
- User guide
This manual is also suitable for
Page is loading ...
Page is loading ...
Page is loading ...
Page is loading ...
Page is loading ...
Page is loading ...
Page is loading ...
Page is loading ...
Page is loading ...
Page is loading ...
Page is loading ...
Page is loading ...
Page is loading ...

1414
en
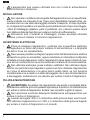
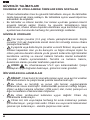
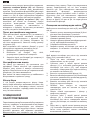
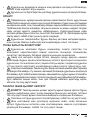
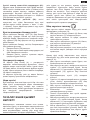
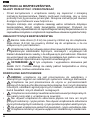
SAFETY INSTRUCTIONS
IMPORTANT TO BE READ AND OBSERVED
• Before using the appliance, read these safety instructions. Keep them nearby
for future reference. These instructions are also available on www.hotpoint.eu
• These instructions and the appliance itself provide important safety in-
struction, to be observed at all times. The manufacturer declines any
liability for failure to observe these safety instructions, for inappropriate
use of the appliance or incorrect setting of controls.
SAFETY WARNINGS
• Very young children (0-3 years) should be kept away from the ap-
pliance. Young children (3-8 years) should be kept away from the appli-
ance unless continuously supervised.
• Children from 8 years old and above and persons with reduced
physical, sensory or mental capabilities or lack of experience and
knowledge can use this appliance only if they are supervised or have
been given instructions on safe use and understand the hazards in-
volved. Children must not play with the appliance. Cleaning and user
maintenance must not be carried out by children without supervision.
• WARNING: This appliance/ accessory uses an UV-C light. Do
not look directly the light while operating, this can cause possible eye
damage.
PERMITTED USE
• CAUTION: the appliance is not intended to be operated by means
of an external timer or separate remote controlled system.
• This appliance is intended to be used in household and similar
applications such as: staff kitchen areas in shops, ofces and other
working environments; farm houses; by clients in hotels, motels, bed &
breakfast and other residential environments.
•
This appliance is not for professional use. Do not use the appliance outdoors.
• Do not use the appliance to vacuum ash or hot coals or any other
hot substance - risk of re. Do not use the appliance to vacuum liquid
or damp substances - risk of electrical shock.
• Do not use the appliance on persons or animals - risk of injury.
• The appliance can only be used with the power supply unit provided.

1515
en
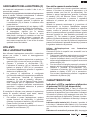
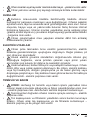
INSTALLATION
• Do not repair or replace any part of the appliance unless speci-
cally stated in the user manual. After unpacking the appliance, make
sure that it has not been damaged during transport. In the event of
problems, contact the dealer or your nearest After-sales Service. Once
assembled, packaging waste (plastic, styrofoam parts etc.) must be
stored out of reach of children - risk of suffocation.
• Remove all packaging materials, including any adhesive label, be-
fore operating the appliance.
ELECTRICAL WARNINGS
•
Before connecting the appliance, verify that electrical ratings cor-responds
to your supply system ratings. The rating plate is on the battery charger.
• It must be possible to disconnect the appliance from the power sup-
ply by unplugging it if plug is accessible, or by a multi-pole switch in-
stalled upstream of the socket and the appliance must be earthed, in
conformity with national electrical safety standards.
• Do not use extension leads, multiple sockets or adapters. Do not use
the appliance when you are wet or barefoot. Do not operate this appli-
ance if it has a damaged power cable or plug, if it is not working properly,
or if it has been damaged or dropped. If the power cable is damaged, it
must be replaced with an identical one - risk of electrical shock.
CLEANING AND MAINTENANCE
• WARNING: Ensure that the appliance is switched off and discon-
nected from the power supply before performing any cleaning or main-
tenance operation - risk of electrical shock. Never use steam cleaning
equipment.
• Do not spray cleaners directly on the appliance – risk of electrical
shock.
• After washing the dust container and lters allow them to dry out. Do
not use the appliance with wet dust container or lters – Risk of electrical
shock or re.

1616
en
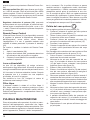
BATTERY SAFETY INFORMATION
• WARNING: For the purpose of recharging the battery, only use the
detachable supply unit provided with this appliance.
• The symbol means that the appliance is provided with a detachable
supply unit.
• The symbol refers to read the user manual.
• The battery must be removed from the appliance before it is scrapped.
• The appliance must be disconnected from the power supply mains
when removing battery
• The battery is to be disposed safety.
• Under abusive conditions, liquid may be ejected from the battery; avoid
contact. If contact accidentally occurs, ush with water. If liquid contacts
eyes, additionally seek medically help. Liquid ejected from the battery may
cause the irritation or burns.
BATTERY TECHNICAL DATA:
Mod. LG18650HD2 (HS MR 2A ZU B) 8 battery cells, 28,8 V 2000mAh/57, 6Wh.
Type/ model of the detachable battery charger: HD2-1.
Mod. LG18650HD2 (HS MR 4A ZO) 6 battery cells, 21,6 V 2000mAh/43,2Wh.
Type/ model of the detachable battery charger: HD2-2.

1717
en
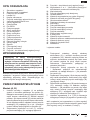
INTRODUCTION
Thank you for purchasing our Multicyclonic
vacuum cleaner handstick. In doing so you
have opted for an effective, high performance
appliance. We advise you to register this
product on www.hotpoint.co.uk to make
sure you are entitled to all the benets made
available by Hotpoint Customer Service.
Multicyclonic vacuum is designed combining efciency
and ergonomy. They new high efciency motors
ensure optimal performances with low consumption.
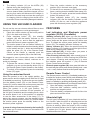
BEFORE FIRST USE
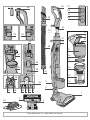
Assembling (A, B)
1. Place the motorized brush (1) on the ground
according to the direction in the gure (A), and
t it by clipping it on the lower part of the main
body (5). Note the voltage indicated on the back
of the brush connector (2) is the same voltage
indicated on the back of the main body. Note to
remove the motorized brush, press the brush
release button (35) on the back and remove the
main body vertically according to the gure A.
2. To remove the dustbin assembly (7), press the
dustbin release button (6) and pull out it.
3. Holding the metal handle in the battery pack (31),
t the battery pack vertically into the battery pack
housing (32). Note the battery voltage indicated on
the label should be the same as indicated on the back
of the main body. Disassembly in the reverse order.
4. Keeping the dustbin handle (8), t the dustbin
assembly in position until it clicks according to
the gure (A).
5. Fit the hose handle (19) into the main body until it
clicks into place (B). To remove the handle, press
the handle release button (36) and pull it out.
6. Fasten the plastic exible hose (26) to the
suction inlet (33) until it clicks into place, same
as the picture. To remove it, press the plastic
exible hose release (27) and pull it out. Place
the plastic exible hose on the clamp (17).
7. Place the two-in-one accessory (25) in the handle
slide clamp (18), same as in the picture (B).
If your appliance is equipped with a Remote Power
Control, you will need to insert the batteries (see paragraph
“Remote Power Control” under chapter “Features”).
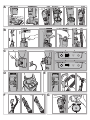
CHARGING THE BATTERY (C)
The charging time is 2 or 4 hours, depending on the model.
Please ensure the battery pack is installed in the
Vacuum cleaner before charging. Use only the original
charger supplied with the appliance.
1. Connect the charger in the back of the main
body, opening the lid for charging (34) and plug
the charger into the mains.
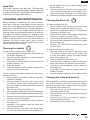
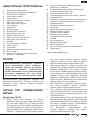
DESCRIPTION OF THE VACUUM
CLEANER
1. Motorized brush*
2. Motorized brush connector*
3. Brush roll cover*
4. Ultraviolet light*
5. Main body
6. Dustbin release button
7. Dustbin assembly
8. Dustbin handle
9. Filter cover
10. Hepa lter
11. Motor cover
12. Upper multicyclone
13. Multicyclonic lter
14. Lower multicyclone
15. Dustbin container
16. Dustbin lid
17. Clamp
18. Handle slide clamp
19. Hose handle
20. Handle grip
21. Remote Power control*
22. Standby button*
23. Button - for electronic power adjustment*
24. Button + for electronic power adjustment*
25. Two-in-one accessory * (Precision nozzle/
Nozzle for delicate surfaces)
26. Plastic exible hose
27. Plastic exible hose release
28. Battery compartment*
29. Suction selector on the accessory position*
30. Suction selector on the brush position*
31. Battery pack*
32. Battery pack housing*
33. Suction inlet
34. Lid for charging*
35. Brush release button
36. Handle release button
37. Start/Stop button
38. Electronic power regulator*
39. 4LEDs*
40. Standby indicator*
41. Battery indicator*
42. Control power indicator*
43. Filter cleaning indicator*
44. Charger
* on some models only

1818
en
2. The battery indicator (41) on the 4LEDs (39)
ashes during the charging time.
3. When the battery indicator (41) is not ashing, the
vacuum cleaner battery has been charged, pull out
the plug from mains and disconnect the charger in
the back of the main body and close the opening lid
for charging. Note the charging time should not be
more than 12 hours to avoid any damage to batteries.
USING THE VACUUM CLEANER
Do not use the vacuum cleaner without lters or dust
container, as the appliance could get damaged.
1. Place the suction selector on the brush position
(30) in the back main body (D).
2. Press start/stop button (37), the standby
indicator (40) and the battery indicator on the
4LEDs (41) are on, and to start the appliance
press the electronic power regulator (38).
3. The suction power is set on medium intensity by
default, to select the desired suction intensity (based
on the model) use the +/- button and electronically
adjust the power (23, 24) of the Remote Power
Control on the handle or manually push the
electronic power regulator (38) on the main body.
We suggest to use a low suction power on delicate
surfaces such as curtains, fabrics, cushions etc to
avoid any damage.
1. To pause the vacuum cleaner, if this feature is
available, you can use the standby button (22) on
the Remote Power Control (based on the model).
2. To switch off the appliance press the start/stop
button (37) again.
Using the motorized brush
When the product is not in the upright position, the
power suction and the rotating brush with the UV light
(if available) are working. To pause the vacuum cleaner
use the standby button (22) on the Remote Power
Control (21) and to restart the suction power press the
standby button or the electronic power regulator.
When the product is in the park position, the
Start&Pause function switches off the operation of
the UV light (if available) and the rotating brush, while
the suction power in on. In this position it is possible
to use the other accessories in the clamp (17). To
pause the vacuum cleaner use the standby button
(22) on the Remote Power Control (21), and to restart
the suction power press the standby button or the
electronic power regulator.
In cases of using of vacuum cleaner by the handle (E)
This allows you to clean surfaces not accessible with
the motorized brush.
1. Place the suction selector on the accessory
position (29) in the back main body.
2. Fit the two-in-one accessory (25) into the handle
frame, pushing down the handle slide clamp (18).
3. To remove the handle, press the handle release
button (36) and pull it out.
4. Press start/stop button (37), the standby
indicator (40) and the battery indicator on the
4LEDs (41) are on, and to start the appliance
press the electronic power regulator (38).
FEATURES
Led indicators and Electronic power
regulator (38,39) (if available)
Standby indicator (40): when you use the standby
button (22) on the Remote Power Control, the suction
power stops and the power indicator (42) blinks one
time. To restart the suction power press the standby
button (22). The standby indicator is always on.
Battery indicator (41): When the product works the
battery indicator (41) is switch on and the light is xed,
while during charging time it ashes.
Power indicator (42): it blinks when you press a
button on the Remote Power Control.
Filter Cleaning Indicator (43): after several hours of
use, the led switch on. After cleaning the HEPA lter
(see chapter “Cleaning and maintenance”), to reset
the indicator press the symbol “+” (24) of Remote
Power Control some seconds.
Electronic power regulator (38): when press this button on
the main body the suction power works cyclically (med -> max
-> min -> med). It allows to set the suction power required.
Remote Power Control
The Remote power control (21) (if available) enables you
to adjust the suction power directly and effortlessly from
the hand grip. When using the vacuum cleaner, you can
keep it on standby by pressing the Standby button (22).
To insert or change the batteries of your Remote Power Control:
1. Open the battery compartment (28).
2. Insert two AAA batteries, making sure of the
positive and negative poles.
3. Close the battery compartment until it clicks into
place and screw the cover.
Ultraviolet light
The UV light (if available) (4) is an ultraviolet steriliza-
tion function, when the brush is collecting dust on the
ground normally, the UV lamp is lighting, antiseptic
function is working. When the brush is not in contact
with an horizontal surface, the UV light is switched off.
To replace the UV light, please contact the nearest
Authorised Service Centre.

1919
en
Hepa lter
This model comprises the Hepa lter. The Hepa lter
ensures maximum protection against allergens and high
air quality, because the air given back by the appliance is
entirely free from dust/powder residues.
CLEANING AND MAINTENANCE
Before cleaning or maintaining the vacuum cleaner,
make sure it has been unplugged from the electrical
outlet. Do not use aggressive substances or abrasive
materials to clean the appliance, its internal parts and
attachments. Use a dry or slightly damp soft cloth for
cleaning. Make sure the appliance and all its parts are
thoroughly dry before restarting the appliance. We
suggest to clean the lter at least every 6 months to
restore its ltering power. In any case we recommend
replacing the lter at least every year to ensure
maximum performance. Always operate the vacuum
cleaner with the lter installed.
Cleaning the dustbin
For the routine cleaning of the dustbin (G):
1. Press the dustbin release button (6) and take out
the dustbin assembly (7).
2. Keep the dustbin assembly in vertical position
with the lid facing down.
3. Press the lock on the dustbin lid (16) to open the
dustbin container (15).
4. Empty the dustbin.
5. Close the dustbin lid until it clicks into place and
replace it into the main body.
For the washing of dustbin container to remove any
residual dirt (G,H):
1. Before washing the dustbin container, make sure
it has been emptied.
2. Align the screw on the back of the motor cover
(11) with the unblock mark on the dustbin (15) to
open the dustbin, turn the upper dustbin same as
the picture (G).
3. Take out the multicyclonic lter (13).
4. Take out the lower multicyclone (14) from dustbin contai-
ner, holding the metal handle same as the picture (H2).
5. Remove any residual dirt by washing the dustbin
container under running water.
6. Let it dry at room temperature until its parts are
thoroughly dry.
7. Assembly in the reverse order the lower mul-
ticyclone and the lter.
8. Align the screw on the back of the motor cover
(11) with the blocked mark on the dustbin to clo-
se the dustbin, turning the upper dustbin same
as the picture (G).
9. When the screw on the back of the motor cover
(11) and the blocked mark on the dustbin are li-
ned up completely, the dustbin is correctly tted.
10. Replace the dustbin assembly into the main body.
Cleaning the lters (H)
To clean the Hepa lter (10):
1. Open the lter cover (9) using the lever of the
handle on the dustbin as the picture (H3).
2. Remove the Hepa lter turning it in the direction
indicated on the lter (H4).
3. Wash the lter under running water, taking care
that the jet of water is not too strong.
4. Hold it so that the water ows parallel to its folds.
5. Let it dry at room temperature until all of its parts
are thoroughly dry.
6. Re-place the Hepa lter and assembly in the
reverse order.
To clean the Multicyclonic lter (13):
1. Align the screw on the back of the motor cover
(11) with the unblock mark on the dustbin (15)
to open the dustbin, turning the upper dustbin
same as the picture (G).
2. Take out the Multicyclonic lter (13).
3. Clean the lter by washing it under running water,
taking care that the jet of water is not too strong.
4. Let it dry at room temperature until its parts are
thoroughly dry.
5. Fit the lter into the special housing inside the
dustbin container.
6. Close the dustbin container in the reverse order.
Cleaning the motorized brush (I)
Before cleaning or maintaining the Motorized brush of
the vacuum cleaner, make sure it has been unplug-
ged from electrical outlet. Always disconnect the Mo-
torized brush before cleaning it.
1. Open the brush roll cover locking (3) by un-
screwing the two screws.
2. Remove the roll cover accordingly the direction
in the gure (I).
3. Remove the roll out of the notch for cleaning.
Avoid cleaning with water.
4. Reassembly in the reverse order.

2020
en
ATTACHMENTS (F)
Two-in-one accessory: Precision Nozzle
Placing the two-in-one accessory in the position
same as the gure (F2), until it clicks, you can use
the precision nozzle. It helps you vacuum corners,
crevices and other difcult-to-reach areas.
Two-in-one accessory: Nozzle for
delicate surfaces
Placing the two-in-one accessory in the position same
as the gure (F3), until it clicks, you can use the nozzle
for delicate surfaces. It is suitable for vacuuming
surfaces requiring special care such as radiators,
furniture etc. Its special natural bristles enable you to
use it on very delicate surfaces without any harm.
SAFEGUARDING THE ENVIRONMENT
DISPOSAL OF PACKAGING MATERIALS
The packaging material is 100% recycla-
ble and is marked with the recycle symbol
(*). The various parts of the packaging
must therefore be disposed of responsi-
bility and in full compliance with local au-
thority regulations governing waste disposal.
SCRAPPING OF HOUSEHOLD APPLIANCES
Dispose of packaging in an environmentally-
friendly manner. This appliance is labelled in
accordance with European Directive
2012/19/EU concerning used electrical and
electronic appliances (waste electrical and
electronic equipment – WEEE). The guideline deter-
mines the framework for the return and recycling of
used appliances as applicable throughout the EU.
Please ask your specialist retailer about current dis-
posal facilities.
Batteries contain substances harmful to the natu-
ral environment. Do not throw them away with other
household waste. Return used batteries to recycling
points. Before disposing of or returning the appliance
to a recycling point make sure to remove the batteries
from the battery compartment.

2121
en
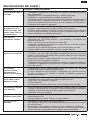
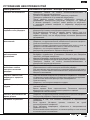
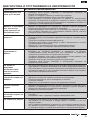
TROUBLESHOOTING
Problem Possible causes / Solutions
The vacuum cleaner
cannot be switched on.
• Check if the Start/ Stop button and the electronic power regulator were pressed.
• The appliance is not charged up, put it back on charge.
• Check if the battery pack is installed correctly.
• After pressing the start/stop button, make sure that the electronic power regulator
on the product is pressed within roughly 1 minute, or the product will not start and
the stand-by and battery indicators will switch off.
The charging time
is not enough after
charging of the battery
pack.
• The charging time is not sufcient. Fully charge the battery according to the
indication method in charging chapter.
• When the battery pack is not longer able to maintain the charge, the battery
pack is aging. Contact an Authorised Service Center since battery belongs
to consumables.
Low suction power. • Clean the lters and, if needed, replace them.
• Make sure the hose handle, exible hose and brush are not blocked.
• Clean the dustbin container and its lters.
• Check if the level of the dust is on the max level, in just case empty the
dustbin container.
• Make sure the suction selector is in the right position.
• The battery pack is discharging. Charge the battery pack.
Remote Power not
working.
• Battery not charged on the handle.
• The batteries were positioned incorrectly inside the battery compartment. Position
the two AAA batteries making sure of the positive and negative poles.
• Remove batteries; then position them again, making sure of the positive and
negative poles.
• Electronic appliances or obstacles may be interfering.
• Check if the Start/ Stop button and the electronic power regulator were pressed..
Small electrostatic
discharges occur while
sucking up.
• If very ne dust or powders are sucked up such as our, etc. small electrostatic
discharges could occur.
• When sucking up materials previously mentioned, we advise not to use the hose
handle, but only the plastic exible hose and to set a low suction power level.
The vacuum cleaner
whistles or vibrates
when in use.
• One or more attachments were assembled incorrectly. Make sure the lters
and brushes were assembled according to these instructions.
• Clean the lters and, if needed, replace them.
• Clean the brush.
• Make sure the suction selector is in the right position.
The brush moves with
difculty.
• Reduce suction power, especially on carpets and fabrics in general.
• The charging time is not sufcient. Fully charge the battery according to the
indication method in charging chapter.
• Check and clean the brush.
The vacuum cleaner
switched off while
using.
• Make sure the hose handle, exible hose and brush are not blocked.
• The battery pack is discharged. Charge the battery pack.
The UV light does not
work.
• Check if the product is placed in the upright position.
• If the UV light cover is too dirty, clean with dry cotton cloth.
• If the UV light is damaged, contact an Authorised Service Center.
• If the small wheels are blocked, clean and remove the dirt from the wheels,
considering the product unplugged.
Page is loading ...
Page is loading ...
Page is loading ...
Page is loading ...
Page is loading ...
Page is loading ...
Page is loading ...
Page is loading ...
Page is loading ...
Page is loading ...
Page is loading ...
Page is loading ...
Page is loading ...
Page is loading ...
Page is loading ...
Page is loading ...
Page is loading ...
Page is loading ...
Page is loading ...
Page is loading ...
Page is loading ...
Page is loading ...
Page is loading ...
Page is loading ...
Page is loading ...
Page is loading ...
Page is loading ...
Page is loading ...
Page is loading ...
Page is loading ...
Page is loading ...
Page is loading ...
Page is loading ...
Page is loading ...
Page is loading ...
Page is loading ...
Page is loading ...
Page is loading ...
Page is loading ...
Page is loading ...
Page is loading ...
Page is loading ...
Page is loading ...
Page is loading ...
Page is loading ...
Page is loading ...
Page is loading ...
Page is loading ...
Page is loading ...
Page is loading ...
Page is loading ...
Page is loading ...
Page is loading ...
Page is loading ...
Page is loading ...
Page is loading ...
Page is loading ...
Page is loading ...
Page is loading ...
Page is loading ...
Page is loading ...
Page is loading ...
Page is loading ...
Page is loading ...
Page is loading ...
Page is loading ...
Page is loading ...
Page is loading ...
Page is loading ...
Page is loading ...
Page is loading ...
Page is loading ...
Page is loading ...
Page is loading ...

Indesit Company SpA
Viale Aristide Merloni, 47
60044 Fabriano (AN), Italy
www.hotpoint.eu
Multi Cyclonic Handstick EU
10/2016 - ver. 5.0
-
 1
1
-
 2
2
-
 3
3
-
 4
4
-
 5
5
-
 6
6
-
 7
7
-
 8
8
-
 9
9
-
 10
10
-
 11
11
-
 12
12
-
 13
13
-
 14
14
-
 15
15
-
 16
16
-
 17
17
-
 18
18
-
 19
19
-
 20
20
-
 21
21
-
 22
22
-
 23
23
-
 24
24
-
 25
25
-
 26
26
-
 27
27
-
 28
28
-
 29
29
-
 30
30
-
 31
31
-
 32
32
-
 33
33
-
 34
34
-
 35
35
-
 36
36
-
 37
37
-
 38
38
-
 39
39
-
 40
40
-
 41
41
-
 42
42
-
 43
43
-
 44
44
-
 45
45
-
 46
46
-
 47
47
-
 48
48
-
 49
49
-
 50
50
-
 51
51
-
 52
52
-
 53
53
-
 54
54
-
 55
55
-
 56
56
-
 57
57
-
 58
58
-
 59
59
-
 60
60
-
 61
61
-
 62
62
-
 63
63
-
 64
64
-
 65
65
-
 66
66
-
 67
67
-
 68
68
-
 69
69
-
 70
70
-
 71
71
-
 72
72
-
 73
73
-
 74
74
-
 75
75
-
 76
76
-
 77
77
-
 78
78
-
 79
79
-
 80
80
-
 81
81
-
 82
82
-
 83
83
-
 84
84
-
 85
85
-
 86
86
-
 87
87
-
 88
88
-
 89
89
-
 90
90
-
 91
91
-
 92
92
-
 93
93
-
 94
94
-
 95
95
-
 96
96


HOTPOINT/ARISTON HS MR 2A ZU B User guide
- Category
- Vacuum cleaners
- Type
- User guide
- This manual is also suitable for
Ask a question and I''ll find the answer in the document
Finding information in a document is now easier with AI
in other languages
Related papers
-
Whirlpool HS MR 2A ZU B User guide
-
HOTPOINT/ARISTON HS MC 07A Z O User guide
-
HOTPOINT/ARISTON SL M07 A3E O User guide
-
-
-
-
-
-
-
Whirlpool SL C18 AA0 Owner's manual
Other documents
-
Hotpoint-Ariston HS MR 4A Z O User manual
-
Hotpoint HS MR 4A ZO UK User guide
-
-
LG V-KC601HTQV User manual
-
-
-
-
-
Imetec 8096 Operating instructions
-
Imetec G7801 Operating instructions