
USER GUIDE
GX300
P/NO : MMBB0383204(1.0)
www.lg.com
ENGLISH
fganhfganh

Bluetooth QD ID B016528

GX300 User Guide
-
English
This guide will help you understand your new mobile phone. It will
provide you with useful explanations of features on your phone.
Some of the contents in this manual may differ from your phone
depending on the software of the phone or your service
provider.

2
Contents
Getting to know your phone ..............4
Installing a memory card ......................5
Installing the SIM and battery ............6
Charging your phone .............................7
Using Dual SIM-card ...............................8
Menu map ..................................................9
On-Screen Icons .....................................11
Calls ............................................................12
Making a call ............................................12
Making a call from your contacts .....12
Answering and rejecting a call ..........12
Using the speakerphone .....................12
Speed dialling .........................................12
Sending SOS Message..........................13
Viewing your call logs ..........................13
Changing the call settings ..................13
Contacts ....................................................14
Searching for a contact ........................14
Adding a new contact ..........................14
Adding a contact to a group ..............14
Messaging ................................................14
Sending a message ...............................14
Entering text ............................................16
T9 mode ....................................................16
Abc mode .................................................16
123 mode ..................................................16
Setting up your e-mail .........................16
Creating new e-mail account ............16
Sending an e-mail using your new
account ......................................................17
Message folders ......................................17
Camera ......................................................18
Taking a quick photo ............................18
Video camera ..........................................18
Shooting a quick video ........................18
Music ..........................................................18
FM radio ....................................................19
Searching for stations...........................19
Listening to the radio ...........................19
Recording the Radio .............................19
Voice recorder .........................................19
Recording your voice memo .............19
Gallery .......................................................20
Organiser ..................................................20
Setting your alarm .................................20
Using the calendar ................................20
Adding an item to your to do list .....20
Adding a note .....................................20
Secret notes ........................................20
Using your calculator .......................20
Using the stopwatch ........................21

3
Date nder ...........................................21
Converting a unit ..............................21
Adding a city to your world time .21
Go to ......................................................21
Torch ......................................................21
Fake call ................................................21
Web ............................................................21
Accessing the wap browser ...........21
Applications ........................................... 22
Settings .....................................................22
Personalising your pro les ............22
Using ight mode .............................22
Changing your display settings ...22
Changing your date & time ...........22
Changing your connectivity
settings .................................................23
Changing your Bluetooth
settings .................................................23
Pairing with another Bluetooth
device ....................................................24
PC Suite .....................................................24
Installing LG PC Suite on your
computer ..................................................24
Changing your other settings ...........24
Changing your phone settings .........25
Changing your security settings ......25
Viewing memory status .......................26
Resetting your phone...........................26
Phone Software update ......................27
Guidelines for safe and
e cient use .............................................28
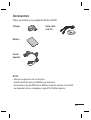
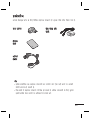
Accessories ..............................................33
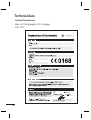
Technical data .........................................34
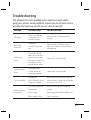
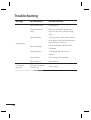
Trouble shooting ...................................35

4
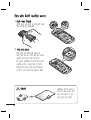
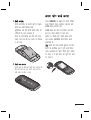
Getting to know your phone
Charger, cable slot,
Handsfree connector
Call key
Dials a phone
number and answers
incoming calls.
End/Power key
Ends or rejects
a call. Turns the
phone on/off.
Returns to the
standby screen
when you use
the menu.
Main screen
Volume key
Memory card slot
Camera
Go to Camera
function directly.
Navigation key
Use for quick
access to phone
functions.
Dual SIM key
Earpiece

5
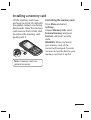
Lift the memory card cover
and insert a micro SD card with
the golden contact area facing
downwards. Close the memory
card cover so that it clicks shut.
To remove the memory card,
gently push it.
Note: A memory card is an
optional accessory.
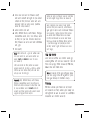
Formatting the memory card
Press Menu and select
Settings.
Choose Memory info, select
External memory and press
Format, and insert security
code.
WARNING: When you format
your memory card, all the
content will be wiped. If you do
not want to lose the data on your
memory card, back it up rst.
Installing a memory card

6
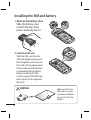
1
Remove the battery cover
Slide the battery cover
towards the top of the
phone and away from it.
2
Install the SIM card
Slide the SIM card into the
SIM card holder making sure
that the gold contact area on
the card is facing downwards.
Please make sure the battery
is removed from the phone
before installing the SIM
card. To remove the SIM card,
pull it gently in the opposite
direction.
SIM1
SIM2
Installing the SIM and battery
WARNING
Make sure that your
SIM card has a neat
and clean cut before
you insert it into the
holder.

7
Charging your phone
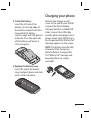
3
Install the battery
Insert the left side of the
battery into the top edge of
the battery compartment first.
Ensure that the battery
contacts align with the phone’s
terminals. Press the right side
of the battery until down it
clicks into place.
4 Replace the battery cover
Insert the top of the battery
cover and push down and slide
until it clicks into place.
Remove the charger socket
cover on the side of your GX300.
Connect the Travel Adapter
(Charger) and the included USB
cable. Connect the USB cable
into the phone and plug it into a
power socket. Your GX300 must
be charged until the “Battery full“
message appears on the screen.
NOTE: The battery must be fully
charged initially to improve
battery lifetime. Disregard the
first “Battery full” message and
keep the phone on charge
overnight.

8
You can see two Network Signal
icons on the left-top of the screen
when you insert two SIM-Card.
To select or switch the SIM-
card, press Menu and select
Settings,then select Dual SIM.
Or press Dual SIM key simply on
the right side of the GX300. Dual
SIM key make it easy for you to
switch SIM-Card whenever you
call, send messages and so on.
TIP! You can see the network
signals highlighted by
background colour when you
switch them. It makes you
easily identify the strength
of your signal of the selected
SIM-Card.
Using Dual SIM-card

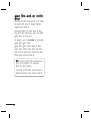
9
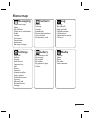
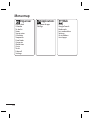
Menu map
Messaging
Create message
Inbox
My mailbox
Create new e-mail address
Drafts
Outbox
Sent items
Saved items
Emoticons
Message settings
Contacts
Names
Settings
Groups
Speed dials
Service dial numbers
Own number
My business card
Log
Call log
Missed calls
Received calls
Dialled numbers
Call duration
Packet data counter
Call costs
Settings
Dual SIM
Pro les
Display
Date & time
Connectivity
Call
Phone
Network
Internet pro les
Access points
Packet data conn.
Security
Memory info
Restore factory
settings
Gallery
My memory card
My images
My sounds
My videos
My games & apps
Others
Media
Camera
Video
Music
FM radio
Voice recorder

10
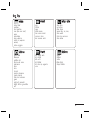
Menu map
Organiser
Alarm clock
Calendar
To-do list
Notes
Secret notes
Calculator
Stopwatch
Date nder
Converter
World time
Go to
Torch
Fake call
Settings
Applications
My games & apps
Settings
Web
Home
Google Search
Bookmarks
Last web address
Settings
Go to address
Saved pages

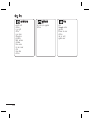
11
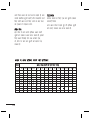
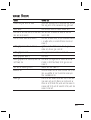
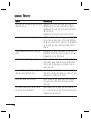
Icon Description
Tells you the strength of
the network signal.
Bluetooth connectivity is
powered on.
The alarm clock is set.
Roaming sevice is used
Indicates new text
message(s).
The normal profile is
activated.
The silent profile is
activated.
The outdoor profile is
activated.
The flight mode profile is
activated.
The headset setting is used.
Indicates the battery
charge level.
On-Screen Icons

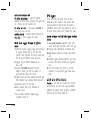
12
Calls
Making a call
1 Key in the number using the
keypad. To delete a digit press
CLR.
2
Press to initiate the call.
3
To end the call, press .
TIP! To enter + when making
an international call, press and
hold 0.
TIP! To control the volume
during a call, press volume key.
Making a call from your
contacts
1 Select Contacts from the home
screen.
2 Using the keypad, enter the first
letter of the contact you want
to call. For example, for Office,
Press 6 three times to select the
first character, “O”.
3
Select Make call by from
Options or press
to initiate
the call.
Answering and rejecting a call
When your phone rings, press
to answer the call.
To mute your phone while it is
ringing, simply select Silent. This
is useful if you have forgotten to
change your profile to Silent for a
meeting.
Press
or select Reject to
reject the incoming call.
Using the speakerphone
During a call, you can activate
speakerphone by pressing
key
and you can use the handset in
hands-free.
If the speakerphone is active, press
key again to resume normal
handset conversation mode.
Speed dialling
Press Menu and select Contacts,
then choose Speed dials.
You can assign a speed dial
number to a contact you call
frequently.
Speed dial 1 is set to your voice
mail and you can not change it.

13
Sending SOS Message
This allows you to send SOS
message to your friends
automatically by long press No. 9
key on you keypad when you are
in emergency.
Initial long press of No. 9 key
brings up your SOS message
settings. Once you set ON, you
can edit this function by selecting
Menu > Contacts > Speed dials.
Viewing your call logs
Press Menu and select Call log.
You can check the call record of
missed, received, and dialled calls
only if the network supports the
Calling Line Identification (CLI)
within the service area.
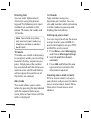
Changing the call settings
You can set the menu relevant to
a call. Press Menu, select Settings
and choose Call and Select SIM 1
or SIM 2.
Call divert - Choose whether to
divert your calls.
Call barring - Select when you
would like calls to be barred.
Fixed dial numbers - Choose a
list of numbers that can be called
from your phone. You’ll need your
PIN2 code from your operator.
Only numbers included in the
fixed dial list can be called from
your phone.
Call waiting - Be alerted when you
have a call waiting. (Depends on
your network provider.)
Call reject - Select Off or On and
choose to reject all calls, contacts,
those from specific groups,
unregistered numbers (those not
in your list of contacts) or those
with no caller ID.
Send my number - Choose
whether your number will be
displayed when you call someone.
(Depends on your network
provider.)
Auto redial - Allows you to set the
auto redial function when a call
attempt has failed.
Minute minder - Determines
whether to sound a tone when
you are on the phone as per the
set time.
Save new number - Choose Yes
or No.

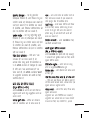
14
Contacts
Searching for a contact
1 Select Contacts from the home
screen and choose Names.
2 Using the keypad enter the first
letter of the contact you want
to call.
3 To scroll through the contacts
and their different numbers use
the navigation keys.
Adding a new contact
1 Press Menu and select Contacts
then choose Names. Press
Options and Add new contact
and choose Handset or SIM 1 or
SIM 2.
2 Enter the first and last name of
your new contact. You do not
have to enter both, but you
must enter one or the other.
3 Enter the number and select
Options then choose Done.
Note: If you add more
information, press Options and
choose Add detail then select
options you want.
Note: When you are storing a
contact’s e-mail address, press
key and select a symbol
@ then OK.
Adding a contact to a group
You can save your contacts into
groups, for example, keeping
your work colleagues and family
separate. There are a number of
groups including Family, Friends,
Colleague, School and VIP already
set up on the phone.
TIP! In contacts, by default there
is a LG Customer Care number
provided
Messaging
Your GX300 includes functions
related to SMS (Short Message
Service), MMS (Multimedia
Message Service), e-mail as well as
the network’s service messages.
Sending a message
1 Press Menu, select Messaging,
and choose Create message.
2 Choose Message to send an
SMS or MMS.

15
3 A new message editor will
open. The message editor
combines Text message and
Multimedia messages into one
intuitive and easy to switch
between editor. The default
setting of the message editor is
text message.
4 Enter the phone number or
press Options and select Send
to add a contact from the
list of your contacts. You can
even add multiple contacts by
selecting Add recipient.
5 Enter your message.
6 Select Options and choose
Insert to add an Image, Video
clip, Sound clip, Schedule,
Business card, Note, Text field,
To do, or a Text template.
7 Press Send.
TIP! You can select your message
type as SMS or MMS when you
enter a text longer than 1 page
in the message field. If you want
to change the type of message to
send, press Menu > Messaging
> Message settings > Text
message > SIM 1 or SIM 2, and
choose Send long text as.
WARNING: Image, Video clip,
Sound clip, Schedule, Business
card, Text field or Subject is
added to the message editor, it
will be automatically converted
to MMS mode and you will be
charged accordingly.
TIP! You can send SMS to many
contacts at a time. “Add” Option
will open the contacts list, from
where user can mark/unmark
contacts for sending the message.
Only 20 contacts can be marked
and if user select Mark all only
first 20 contacts will be marked.
To send the SMS to a particular
group of contacts select “Contact
groups” option from the list

16
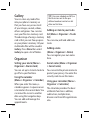
Entering text
You can enter alphanumeric
characters using the phone’s
keypad. The following text input
methods are available in the
phone: T9 mode, Abc mode and
123 mode.
Note: Some fields may allow
only one text input mode (e.g.
telephone number in address
book fields).
T9 mode
T9 mode uses a built-in dictionary
to recognise words you’re writing
based on the key sequences you
press. Simply press the number
key associated with the letter you
want to enter, and the dictionary
will recognise the word once all
the letters are entered.
Abc mode
This mode allows you to enter
letters by pressing the key labeled
with the required letter once,
twice, three or four times until the
letter is displayed.
123 mode
Type numbers using one
keystroke per number. You can
also add numbers while remaining
in letter modes by pressing and
holding the desired key.
Setting up your e-mail
You can stay in touch on the move
using e-mail on your GX300. It’s
quick and simple to set up a POP3
or IMAP4 e-mail account.
1 Press Menu, select Messaging,
and choose Message Settings.
2 Select E-mail then E-mail
accounts.
3 Press Add and follow the pop
up instruction and enter the
information required.
Creating new e-mail account
If the e-mail account is set up in
your phone and you want to add a
new e-mail account, Select Menu,
then select Create new e-mail
address.

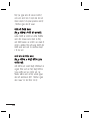
17
Sending an e-mail using your
new account
To send/receive an e-mail, you
should set up an e-mail account.
1 Select Menu, select Messaging
and choose Create message.
2 Choose E-mail and a new e-mail
will open.
3 Enter the recipient’s address
and write a subject.
4 Enter your message.
5 Press Options, select Insert
to add an Image, Video clip,
Sound clip, Business card,
Schedule or a Note.
6 Press Send and your e-mail will
be sent.
Message folders
Press Menu, select Messaging.
The folder structure used on your
GX300 is fairly self explanatory.
Create message - Allows you to
create new message.
Inbox - All the messages you
receive are placed into your Inbox.
From here you can reply, forward
and more.
My mailbox - All your e-mails
you receive are placed into My
mailbox.
Drafts - If you don’t have time to
finish writing a message, you can
save what you have written so far
in here.
Outbox - This is a temporary
storage folder used while
messages are being sent.
Sent items - Copies of all the
messages you send are kept into
your Sent items.
Saved Items - You can access your
Saved messages, Text templates
and Multimedia templates.
Emoticons - A list of useful
emoticons already written for a
quick reply. You can add, edit and
delete emoticons. You can insert
the emoticon which you preferred
on writing a message.
Message settings - Your message
settings are pre-defined so
that you can send messages
immediately. If you would like to
change the settings, you can do
this using the settings options.

18
TIP! Messages which are stored
in Phone or SIM1 / SIM 2 memory
can be moved either to SIM1 /
SIM2 or Phone memory.
TIP! Inbox Messages can be
sorted with the given sorting
options for an easy acess of
messages (Subject,Date,Sender)
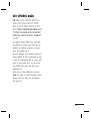
Camera
Using the camera module built in
your phone, you can take pictures
of people. Additionally, you can
send photos to other people and
select photos as wallpaper.
Taking a quick photo
1 Press Menu and select Media.
Select Camera to open the
viewfinder.
2 Holding the phone and, point
the lens towards the subject of
the photo.
3 Press
key to take a photo.
Video camera
Shooting a quick video
1 Press Menu and select Media,
then choose Video.
2 Point the camera lens towards
the subject of the video.
3 Press
key to start recording.
4 REC will appear in the
viewfinder and a timer will
show the length of your video.
5 Select Stop to stop recording.
Music
Your GX300 has a built-in music
player so you can play all your
favourite music.
Note: Music is copyright
protected in inte rnational
treaties and national copyright
laws. It may be necessary to
obtain permission or licence to
reproduce or copy music. In some
countries national law prohibits
private copying of copyrighted
material. Please check the
national legislation of the
applicable country concerning
the use of such materials.
Page is loading ...
Page is loading ...
Page is loading ...
Page is loading ...
Page is loading ...
Page is loading ...
Page is loading ...
Page is loading ...
Page is loading ...
Page is loading ...
Page is loading ...
Page is loading ...
Page is loading ...
Page is loading ...
Page is loading ...
Page is loading ...
Page is loading ...
Page is loading ...
Page is loading ...
Page is loading ...
Page is loading ...
Page is loading ...
Page is loading ...
Page is loading ...
Page is loading ...
Page is loading ...
Page is loading ...
Page is loading ...
Page is loading ...
Page is loading ...
Page is loading ...
Page is loading ...
Page is loading ...
Page is loading ...
Page is loading ...
Page is loading ...
Page is loading ...
Page is loading ...
Page is loading ...
Page is loading ...
Page is loading ...
Page is loading ...
Page is loading ...
Page is loading ...
Page is loading ...
Page is loading ...
Page is loading ...
Page is loading ...
Page is loading ...
Page is loading ...
Page is loading ...
Page is loading ...
Page is loading ...
Page is loading ...
Page is loading ...
Page is loading ...
Page is loading ...
Page is loading ...
Page is loading ...
Page is loading ...
Page is loading ...
Page is loading ...
-
 1
1
-
 2
2
-
 3
3
-
 4
4
-
 5
5
-
 6
6
-
 7
7
-
 8
8
-
 9
9
-
 10
10
-
 11
11
-
 12
12
-
 13
13
-
 14
14
-
 15
15
-
 16
16
-
 17
17
-
 18
18
-
 19
19
-
 20
20
-
 21
21
-
 22
22
-
 23
23
-
 24
24
-
 25
25
-
 26
26
-
 27
27
-
 28
28
-
 29
29
-
 30
30
-
 31
31
-
 32
32
-
 33
33
-
 34
34
-
 35
35
-
 36
36
-
 37
37
-
 38
38
-
 39
39
-
 40
40
-
 41
41
-
 42
42
-
 43
43
-
 44
44
-
 45
45
-
 46
46
-
 47
47
-
 48
48
-
 49
49
-
 50
50
-
 51
51
-
 52
52
-
 53
53
-
 54
54
-
 55
55
-
 56
56
-
 57
57
-
 58
58
-
 59
59
-
 60
60
-
 61
61
-
 62
62
-
 63
63
-
 64
64
-
 65
65
-
 66
66
-
 67
67
-
 68
68
-
 69
69
-
 70
70
-
 71
71
-
 72
72
-
 73
73
-
 74
74
-
 75
75
-
 76
76
-
 77
77
-
 78
78
-
 79
79
-
 80
80
-
 81
81
-
 82
82


