Page is loading ...

SILICONE
T
E
F
L
O
N
Icons
SILICONE
T
E
F
L
O
N
Icons
T
E
F
L
O
N
SILICONE
1
®
U
P
C
Write purchased model number here.
Escriba aquí el número del modelo comprado.
Inscrivez le numéro de modèle ici.
For easy installation of your Delta
faucet you will need:
•ToREAD ALLtheinstructionscompletely
beforebeginning.
•ToREAD ALLwarnings,care,andmaintenance
information.
•Topurchasethecorrectwater supply hook-up.
You may need/Usted puede necesitar/
Articles dont vous pouvez avoir besoin:
SILICONE
T
E
F
L
O
N
Icons
SILICONE
T
E
F
L
O
N
Icons
US.Pat. 3,645,493, 3,786,995, 4,523,604, 4,562,960, 4,593,430, 4,218,785, 4,577,653, 4,765,365
T
E
F
L
O
N
3/32"(2.38mm)
Models/Modelos/Modèles
3583&3584
Series/Series/Seria
Para instalación fácil de su llave Delta
usted necesitará:
•LEER TODASlasinstruccionescompletamente
antesdeempezar.
•LEER TODOSlosavisos,cuidados,e
informacióndemantenimiento.
•Comprarlasconexionescorrectasparael
suministro de agua.
Pour installer votre robinet Delta
facilement, vous devez:
•LIRE TOUTESlesinstructionsavantdedébuter;
•LIRE TOUSlesavertissementsainsiquetoutes
lesinstructionsdenettoyageetd’entretien;
•Acheterlebonnécessairederaccordement.
TWO HANDLE WIDESPREAD
LAVATORY FAUCETS
LLAVES DE LAVAMANOS
EXTENDIDAS DE DOS
MANIJAS
ROBINETS À ENTRAXE LONG
À DEUX POIGNÉES POUR
LAVABO
53911 53911 53911 53911 53911
53911 53911 53911 53911 53911
5/13/08 Rev.A
®
ASMEA112.18.1/CSAB125.1

2
53911 Rev.A
CLEANING AND CARE
Careshouldbegiventothecleaningofthisproduct.Althoughitsfinish
isextremelydurable,itcanbedamagedbyharshabrasivesorpolish.
Toclean,simplywipegentlywithadampclothandblotdrywitha
softtowel.
Allparts and finishes of the Delta
®
faucetarewarrantedtotheoriginal consumer purchaser to
be free from defects in material & workmanship for as long as the original consumer pur-
chaserownstheirhome. Delta FaucetCompany recommends using a professionalplumberfor
allinstallation&repair.
Delta
willreplace,FREEOFCHARGE,duringthewarrantyperiod,anypartorfinishthatproves
defectiveinmaterialand/orworkmanshipundernormalinstallation,use& service.Replacement
partsmaybeobtainedbycalling1-800-345-DELTA(intheU.S.andCanada)orbywritingto:
In the United States: In Canada:
Delta
FaucetCompany Delta
FaucetCanada
ProductService TechnicalServiceCentre
55E.111thStreet 420BurbrookPlace
Indianapolis,IN46280 London,ONN6A4L6
This warranty is extensive in that it covers replacement of all defective parts and even finish,
but these are the only two things that are covered. LABOR CHARGES AND/OR DAMAGE
INCURREDININSTALLATION,REPAIR,ORREPLACEMENTASWELLASANYOTHERKIND
OF LOSS OR DAMAGES ARE EXCLUDED. Proof of purchase (original sales receipt) from
theoriginal consumer purchaser mustbemadeavailabletoDeltaforallwarrantyclaims.THIS
IS THE EXCLUSIVE WARRANTY BY DELTA FAUCET COMPANY, WHICH DOES NOT
MAKE ANY OTHER WARRANTY OF ANY KIND, INCLUDING THE IMPLIED WARRANTY
OFMERCHANTABILITY.
This warranty excludes all industrial, commercial & business usage, whose purchasers are
herebyextended a fiveyearlimited warrantyfromthedate of purchase,withallothertermsof
this warranty applying except the duration of the warranty. This warranty is applicable to
Delta
®
faucetsmanufacturedafterJanuary1,1995.
Some states/provinces do not allow the exclusion or limitation of incidental or consequential
damages,sotheabovelimitationorexclusionmaynotapplytoyou.Anydamagetothisfaucetas
aresultofmisuse,abuse,orneglect,oranyuseofotherthangenuineDelta
®
replacementparts
WILLVOIDTHEWARRANTY.
Thiswarrantygivesyouspecificlegalrights,andyoumayalsohaveotherrightswhichvaryfrom
state/provincetostate/province.ItappliesonlyforDelta
®
faucetsinstalledintheUnitedStatesof
America,Canada,andMexico.
LIFETIME FAUCET AND FINISH LIMITED WARRANTY
©2008MascoCorporationofIndiana
©2008MascoCorporacióndeIndiana
LIMPIEZA Y CUIDADO DE SU LLAVE
Tengacuidadoaliralimpiaresteproducto.Aunquesuacabadoes
sumamentedurable,puedeserafectadoporagentesdelimpiezaopara
pulirabrasivos.Paralimpiarsullave,simplementefrótelaconuntrapo
húmedoyluegoséquelaconunatoallasuave.
©2008MascoCorporacióndeIndiana
Todas las piezas y acabados de la llave Delta
®
están garantizados al consumidor comprador
original, de estar libres dedefectosdematerialy fabricación,por el tiempo que el consumidor
comprador original sea dueño de su casa. Delta Faucet Company recomienda que use un
plomeroprofesionalparatodaslasinstalacionesyreparaciones.
Delta reemplazará, LIBRE DE CARGO, durante el período de garantía, cualquier pieza o
acabado que pruebe tener defectos de material y/o fabricación bajo instalación normal, uso y
servicio. Piezas de repuesto pueden ser obtenidas llamando al 1-800-345-DELTA (en los
EstadosUnidosyCanada)oescribiendoa:
En los Estados Unidos: En Canada:
DeltaFaucetCompany DeltaFaucetCanada
ProductService TechnicalServiceCentre
55E.111thStreet 420BurbrookPlace
Indianapolis,IN46280 London,ONN6A4L6
Estagarantíaesextensivaenloquecubreelreemplazamientodetodaslaspiezasdefectuosasy
hastaelacabado,peroéstassonlasúnicasdoscosasqueestáncubiertas.CARGOSDELABOR
Y/O DAÑOS INCURRIDOS EN LA INSTALACIÓN, REPARACIÓN, O REEMPLAZAMIENTO
COMO TAMBIÉN CUALQUIER OTRO TIPO DE PÉRDIDA O DAÑOS ESTÁN EXCLUÍDOS.
Prueba de compra (recibo original de venta) del comprador consumidor original debe de ser
disponible a Deltapara todos los reclamos. ESTA ES LA GARANTÍA EXCLUSIVA DE DELTA
FAUCET COMPANY, QUE NO HACE CUALQUIER OTRA GARANTÍA DE CUALQUIERTIPO,
INCLUYENDOLAGARANTÍAIMPLÍCITADECOMERCIALIZACIÓN.
Estagarantíaexcluyetodousoindustrial,comercial ydenegocio,acuyoscompradoresseles
daunagarantíalimitadaextendidadecincoañosdesdelafechadecompra,contodoslosotros
términosdeestagarantíaaplicados,exceptoeldeduracióndeésta.Estagarantíaesaplicablea
lasllavesdeDelta
®
fabricadasdespuésdeEnero1,1995.
Algunos estados/provincias no permiten la exclusión o limitación de daños incidentales o
consecuentes,demaneraquelalimitaciónoexclusiónarribaescritapuedenoaplicarleausted.
Cualquierdañoa estallave,resultado delmaluso, abuso,odescuido, ocualquierotro usode
piezasderepuestoquenoseangenuinasdeDelta
®
ANULARÁNLAGARANTÍA.
Esta garantía le da derechos legales específicos, y usted puede, también tener otros dere-
chos que varían de estado/provincia a estado/provincia. Es aplicable sólo a las llaves Delta
®
instaladasenlosEstadosUnidosdeAmerica,CanadayMexico.
GARANTÍA LIMITADA DE POR VIDA DE LA LLAVE Y SU ACABADO
¡ADVERTENCIA!
NosepuedeusarScrubbing Bubbles
®
Bathroom Cleaner o Lysol
®
Basin Tub and Tile Cleanerenlasmanijastransparentesredondos
ydepalanca.Elusodeestosproductospuedenresultarenmanijasraja-
dososeveramentedañados.Siestosproductoscaensobrelamanija,
séqueloinmediatamenteconunatoalladealgodónsuave.
TouteslespiècesetlesfinisdurobinetDelta
®
sontprotégéscontrelesdéfectuositésdematériau
etlesvicesdefabricationparunegarantiequiestconsentieaupremieracheteuretquidemeure
validetantquecelui-cidemeurepropriétairedesamaison.Deltarecommandedefaireappelàun
plombiercompétentpourl'installationetlaréparationdurobinet.
Pendant la période de garantie, Delta remplacera GRATUITEMENT toute pièce ou tout fini,
présentant une défectuosité de matériau ou un vice de fabrication pour autant que l'appareil
ait été installé,utilisé et entretenu correctement. Pour obtenir des pièces de rechange, veuillez
communiquer par téléphone au numéro 1-800-345-DELTA (aux États-Unis ou au Canada)
etparécritàl'unedesadressessuivantes:
Aux États-Unis Au Canada
DeltaFaucetCompany DeltaFaucetCanada
ProductService Centredeservicestechniques
55E.111thStreet 420BurbrookPlace
Indianapolis,IN46280 London,OntarioN6A4L6
Laprésentegaranties'appliqueauremplacementdetoutesles piècesdéfectueuses,ycompris
le fini, et elle ne couvre que ces éléments. LES FRAIS DE MAIN-D'OEUVRE ET (OU) LES
DOMMAGES PROVOQUÉS AU COURS DE L'INSTALLATION, DE LA RÉPARATION OU DU
REMPLACEMENT D'UN ÉLÉMENT AINSI QUE LES PERTES OU DOMMAGES DE TOUTE
AUTRENATURENESONTPASCOUVERTSPARLAGARANTIE.Touteréclamationenvertude
laprésentegarantiedoitêtreadresséeàDelta,accompagnéedelapreuved'achat(originaldela
facture)dupremieracheteur.CETTEGARANTIEESTLASEULEOFFERTEPARDELTAFAUCET
COMPANY OU DELTA FAUCET CANADA, SELON LE CAS. ELLE EXCLUT TOUTE AUTRE
GARANTIE,YCOMPRISLAGARANTIEIMPLICITEDEQUALITÉMARCHANDE.
Les robinets installés dans un établissement industriel ou commercial ou dans une place
d'affaires sont protégés par une grantie étandue de cinq ans qui prend effet à compter de la
dated'achat.Touteslesautresconditionsdelagarantiedecinqanssontidentiquesàcelledela
présente garantie. La présentegaranties'applique à tous les robinetsDelta
®
fabriqués après le
1erjanvier1995.
DanslesÉtatsoulesprovincesoùilestinterditd'exclureoudelimiterlesresponsabilitésàl'égard
desdommagesindirectsoufortuits,lesexclusionsetleslimitessusmentionnéesnes'appliquent
pas.Lesdommagesrésultantd'unemauvaiseutilisation,d'uneutilisationabusivedelanégligence
ou de l'utilisation de pièces autres que des pièces d'origine Delta
®
RENDENT LA GARANTIE
NULLEETSANSEFFET.
Laprésentegarantievousdonnedesdroitsprécisquipeuventvarierselonvotrelieuderésidence.
Ellenes'appliquequ'auxrobinetsDelta
®
installésauxÉtats-Unis,auCanadaetauMexique.
GARANTIE À VIE LIMITÉE DES ROBINETS ET DE LEURS FINIS
INSTRUCTIONS DE NETTOYAGE
Ilfautlenettoyeravecsoin.Mêmesisonfiniestextrêmementdurable,il
peutêtreabîmépardesproduitsfortementabrasifsoudesproduitsde
polissage.Ilfautsimplementlefrotterdoucementavecunchiffonhumide
etlesécheràl'aided'unchiffondoux.
AVERTISSEMENT:
N’employez pas le nettoyant pour salle de bain Scrubbing Bubbles
®
ni
le Nettoyant de Lavabos, de Baignoires et de Carreaux Lysol
®
surles
manettesetlespoignéessphériquestransparentes.Cesproduitspeuvent
fairefissurerlespoignéesetlesmanettesoulesabîmergravement.Sices
poigneésoucesmanettessontaspergéesaccidentellementparl'unou
l'autredesproduitsmentionnés,lesessuyerimmédiatementàl'aided'un
chiffondecotondoux.
WARNING:
Scrubbing Bubbles
®
Bathroom Cleaner and Lysol
®
Basin Tub and Tile
Cleaner mustnotbeusedontheclearknobhandlesandlevers.Useofthese
cleanerscanresultincrackedorseverelydamagedhandles.Ifoverspraygets
ontothehandles,immediatelywipethemdrywitha soft cotton cloth.
3
53911 Rev.A
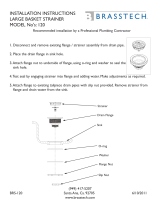
Drain(Exploded)
RP26533▲
Metal Pop-Up Assembly Less Lift Rod
Ensamble del Desagüe Automático de Metal Sin Barra de Alzar
Renvoi Mécanique en Métal Sans la Tirette.
RP5648▲
Stopper
Tapón
Bonde
RP6140
Nut&Washer
TuercayArandela/
Roldana
ÉcrouetRondelle
RP23060▲
Flange
Reborde
Collerette
RP6142
Gasket
Empaque
Joint
RP6128
Tailpiece
TubodeCola
RaccorddeVidangeDroit
RP12516
Strap&Screw
BarraChatayTornillo
FeuillardetVis
RP6132
Nut
Tuerca
Écrou
RP12517
HorizontalRod&Clip
BarraHorizontalyGancho
TigeHorizontaleetAgrafe
RP6130
PivotSeat&Gasket
AsientodePivoteyEmpaque
JointetSiègeduPivot
▲SpecifyFinish/EspecifíqueelAcabado/PrécisezleFini
RP23062
GridFlange
Pestaña/Reborde
BridedeCrépine
RP6142
Gasket
Empaque
Joint
RP6140
Nut&Washer
TuercayArandela/Roldana
ÉcrouetRondelle
RP6128
Tailpiece
TubodeCola
RaccorddeVidangeDroit
RP6346
Complete Grid Strainer Assembly
Ensamble Completo del Colador con Rejilla
Crépine Complète
RP34352
Hose
Manguera
Flexible
3583, 3584
Series/Series/Seria
RP21688▲
SpoutAssembly
EnsambledelTubodeSalida
Bec
RP19754▲
Aerator
Aireador
Aérateur
RP18882▲
BasewithGasket
BaseconEmpaque
EmbaseavecJoint
RP6052
Gasket/Empaque/Joint
RP6087
Nut&Washer
TuercayArandela
ÉcrouetRondelle
RP11729
Gasket&O-Ring
EmpaqueyAnillo"O"
JointetJointTorique
RP12038
Nut/Tuerca/Écrou
RP37062
MountingHardware
PiezasparalaMontura
Accessoiresde
Montage
RP6060, RP6060SB
BonnetNuts
Bonetes/Capuchones
ChapeauxFiletés
RP1740
StemUnitAssembly
EnsambledelaUnidad
delVástago
Obturateurs
RP4993
Seats&Springs
AsientosyResortes
SiègesetRessorts
RP10965▲
Basew/Gasket
BaseconEmpaque
EmbaseavecJoint
RP38367▲
EndValveAssembly-WF
EnsambledelaVálvulaFinal
EmbaseavecJointSoupape
RP19525▲
LiftRod
BarradeAlzar
TigedeManoeuvre
RP9519
Nuts&Washers
TuercasyArandelas
ÉcrousetRondelles
RP5861
CouplingNuts
TuercasdeAcoplamiento
ÉcroudeRaccordement
RP24097
1/4TurnStop
Topeaun1/4deGiración
Butée1/4deTour
RP24096
StemUnitAssembly–
BrassStem–SSPlate
EnsambledelaUnidaddel
Vástago–VástagoBronce–
PlacadeAceroInoxidable
Obturateurs–Obturateur
Laiton–PlaqueenAcier
Inoxydable
RP38294
CouplingTee
Acoplamientode"T"
RaccordenT
RP13938
O-Ring
Anillo“O”
JointTorique
RP13938
O-Ring
Anillo“O”
JointTorique
4
53911 Rev.A
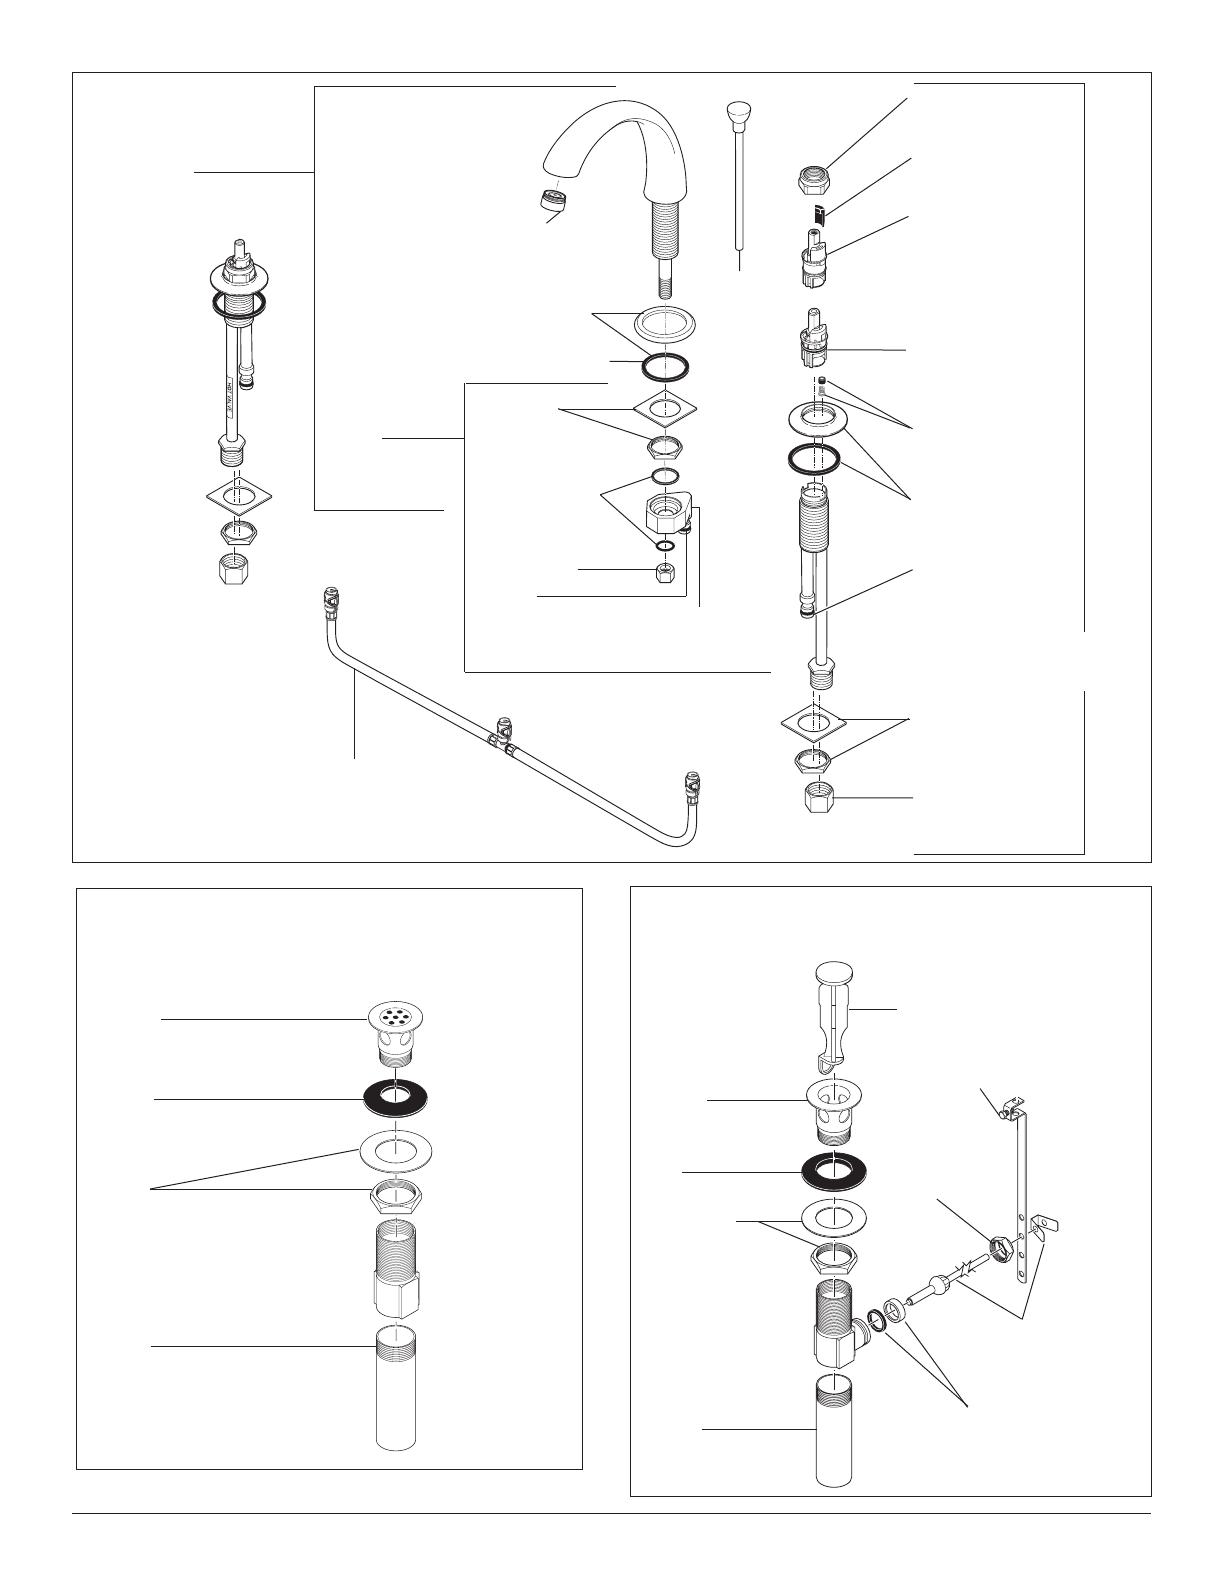
Contactyourdistributorforhandleandaccent
options/finishes.
Comuníqueseconsudistribuidorparaobtener
opcioneseneltipodemanijaydetalles(acentos)/
acabados.
Pourobtenirdesrenseignementssurlespoi-
gnées,lesgarnituresetlesfinislivrables,veuillez
communiqueravecvotredistributeur.
H23
H48
H26
H212
H24 A24
A23
H41
H27
H25
A22H22
H48
Brass1/4Turn(Knob)
3750014
Maintenance
If faucet leaks from spout outlet–Shutoffwatersupplies–
ReplaceSeatsandSprings(1).*
If leak persists–Shutoffwatersupplies–
ReplaceStemUnitAssembly(2).*
*Installstems(2)and1/4turnstops(3)correctlyforproperhandle
rotation.Note:Notallmodelsrequire1/4turnstop.
Brass1/4Turn(Lever)
3750014
1
2
3
1
2
3
Entretien
Si le robinet fuit par la sortie du bec–coupezl’eau–puisremplacezles
siègesetlesressorts(1).*
Si le robinet fuit encore–coupezl’eau–puisremplacezl’obturateur(2).*
Mantenimiento
Si la llave tiene filtraciones del pico del tubo de salida–
Cierrelossuministrosdeagua–ReemplacelosAsientosyResortes(1).*
Si la filtración persiste–
Cierrelossuministrosdeagua–Reemplaceelensambledela
UnidaddelaEspiga(2).*
*Instalelasespigas(2)ylospares(topes)aun1/4degiracíon(3)
correctamenteparaobtenerunarotacióndebida.Nota: Notodoslos
modelosrequierenunmecanismodeparadaaun1/4degiracíon.
*Installercorrectementlesobturateurs(2)etlesbutées1/4detour(3)
pourquelesmanettestournentdanslebonsens.Note : Labutée1/4
detourn'estpasrequisesurtouslesmodèles.

5
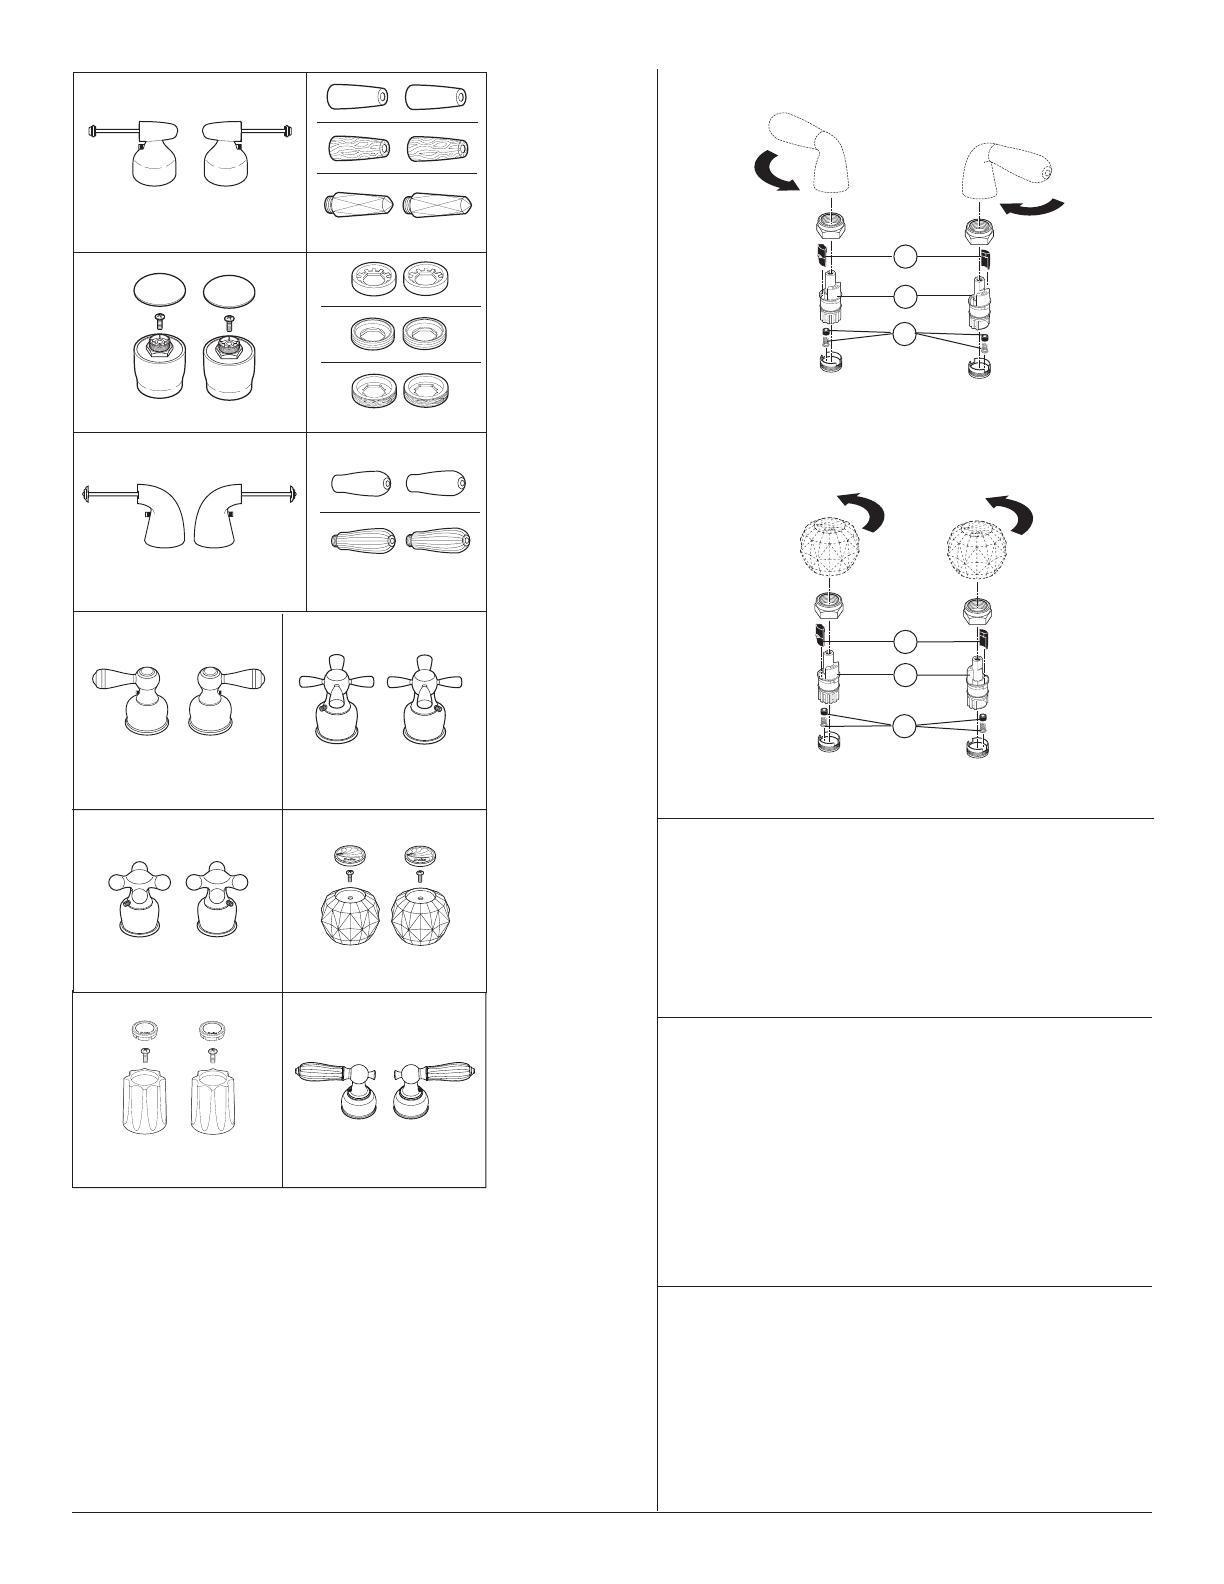
A.
Properlyalignbase(1)onendvalves.Slidehot(2)andcold(3)end
valveswithgaskets(4)throughsink.NOTE:Hotsideendvalveis
labeled(5).
B.
Passwasher(1)thennut(2)overcoppertube(3).
53911 Rev.A
1
C.
Secureendvalvewithnut,washerandwrench.RepeatstepsB
andCforremainingendvalve.NOTE: Coppertubes(1)install
awayfromspout.
D.
Noteproperendvalveinstallation.
A.
Positionnezl’embase(1)correctementsurlessoupapes.Introduisezles
soupapesd’eauchaude(2)etd’eaufroide(3)avecleurjointrespectif
danslelavabo.NOTE-Lasoupaped’eauchaudeestidentifiéeparune
étiquette(5).
B.
Passezlarondelle(1),puisl’écrou(2)surletubeencuivre(3).
A.
1
2
3
4
1
2
3
5
C.
Fixezlasoupapeàl’aidedel’écrouetdelarondelle.Répétezles
étapesBetCpourl’autresoupape.NOTE-Lestubesencuivre
doiventêtreéloignésdubec.
D.
Soupapebieninstallée
A.
Alinielabasecorrectamente(1)enlaválvulasfinales.Deslicelas
válvulasfinales,caliente(2)yfría(3),conlosempaques(4)através
dellavamanos.NOTA:Lapartecalientedelaválvulafinalestá
etiquetada(5).
B.
Paselaarandela(1)yluegolatuerca(2)sobreeltubodecobre(3).
C.
Asegurelaválvulafinalconlatuercaylaarandela.Repitalospasos
ByCenlaválvulafinalquequeda.NOTA:Lostubosdecobrese
instalanconcaradefrentealladoopuestodeltubodesalida.
D.
¡Observelainstalacióncorrectadelaválvulafinal!
B.
C.
D.
1
6
53911 Rev.A
2
E.
Installthespout(1),base(2)andgasket(3).Securewithwasher(4)and
nut(5).Assemblegasket(6),tee(7),O-ring(8)andsecurewithnut(9).
Notes:CouplingTeetofacetheback.Ifsinkisuneven,usesilicone
underthegasket(3).
F.
SnaptheQuickConnecthoseassembly(1)ontotheteenipple(2)and
endvalvenipples(3).Pulldownmoderatelytoensureeachconnection
hasbeenmade.WARNING:DO NOT REMOVE the clips from the
hose assembly.
3
2
1
1 2
Make Connections to water lines:
Choosehook-upsfor1/2"I.P.S.connections:
(1)Ballnoseriser(3/8"O.D.coppertubing),or
(2)1/2"I.P.S.faucetconnector
Usetheenclosedcouplingnuts(3)withtheballnoserisers(1).
Usetwowrencheswhentightening.Donotovertighten.
Completestep3or4forpop-uporgridstrainerinstallation.
3
1/2”(12.7mm)IPS
E.
Installezlebec(1),l'embase(2)etlejoint(3).Fixezensuitelebecàl’aide
delarondelle(4)etdel’écrou(5).Assemblezlejoint(6),leraccordenT(7)
etlejointtorique(8),puisfixezcesélémentsenplaceàl’aidedel’écrou(9).
Note-Silasurfacedulavaboestinégale,appliquezducomposé
d’étanchéitéàlasiliconesouslejoint.
F.
Branchezlestuyauxàraccordementrapide(1)surlemamelondu
raccordenT(2)etlesmamelonsdesoupapeenexerçantunepression
(3).Tirezmodérémentsurlesraccordspourvousassurerqu’ilssont
biensolides.AVERTISSEMENT: NE RETIREZ PAS les brides
des tuyaux.
Raccordez les tuyaux d’eau chaude et d’eau froide.
Choisissezdesraccordscompatibles1/2poIPS:
1) tubes-raccordsàportéesphérique(tubeencuivre3/8pod.e.)
ou
2) raccordsderobinet1/2poIPS.
Sivousutilisezdestubes-raccordsàportéesphérique(1),servez-vous
desécrousderaccordementfournis(3).Utilisezdeuxcléspourserrer
lesraccords.Prenezgardedetropserrer.
Installezlacrépineoulerenvoimécaniqueconformémentaux
instructionsdesétapes3et4.
E.
Instaleeltubodesalida(1),base(2)yelempaque(3).Asegúreloconla
arandela(4)ytuerca(5).Ensambleelempaque(6),laT(7),elanilloO
(8)yfijeconlatuerca(9).Nota:Siellavamanosestádesnivelado,utilice
silicóndebajodelempaque.
F.
Coloqueapresiónlamangueradeconexiónrápida(1)enlaentrerrosca
delaTdeacoplamiento(2)ylasentrerroscasdelaválvulaextrema(3).
¡Halehaciaabajomoderadamenteparaasegurarquecadaconexiónse
hahecho!AVISO: NO QUITE los clips o ganchos del ensamble de
la manguera.
Haga las conexiones a las líneas de agua:
EscojalasconexionsIPSde1/2":
(1) ConexiónBola-nariz(Tuberíadecobrede3/8"D.E.),o
(2) ConectordellaveI.P.S.1/2"
Utilicelastuercasdeacoplamientoincluidas(3)conlaconexión
bola-nariz(1).Utilicedosllavesdetuercascuandoapriete.
Noaprietedemasiado.
Completeelpaso3ó4paraelcoladorderejillaolainstalacióndel
desagüeautomático.
F.
1
2
3
5
6
7
8
9
4
E.
3
Renvoi mécanique en métal
Desagüe automático de metal
Metal Pop-Up
7
53911 Rev.A
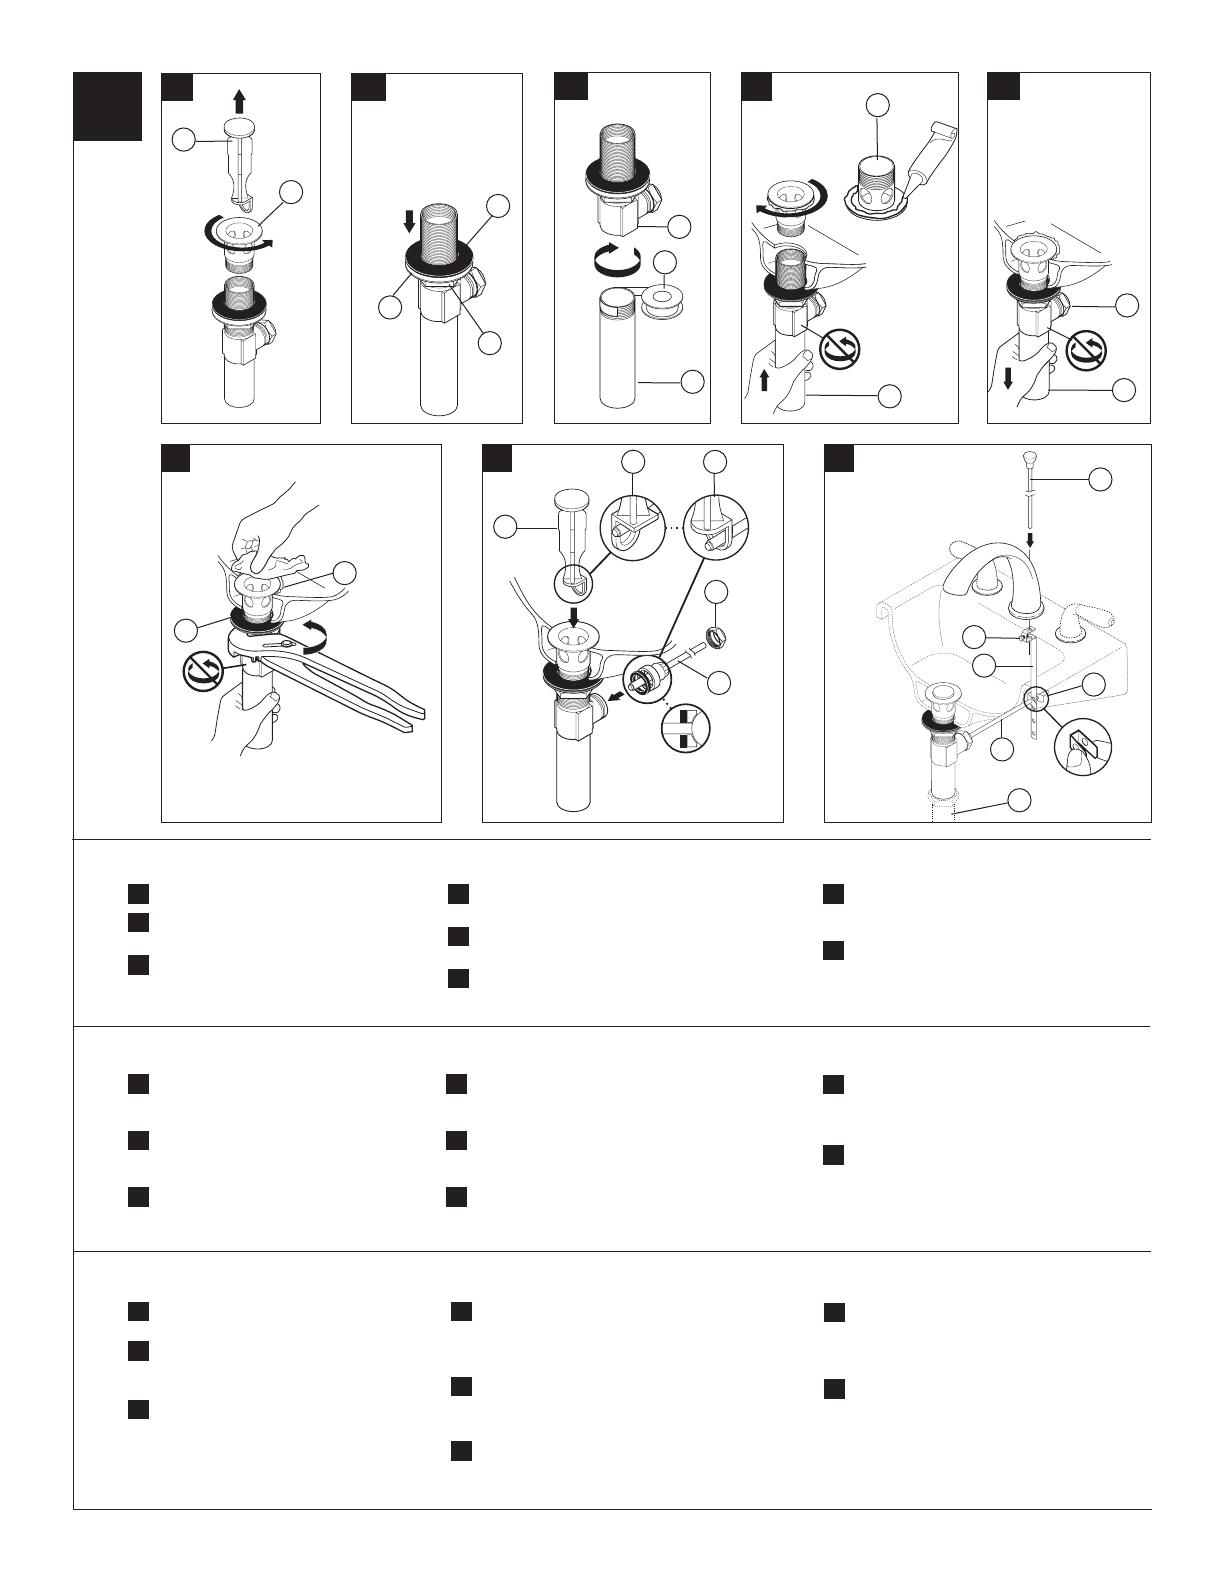
A.
Removestopper(1)andflange(2).
B.
Screwnut(1)allthewaydown.
Pushwasher(2)andgasket(3)down.
C.
Removetailpiece(1)frombody(2),add
Teflon
®
tape(3),replacetailpiece.
3
D.
Applysiliconetoundersideofflange(1).Insert
body(2)intosink.Screwflange(1)intobody(2).
E.
Pivot(1)mustfacefaucet.Pullassembly(2)down
firmlyandholdinplace.DONOTTWIST.
F.
Tightennut/washer/gasket(1),cleanoffexcess
silicone(2).DONOTTWIST.
Step3a
Step3b
Step3e
Step3c
Step3d
SILICONE
A.
B.
C.
D.
E.
Step3f
F.
G.
Removepivotnut(1).Installhorizontalrod
(2)andstopper(3)asremovable(4)ornon-
removable(5).Handtightenpivotnut(1).
H.
Attachhorizontalrod(1)tostrap(2)using
clip(3).Installliftrod(4),tightenscrew(5).
Connectassemblytodrain(6).
A.
Quiteeltapón(1)yelreborde(2).
B.
Atornillelatuerca(1)completamentehasta
abajo.Empujelaarandela/roldana(2)yel
empaque(3)haciaabajo.
C.
Quiteeltubodecola(1)delcuerpo(2),
apliquecintaTeflon
®
(3),coloqueotravez
eltubodecola.
D.
Apliquesilicónalaparteinteriordelreborde(1).
Inserteelcuerpo(2)enellavamanos.Atornilleel
reborde(1)enelcuerpo(2).
E.
Elpivote(1)debedeestardefrentealallave.Hale
elensamble(2)haciaabajofirmementeysujételo
ensitio.NOLOGIRE.
F.
Aprietelatuerca/arandela/empaque(1),limpieel
excesodesilicón(2).NOLOGIRE.
G.
Quitelatuercadelpivote(1).Instalela
barrahorizontal(2)yeltapón(3)comodes-
montable(4)ofijo(5).Aprieteamano
latuercadelpivote(1).
H.
Unalabarrahorizontal(1)alabarrachata
(2)utilizandoelgancho(3).Instalelabarra
dealzar(4),aprieteeltornillo(5).Conecte
elensamblealdesagüe(6).
A.
Enlevezlabonde(1)etlacollerette(2).
B.
Serrezl’écrou(1)pourlefairedescen
complètement.Poussezlarondelle(2)etle
joint(3)verslebas.
C.
Enlevezleraccorddroitdevidange(1)du
corps(2),appliquezdurubandeTeflon
®
(3),
puisremettezleraccorddroitenplace.
D.
Appliquezducomposéàlasiliconesousla
collerette(1).Introduisezlecorps(2)dans
llavabo,puisvissezlacollerette(1)dansle
corps(2).
E.
Lepivot(1)doitfairefaceaurobinet.Tirez
l’ensemble(2)verslebasfermementet
maintenez-leenplace.PRENEZGARDEDE
LETORDRE.
F.
Serrezl’écroucontrelarondelleetlejoint(1),
puisenlevezlesurplusdecomposéàlasilicone
(2).PRENEZGARDEDETORDRELEPIVOT.
G.
Enlevezl’écroudupivot(1).Installezlatige
horizontale(2)etlabonde(3)demanièrequela
bondesoitamovible(4)ounonamovible(5).
Serrezl’écrou(1)dupivotàlamain.
H.
Fixezlatigehorizontale(1)aufeuillard(2)
àl’aidedel’agrafe(3).Installezlatigede
manoeuvre(4)etserrezlavis(5).Fixez
l’ensembleaurenvoi(6).
1
2
1
2
3
1
2
1
2
1
2
H.
1
5
3
4
2
1
2
3
6
Step3g
1
3
4
5
2
G.
Quiteelaireador(1)ygirelasmanijasdelallave(2)completamentea
laposiciónabierta.Abralossuministrosdeaguacalienteyfría(3)ydeje
queelaguacorraporlaslíneasporunminuto.Importante:Esto limpia
cualquier escombro que pudiera causar daño a las partes internas.
Reinstaleelaireador.
Examinetodaslasconexionesdondeseñalanlasflechasporsihay
filtracionesdeagua.Aprietedenuevosiesnecesario,perono
aprietedemasiado.
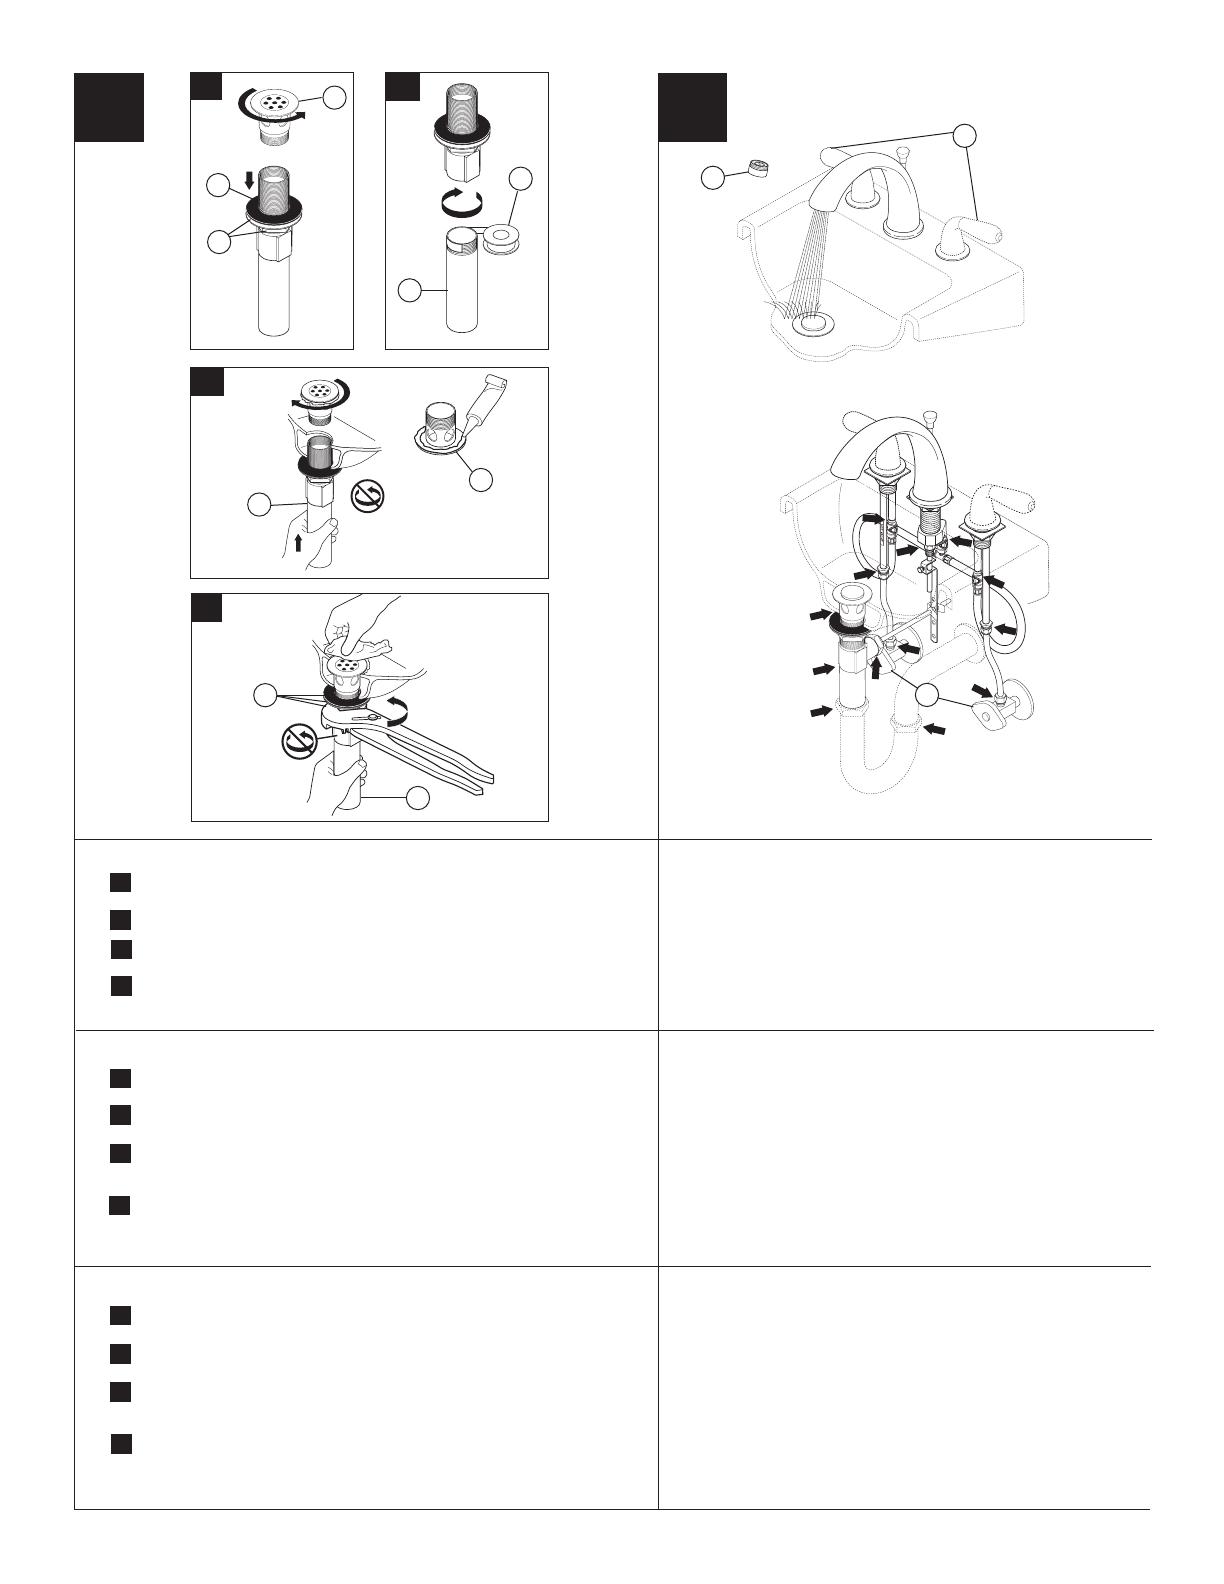
Removeaerator(1)andturnfaucethandles(2)allthewayon.Turnon
hotandcoldwatersupplies(3)andflushwaterlinesforoneminute.
Important:This flushes away any debris that could cause damage
to internal parts.Reinstallaerator.
Checkallconnectionsatarrowsforleaks.Re-tightenifnecessary,but
donotovertighten.
Retirezl’aérateur(1)ettournezlespoignées(2)durobinetpourouvrir
celui-cicomplètement.Rétablissezl’alimentationeneauchaudeeten
eaufroide(3),puislaissezs’écoulerl’eauuneminute.Important:Il
faut laisser s’écouler l’eau pour évacuer les saletés qui pourraient
abîmer les éléments internes du robinet. Réinstallezl’aérateur.
Vérifiezl’étanchéitédetouslesraccordsidentifiésparuneflèche.
Resserrezlesraccordsaubesoin,maisprenezgardedetroplesserrer.
1
3
2
8
53911 Rev.A
5
4
A.
Step3c
B.
SILICONE
C.
D.
Instalación del colador de rejilla
Quiteelrebordedelarejilla(1).Atornillelatuercaylaarandela(2)lomás
posible.Empujeelempaque(3)hacialatuercaylaarandela.
Quitelapiezadecola(1)yapliquélacintaTeflon
®
(2)alasroscas.Coloquela
piezadecolaotravez.
Apliqueelselladordesilicónalaparteinteriordelrebordedelarejilla
(1).Introduzcalapiezadelcolador(2)haciaarriba,atravésdelfondodel
lavamanos.Atornilleelrebordedelarejillayasegúrela.
Haleelrebordedelarejilla(1)haciaabajodentrodelagujerodeldesagüey
fijeelempaque,latuercaylaarandela(2).No gire el reborde de la rejilla
mientras aprieta la tuerca, o el sellador pueda no sellar eldesagüe. Limpie
el exceso de sellador.
A.
B.
C.
D.
Grid Strainer Installation
Removegridflange(1).Screwnutandwasher(2) downasfaraspossible.
Pushgasket(3)downtonutandwasher.
Removetailpiece(1)andapplyTeflon
®
tape(2)tothreads.Replacetailpiece.
Applysiliconesealanttoundersideofgridflange(1).Insertgridstrainerassembly
(2)upthroughbottomoflavatory.Screwgridflangebackonandsecure.
Pullgridstrainer(1)straightdownintodrainholeandsecuregasket,washer
andnut(2).
Do not turn grid strainer while tightening nut or sealant may not
seal drain. Remove excess sealant.
A.
B.
C.
D.
Installation de la crépine
Enlevezlacollerette(1)delacrépine.Serrezl’écrouetlarondelle(2)autantque
possible.Abaissezlejoint(3)contrel’écrouetlarondelle.
Enlevezleraccorddroitdevidange(1)etappliquezdurubandeTéflon
®
(2)
surlesfilets.Remettezleraccorddroitdevidangeenplace.
Appliquezducomposéd’étanchéitéàlasiliconecontreledessousdela
collerette(1)delacrépine.Introduisezlacrépinecomplète(2)parledessous
dulavabo.Remettezlacollerettedelacrépineenplaceetserrez-la.
Tirezlacrépine(1)directementdansletrouderenvoietimmobilisez-laà
l’aidedujoint,delarondelleetdel’écrou(2).Évitez de faire tourner la
crépine en serrant pour ne pas compromettre l’étanchéité. Enlevez le
surplus de composé d’étanchéité.
A.
B.
C.
D.
1
2
3
2
1
1
2
1
2
/