Page is loading ...

USB Instant DVD for MAC
www.adstech.com
Technical Support: 562.926.4338
Technical Support Hours: 8am-5pm M-F PST
User's Guide : Second Edition
USB Instant DVD for MAC

USB Instant DVD for Mac 2
USB Instant DVD for Mac 3

Table of Contents
Copyright Notice
The USB Instant DVD For Mac is an innovative, hassle-free device that is designed to let you edit and archive
your home movies easily. ADS Technologies respects the rights of copyright owners and asks that you do the
same. The Copy Right Act gives owners of copyrights the exclusive right to reproduce and prepare derivative
works as well as to publicly perform, display and distribute their works. This means that you must obtain
permission to engage in any of these activities when using works that are copyrighted by another person.
© 2003 ADS Technologies. All Rights Reserved
Revision 1 January 2003
Apple and Macintosh are registered trademarks of Apple Computer, Inc.
ADS is a registered trademark of ADS Technologies Inc. ADS Technologies (ADS) makes no warranty of any kind with regard to this material,
including but not limited to, the implied warranties of merchantability and tness for a particular purpose. The information furnished within this
written document is for information purposes only and is subject to change without notice. ADS Technologies assumes no responsibility or
liability for any errors or inaccuracies that may appear herein. ADS makes no commitment to update or to keep current information contained
within this document. (rtt)
Instant DVD for Mac Overview . . . . . . . . . . . . . . . . . . . . . . . . . . . . . . . . . . . . . . . . . . . 4
System Requirements and Contents . . . . . . . . . . . . . . . . . . . . . . . . . . . . . . . . . . . . . . 8
Hardware Installation Guide . . . . . . . . . . . . . . . . . . . . . . . . . . . . . . . . . . . . . . . . . . . . . 9
PixeDV: Overview . . . . . . . . . . . . . . . . . . . . . . . . . . . . . . . . . . . . . . . . . . . . . . . . . . . . 12
• Launching PixeDV . . . . . . . . . . . . . . . . . . . . . . . . . . . . . . . . . . . . . . . . . . . . 14
• Capturing Video . . . . . . . . . . . . . . . . . . . . . . . . . . . . . . . . . . . . . . . . . . . . . .16
• Exporting Video . . . . . . . . . . . . . . . . . . . . . . . . . . . . . . . . . . . . . . . . . . . . . . 20
• Importing Video . . . . . . . . . . . . . . . . . . . . . . . . . . . . . . . . . . . . . . . . . . . . . . 21
• Using the Album . . . . . . . . . . . . . . . . . . . . . . . . . . . . . . . . . . . . . . . . . . . . . .22
• Trimming Videos with MPEG Cutter . . . . . . . . . . . . . . . . . . . . . . . . . . . . . . 25
• Exporting Files for use in DVD Studio Pro . . . . . . . . . . . . . . . . . . . . . . . . . .29
Frequently Used Terms . . . . . . . . . . . . . . . . . . . . . . . . . . . . . . . . . . . . . . . . . . . . . . . .32
Capty DVD/VCD: Launch Capty DVD/VCD . . . . . . . . . . . . . . . . . . . . . . . . . . . . . . . . 33
• Creating a Title Menu . . . . . . . . . . . . . . . . . . . . . . . . . . . . . . . . . . . . . . . . . 35
• Setting Markers . . . . . . . . . . . . . . . . . . . . . . . . . . . . . . . . . . . . . . . . . . . . . . 40
• Creating Chapter Menus . . . . . . . . . . . . . . . . . . . . . . . . . . . . . . . . . . . . . . . 41
• Authoring Formation & Disc Playback: DVD Video / Video CD . . . . . . . . . .43
• Editing a Slideshow . . . . . . . . . . . . . . . . . . . . . . . . . . . . . . . . . . . . . . . . . . .49
• Preview to Conrm Writing . . . . . . . . . . . . . . . . . . . . . . . . . . . . . . . . . . . . . 51
• Creating a DVD Video . . . . . . . . . . . . . . . . . . . . . . . . . . . . . . . . . . . . . . . . .53
Button Builder . . . . . . . . . . . . . . . . . . . . . . . . . . . . . . . . . . . . . . . . . . . . . . . . . . . . . . .54
• Creating Buttons . . . . . . . . . . . . . . . . . . . . . . . . . . . . . . . . . . . . . . . . . . . . . 55
• Thumbnail Display frame setting . . . . . . . . . . . . . . . . . . . . . . . . . . . . . . . . . 57
• Special Effects . . . . . . . . . . . . . . . . . . . . . . . . . . . . . . . . . . . . . . . . . . . . . . .57
Glossary . . . . . . . . . . . . . . . . . . . . . . . . . . . . . . . . . . . . . . . . . . . . . . . . . . . . . . . . . . . 58
Service & Warranty . . . . . . . . . . . . . . . . . . . . . . . . . . . . . . . . . . . . . . . . . . . . . . . . . . .60
USB Instant DVD for Mac 2
USB Instant DVD for Mac 3

Instant DVD for MAC is a fun and easy way to
get DVD and VCD video into your Macintosh
so you can archive your home movies. Instant
DVD then lets you publish the video to CD or
DVD disk or publish to the Internet or send
the video back to a VCR or camcorder for
distribution on Tape.
All the video compression takes place in the
Instant DVD device so when the video comes
through the USB port it is already compressed
in the format you desire such as MPEG-1 for VCD (Video on CD) or MPEG-2 for DVD
(Digital Versatile Disc).
USB Instant DVD includes several exible and dynamic software tools for your video
projects:
Instant DVD for Mac Overview
USB Instant DVD for Mac 4
USB Instant DVD for Mac 5

PixeDV: Capture, Import, Export, Organize Video
PixeDV for Mac is the main application you will be using to Capture video, Organize the video
you captured and even Import video from other sources
PixeDV for Mac, despite its name, DOES NOT CAPTURE DV. It only captures MPEG1 and
MPEG2 les. MPEG les are necessary for the creation of DVD or VCD movies.
Once you install the software and connect the hardware, you will be able to Preview the video
live from any analog source and capture the video into the right bit rates for making a DVD or
VCD Movie.
USB Instant DVD can capture video up to 6 Mbits (6 Megabits per second). Most DVD movies
that you rent or buy today are only encoded at 4 Mbits (4 Megabits per second). The higher the
capture bit rate, the better the quality but you will also take up more hard drive space.
Commercial Blank recordable DVD disks have a capacity of 4.7 GB.
When capturing MPEG-2 video at 4 Megbits of data per second (Mb/sec.) you will use up
approximately 2 GB of hard disk space per hour. This means you can record and burn about 2
hours of MPEG-2 video onto a single DVD disk.
This is very important to know since 3 hours (180 minutes) of video that you capture at 4 Mb/sec.
would result in a le size on your hard drive of:
5400 MB (MegaBytes) or about 5.4 GB (GigaBytes) !!!
This is more than you can record on a 4.7 GB disk!
Audio is one more thing to consider when capturing Mpeg video. The two most common audio
formats for DVD video are MPEG 1 Layer 2 and PCM.
PCM is essentially uncompressed audio recorded at 1.5 Mb/sec. This data rate is added to the
video bit rate to arrive at the total video le size. The PixeDV for Mac software only captures
audio in MPEG-1 Layer 2 format. MPEG 1 Layer 2 is a compressed format and is the cousin of
the more famous MP3 audio format. MPEG-1 Layer 2 is generally captured at
224 Kbit/sec. – 384 Kbit/sec. This data rate is added to the total video le size, but you can see
that it is much smaller than PCM.
Most late model home DVD players in the North America can playback MPEG-1 Layer 2 audio.
The general rule is that if the DVD player supports VCD playback, it will support DVD’s with
MPEG-1 Layer 2 audio format. All European (PAL) DVD players support MPEG-1 Layer 2 audio.
So if your goal is to capture 2 hours of video to burn on a single sided 4.7 GB DVD disk, we
recommend you set your capture rate at 4 Mb/sec.
USB Instant DVD for Mac 4
USB Instant DVD for Mac 5

MPEG2 offers the best quality in relation to le size for capturing video.
DV or otherwise know as DIGITAL VIDEO will need 4 GB for every 20 minutes of video. DV is
good for some applications, when you want to capture in DV, Edit in DV and OUTPUT back to
DV. (Back to camcorder). This is why you need rewire for DV. The data being sent back and
forth from a DV camcorder is huge. 25 Megabits per second, thats 3.6 Megabytes per second.
With the USB Instant DVD for Mac, video can be captured at relatively low bit rates but VERY
GOOD quality. For connecting to your Mac, USB 1.1 as an interface is sufcient since USB
offers up to 12 Megabits of throughput per second. Plenty of bandwidth to capture video with
DVD quality.
If you plan to make DVD or VCD movies, USB Instant DVD for Mac is the perfect solution. It
captures in MPEG2, which means you are one step closer to making a DVD disk. Just run
CaptyDVD and author/publish the captured video to DVD.
Other DVD authoring/publishing solutions like Apple’s IDVD software actually capture the video
in DV. It then transcodes, in laymens terms, saves the le as an MPEG2 le. This is a two step
process. Although the transcoding process via software is done very well, it is no comparison
to capturing your video source REAL TIME into an MPEG2 File.
PixeDV: Capture, Import, Export, Organize Video
USB Instant DVD for Mac 6
USB Instant DVD for Mac 7

CaptyDVD: Author and Publish to DVD
CaptyDVD Starts where you left off with PixeDV. It takes the MPEG2 movies that you
have captured and publishes the MPEG2 les into a DVD Movie.
This process of “making” a DVD movie is known as “AUTHORING”.
Authoring with CaptyDVD provides the easiest, professional level package available in
the market today.
With fully customizable chapter menu’s, backgounds and even a built-in button maker,
CaptyDVD provides the best value compared to IDVD and DVD Studio Pro from Apple.
CaptyDVD has a built-in DVD Burning Engine that allows you to burn your DVD Project
into blank DVD disks by using Apple’s Superdrive or any external rewire DVD Burner.
Currently, every external Firewire DVD Burner that you can buy uses either a Panasonic
or Pioneer drive. You can also take an internal IDE DVD Burner from either Panasonic or
Pioneer and mount them inside an external 1394 enclosure.
You can purchase the PYRO Drive Kit which ADS Technologies also manufactures. This
is an external rewire enclosure that accepts any IDE device (hard drive, cd rom, dvd
rom, dvdr) and convert the devices to rewire.
For more information about the PYRO Drive Kit, please check our website:
www.adstech.com
VCD Authoring
For VCD movies, CaptyDVD can make a VCD volume. Which means you can Author a
VCD Disk but NOT actually burn it. You can simply make and save the VCD volume to
your drive. You can then drag that volume into Roxio’s latest TOAST software for burning
VCD’s on the Mac.
This was intentionally done since Roxio offers better compatibility than any other CDRW
burning software in the market today.
USB Instant DVD for Mac 6
USB Instant DVD for Mac 7

System Requirements & Contents
To Capture MPEG-1 at 30 frames per second:
Any Macintosh with built-in USB
To Capture MPEG-2 at 30 frames per second:
Power Mac G4 4000/AGP or greater
Power Mac G4 Cube
Power Book G4 400 or greater
- Mac OS X
- 256 MB of RAM
- CD-ROM
- 100 MB hard disk space for capture/editting applications
- 3 GB minimum hard disk space recommended for capturing and editing video
- Available USB Port
Additional Requirements for Publihsing VCD ir DVD Disk:
- CD-RW drive required to write/burn VCD or SVCD disk
- DVD-R/RW drive required to write/burn DVD disks
- VCD burning requires Toast Platinum
System Requirements:
USB Instant DVD For Mac Includes:
- USB Instant DVD For Mac device
- 6' USB cable
- SVIDEO cable
- Audio/Video connection cables
- CD with Bundled Software: PixeDV Video Capture, CaptyDVD Authoring
- User's Manual
USB Instant DVD for Mac 8
USB Instant DVD for Mac 9

Hardware installation Guide
Getting Started
The basic steps are:
1. Check USB Instant DVD package contents
2. Wire it up! - Audio and Video connectors
3. Install Application software
4. Plug it in! - Power and USB connection
5. Verify Hardware Installation
6. Start Making DVD Movies
Check USB Instant DVD Contents
Hardware:
(a) USB Instant DVD device
(b) 5 VDC Power supply
(c) 6 ft. USB Cable
(d) 6 ft. A/V In Cable (RCA video and audio to RCA video and 3.5 mm stereo)
(e) 9 ft. Audio out to TV/VCR cable (3.5 mm stereo w/female 3.5mm Y to R+L RCA audio)
(f) 9 ft. RCA Video cable
(g) 6 ft. SVHS Cable
USB Instant DVD for Mac 8
USB Instant DVD for Mac 9

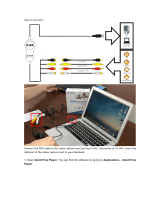
Wire it up!
In this section we will connect all audio and video cables
that you will use to capture audio and video and then
send audio and video back to a tTV or VCR for viewing
or recording.
1. Connect your video source (VHS, DVD, Laser Disc
Player, TV. etc.) to your USB Instant DVD.
2. Connect your 6 ft. A/V in cable to the 3 RCA jacks to
your analog audio/video source RCA line out.
The other end connects to the “RCA Video In” jack and
“Audio In” jack on the back of your USB Instant DVD.
This step is optional, if you dont plan to send video
back to tv or vcr, skip to software installation.
Connect your USB Instant DVD to your TV or VCR. This
will send captured or edited video back to your TV or
VCR for viewing or recording.
Connect RCA cable to “Video Out” on Instant DVD
Connect other end to Video IN on your TV or VCR.
Connect the Audio Out of your PC to the Audio In
on your TV or VCR. This will send recorded audio
from your PC out for recording or listening on
your TV or VCR.
USB Instant DVD for Mac 10
USB Instant DVD for Mac 11

Install Software
In this section you will Connect USB Instant DVD to your Mac and Install the Application Software
1. Insert the USB Instant DVD CD into your CD ROM DRIVE
2. The USB Instant DVD CD Volume will mount on your desktop
3. Click on the USB Instant DVD CD on your Desktop.
4. Go to the Finder File Menu on the upper left and click duplicate.
5. The CD will now be copied to your desktop.
Plug It In!
In this section you will Connect USB Instant DVD to your Mac
1. Find an available USB Port on your MAC. For better bandwidth, plugging directly to the USB Port in the
Back of the Mac is preferable rather than a USB Hub or the USB Port on your Keyboard.
2. Plug it in!
USB Instant DVD for Mac 10
USB Instant DVD for Mac 11

Overview
OVERVIEW
The PixeDV for Mac application allows you to do the following:
• Capture Real-Time from any video source into an MPEG1 or MPEG2 Movie
• Output MPEG1 or MPEG2 Video les to a VCR or TV
• Import other media(QuickTime, DV, Etc) into the PixeDV Album
• Manage and organize your media in the PixeDV Album
• Easily remove unwanted scenes from your captured MPEG movies.
• Built-In players allow you to play MPEG Movies or QuickTime Movies
About MPEG:
MPEG (Moving Picture Experts Group) is the international Standard Organization to generate
standards for digital video and audio compression.
MPEG1 is intended for VideoCD creation with VHS level quality.
MPEG2 features higher quality video and is used for DVD Creation. MPEG2 offers the best Video
quality in relation to le sizes.
PixeDV Capture Settings
USB Instant DVD for Mac 12
USB Instant DVD for Mac 13

USB Instant DVD for Mac 12
USB Instant DVD for Mac 13

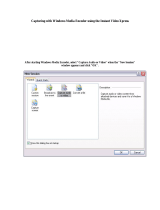
LAUNCHING PIXEDV
If you plan to capture video, make sure the USB Instant DVD , your video sources and your Macintosh
are all connected properly. Please refer to the HARDWARE INSTALLATION section of this manual
if you need help.
Open the USB Instant DVD folder that you may have copied to your desktop or inside your
Macintosh Hard Drive.
You will see the following icons:
USB Instant DVD for MAC
USB Instant DVD for Mac 14
USB Instant DVD for Mac 15

Depending on your View settings for OSX, this may appear as Icons, as a List or display in column mode.
Double Click on the PixeDV Icon on your G3 or G4 Mac. You will see this startup Screen:
You can click on any of the ve functions at any time. The buttons are not sequential. Which means it would
not matter whether you clicked Capty or Album rst.
Clicking Quit will exit the application.
When you click on CAPTY, IMPORT, ALBUM, you will always have a navigation bar on the topmost side of the
screen that can take you to all the various functions of the PixeDV for MAC application as shown below:
For best performance, since you will be dealing with large les when capturing video, turn off the screen
saver and power saving on your Mac. It would also be best that you have no other programs running
when capturing video.
USB Instant DVD for Mac 14
USB Instant DVD for Mac 15

CAPTURING VIDEO
Clicking on the CAPTY button will take you to this window:
The rst step is to check your capture settings. Click on the tab that says capture. This will take you to
this window:
USB Instant DVD for Mac 16
USB Instant DVD for Mac 17

From this window you can select:
Video Input
S-Video – Sometimes referred to as SVHS, select this input if you have a video source that is plugged into the
S-Video connector on the USB Instant DVD for MAC
Composite – Sometimes referred to as RCA jacks, select this input if you have a video source that is plugged
into the Composite connector.
Recording System
NTSC - Select if you have an NTSC video source. Countries that use the NTSC Standard are USA,
Canada, Mexico, Japan and the Philippines.
PAL - Select if you have a PAL video source. Countries that use the PAL Standard are Most Parts of
Europe, South America and Most Parts of Asia.
Capturing Format
MPEG1
Select MPEG1 if you plan to create a VCD Movie.
Select your quality level. For a more detailed explanation about Quality Levels, check the Capture Settings
table in the USING PixeDV for MAC Overview section of the MANUAL.
MPEG2
Select MPEG2 if you plan to create a DVD Movie.
Select your quality level. For a more detailed explanation about Quality Levels, check the Capture Settings
table in the USING PixeDV for MAC Overview section of the MANUAL.
Customize
Customize your capture settings. You can select your bit rate, capture image size and change the capture
settings from CBR to VBR. This means:
CBR – Constant Bit Rate
The video stream is always encoded and xed to a constant value. High motion scenes and low motion
scenes are always allocated the same number of bits. A video stream of a an area of the sky which constantly
stays blue gets the same number of bits as a fast action scene.
VBR – Variable Bit Rate.
The video stream is encoded at variable bit rates depending on the scene being captured. High motion scenes
will be allocated more space to capture more detail.
USB Instant DVD for Mac 16
USB Instant DVD for Mac 17

Start capturing:
Once you have selected all your settings, you can now click on the Start Capture button to start
the capture process.
Video should start previewing on the blue area of the interface about 1 second after you click Start Capture.
This one second delay should be accounted for when you start capturing video.
With the capture process started, you will notice the status screen will start giving you specications on the le
you are capturing, how large it is and how much hard drive space you have left.
USB Instant DVD for Mac 18
USB Instant DVD for Mac 19

To stop the capture process, click on the STOP Capture Button. A thumbnail of the le you just captured
will appear, on the right. In the illustration shown above, 3 thumbnails are shown. This is for illustration
purposes only. When you rst start the program, you would normally not have any thumbnails shown
until after capturing.
The video that you just captured will be placed in the default album folder. Albums can be renamed, deleted,
created etc. This will be explained more under the Album section of this manual.
The one error message that you might get during the capture process will be:
This error would normally be caused by selecting the wrong video Source under capture settings. Please
make sure that you select S-Video if you have an S-Video source or Composite if you have a composite
source plugged into the USB Instant DVD.
Global Preference
The Global Preference button that appears on the
upper right side of the capture screen manages:
1 – Import File Locations: Point to the correct directory
on your Mac for importing les
2 – Points to the directory where you want to create
PLAY LIST Files. In the ALBUM section of this
manual you can create play list’s for playing several
les continuously.
3 – Slide Show Settings: You can run a slide show of
the video les or any other les in an album. The rst
frame of every video le will be shown.
USB Instant DVD for Mac 18
USB Instant DVD for Mac 19

EXPORTING VIDEO
To export video back to a VCR , CAMCORDER or for preview on a TV MONITOR, click on the OUTPUT
Button on the main CAPTY interface. Clicking on OUTPUT will take you to this screen.
Drag thumbnails into the output box. You can drag as many les that you want in whatever order and
play them back.
Click on the START Button to start the export process. Click on the STOP Button to stop.
Once the export process is started, you will see this activity at the bottom left of the screen:
IMPORTANT: If for some reason you don’t see video out to your TV or video is not recording on your VCR,
check your cable connections. Please consult the HARDWARE INSTALLATION GUIDE section of this manual
for more instructions.
USB Instant DVD for Mac 20
USB Instant DVD for Mac 21
/