
4000710-06
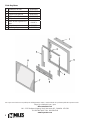
*Note: Wall finish must be flush or slightly
in front of this frame on heater!
534 Heater
16” min. for
zero clearance
Steel Back Plate
Screw-on
Top Baffle
Drop-in
Cross Bar
Hinge Pins (3)
Clip-on Side Trim (LH/RH)
Cast Iron Fret
(drops into slots)
Removable Cast Iron
Access Panel
Screen Mesh
Door
Installation Instructions
Note: This kit must be installed
or serviced by a qualifi ed
installer, service agency or gas
supplier. These instructions are
to be used in conjunction with
the main installation instructions
for the above listed heater
model.
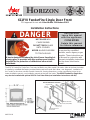
HOT GLASS WILL
CAUSE BURNS.
DO NOT TOUCH GLASS
UNTIL COOLED.
NEVER ALLOW CHILDREN
TO TOUCH GLASS.
DANGER
!
A barrier designed to reduce the risk of burns from the hot
viewing glass is provided with this appliance and shall be
installed for the protection of children and other at-risk
individuals.
INSTALLER
Leave this manual
with the appliance.
CONSUMER
Retain this manual
for future reference.
611FVI FenderFire Single Door Front
HORIZON
CSA approved for use with Valor Models 534 Heaters ONLY
The 611FVI FenderFire Single Door Front may be fi tted to any Valor model 534 heater, either at the time the heater
is installed or retrofi tted afterwards (provided existing wall and hearth fi nish allow—see diagrams*). Installation of
the FenderFire door does not affect mantle clearances, framing dimensions, or other specifi cations listed in the
heater installation manual—see installation manual packed with the heater. The 611FVI FenderFire Single Door
may also be installed with optional 615CVI Cast Outer Plate (see installation instructions with kit).

2
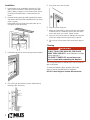
Installation
1. Install heater as per installation instructions. Finish
wall up to black frame on heater ensuring that wall
fi nish is fl ush or slightly in front of black frame. Allow
for height of fi nished hearth, or steel plate will not
install.
2. Remove existing top heat baffl e supplied with heater
and replace with top baffl e supplied with 611 kit using
same 3 screws.
Note: Baffl e will only install with proper side up. Do
not tighten screws all the way.
3. Install backing plate as shown using screws provided.
4. Clip in left and right side trim pieces. Adjust tabs by
bending to fi t if necessary.
5. Drop upper cross bar into slots.
6. Drop door onto hinge pins.
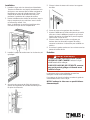
7. Adjust top heat baffl e by opening the door and pulling
it forward until so it meets the back of the wire mesh
on the door when it is closed. Tighten screws.
8. Drop cast iron fret into place by sliding bolts into slots
of side trim. Adjust bolts as necessary for tight fi t.
9. Clip cast iron access panel onto hooks within legs of
fret.
Cleaning
The surround and the screened doors can be cleaned
with a soft brush.
To clean the fi replace glass window, refer to the
owner’s manual supplied with the appliance.
DO NOT clean the glass window with ammonia!
WARNING
DO NOT TOUCH THE DOOR OR FIREPLACE
DO NOT TOUCH THE DOOR OR FIREPLACE
WHILE THEY ARE HOT!
WHILE THEY ARE HOT!
Let the fi replace cool fi rst
Let the fi replace cool fi rst
before cleaning it.
before cleaning it.
FOR SAFETY PURPOSE, ensure the screen
FOR SAFETY PURPOSE, ensure the screen
door is closed before operating the fi replace.
door is closed before operating the fi replace.
!

3
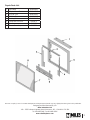
1 Top Baffl e 4000444AZ
2 Drop-in Cross Bar 4000407AZ
3 LH Side Trim 4000392AZ
4 RH Side Trim 4000393AZ
5 Backing Plate 4000680AZ
6 Fret & Ash Pan Door RA24CV
7 Handle 4000633
8 Screen Door Assy 4000708
Repair Parts List
Designed and Manufactured by / for
Miles Industries Ltd.
190 – 2255 Dollarton Highway, North Vancouver, B.C., CANADA V7H 3B1
Tel. 604-984-3496 Fax 604-984-0246
www.valorfi replaces.com
Because our policy is one of constant development and improvement, details may vary slightly from those given in this publication.
Page is loading ...
Page is loading ...
Page is loading ...
-
 1
1
-
 2
2
-
 3
3
-
 4
4
-
 5
5
-
 6
6


Ask a question and I''ll find the answer in the document
Finding information in a document is now easier with AI
in other languages
- français: Valor 611FVI Le manuel du propriétaire
