
User Guide


Cashmaster One - User Guide
10479 - vH 3
Document information
Date: 01 February 2017
Document ID: 10479
Revision: vH
Contact
Cashmaster International Ltd.
Dunnottar House
Unit 6 St David’s Drive
St David’s Business Park
Dalgety Bay
Fife
KY11 9PF
Scotland
United Kingdom
www.cashmaster.com
support@cashmaster.com
Copyright
Copyright © 2017 Cashmaster International Ltd - All Rights Reserved.
Other product and company names may be trademarks or registered trademarks of other companies,
and are the property of their owners. They are used only for explanation, without intent to infringe.
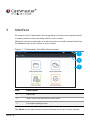
Intended purpose
This document is provided for Cashmaster One users and describes how to get the most from
their Cashmaster One product.
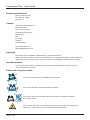
Safety and using the counter
The counter must be used on a stable and level surface.
The counter cannot be used with excessive vibration.
The counter cannot be used when exposed to strong air-conditioning systems
or excessive drafts.
This is a class A product. In a domestic environment, this product may cause radio
interference. In this case, the user must take adequate measures.

Cashmaster One - User Guide
10479 - vH 4
FCC statement
This device complies with Part 15 of the FCC Rules. Operation is subject to the following conditions:
• This device may not cause harmful interference.
• This device must accept any interference received, including interference that may cause
undesired operation.
This equipment has been tested and found to comply with the limits for a Class A digital device,
pursuant to Part 15 of the FCC Rules.
These limits are designed to provide reasonable protection against harmful interference when the
equipment is operated in a commercial environment. This equipment generates, uses and can radiate
radio frequency energy, and if it is not installed and used in accordance with the instruction manual, it
may cause harmful interference to radio communications. Operation of this equipment in a residential
area is likely to cause harmful interference, in which case the user will be required to correct the
interference at their own expense.
Any modications made to this device that are not approved by Cashmaster International Ltd may void
the authority granted to the user by the FCC to operate this equipment.


10479 - vE 6
29
1 Product information
2 Getting started
3 Interface
4 Operations
5 Troubleshooting
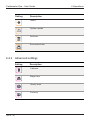
1.1 Variants 8
1.2 Connections 13
1.3 Power 13
2.1 Package contents 16
2.2 Install the hod 18
2.3 Install the optional printer 18
2.4 Connect the power adaptor 20
2.5 Power up 21
3.1 Count screen 23
3.2 Icons 24
4.1 Counting 29
4.2 System settings 33
4.3 Editing the counter workow 35
4.4 Multi-till counting (Max only) 35
4.5 Changing the printer roll 36
4.6 Removing the hod 38
4.7 Care and maintenance 39
5.1 Notes and bills 40
5.2 Coins 41
5.3 Printer 41
5.4 Note learning 42
Contents
8
15
22
29
40

10479 - vE 7
6 Specications
7 Global support
5.5 Miscellaneous 42
6.1 Regulatory and approvals 44
6.2 Counter specications 44
6.3 Printer specications 45
44
46

10479 - vE 8
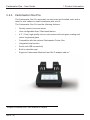
1 Product information
1.1 Variants
The Cashmaster One product range counts notes, coins and coupons in any
congured currency, and can help streamline cash-handling business
processes.
The Cashmaster One counters are count-by-weight devices controlled by a
robust colour touch-screen display.
All Cashmaster One counters are compatible with the Cashmaster Printer One.
All models support easy software updates using a USB ash drive.
The Cashmaster One product range has three variants:
• Cashmaster One Pro
Counts notes and coins in up to two different currencies.
• Cashmaster One Plus
Counts notes, coins, vouchers and coupons. On-screen numeric keypad for
manual entry of non-cash items such as debit or credit cards, and add-list
for cheques, in up to four different currencies.
• Cashmaster One Max
Counts notes, coins, vouchers and coupons. On-screen numeric keypad for
manual entry of non-cash items such as debit or credit cards, and add-list
for cheques, in up to eight different currencies. Multi-till feature to save and
recall hundreds of individual till count records for later retrieval and
download. Ethernet connectivity as standard.

Cashmaster One - User Guide
10479 - vH 9
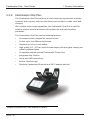
1.1.1 Cashmaster One Pro
The Cashmaster One Pro accurately counts loose and bundled cash, and is
ideal for sole traders or small businesses with one till.
The Cashmaster One Pro has the following features:
• Quickly counts coins and notes
• User-congurable oat / Start bank feature
• 4.3" (11cm) high-quality colour touch-screen with anti-glare coating and
robust toughened glass
• Compatible with the optional Cashmaster Printer One
• Integrated help function
• Serial and USB connectivity
• Built-in calculator app
• Supports Cashmaster Bluetooth and Wi-Fi adaptor add-on1
1Adaptor available soon, see website for details
1 Product information

Cashmaster One - User Guide
10479 - vH 10
1.1.2 Cashmaster One Plus
1Adaptor available soon, see website for details
The Cashmaster One Plus performs all cash-counting requirements including
vouchers and coupons, and non-cash items such as debit or credit cards and
cheques.
With multiple count mode capabilities, the Cashmaster One Plus is ideal for
small to medium-sized businesses with multiple tills and cash-handling
processes.
The Cashmaster One Plus has the following features:
• On-screen numeric keypad for manual entries
• Counts up to four different currencies
• Supports up to four count modes
• High quality 5.0" (12.7cm) touch-screen display with anti-glare coating and
robust toughened glass
• Compatible with the optional Cashmaster Printer One
• Integrated help function
• Serial and USB connectivity
• Built-in calculator app
• Supports Cashmaster Bluetooth and Wi-Fi adaptor add-on1
1 Product information

Cashmaster One - User Guide
10479 - vH 11
1.1.3 Cashmaster One Max
1Adaptor available soon, see website for details
The Cashmaster One Max offers advanced functionality, including multi-till
memory and built-in Ethernet. With extended features and customisation
options, the Cashmaster One Max is ideal for larger organisations, or
businesses which have demanding processes and complex operational
requirements.
The Cashmaster One Max has the following features:
• On-screen numeric keypad for manual entries
• Counts up to eight different currencies
• 10+ customised count modes
• Multi-till memory - save and recall hundreds of individual till counts
• Ethernet connectivity enables remote management from a central location
• High quality 5.0" (12.7cm) touch-screen display with anti-glare coating and
• robust toughened glass
• Compatible with the optional Cashmaster Printer One
• Integrated help function
• Serial and USB connectivity
• Built-in calculator app
• Supports Cashmaster Bluetooth and Wi-Fi adaptor add-on1
1 Product information

Cashmaster One - User Guide
10479 - vH 12
1.1.4 Cashmaster Printer One
The optional Cashmaster Printer One can integrate with any of the three
counters in the Cashmaster One range. It easily and neatly ts into the base of
the counter. With intelligent autostart, as soon as the printer is installed it is
ready for use - no setup is required. The Cashmaster Printer One can print
graphics in addition to text, providing additional exibility and output options.
The Cashmaster Printer One has the following features:
• Ink-free thermal printing
• Integrated printer - no additional desk space required
• No cables or leads to connect
• Instant and quiet operation
• Charges through the Cashmaster One counter
• Energy efcient
1 Product information

Cashmaster One - User Guide
10479 - vH 13
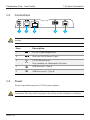
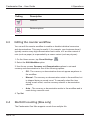
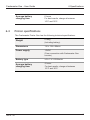
1.2 Connecons
1.3 Power
123 4 5
Communication ports should only be directly connected to equipment within the same
building.
Only use a Cashmaster-supplied PSU with your Cashmaster One product. Using a non-
Cashmaster PSU may result in damage to the product and will invalidate your warranty.
Power is provided using the 12V DC power adaptor.
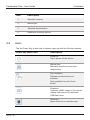
Item Description
12V DC Power adaptor port
Dual-use RS232/Serial IO port
10/100 Ethernet port
Only available on Cashmaster One Max.
USB Host port - Type A
USB Device port - Type B
1
2
3
4
5
1 Product information

Cashmaster One - User Guide
10479 - vH 14
1.3.1 External power
1.3.2 Baery
Do not connect power adaptor with wet hands or use a damaged or wet power adaptor.
Only use the Cashmaster One counter with the factory supplied power adaptor.
Plug the power adaptor into the socket at the back of the Cashmaster One
counter.
The Cashmaster One counter battery is charged when the mains power is
connected .
Typical charging time is 6 hours. For best results, charge at between 10°C
and 30°C.
A fully-charged battery lasts for up to 8 hours with normal use.
1 Product information

10479 - vE 15
2 Getting started
This chapter describes the initial steps required to start using the Cashmaster
One counter.

Cashmaster One - User Guide
10479 - vH 16
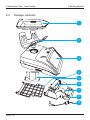
2.1 Package contents
1
2
3
4
5
6
7
8
9
2 Getting started

Cashmaster One - User Guide
10479 - vH 17
1
3
5
7
9
2.1.1 Package contents list
Item Description
Scoop
Hod
Cashmaster One
Cashmaster One battery
Base plate cover
Cashmaster Printer One battery
Paper roll
Cashmaster Printer One (optional)
Power adaptor
1
2
3
4
5
6
7
8
9
2 Getting started

Cashmaster One - User Guide
10479 - vH 18
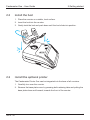
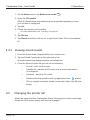
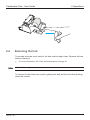
2.2 Install the hod
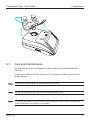
2.3 Install the oponal printer
1. Place the counter on a stable, level surface.
2. Insert the hod into the counter.
3. Gently twist the hod and push down until the hod clicks into position.
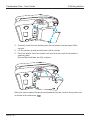
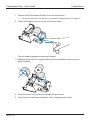
The Cashmaster Printer One can be integrated into the base of all counters.
1. Carefully turn over the counter.
2. Remove the base plate cover by pressing both retaining tabs and pulling the
base plate down and forward, towards the front of the counter.
2 Getting started

Cashmaster One - User Guide
10479 - vH 19
.
3. Carefully insert the two holding tabs on the printer into the base of the
counter.
4. Lift the printer up and into the base of the counter.
5. Push the printer into the counter until you hear the click of the printer’s
retaining tabs.
Ensure that both tabs are fully in place.
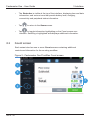
After you have inserted the printer and powered up the counter, the printer icon
is shown in the status bar
2 Getting started

Cashmaster One - User Guide
10479 - vH 20
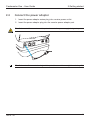
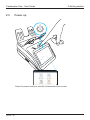
2.4 Connect the power adaptor
1. Insert the power adaptor mains plug into a mains power outlet.
2. Insert the power adaptor plug into the counter power adaptor port.
The Cashmaster One counter must be placed near to the power supply during setup.
The Cashmaster One counter is designed for portable use and has an eight-hour battery life
.
2 Getting started
Page is loading ...
Page is loading ...
Page is loading ...
Page is loading ...
Page is loading ...
Page is loading ...
Page is loading ...
Page is loading ...
Page is loading ...
Page is loading ...
Page is loading ...
Page is loading ...
Page is loading ...
Page is loading ...
Page is loading ...
Page is loading ...
Page is loading ...
Page is loading ...
Page is loading ...
Page is loading ...
Page is loading ...
Page is loading ...
Page is loading ...
Page is loading ...
Page is loading ...
Page is loading ...
Page is loading ...
Page is loading ...
-
 1
1
-
 2
2
-
 3
3
-
 4
4
-
 5
5
-
 6
6
-
 7
7
-
 8
8
-
 9
9
-
 10
10
-
 11
11
-
 12
12
-
 13
13
-
 14
14
-
 15
15
-
 16
16
-
 17
17
-
 18
18
-
 19
19
-
 20
20
-
 21
21
-
 22
22
-
 23
23
-
 24
24
-
 25
25
-
 26
26
-
 27
27
-
 28
28
-
 29
29
-
 30
30
-
 31
31
-
 32
32
-
 33
33
-
 34
34
-
 35
35
-
 36
36
-
 37
37
-
 38
38
-
 39
39
-
 40
40
-
 41
41
-
 42
42
-
 43
43
-
 44
44
-
 45
45
-
 46
46
-
 47
47
-
 48
48


Cashmaster one plus User manual
- Type
- User manual
Ask a question and I''ll find the answer in the document
Finding information in a document is now easier with AI
Related papers


Other documents
-
Protocol 3102-3A Digital Coin Counting Bank User manual
-
AccuBANKER AB510 User guide
-
Traceable SpatulaBalance User manual
-
AccuBANKER AB550 User guide
-
-
Safescan 6185 Owner's manual
-
-
 CashConcepts CCE 4000 User manual
-
CPI CMX02 User guide
-
