Ginnys 12 in 1 Kitchen Master - HOUS-HS-3318 Owner's manual
- Category
- Food processors
- Type
- Owner's manual

12-in-1
Kitchen Master
Instruction Manual
MODEL: HOUS-HS-3318
Ginnys.com • 1.800.544.1590
BRAND

TABLE OF CONTENTS
“Life is happening.
We’ll help you live it...one moment at a time.”
Important Safeguards 3-4
Specications 5
Part Names 6
How to Operate 7-10
Cleaning and Care 11
Recipes 11-14
Warranty 15
President, Ginny’s
IMPORTANT SAFEGUARDS 3
2IMPORTANT SAFEGUARDS 3 2 IMPORTANT SAFEGUARDS
Ginnys.com •1.800.544.1590
IMPORTANT SAFEGUARDS
Read this user manual carefully before you use the appliance and
save it for future reference.
1. Always unplug the appliance before you reach into the blender
jar with your ngers or an object (e.g. a spatula).
2. Never use your ngers or an object (e.g. a spatula) to push
ingredients down the feed tube while the appliance is running.
Always use the food pushers provided.
3. Be very careful when you handle the blades or inserts. Be
especially careful when you remove them from the bowl or jar,
when you empty the bowl or jar, and when you clean them.
Their cutting edges are very sharp.
4. This appliance is not intended for use by persons (including
children) with reduced physical, sensory or mental capabilities,
or lack of experience and knowledge, unless they have been
given supervision or instruction concerning use of the appliance
by a person responsible for their safety.
5. Children should be supervised to ensure that they do not play
with the appliance.
6. Check if the voltage indicated on the appliance corresponds to
the household voltage before you connect the appliance.
7. Never let the appliance run unattended.
8. Never connect this appliance to a timer switch.
9. Do not use the appliance if the cord, the plug or other parts
are damaged. Contact Ginny’s Customer Service for a
refund or replacement.
10. Always switch off the appliance by turning the control knob to 0,
and switch off the appliance before you detach any accessory.
11. Unplug the appliance immediately after use.
12. Never immerse the motor unit in water or any other liquid, nor
rinse it under the tap.
13. Wait until moving parts stop running before you remove the lid of
the bowl or jar.
14. Do not exceed the maximum content indicated on the bowl or
the blender jar.
15. Thoroughly clean the parts that come into contact with food
before you use the appliance for the rst time.
16. Care shall be taken when handling the sharp cutting blades,
as in emptying the bowl and during cleaning.
Thank you for purchasing the Ginny’s
Brand 12-in-1 Kitchen Master! It’s
almost like having another pair of hands
in the kitchen as it preps vegetables,
mixes dough, presses juice and creates
salads. Both blender and processor, it
ranges from soup to nuts, so that your
cooking becomes easier, faster and
much more fun!
Enjoy!

4
IMPORTANT SAFEGUARDS
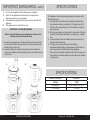
SPECIFICATIONS
SPECIFICATIONS
Power Consumption: 120V/60Hz
Wattage: 600W
Dimensions: 8-3/4” diam. x 15-1/2” h.
Cord Length: 48” long
PRECAUTIONS/SPECIFICATIONS 5
IMPORTANT SAFEGUARDS
4 5
IMPORTANT SAFEGUARDS Ginnys.com • 1.800.544.1590
IMPORTANT SAFEGUARDS...cont’d
This appliance has a polarized plug (meaning one blade is wider
than the other one).
1. To reduce the risk of electric shock, this plug is intended to t
into a polarized outlet in one direction. If the plug does not t
into the outlet, reverse the plug. Do not attempt to modify the
plug in any way.
2. A short power-supply cord is provided to reduce risks of injuring
yourself from becoming entangled in, or tripping over, a longer
cord.
3. Longer extension cords are available and may be used if you
exercise caution during use.
4. If a longer cord is used, please note the following:
• The marked electrical rating of the extension cord should be at
least as great as the electrical rating of the appliance.
• The longer cord should be arranged so that it will not drape over
the counter top or tabletop where it can be pulled on by children
or tripped over.
17. Do not use the appliance if the rotating sieve is damaged.
18. Switch off the appliance and disconnect from supply before
changing accessories or moving parts.
19. The accessories supplied are the only ones to be used with this
appliance.
20. This appliance is for household use only.
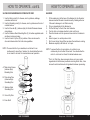
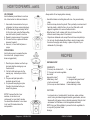
IMPORTANT: LOCKING MECHANISM
Before using the blender or processing bowl, make sure it is
securely locked onto the motor base.
A. Lower the processing bowl onto the motor base and turn clockwise
to lock into place. Also, make sure the lid is on the processing bowl
before turning on the motor.
B. Lower the blender jar onto the motor base and turn clockwise to
lock into place. Make sure the blender jar lid is in place before turning
on the motor.
A. B.

7
INSTALLATION & GROUNDING
6
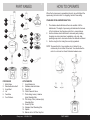
10 PART NAMES
Ginnys.com • 1.800.544.1590
6 7
PART NAMES
2
10
3
4
9
8
7
6
6
HOW TO OPERATE
1
11
12
13
14
5
15
PROCESSOR
1. Motor Base
2. Detachable drive shaft
3. 6-cup Bowl
4. Lid
5. Feed tube
6. Food Pushers
ATTACHMENTS
7. 6-cup Blender Jar
8. Stainless steel knife blade
9. Dough tool
10. Citrus Presser & Sieve
11. Thick slicing/ coarse ( Julienne
style) Shredding Disc
12. Thin slicing / Fine ( Julienne style)
Shredding Disc
13. French Fry Disc
14. Stainless Steel Shredding Disc
15. Spatula
16. Blender Jar Lid & Filler Cap-2 oz.
When the food processor is assembled, plug into an outlet. Adjust the
speed using the control dial. For chopping, use the Pulse setting.
STAINLESS STEEL KNIFE/DOUGH TOOL
1. The stainless steel knife blade is the most versatile of all the
attachments. The length of processing will determine the neness
of the food texture. Use the pulse control for a coarser texture.
2. Use the stainless steel knife blade for cake and pastry making,
chopping raw and cooked meat, vegetables, nuts, pate, dips,
pureeing soups and to also make crumbs from biscuits and bread.
3. Use the dough tool for mixing our and dry ingredients.
NOTE: To ensure the life of your machine, do not allow it to run
continuously for more than 30 seconds. You should allow the
motor to cool down for at least 3 minutes between uses.
16

UTENSILS & COOKING CUSTOMER REVIEWS
HOW TO OPERATE...cont’d.
8
7
9
HOW TO OPERATE Ginnys.com • 1.800.544.1590
8 9
HOW TO OPERATE...cont’d.
SLICING DISC/SHREDDING DISC/FRENCH FRY DISC
1. Use the Slicing side (A) for cheese, carrots, potatoes, cabbage,
cucumber and onions.
2. Use the Shredding side (A) for cheese, carrots, potatoes and foods of
a similar texture.
3. Use the Fine side (B) ( Julienne style) for Grated Parmesan cheese
and potatoes.
4. Use the Stainless Steel Shredding Disc (C) for leaer vegetables such
as lettuce, herbs and celery.
5. Use the French Fry Disc (D) for potatoes. It also can be used to
slice and Julienne other rm fruits and vegetables.
NOTE: To ensure the life of your machine, do not allow it to run
continuously for more than 1 minute. You should allow the motor
to cool down for at least 3-4 minutes before next operation.
BLENDER
1. Fit the sealing ring (at the base of the blender jar) into the motor
base and ensure the seal is located correctly. Leaking will occur
if the seal is damaged or not tted correctly.
2. Put your ingredients into the blender jar.
3. Put the ller cap* in the lid, then turn clockwise.
4. Turn the lid in a clockwise direction to lock onto the jar.
5. Place the blender onto the processor base and turn clockwise to
lock.
6. Select a speed, or use the pulse control.
7. Don’t move the jar, lid and ller cap when the machine is working.
8. Maximum capacity is 48 uid ozs. or 6 cups.
NOTE: To ensure the life of your machine, do not allow to run
continuously for more than 30 seconds. You should allow the
motor to cool down for at least 3 minutes between uses.
*The 2 oz. Filler Cap, when removed, allows you to pour extra
ingredients into the blender jar without removing the lid. Also, it can
be used to add small amounts of ingredients between processing.
A. Thick slicing/Coarse
(Julienne style)
Shredding Disc
B. Thin slicing/Fine
(Julienne style)
Shredding Disc
C. Stainless Steel
Shredding Disc
D. French Fry Disc
E. Drive Shaft
A
B
C
D
E

HOW TO OPERATE...cont’d.
PART NAMES & CONTROL PANEL PART NAMES & CONTROL PANEL 11
1010
10 11
CARE & CLEANING
Ginnys.com • 1.800.544.1590
10 11
CARE & CLEANING
Always switch off and unplug before cleaning.
• Handle the blades and cutting discs with care - they are extremely
sharp.
• Some foods may discolor the plastic. This is perfectly normal and won’t
harm the plastic or affect the avor of your food. Rub with a cloth
dipped in vegetable oil to remove the discoloration.
• Wipe the base (1) with a damp cloth, then dry. Ensure that the
interlock area is always clear of food debris.
• All parts are dishwasher safe, except the motor base and plastic jar.
• Do not touch the knife blades. Brush them, using hot soapy water,
then rinse thoroughly under the tap, or place on top rack of your
dishwasher. Dry thoroughly.
VEGETABLE SOUP
INGREDIENTS:
1 (14 ounce) can chicken broth 1 c. water
1 (11.5 ounce) can tomato-vegetable
juice cocktail
1 large potato, diced* 2 carrots, sliced*
2 stalks celery, diced* 1 c. chopped fresh green beans*
1 c. fresh corn kernels* salt and pepper to taste
1 (14.5 ounce) can diced tomatoes Creole seasoning to taste
DIRECTIONS:
1. In a large stock pot, combine broth, tomato juice, water, potatoes,
carrots, celery, undrained chopped tomatoes, green beans, and corn.
2. Season with salt, pepper and your favorite seasoning. Bring to a boil
and simmer for 30 minutes or until all vegetables are tender.
* NOTE: Use your Kitchen Master to process the fresh vegetables for
a soup with “just picked” taste!
6 Servings
RECIPES
ICE CRUSHER
Use the blender jar and blades to crush ice
into a ner texture for drinks and desserts.
1. Use smaller, home-made ice from your
refrigerator (not large, commercial cubes).
2. Fill the blender jar approximately half full
(to 24oz. line) and, using the Pulse setting,
use short bursts of power to crush ice.
4. Repeat to acquire amount of ice needed.
5. For even ner ice, re-pulse until the ice
becomes “powdery”.
6. Use as is, or avor with fruit juices or
syrups.
CITRUS PRESS
Use the citrus press to squeeze the juice
from citrus fruits (oranges, lemons,
limes and grapefruits).
1. Place the juicer strainer over the 6-cup
bowl and slide the reaming cup over
the drive shaft.
2. Cut fruit in half and press onto the
reaming cup. Juice will pour into the
bowl.
3. The press will yield juice with a
moderate amount of pulp.
4. For juice with less pulp, pour juice
through a ne strainer before you
decant into glasses.
NOTE: To ensure the life of your
machine, do not allow to run
continuously for more than 3 minutes.
You should allow the motor to cool down
for at least 30 minutes before the
next operation.

HOW TO OPERATE YOUR MICROWAVE 12 HOW TO OPERATE YOUR MICROWAVE 13
12 RECIPES RECIPES
12
HEARTY HAM & POTATO CASSEROLE
INGREDIENTS:
4 c. peeled and sliced potatoes* 2 c. diced ham*
1/2 onion, chopped* 2 c. milk
1 c. frozen peas 3 Tbsp. all-purpose our
2 Tbsp. butter 1/2 tsp.salt
1/2 tsp. ground black pepper 1/8 tsp. garlic powder
1/8 tsp. onion powder 1 tsp. dried parsley
1/4 lb.Cheddar cheese, diced* 1 pinch paprika, or to taste
DIRECTIONS:
1. Preheat oven to 350°F.
2. Layer half the potatoes, half the ham, and half the onion in a 2-quart
baking dish; repeat the layers.
3. Heat milk, peas, our, butter, salt, black pepper, garlic powder, and
onion powder in a saucepan over medium heat, stirring constantly,
until thickened, 7 to 10 minutes.
4. Stir Cheddar cheese into sauce until cheese is melted.
5. Pour sauce over potato and ham mixture; sprinkle with paprika.
6. Cover baking dish with aluminum foil.
7. Bake in the preheated oven until potatoes are tender, about 1 hour.
8. Remove foil and continue baking until lightly browned, about
15 minutes more.
* NOTE: Use your Kitchen Master to process the ingredients.
6 Servings
APPLE PIE SQUARES
INGREDIENTS:
CRUST:
2 c. all-purpose our* 1/2 tsp. salt
2/3 c. shortening* 1/4 c. water
2 eggs 1Tbsp. lemon juice
FILLING:
6 apples - peeled, cored,
and cut into 1/2-inch slices*
1 c. white sugar 3 Tbsp. all-purpose our
1/2 tsp.ground cinnamon
DIRECTIONS:
1. Preheat oven to 350°F.
2. Whisk 2 cups our and salt together in a bowl.
3. Cut shortening* into our mixture, until crumbly.
* Use your Kitchen Master
4. Whisk water, eggs, and lemon juice together in a separate bowl; stir
into our mixture until dough forms a ball.
5. Split dough into halves; roll each half into about a 9x13-inch rectangle.
6. Press 1 rectangle into the bottom of a 9x13-inch baking dish.
7. Place apple slices in a large bowl; add sugar, 3 tablespoons our, and
cinnamon.
8. Toss apples to coat; spread over crust. Cover apple lling with
remaining crust, piecing together any scraps to cover any holes.
9. Cut several slits into top crust for ventilation while cooking.
10. Bake in the preheated oven until edges are browned and crisp, 45
minutes to 1 hour. Cool to room temperature before cutting into
squares, about 30 minutes.
* NOTE: Use your Kitchen Master to process these ingredients.
8 Servings
RECIPES
13
RECIPES

WARRANTY
Ginny’s warrants this product free from defects in material
and workmanship for one year from provable date of purchase.
Within this warranty period, Ginny’s will repair or replace,
at its option, defective parts at no charge, provided the
product is returned, freight prepaid with proof of
purchase to Ginny’s.
Allow 2-4 weeks for return shipping.
This warranty does not cover improper installation, misuse,
abuse or neglect on part of the owner.
Warranty is also invalid in any case that the
product is taken apart or serviced by an
unauthorized service station.
This warranty gives you specic legal rights
and they may vary from state to state.
THE FOREGOING WARRANTIES ARE IN LIEU
OF ALL OTHER WARRANTIES AND CONDITIONS,
EXPRESS OR IMPLIED,
INCLUDING BUT NOT LIMITED TO THOSE OF
MERCHANTIBILITY OR FITNESS
FOR A PARTICULAR PURPOSE.
Customer Service
Phone: 1•800•544•1590
8:00 am to Midnight, Monday through Friday
Ginnys.com • 1.800.544.1590 WARRANTY
14 15
STRAWBERRY YOGURT SMOOTHIE
INGREDIENTS:
1 container (6 oz) strawberry yogurt
1/2 c. sliced fresh or frozen strawberries
1/2 c. orange or pineapple juice
Pineapple chunks, strawberries or kiwifruit slices, if desired
DIRECTIONS:
1.Place yogurt, strawberries and juice in blender.
2.Cover; blend on medium speed about 2 minutes or until smooth.
3.Pour into serving glass. Garnish with pineapple.
Serve immediately.
Serves 1
(Double or triple ingredients for more servings).
INGREDIENTS:
1-1/2 c. small curd cottage cheese* 2 Tbsp. milk*
2 tsp. lemon juice* 2 tsp. grated onion*
3 Tbsp. crumbled blue cheese* 1 Tbsp. chopped fresh parsley*
1 medium bell pepper
Raw vegetables, for dipping
DIRECTIONS:
1. Place all ingredients except bell pepper and raw vegetables in
* Kitchen Master blender. Cover and blend on medium speed,
stopping blender occasionally to scrape sides, until smooth.
2. Cover and refrigerate 1 hour to blend avors.
3. Cut off top of bell pepper and hollow out. Spoon dip into pepper.
Serve with raw vegetables, cut into bite-sized pieces.
RECIPES
BLUE CHEESE VEGETABLE DIP

15
-
 1
1
-
 2
2
-
 3
3
-
 4
4
-
 5
5
-
 6
6
-
 7
7
-
 8
8
-
 9
9


Ginnys 12 in 1 Kitchen Master - HOUS-HS-3318 Owner's manual
- Category
- Food processors
- Type
- Owner's manual
Ask a question and I''ll find the answer in the document
Finding information in a document is now easier with AI
Related papers


Other documents
-
 Germanica GER-9WB User manual
-
Andrew James Multifunctional Processor User manual
-
Magimix Ma Cuisine C 3200 User manual
-
NutriBullet NLBVG User manual
-
Magimix Compact 3200 XL Operating instructions
-
 L'Equip EXPANDABLE 524 User manual
-
Cuisinart BFP-703 Series User manual
-
-
-

