Your new mailbox comes completely assembled. To begin using your mailbox, it must be properly mounted in accordance
with USPS requirements to facilitate carrier access, described below. You can mount your mailbox on one of the optional
mailbox posts we offer (sold separately), or you can mount it to a wooden post using the optional 4X4 Adapter (also sold
separately).
CUSTOMERS ARE REQUIRED TO CONTACT THE LOCAL POST OFFICE BEFORE INSTALLING THE MAILBOX TO
ENSURE ITS CORRECT PLACEMENT AND HEIGHT AT THE STREET. GENERALLY, MAILBOXES ARE INSTALLED AT
A HEIGHT OF 41-45 INCHES FROM THE ROAD SURFACE TO INSIDE FLOOR OF THE MAILBOX OR POINT OF MAIL
ENTRY (LOCKED DESIGNS) AND ARE SET BACK 6-8 INCHES FROM THE FRONT FACE OF CURB OR ROAD EDGE
TO THE MAILBOX DOOR.
Mounting Instructions
If you have any questions about how to mount or use this mailbox, or if you need any replacement parts, please call
us directly at (800) 464-7491 or contact us at www.architecturalmailboxes.com.
© 2014, Architectural Mailboxes, LLC Rev. I
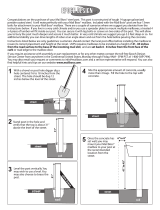
For 3” Round In-ground Post (item 7505 or 7507) or Standard In-ground Post (item 5525): Dig a hole deep
enough to allow the box to sit at the specified height, as required by your local post office. The height from the
road level to the mailbox floor is typically between 41 and 45 inches. Make sure the hole is set back from the road
such that the distance from the curb or the road edge to the mailbox face meets local post office requirements,
typically between 6 and 8 inches.
For Standard Surface Mount Post item 5526: If using j-bolts, dig a hole deep enough to properly support the box
(about 18") and to allow the box to sit at the specified height. If using concrete anchors in preexisting concrete,
make sure the anchor positions allow the box to sit at the specified height. Also, make sure the bolt or anchor
positions allow for the specified set-back, typically 6 to 8 inches from curb.
For Decorative Post item 5515: Refer to the instructions included with the post.
1
For 3” Round In-ground Post (item 7505 or 7507) or
Standard In-ground Post (item 5525): Pour the concrete
(at least 1 cubic foot recommended) completely around the
post, making sure the post and mailbox are level and
correctly positioned according to your local post office.
For Standard Surface Mount Post (item 5526): Pour
concrete around j-bolts held in the correct pattern, or install
anchors in the correct pattern into dry concrete.
For Decorative Post (item 5515): Refer to the
instructions included with the post.
2
For 3” Round In-ground Post (item 7505 or 7507), or Standard Posts (items 5525 or
5526): Attach the mailbox to the post using the hardware included with the post.
For Decorative Post (item 5515): Refer to the instructions included with the post.
Note - If you are using a mounting method other than one of our optional post (items
7505, 7507, 5525, 5526, 5515 or 5565): The mailbox has mounting bolt patterns on the
bottom that are designed to provide adequate mounting strength and stability for long term
use. Do not drill new mounting holes into the mailbox floor. Instead, create a bracket to
attach the mailbox to the post using the existing holes in the mailbox floor. Drilling new holes
or modifying the mailbox in any way may compromise the function, strength or corrosion
resistance of the product, and void the warranty.
3
Height per local post
office, typically between
41 and 45 inches to floor.
Set back per local post office,
typically between 6 and 8 inches.
NOTE: The mounting hardware
to attach this mailbox to your
existing post or to a post from
another manufacturer is not
included. Compatible mounting
hardware is included with all
Architectural Mailboxes posts,
sold separately.
!
x4
Oasis 360 Mailbox (Model 6300) Instructions
4
Attach the mailbox to the
post using the hardware
included with the post.
www.architecturalmailboxes.com (800) 464-7491
R

Using your new mailbox
Oasis 360 Mailbox (Model 6300) Instructions
© 2014, Architectural Mailboxes Rev. I
www.architecturalmailboxes.com (800) 464-7491
R
INCOMING DELIVERIES - Your Oasis 360 Mailbox is equipped with a hopper style door, designed to accept delivery of mail
and small parcels. This mailbox provides some security until you are able to retrieve your deliveries at the end of the day.
Although this box is locking and provides a front line deterrent for thieves, it is not a safe and you should take reasonable
precautions to make sure your deliveries remain secure. Here are some suggestions:
Do not leave deliveries in your box for extended periods of time. Collect your deliveries every day and don’t leave them
overnight.
Do not let your deliveries stack up in the receptacle.
When away for an extended period of time, request your local Post Office to hold your deliveries until you return. Your
mail is safest behind the walls of your local Post Office.
If you are receiving very valuable or sensitive deliveries, consider a means for their delivery consistent with their nature,
such as through registered mail or a trackable courier.
KEYS - Your new mailbox comes with four keys. Contact us directly if you need additional key blanks. The keys allow access
to the storage compartment through either the front door or the rear door. To retrieve incoming deliveries, simply open the
front or rear access door. IT IS IMPORTANT TO NOTE THAT IT IS NOT THE RESPONSIBILITY OF MAIL CARRIERS TO
OPEN MAILBOXES THAT ARE LOCKED, ACCEPT KEYS FOR THIS PURPOSE, OR LOCK MAILBOXES AFTER DELIV-
ERY OF THE MAIL.
OUTGOING MAIL - If you want to leave mail for your carrier to pick up, place the mail under the outgoing clip and raise the
flag. Upon your carrier’s next delivery, he or she will retrieve your outgoing mail and lower the flag.
Outgoing Mail Clip
Rear Owner
Access Door
Outgoing Mail Flag
Incoming Mail Door
Front Owner
Access Door
/
