Zoom TAC-2R User guide

Type
User guide

Zoom TAC-2R is a mixing application designed for Zoom TAC-2 and TAC-2R Thunderbolt™ audio interfaces, allowing you to make detailed adjustments to the built-in mixer and high-quality monitoring effects using your computer. Features include LO CUT, PHASE reversal, and AUTO GAIN that automatically sets optimal input signal levels. Additionally, LOOPBACK functionality sends both input and computer signals back to the computer, and MEMORY allows you to save and recall your preferred settings with ease.

Zoom TAC-2R is a mixing application designed for Zoom TAC-2 and TAC-2R Thunderbolt™ audio interfaces, allowing you to make detailed adjustments to the built-in mixer and high-quality monitoring effects using your computer. Features include LO CUT, PHASE reversal, and AUTO GAIN that automatically sets optimal input signal levels. Additionally, LOOPBACK functionality sends both input and computer signals back to the computer, and MEMORY allows you to save and recall your preferred settings with ease.

© 2014 ZOOM CORPORATION
Copying or reprinting this manual in part or in
whole without permission is prohibited.
Reference guide
2
is a mix application designed specifically for the , . Using a computer, you can make settings for the built-in mixer and for the
high-quality monitoring effects. Functions include LO CUT, PHASE reversal and AUTO GAIN, which automatically detects input signal levels. Other functions are LOOP-
BACK, which sends the input signal and computer signal back to the computer, and MEMORY, which allows you to save settings with one touch.
Depending on whether a
or is connected, the screen display and some of its functions will differ.
Installing and launching
Introduction
3.Launch
When you connect a or to a computer using a Thun-
derbolt™ cable,
will launch automatically.
HINT
• See the or operation manual for instructions about connecting
it with a computer.
If it does not launch automatically, open
from the Applications
folder on the computer.
1.Download to the computer
Download the application from the ZOOM website (http://www.zoom.co.jp/
downloads).
HINT
• You can download the latest ZOOM from the above website.
• The supported operating systems are as follows.
Mac OS X 10.8.5 (or later)
2.Install on the computer
Click the "ZOOM TAC-2 MixEfx.pkg" icon and follow the instructions to install
.
3
Overview of sections/Basic operations
Setting the input
preamp
P.4
Setting the effect
P.8
Checking computer settings/Using
the loopback function
P.6
Saving and loading settings
P.8
Using the
built-in mixer
P.6
Setting the output level
P.7
Setting the input preamp
P.5
Setting the output level
P.7
• Click a knob and drag up or down to adjust it.
• Press the shift key while moving a knob to make ne adjustments.
• Click a knob value to allow direct entry of the value.
• Click a button to turn it on/off.
To change the sampling rate, open the Utilities folder in the Applications folder and double-click the
Audio MIDI Setup application. Select "TAC-2" or "TAC-2R" in the application and set the sampling rate.
Basic operations
When a is connected, the
screen display and some of its functions will change.
differences
4
Setting the input preamp (INPUT PREAMP)
Adjusting the input gain
Turn the GAIN knob to adjust the input gain so that it does not
cause the CLIP indicator to light.
Enabling the lo-cut filter
Click the LO CUT button so that it lights.
The cutoff frequency is 80 Hz.
Reversing the polarity
Click the PHASE button so that it lights.
Using phantom power
Click the PHANTOM button so that it lights.
Checking input levels
Check the level meters to see the input levels of INPUT 1 and
INPUT 2.
If an input exceeds 0 dB (maximum value), the top of the meter
will light red. Click the top of the meter to turn off this indicator.
Adjusting the gain automatically
To set the optimal gain level automatically, click the AUTO but-
ton and input the audio signal.
Setting the gain automatically
1.Select the maximum recording level.
2.Enable the automatic gain setting.
Click
3.Input the audio signal.
4.Complete the setting.
Click again
HINT
If there is no input for about three seconds, the button will blink
more rapidly and the setting will complete automatically.
NOTE
• Automatic gain can only be set when a is connected.
• When a
is connected, no AUTO button will be shown.
Using a
5
Adjusting the input gain
Turn the GAIN knob to adjust the input gain so that it does not
cause the CLIP indicator to light.
NOTE
If you adjust the GAIN knob, the input
gain setting will also change automatically.
Using the Hi-Z function
Click the Hi-Z button so that it lights.
Enabling the lo-cut filter
Click the LO CUT button so that it lights.
The cutoff frequency is 80 Hz.
Reversing the polarity
Click the PHASE button so that it lights.
Using phantom power
Click the PHANTOM button so that it lights.
Phantom power will be supplied to both INPUT 1 and INPUT 2
simultaneously.
Checking input levels
Check the level meters to see the input levels of INPUT 1 and
INPUT 2.
If an input exceeds 0 dB (maximum value), the top of the meter
will light red. Click the top of the meter to turn off this indicator.
Using a
6
Using the built-in mixer (MIXER)
Adjusting the input signal panning
Turn the INPUT 1 PAN and INPUT 2 PAN knobs to adjust the panning of the input signals.
Double-click to set it to 0 (center).
In the center position, the reduction is -3 dB.
Adjusting the input signal levels
Turn the INPUT 1 LEVEL and INPUT 2 LEVEL knobs to adjust the levels of the input
signals.
Double-click to set it to 0 dB.
Adjusting signal levels input from the computer
Turn the COMPUTER LEVEL knob to adjust the computer input levels.
Double-click to set it to 0 dB.
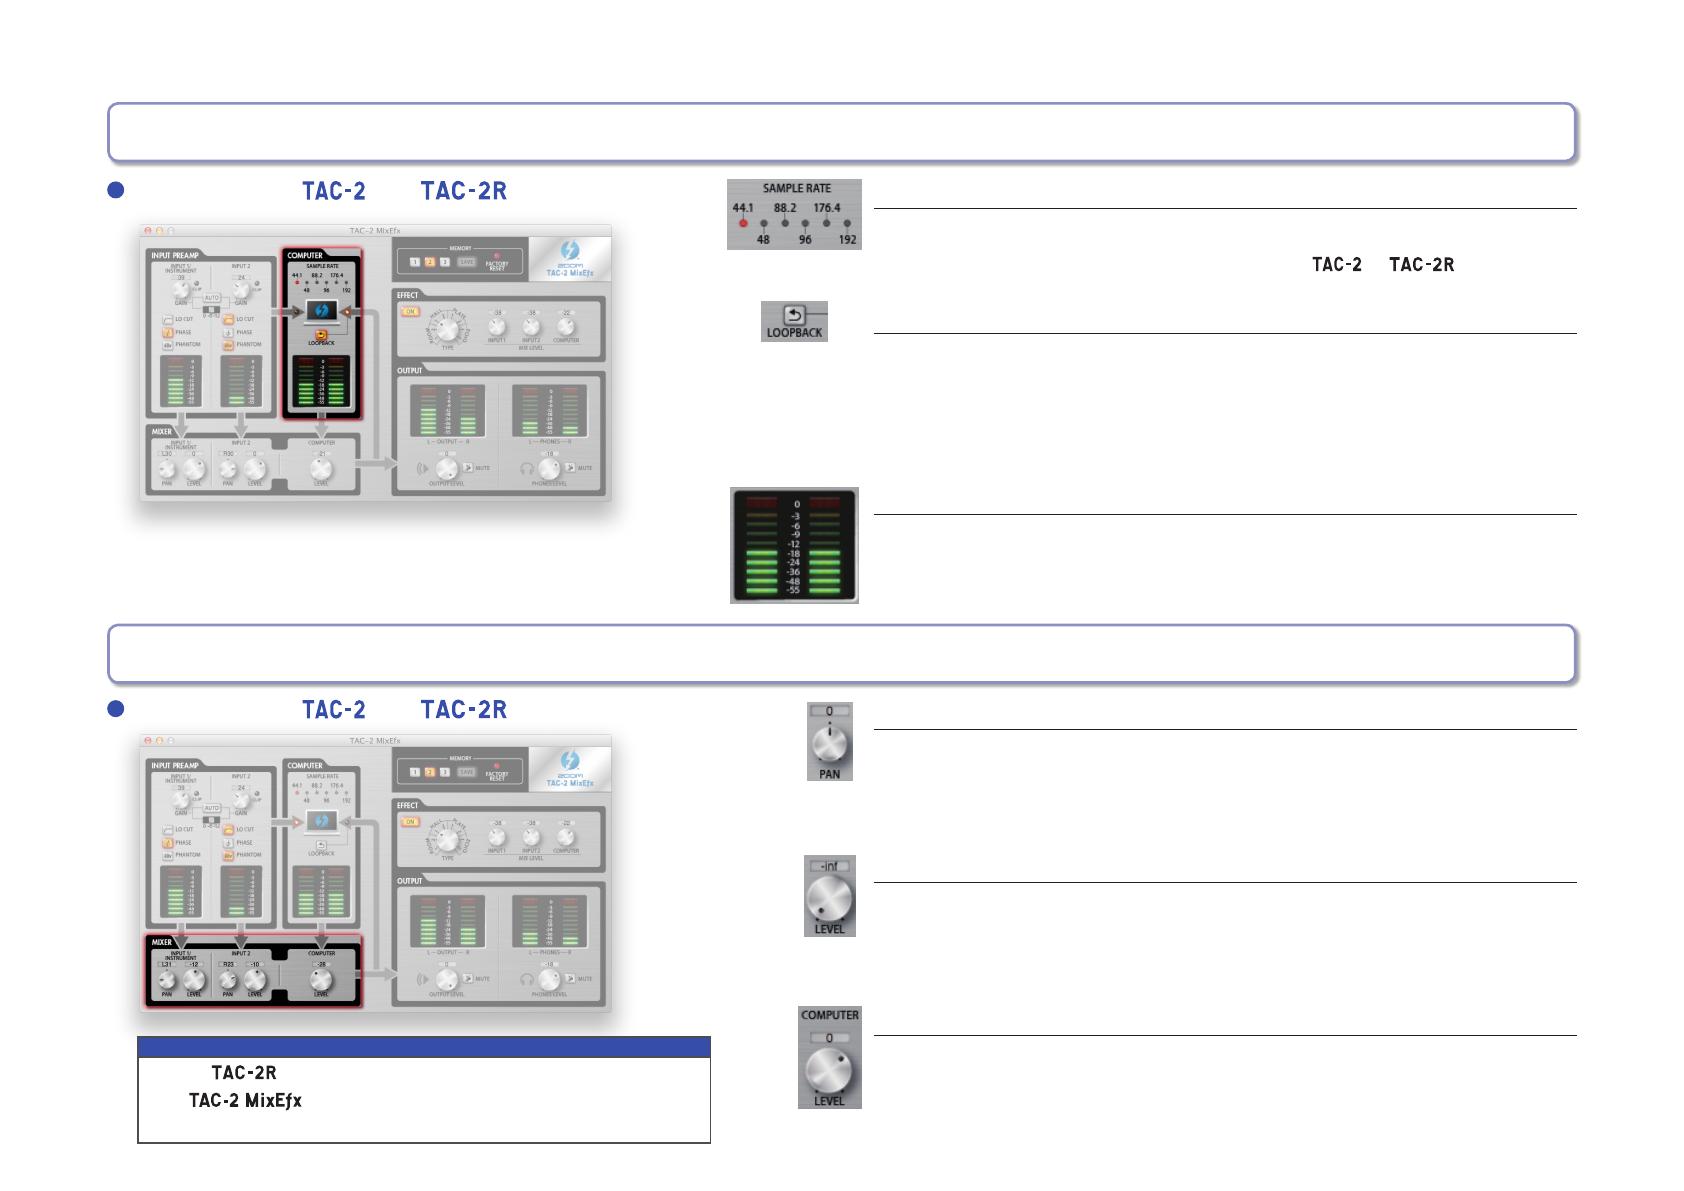
Checking computer settings/Using the loopback function (COMPUTER)
Checking the sampling rate
Checking the sampling rate.
The lit indicator shows the sampling rate that the
or is using.
Sending the mixed signal to the computer
The signals input through INPUT 1 and INPUT 2 and from the computer can be
mixed and sent back to the computer.
When you want to record the final mixed signal, press the LOOPBACK button
so that it lights.
Checking input levels from the computer
Check the level meters to see the input levels from the computer.
If an input exceeds 0 dB (maximum value), the top of the meter will light red.
Click the top of the meter to turn off this indicator.
NOTE
If the DIRECT MONITOR switch position is changed,
the
pan and input level settings will also change
automatically.
Same for both and
Same for both and
7
Setting the output level (OUTPUT)
Adjusting the OUTPUT/PHONES volume levels
Turn the OUTPUT LEVEL and PHONES LEVEL knobs to adjust their volumes in-
dependently.
Muting the OUTPUT/PHONES outputs
The OUTPUT/PHONES outputs can be muted.
Click the MUTE button so that it lights to mute the output.
Checking output levels
You can check the OUTPUT/PHONES level with the level meters.
If an output exceeds 0 dB (maximum value), the top of the meter will light red.
Click the top of the meter to turn off this indicator.
Adjusting the DIGITAL LEVEL
Turn the DIGITAL LEVEL knob to adjust it.
Muting the DIGITAL LEVEL output
You can mute the DIGITAL LEVEL output.
Click the MUTE button so that it lights to mute the output.
Checking output levels
You can check the output level with the level meters.
If an output exceeds 0 dB (maximum value), the top of the meter will light red.
Click the top of the meter to turn off this indicator.
OUTPUT PHONES
Using a
Using a
NOTE
cannot be used to adjust the OUTPUT
and PHONES levels.Use the
OUTPUT and
PHONES knobs to adjust these levels.
8
Loading settings
1.Load saved settings.
Click
Saving and loading settings (MEMORY)
Saving settings
1.Start saving settings.
Click
2.Select a blinking button and save the settings.
Click
Resetting interface settings
To restore a or to its factory
default settings, click the FACTORY RESET
button. Settings saved in
will be retained.
Setting the effect (EFFECT)
Adjusting effect settings
1.Turn the effect on.
Click
2.Select the effect.
Turn
3.Adjust the effect MIX LEVEL.
Turn
Effect types
ROOM1
This reverb simulates the reverbera-
tions of an echo chamber in a re-
cording studio.
ROOM2
This reverb simulates the rever-
berations of a concert in a club.
HALL1
This reverb simulates a concert hall
with bright reverberations.
HALL2
This reverb simulates a concert hall
with muted reverberations.
PL ATE1
This simulates a plate reverb with
short reflections.
PL ATE2
This simulates a plate reverb with
long reflections.
ECHO1
This shor t delay can be used in
many situations.
ECHO2 This simulates a tape echo.
Same for both and
Same for both and
Setting version update alerts
1.Select in the menu bar.
Click
2.Select "Preferences…"
Click
3.Enable the version update alerts.
HINT
• The alerts are enabled when checked.
Viewing version information
1.Select in the menu bar.
Click
2.Select "About TAC-2 MixEfx".
Click
3.Check the version information.
HINT
"Version" is the mixer application version and "Device Version" is
the version of the
or hardware.
Managing software and firmware versions
iPad, iPhone, iPod, and iPod touch are trademarks of Apple Inc., registered in the U.S. and other countries.
Note: All trademarks and registered trademarks in this document are for identification purposes only and are not intended to infringe on the copyrights of their respective owners.
Z2I-2040-04
ZOOM CORPORATION
4-4-3 Kanda-Surugadai, Chiyoda-ku, Tokyo 101-0062 Japan http://www.zoom.co.jp
  • Page 1 1
  • Page 2 2
  • Page 3 3
  • Page 4 4
  • Page 5 5
  • Page 6 6
  • Page 7 7
  • Page 8 8
  • Page 9 9

Zoom TAC-2R User guide

Type
User guide

Zoom TAC-2R is a mixing application designed for Zoom TAC-2 and TAC-2R Thunderbolt™ audio interfaces, allowing you to make detailed adjustments to the built-in mixer and high-quality monitoring effects using your computer. Features include LO CUT, PHASE reversal, and AUTO GAIN that automatically sets optimal input signal levels. Additionally, LOOPBACK functionality sends both input and computer signals back to the computer, and MEMORY allows you to save and recall your preferred settings with ease.

Ask a question and I''ll find the answer in the document

Finding information in a document is now easier with AI