Bontrager GoTime Owner's manual
- Category
- Bicycle accessories
- Type
- Owner's manual
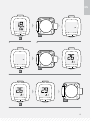
Bontrager GoTime is an easy-to-use cyclocomputer that provides you with essential ride data. It has a large display that shows your speed, distance, time, and more. GoTime is also water-resistant and has a long battery life, so you can ride with confidence in any weather. With its simple setup and intuitive interface, GoTime is the perfect cyclocomputer for riders of all levels.
Bontrager GoTime is an easy-to-use cyclocomputer that provides you with essential ride data. It has a large display that shows your speed, distance, time, and more. GoTime is also water-resistant and has a long battery life, so you can ride with confidence in any weather. With its simple setup and intuitive interface, GoTime is the perfect cyclocomputer for riders of all levels.


-
 1
1
-
 2
2
-
 3
3
-
 4
4
-
 5
5
-
 6
6
-
 7
7
-
 8
8
-
 9
9
-
 10
10
-
 11
11
-
 12
12
-
 13
13
-
 14
14
-
 15
15
-
 16
16
-
 17
17
-
 18
18
-
 19
19
-
 20
20
-
 21
21
-
 22
22
-
 23
23
-
 24
24
-
 25
25
-
 26
26
-
 27
27
-
 28
28


Bontrager GoTime Owner's manual
- Category
- Bicycle accessories
- Type
- Owner's manual
Bontrager GoTime is an easy-to-use cyclocomputer that provides you with essential ride data. It has a large display that shows your speed, distance, time, and more. GoTime is also water-resistant and has a long battery life, so you can ride with confidence in any weather. With its simple setup and intuitive interface, GoTime is the perfect cyclocomputer for riders of all levels.
Ask a question and I''ll find the answer in the document
Finding information in a document is now easier with AI
Related papers
-
Bontrager trip 100 User manual
-
-
-
-
-
-
-
-
-