Page is loading ...

ENG CC-RD100 STRADA
1
8
4
6
SENSOR LINE
or
5
6
3
CLICK
2
1
!
!
1
2
9
1
2
1
b
a
for STEM
for HANDLEBAR
SENSOR LINE
SENSOR LINE
2
2
2
2
A
1
1
or
or
B
Max. 5 mm
Max. 5 mm
B
aa
bb
7
AC
MENU
B
D
F
G
C
H
E
MODE
A
Push!
4
6
8 9
5
2
1
3
7
STRADA
CYCLOCOMPUTER
CC-RD100
Owner's Manual
U.S. Pat. Nos. 5236759/6957926 Pat./Design Pat. Pending
Copyright© 2006 CATEYE Co., Ltd.
CCRD1W-060228 066600500 2
®
Component name
1 Bracket band
2 Bracket
3 Sensor
4 Magnet
5 Sensor rubber band (x2)
6 Sensor hook
7 Sensor rubber pad (x3)
8 Nylon ties (x5)
9 Bracket rubber pad
LIMITED WARRANTY - 2-Year Computer only
(Accessories/Attachments and Battery Consumption excluded)
If trouble occurs during normal use, the part of the Computer will be re-
paired or replaced free of charge. The service must be performed by CatEye
Co., Ltd. To return the product, pack it carefully and remember to enclose
the warranty certificate with instruction for repair. Please write or type your
name and address clearly on the warranty certificate. Insurance, handling
and transportation charges to our service shall be borne by person desiring
service.
CO
.,LTD.
2-8-25, Kuwazu, Higashi Sumiyoshi-ku,
Osaka 546-0041 Japan
Attn: CATEYE Customer Service Section
Service & Research Address for USA
CATEYE Service and Research Center
1705 14th St. 115 Boulder, CO 80302
Phone: 303.443.4595
Toll Free: 800.5CATEYE
Fax: 303.473.0006
E-mail: [email protected]
URL: http: //www.cateye.com
You can also use ties 8 to secure the
sensor.

ENG CC-RD100 STRADA
2
#160-0290 (#160-0291)
Parts Kit (Rear long cord)
#169-9760
Magnet for Composite Wheel
#169-9690
Hi-Power Wheel Magnet
#169-9691
Wheel Magnet
#160-0280
Bracket band
#169-6180
Lithium Battery (CR1620)
SET-UP (BEFORE USE) SETTING MENUOPERATION FLOW
L (mm)
ETRTO Tire size
L (mm)
ETRTO
L (mm)
ETRTO Tire sizeTire size
47-305
47-406
47-507
23-571
37-590
40-559
47-559
50-559
54-559
57-559
57-559
32-630
18-622
20-622
23-622
25-622
28-622
32-622
37-622
40-522
12 x 1.75
14 x 1.50
14 x 1.75
16 x 1.50
16 x 1.75
18 x 1.50
18 x 1.75
20 x 1.75
20 x 1-3/8
22 x 1-3/8
22 x 1-1/2
24 x 1
24 x 3/4 Tubular
24 x 1-1/8
24 x 1-1/4
24 x 1.75
24 x 2.00
24 x 2.125
26 x 7/8
26 x 1(59)
26 x 1(65)
26 x 1.25
26 x 1-1/8
26 x 1-3/8
26 x 1-1/2
26 x 1.40
26 x 1.50
26 x 1.75
26 x 1.95
26 x 2.00
26 x 2.10
26 x 2.125
26 x 2.35
26 x 3.00
27 x 1
27 x 1-1/8
27 x 1-1/4
27 x 1-3/8
650 x 23C
650 x 35A
650 x 38A
650 x 38B
700 x 18C
700 x 19C
700 x 20C
700 x 23C
700 x 25C
700 x 28C
700 x 30C
700 x 32C
700C Tubular
700 x 35C
700 x 38C
700 x 40C
935
1020
1055
1185
1195
1340
1350
1515
1615
1770
1785
1753
1785
1795
1905
1890
1925
1965
1920
1913
1952
1953
1970
2068
2100
2005
2010
2023
2050
2055
2068
2070
2083
2170
2145
2155
2161
2169
1935
2090
2125
2105
2070
2080
2086
2096
2105
2136
2146
2155
2130
2168
2180
2200
Tire size
2
6
x
1
-
3
/
8
[Tire size] or [ETRTO]
0
Tm
Dst
Dst 2
Av
Mx
Odo
AC
Current Speed
0.0 (4.0) - 200.0 km/h
[0.0 (3.0) - 125.0 mph]
RESET-1
RESET-2
0
Tm
Dst
Av
Mx
0
Dst 2
0.0(4.0) - 200.0 km/h
[0.0(3.0) - 125.0 mph]
0.0 - 9999.9 /
10000 - 99999 km [mile]
0:00 - 23:59
or 1:00 - 12:59
Tm
(Elapsed Time)
Mx
(Maximum Speed)
Odo
(Total Distance)
(Clock)
Dst
(Trip Distance)
Dst 2
(Trip Distance-2)
Av
(Average Speed)
0:00'00" - 9:59'59"
0.00 - 999.99 km [mile]
0.00 - 999.99 /
1000.0 - 9999.9 km [mile]
0.0 - 200.0 km/h
[0.0 - 125.0 mph]
RESET-1
RESET-1
RESET-1
RESET-1
RESET-2
km/h mph
00-59
Odo Input
km/h
or
mph
Wheel size
Clock Setting
0-23 / 1-12
or (Wheel size icon)
24h 12h
Menu Finishi
To Menu
To Menu
To Menu
To Menu
All Clear
DATA RESET
1
Select
km/h
or
mph
2
Wheel Circumference
3
Clock Setting
4
0-23 / 1-12 00-59
MODE
(2 sec.)
km/h mph
24h 12h
SET
SET
SET-UP END
SET
SETTINGS
L (mm)
START : 2096
START: 24h - 0:00
START : km/h
SET : 2068
SET : km/h
SET : 24h - 10:30
To Menu
SET
SET
SET
SET
MODE
(2 sec.)
MODE
(2 sec.)
MODE
(2 sec.)
MODE
(2 sec.)
MODE
(2 sec.)
MODE
(2 sec.)
MODE
(2 sec.)
MODE
MODE
MODE MODE MODE
MODE
MODE
MODE
MODE
MODE
MODE
MODE
MODE
MODE MODE MODE
MODE
(2 sec.)
MODE
(2 sec.)
MODE
(2 sec.)
MODE
MODE
MODE
(2 sec.)
MODE
(2 sec.)
MODE
(2 sec.)
MODE
(2 sec.)
BATTERY
All Clear
CR1620
(SET-UP )
1
+
OK NO!
Standard Parts Option Parts

ENG CC-RD100 STRADA
3
CAUTION
• Do not concentrate on the computer while riding. Be sure to ride safely!
• Tighten the dial on the bracket band by hand only. Overtightening can damage the screw threads.
• When cutting off the protruding part of the bracket band, rounding the edges to prevent injury.
• When using the computer installed on the bracket, press the MODE button around the three dots below
the screen. Pressing hard on other areas can result in malfunction or damage.
• Install the magnet, sensor, and bracket securely. Check these periodically.
• Avoid having the computer in hot direct sunlight for extended periods.
• Do not disassemble the computer.
• When unclipping the computer from the bracket, always hold one hand under the computer so as not to
drop it. Dropping the computer may damage it.
• Never place the computer on a metal surface. If you do, the contact points will conduct electricity,
discharging the battery.
• When cleaning the computer and accessories, do not use thinners, benzene, or alcohol.
• When tightening down the battery cover after replacing the battery, make sure that the rubber packing is
properly seated to ensure that a waterproof seal is maintained.
• Dispose of used batteries according to local regulations. Do not put batteries into mouth. If swallowed,
consult a doctor immediately.
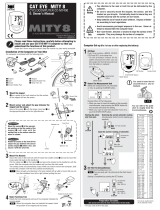
Correct installation of sensor and magnet
Please set the computer up before mounting the bracket sensor on the bike.
A
Attach the magnet so that it passes through the sensor line of the sensor.
B
Be sure that the clearance between sensor surface (at sensor line) and the magnet does not exceed 5 mm.
Part names
A
MODE button
When using the computer installed on the bracket, press the three dots just below the screen.
When using the computer alone, press the MODE button on the back directly.
B
Current Speed
C
Pace arrow
Indicates whether the current speed is faster or slower than the average speed. ( Faster, Slower)
D
Speed unit
E
Mode symbol
Indicates the data currently displayed on the bottom row.
Tm ......... Elapsed Time Dst (Dst 2) ........ Trip Distance
Av .......... Average Speed Mx ..................... Maximum Speed
Odo ........ Total Distance
...................... Clock
F
Wheel size icon
G
Battery case cover
H
Contact
Before Installation
We recommend sliding the computer onto the bracket to Set Up BEFORE mounting the bracket sensor
wire to the bike. The mode button on the back of the computer can be difficult to press if not mounted.
Initial Computer Set-up
Carry out the SET-UP procedure corresponding to the bicycle on which the computer is being installed.
Press the AC button to carry out the settings in to set up the following: order: Speed unit -> Tire size ->
Clock. Finally, press the MENU button to register the setting.
Select Speed Scale: Press the MODE button to switch between kph(kilometers) and mph(miles). When
the desired speed scale is flashing, press the MENU button to set.
Tire Circumference: Find the size of your front tire and match to the tire circumference chart (part 3 of
SET-UP CHART). Press the MODE button to increase the value of the flashing digit. HOLD the MODE
button to shift to the next digit on the left. Repeat until finished and then press the MENU button to set the
tire circumference.
Clock Setting: HOLD the MODE button for two seconds and “24h” will flash. Press the MODE button to
switch between 12H and 24H. HOLD the MODE button for two seconds set and hours begin to flash.
Increase the value by pressing the MODE button. HOLD down the MODE button for two seconds to set and
minutes will flash. Increase the value for minutes by pressing the MODE button. When time is correct,
press and release the MENU button. Initial set-up is now complete.
Starting/Stopping measurement
This computer is set to automatic time mode. automatically carries out measurements when the bicycle is
in use. When the bicycle moves forward the computer will display speed. user starts exercising, measure-
ment starts accordingly; when the user stops, measurement stops. While the bicycle is in motion, the
speed unit icon flashes.
Switching Computer function
Press the MODE button to switch the computer function according to the OPERATION FLOW CHART.
Measurement of DST-2 (Trip Distance-2) starts/stops according to the Trip Distance. Note, however, that DST-2
measurement must be reset individually.
Resetting data
To reset measurement data, display any data other than DST-2 and then press and hold the MODE button.
If the MODE button is pressed and held with DST-2 displayed, DST-2 only is reset. The total distance is not
reset in either case.
Power-saving function
If the computer has not received any signal for an hour, power-saving mode will activate and only the clock will
be displayed. Alternatively, if the sensor detects a signal or the MODE button is pressed, the main display
reappears.
Dual Wheel Size
Two wheel sizes ( and ) can be registered on the computer. This is useful when the computer is
shared between two bicycles or when different wheel sizes are used on the same bicycle but at different
times.
* Use the menu screen to toggle between A and B. For further information, see the SETTING MENU.
Changing the computer settings
To bring up the menu screen, press the MENU button with the Measuring screen displayed. The settings
can be checked and changed on this screen if necessary.
With the menu screen displayed, press and hold the MODE button to change the setting for the display
menu. If the menu screen is not touched for a minute, the Measuring screen reappears. The new settings
are applied only when the SET button (Finishi) is pressed.
Press the MENU button to change any settings after initial set up. Press the MODE button to switch between
functions displayed in the following order:
A or B Wheel Size: HOLD the MODE button and A or B begins to flash. Press the MODE button to switch
between the two. Pres the MENU button to set and return to the “menu loop”.
Tire Circumference: Hold the MODE button. Find your tire size off the front tire and match to the circumference
chart (part 3 of SET-UP CHART). Press the MODE button to increase the value of the flashing digit. HOLD the
MODE button to shift to the next digit on the left. Repeat until tire circumference is correct. Press the MENU
button to set and return to the “menu loop”.
Clock Setting: HOLD the MODE button and “24H” will flash. Press the MODE button to switch between “24H”
and “12H”. HOLD the MODE button to set and the Hours will flash. Increase the values by pressing the MODE
button. When the Hour is correct HOLD the MODE button and minutes will begin to flash. Increase the value by
pressing the MODE button. When the time is correct press the MENU button to return to the “menu loop”.
Odometer Input: HOLD the MODE button. The digit will flash. Press the MODE button to increase the value.
HOLD the MODE button to shift to the next digit on the left. Repeat until the correct odometer is correct.
Press the MENU button to set and return to the “menu loop”.
Kph/Mph: Hold the MODE button. Press the MODE button to switch between kph and mph. When the
desired speed scale is flashing, press the MENU button to set and return to the “menu loop”.
Exit the “menu loop” by pressing the MENU button again.
* For further information, see the SETTING MENU CHART.
Maintenance
To clean the computer or accessories, use diluted neutral detergent on a soft cloth, and then wipe it off
with a dry cloth.
Troubleshooting
The MODE button does not work when the computer is mounted on its bracket.
Check that there is no dirt between the bracket and the computer.
Wash off the bracket with water to get rid of any dirt, and to ensure that the computer slides in and out
smoothly.
Speed and distance are not displayed. (Touch a metal item against two contact points of the computer
several times to create a short circuit while observing the display. If a numeric value appears, this signifies
that the computer is functioning normally.)
Is the clearance between the sensor and magnet too great?
Does the magnet pass through the sensor line?
Adjust the positions of the magnet and sensor.
Is there any foreign matter (which would prevent a clean contact) on the contact points of the computer
and/or bracket?
Clean the contact points.
Check that no wire cable is worn or broken. Even with a normal appearance, it may be that a wire cable
could be damaged broken internally.
Replace the bracket sensor set.
No display.
Is battery in the computer run down?
Replace battery and press the All Clear button on the back. it. Then reinitialize the computer according to
SET-UP procedures 1 to 4.
Incorrect data appears.
Note the total distance if possible. Then reinitialize the computer according Press the All Clear button to
SET-UP procedures 1 to 4. Then enter the total distance previously noted in the SETTING MENU.
Replacing the Battery
If the display appears faded, replace the battery. Before removing the old battery, note the current total
distance. Install a new lithium battery (CR1620) with the (+) side facing upward. Press the All Clear button
on the back and follow set up procedures. Then reinitialize the computer according to SET-UP procedures
1 to 4. Then enter the total distance, previously noted, via Odo Input in the SETTING MENU.
Specification
Battery ..................................... Lithium Battery CR1620 X 1
Battery Life .............................. Approx. 1 year (Using the battery for one hour a day; the battery life will vary
with the conditions of use.)
Controller ................................. 4-bit 1-chip microcomputer (Crystal controlled oscillator)
Display ..................................... Liquid crystal display
Sensor ..................................... No contact magnetic sensor
Wheel circumference range .... 0100 mm – 3999 mm (Default figure A : 2096 mm, B : 2096 mm)
Working temperature .............. 0°C - 40°C (32°F - 104° F)
Dimension/Weight ................... 1-53/64” x 1-7/32” x 19/32” (46.5 x 31 x 15 mm) / 0.63 oz (18 g)
* The factory-loaded battery life might be shorter than the above-mentioned specification.
* The specifications and design are subject to change without notice.
/
![CAT EYEEnduro 8 [CC-ED300]](http://vs1.manuzoid.com/store/data/000426304_2-f43a957600499ff339090d0d3770f813-160x210.png)