Black & Decker KC9662C User manual
- Category
- Power drills
- Type
- User manual

2
10mm Cordless Drills/Drivers
KC8482C/KC9682C/KC1282C Hammer Drill/Driver
KC8452C/KC8462C/KC9662C Drill/Driver
KC8402C Drill
Instruction Manual
Important!
On delivery your cordless drill/driver is not charged.
It must be charged for the appropriate time before
use. To prolong battery life, avoid leaving the tool on
charge for periods longer than two days.
Safety instructions
Warning! When using electric tools, the
following basic safety precautions should always be
taken to reduce the risk of fire, electric shock and
personal injury.
Read all these instructions before attempting to
operate this product and save these instructions.
For safe operation:
• We recommend that you take appropriate
measures for the protection of hearing if the
sound pressure of 85 dB (A) is exceeded.
• Keep the work area clean. Cluttered areas and
benches invite injuries.
• Consider work area environment. Do not
expose power tools or chargers to rain. Do not
use power tools in damp or wet locations. Keep
work area well lit. Do not use power tools in the
presence of flammable liquids or gases.
• Guard against electric shock. Avoid body
contact with earthed or grounded surfaces
(e.g. pipes, radiators, ranges, refrigerators).
• Keep children away. Do not let visitors touch
the tool or extension cord. All visitors should be
kept away from work area.
• Store idle tools. When not in use, tools and
batteries should be stored in a dry, high or locked
place, out of reach of children.
• Do not force the tool. It will do the job
better and more safely at the rate for which it
was intended.
• Use the right tool. Do not force small tools or
attachments to do the job of a heavy duty tool.
Do not use tools for purposes not intended;
for example, do not use a circular saw to cut tree
limbs or logs!
• Dress properly. Do not wear loose clothing or
jewellery as they can be caught in moving parts.
Rubber gloves and non-skid footwear are
recommended when working outdoors. Wear
protective hair covering to contain long hair.
• Use safety glasses. Use a face or dust mask if
the cutting operation is dusty or if using in
enclosed spaces.
• Secure your work. Use clamps or a vice to hold
your work. It is safer than using your hand and it
frees both hands to operate the tool.
• Do not overreach. Keep proper footing and
balance at all times.
• Maintain tools with care. Keep tools sharp
and clean for better and safer performance.
Follow instructions for lubricating and changing
accessories. Keep handles dry, clean and free
from oil and grease.
• Remove adjusting keys and wrenches.
Form the habit of checking to see that keys
and adjusting wrenches are removed from tool
before switching it on.
• Avoid unintentional starting. Do not carry a
tool with a finger on the switch.
• Stay alert. Watch what you are doing. Use
common sense. Do not operate when you are tired.
• Check damaged parts. Before further use of
the tool, a guard or other part that is damaged
should be carefully checked to determine that it
will operate properly and perform its intended
function. Check for alignment of moving parts,
binding of moving parts, breakage of parts,
mounting and any other conditions that may
affect its operation. A guard or other part that is
damaged should be properly repaired or
replaced by an authorised service centre unless
otherwise indicated in this instruction manual.
Have defective switches replaced by an
authorised service centre. Do not use the tool if
the switch does not turn it on and off.
• Warning! The use of any accessory or
attachment, other than recommended in this
instruction manual, may present a risk of
personal injury.
• Have your tool repaired by a qualified person.
Repairs should only be carried out by qualified
persons using original spare parts, otherwise
considerable danger to the user may result.
• This electrical appliance is in accordance with the
relevant standards.

3
However, if the outer seal is broken and this
leakage gets on your skin:
•Wash quickly with soap and water.
•Neutralise with a mild acid such as lemon
juice or vinegar.
•If battery liquid gets into your eyes, flush
them with clean water for a minimum of
10 minutes and seek immediate medical
attention. (Medical note: The liquid is a
25-35% solution of potassium hydroxide.)
•Do not attempt to open your drill/driver or
charger housings’ or the battery pack.
•Do not attempt to recharge non-rechargeable
batteries.
•The supply cord of the charger should not be
replaced by the customer; if the cord is
damaged it should be replaced at an authorised
Black & Decker service centre.
•Ensure that the battery pack is correct for the tool.
•Ensure that the outside surface of the battery
pack or tool is clean and dry before plugging into
the charger.
•Ensure that the battery is charged using the
correct charger recommended by the
manufacturer. Incorrect use may result in a
risk of electric shock, overheating or leakage of
corrosive liquid from the battery.
Save these instructions!
Electrical safety (UK only)
•Your equipment is fitted with two core cable and
a non rewirable plug. The plug is fitted with a
3 amp fuse which should only be replaced with
an identical fuse approved to BS1362.
Note: Fuses do not give personal protection against
electric shock.
•After changing the fuse in your plug always
ensure the fuse cover is refitted. If the fuse cover
is missing or damaged do not use the plug.
For replacement or detachable fuse covers
contact a Black & Decker service centre.
•Tools supplied with loose Black & Decker
extension cable and have a 13 amp plug fitted
are supplied with a 13 amp fuse, which is the
recommended fuse for the extension cable.
Note: If a non Black & Decker extension cable is to
be used on this product the recommended fuse
stated in the literature should be fitted to the plug.
ENGLISH
Charger plug and cable
•Do not tug at the cable to pull the plug from
the socket.
•Make sure the cable is located so that it will not
be stepped on, tripped over, or otherwise
subjected to damage or stress.
•Keep the cable away from heat, oil, sharp edges
and rough surfaces and always ensure it is in
good condition.
Additional drill and charger
safety rules
•Danger! 240 volts are present at the charging
terminals. Do not probe with conductive objects
or you will risk an electric shock.
•Danger! If the energy pack case is cracked or
damaged, do not insert into the charger or you
will risk an electric shock.
•The charger is designed for indoor use only.
•Do not operate the charger if it has received
a sharp blow, been dropped, or otherwise
damaged in any way. Take it to a Black & Decker
service centre.
•Never attempt to connect two chargers together.
•Always disconnect the supply before making
or breaking connections to the battery.
•Be aware that this tool is always in an operating
condition, because it does not have to be
plugged into an electrical outlet. Keep the switch
control lever in the “Off” position when the tool is
not in use or when changing accessories.
•When drilling or driving screws into walls, floors
etc., check wherever “live” electrical wires may
be encountered. Do not touch any front metal
parts of the tool! Hold the tool only by the
plastic housing.
•The charger and drill/driver are specifically
designed to work together. Do not attempt to
charge the drill/driver with any other charger
than the one supplied with the tool.
•Do not store the tool in locations where the
temperature may reach or exceed 50˚C (120˚F)
(such as outside sheds or metal buildings
in summer).
•Do not charge your drill/driver when it or the air
temperature is below (+40˚F) 4˚C or above
(+105˚F) 40˚C. This is important and may prevent
serious damage to the battery.
•Do not incinerate the drill/driver even if it is
severely damaged or completely worn out.
The battery pack can explode in a fire. A small
leakage of liquid from the battery cells may occur
under extreme usage, charging or temperature
conditions. This does not indicate a failure.

4
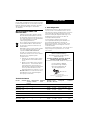
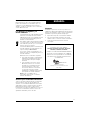
Fit a
BS1363A
approved
plug
Connect blue
to N (neutral)
Make sure that the
outer sheath of the
cable is held firmly
by the clamp
Fit the
recommended
fuse
Connect brown
to L (live)
240 volts AC only.
Never use a light
socket
Mains plug replacement (UK only)
Should your mains plug need replacing and you are
competent to do this, proceed as instructed below.
If you are in doubt contact a Black & Decker service
centre or a qualified electrician.
• Disconnect the plug from the power supply.
• Cut off the plug and dispose of safely. A plug
with bared copper conductors is very dangerous
if engaged in a live socket outlet.
• Only fit 13 amp BS1363A approved plugs fitted
with the correctly rated fuse.
• The cable wire colours, or a letter, will be marked
at the connection points of most good quality
plugs. Attach the wires to their respective points
in the plug (see diagram). Brown is for ‘live’ (L)
and blue is for ‘neutral’ (N).
• Before replacing the top cover of the mains plug
ensure that the cable restraint is holding the
outer sheath of the cable firmly and that the two
leads are correctly fixed at the terminal screws.
• Warning! Never connect live or neutral wires
to the earth pin marked ‘E’ or .
Extension cables
You can use up to 100 feet (30 metres) of
Black & Decker 2-core extension cable without
undue loss of power.
Note: An extension cable should not be used unless
absolutely necessary. Use of an improper extension
cable could result in a risk of fire and electric shock.
If an extension cable must be used, make sure it is
properly wired and in good electrical condition.
Description (Fig. A)
A
1. Power pack
2. Power pack release button
3. Switch
4. Forward/reverse/lock lever
5. Two gear selector
6. Storage for bit and key (bit only on
keyless chuck models)
7. Clutch/hammer mechanism
(where applicable)
8. Keyed chuck
9. Keyless chuck
10. 1 hour charger
11. 3 hour charger
Charging the batteries (Fig. B1 & 2)
B
The batteries in your drill/driver are not
charged when supplied as new.
Before attempting to charge your drill,
read thoroughly all of the preceding and
following instructions!
To charge your drill, follow the steps below:
• Put the forward/reverse lever in the
“OFF” (centre) position, and remove any
accessories from the chuck.
• To release the battery, press the buttons
and pull the battery out (Fig. B1).
• Plug the charger into a standard
electrical outlet.
• Place the battery in the charger
as indicated (Fig. B2).
During charging, the charger and battery
may feel warm to touch; this is quite normal.
• Allow the battery to remain in this
condition for at least 3-5 hours for a
3 hour charger or until the red light goes
out on a 1 hour charger. It will then be
ready for use.
• Disconnect the supply before making or
breaking connections to the battery.
Important charging notes
• Longest life and best performance can be
obtained if the energy pack is charged when the
air temperature is about 24°C. Do not charge the
energy pack in an air temperature below 5°C,
or above 35°C.
• Whilst charging, the charger and the energy pack
may become warm to touch. This is a normal
condition and does not indicate a problem.
• If the energy pack does not charge properly,
proceed as follows:
• Check the current at the socket by plugging
in a lamp or other appliance.
• Move the charger and power pack to a
location where the surrounding air
temperature is about 24˚C. In an extremely
warm environment the energy pack may be
too hot to permit charging.

5
ENGLISH
• If charging problems persist, take or send
the tool, energy pack and charger to an
authorised service centre.
• The energy pack should be recharged when it
fails to produce sufficient power on jobs which
were easily done previously. Do not continue to
use under these conditions. Follow the charging
procedure described above. You may also
charge a partially used pack whenever you wish.
1 hour charger only:
• The charger and energy pack can be left
connected indefinitely. The charger will keep the
energy pack fully charged.
Switch and forward/reverse lever
(Figs. C1 - 4)
C
To turn the drill on, squeeze the trigger switch.
To turn the drill off, release the trigger switch
(Fig. C1).
The forward/reverse lever is a three position
lever located over the trigger switch in the
housing.
• During charging, changing accessories
or storage, move the lever to the “Off”
position in the middle (Fig. C2).
• Slide it to the right to drill holes or
drive screws (Fig. C3).
• To remove screws or back out jammed
drill bits, move the lever fully to the left
(Fig. C4).
Two speed selector (Fig. D)
D
Your drill has a two speed mechanical gear
selector at the top of the housing. In order to
change the speed setting, allow the chuck to
rotate slowly by pressing gently on the
trigger switch.
To select the low speed setting, slide the
selector switch towards the front end of the
drill. The number 1 will appear on the
selector. This will produce a speed ideal for
screwdriving (Fig. D).
To select the high speed setting, slide the
selector switch towards the back end.
The number 2 will appear on the selector.
This will produce a speed ideal for drilling
and hammer drilling.
Warning! Do not change gear while the unit
is running.
Torque control (except KC8402C)
E
Your drill/driver is equipped with a torque
control mechanism to enable you to do
repetitive screwdriving.
• When screwing in the first screw,
determine the correct torque setting
which will result in the screw being flush
with the surface of the workpiece.
• By keeping the same torque setting,
all following screws will also be flush with
the workpiece, due to the torque
mechanism which disengages the
power of the motor at the moment the
screw is flush.
• This mechanism prevents damage to
the screwhead and the workpiece
(e.g. screws are not driven in too far).
Combination percussion action and
torque adjustment collar (KC8482C,
KC9682C & KC1282C)
These units are equipped with a combination
percussion action and torque adjustment
collar. To select for percussion action rotate
the collar until the hammer symbol is in line
with the indicator on the top of the drill
housing. To select the correct action for
non-masonry drilling tasks rotate the collar
until the drill bit symbol is in line with the
indicator on the top of the drill housing.
For screwdriving, these units are equipped
with 5 position collars, allowing adjustment
of the torque to suit the size of the screw
and the material involved. Before starting
work, adjust the torque in the following way.
Set the collar in position 1 and begin
screwdriving (low torque). If the machine
clutch ratchets too early, adjust the collar to
increase the torque as required.
Maximum recommended capacities
8.4V 9.6V 12V
Steel 10mm 10mm 10mm
Wood 15mm 20mm 25mm
Masonry (combi only) 10mm 10mm 12mm
Chucks (Figs. F1 - 3)
F
Keyless chuck
To insert a drill bit or other accessory,
follow the steps listed below:
• Switch the control lever to the
“Off” position.

6
To fasten all chucks
Put the chuck on the thread and turn it
clockwise till it stops. Tighten firmly. Put in
the screw and turn it anti-clockwise till
absolutely firm.
Hints on use
For longest product life, do not force the tool!
• Lock the trigger switch “Off” with the switch
control lever when attaching or changing bits
or accessories and when storing.
• Use sharp drill bits only.
• For wood, use twist drill bits, spade bits, power
auger bits, or hole saws.
• For metal use high speed steel twist bits.
• For masonry, such as brick, cements etc.,
use carbide-tipped bits.
• Be sure the material to be drilled is anchored
or clamped firmly. If drilling thin material use a
wood “back up” block to prevent damage to
the material and increase control on
breakthrough.
• Centre punch an indentation at the point to be
drilled. This will overcome the tendency of the bit
to slip around on a smooth surface. Place the tip
of the bit in the indentation and pull the trigger to
switch the motor on.
• Always apply pressure in a straight line with the
bit. Use enough pressure to keep your drill/driver
biting, but do not push hard enough to stall the
motor or deflect the bit. To minimise stalling on
breaking through the material, reduce pressure
on the drill/driver and ease the bit through the
last part of the hole.
• Hold the drill/driver firmly to control its
twisting action.
• During heavy drilling your unit may become hot.
Under these circumstances please allow the unit
to cool before continuing.
Drilling in wood
Holes in wood can be made with the same twist drill
bits used for metal. These bits should be sharp and
should be pulled out frequently when drilling to clear
chips from the flutes. Work that is apt to splinter
should be backed up with a block of wood. Let up
on the pressure just before the tip cuts through; this
will give a good clean hole.
Drilling in metal
Use a cutting lubricant when drilling ferrous metals.
The exceptions are iron and brass which should be
drilled dry.
• Grasp the rear half of the chuck with one
hand and use your other hand to rotate
the front half clockwise (hold the tool
pointing away from you) (Fig. F1).
• Insert the bit or other accessory about
2cm into the chuck and tighten securely
by holding the rear half of the chuck and
rotating the front portion anti-clockwise
(Fig. F2). To release the accessory,
repeat step 2 listed above.
To keep the keyless chuck in good condition,
occasionally tap lightly to free any dust that
may have accumulated inside.
Warning! Do not attempt to tighten drill bits
(or any other accessory) by gripping the front
part of the chuck and turning on the tool.
Damage to the chuck and personal injury
may result.
Chuck and key
To insert a drill bit or other accessory,
follow the steps listed below:
• Switch the control lever to the
“Off” position.
• Turn the chuck collar to open the
chuck jaws.
• Place the bit in the chuck as far as it
will go and then tighten the chuck collar
by hand.
• Place the chuck key in each of the three
holes and tighten in a clockwise direction
(Fig. F3).
• To release the bit, turn the chuck key in
an anti-clockwise direction in just one
hole then loosen the chuck by hand.
Changing the chuck (Fig. G1 - 4)
G
Open the jaws of the chuck completely.
Inside you will see the head of a screw.
Unscrew this screw by turning clockwise.
It is very important to use the right size of
screwdriver bit to prevent damage to the head!
(Fig. G1 & 3)
Keyless chuck
Place an allen key in the chuck and tighten the
jaws. Give the allen key a short powerful blow
with a rubber or wooden hammer or your
hand. The chuck will be loose and can be
screwed off the tool (Fig. G2).
Chuck and key
Put the chuck key in one of the holes of the
chuck and give it a short powerful blow either
with a hammer or your hand. The chuck will
be loose and can be screwed off the tool
(Fig. G4).

7
ENGLISHDrilling in masonry
Use carbide tipped masonry bits at high speeds.
Keep an even force on the drill but not so much that
brittle materials crack. A smooth, even flow of dust
indicates the proper drilling rate.
Screw lubricants
In some instances it may be to your advantage to
use a lubricant to make a screw drive a little easier.
Two common lubricants are a bar of soap and dish
washing liquid. Just put a little on the screw threads
for easy driving.
Cleaning and lubrication
• Use only mild soap and a damp cloth to clean
the tool. Do not use petrol, turpentine, lacquer
or paint thinner, dry cleaning fluids or
similar products.
• Never let any liquid get inside the tool.
Never immerse any part of the tool in liquid.
• Self lubricating bearings are used in the tool and
periodic relubrication is not required.
• In the unlikely event that your drill/driver should
ever require service, take or send it to your local
Black & Decker service centre.
Accessories
Black & Decker offer a complete range of screwdriver
bits. We recommend that Black & Decker
accessories are used. Please consult your local
Black & Decker dealer or service centre for details.
Rechargeable batteries and the
environment
Black & Decker cordless tools use nickel
cadmium (NiCad) batteries or battery packs
which can be charged many times to give
long life and repeatedly full power.
Cd
This symbol indicates the NiCad batteries
contained within this unit must be disposed
of properly and not discarded in everyday
household waste which may be disposed of
in an incinerator or landfill site.
NiCad batteries can be harmful to the
environment and can explode when exposed
to fire. Do not incinerate.
Therefore, when your tool or battery pack
needs replacing, think of the protection of
our environment.
Black & Decker recommends the following:
• Discharge batteries completely by
running the unit until the energy is
completely discharged and then remove
from the tool.
• Take the battery pack to a Black & Decker
service centre, your local dealer or your
local recycling station. If necessary,
contact your local council for disposal
information. The collected batteries will
be disposed of properly and/or used for
recycling purposes whilst protecting
the environment.
Note: You as a customer are responsible
for proper disposal or recycling of the
battery pack.
Black & Decker after sales service
All Black & Decker products are scrupulously tested
before leaving the factory. However, in the case of
your power tool being defective, please take it to
your nearest Black & Decker service centre. All DIY
and gardening products, as well as the fittings we
recommend, are guaranteed for 12 months parts
and labour.
Guarantee
If a Black & Decker product becomes defective
due to faulty materials or workmanship during the
guarantee period following purchase, we guarantee
to repair it free of charge, provided that:
• The product has not been misused.
• Repairs have not been attempted by persons
other than our own service staff or the staff or
authorised repairers.
• Proof of purchase date is produced.
This guarantee is offered as an extra benefit and is
additional to consumers’ statutory rights.

8
ENGLISH
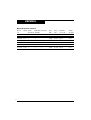
Cat. no. Voltage Mechanical Adjustable Percussion Low High Charger Charge
gears clutch action speed speed cat. no. time
KC8402C 8.4V 2 300 850 A9253 (807708) 3hr
KC8452C 8.4V 2 • 0-300 0-850 A9253 (807708) 3hr
KC8462C 8.4V 2 • 0-300 0-850 A9254 1hr
KC8482C 8.4V 2 •• 0-300 0-850 A9254 1hr
KC9662C 9.6V 2 • 0-350 0-1000 A9255 1hr
KC9682C 9.6V 2 •• 0-350 0-1000 A9255 1hr
KC1282C 12.0V 2 •• 0-400 0-1200 A9256 1hr
EC Declaration of Conformity
We declare that units:
KC8482C, KC9682C, KC1282C, KC8452C,
KC8462C, KC9662C, KC8402C
conform to 89/392/EEC, EN50144
A weighted sound pressure <70dB (A)
A weighted sound power <85dB (A)
Hand/arm weighted vibration 0.65m/s
2
Brian Cooke
Director of Engineering
Spennymoor, County Durham DL16 6JG
United Kingdom
Technical specifications
Page is loading ...
Page is loading ...
Page is loading ...
Page is loading ...
Page is loading ...
Page is loading ...
Page is loading ...
Page is loading ...
Page is loading ...
Page is loading ...
Page is loading ...
Page is loading ...
Page is loading ...
Page is loading ...
Page is loading ...
Page is loading ...
Page is loading ...
Page is loading ...
Page is loading ...
Page is loading ...
Page is loading ...
Page is loading ...
Page is loading ...
Page is loading ...
Page is loading ...
Page is loading ...
Page is loading ...
Page is loading ...
Page is loading ...
Page is loading ...
Page is loading ...
Page is loading ...
Page is loading ...
Page is loading ...
Page is loading ...
Page is loading ...
Page is loading ...
Page is loading ...
Page is loading ...
Page is loading ...
Page is loading ...
Page is loading ...
Page is loading ...
Page is loading ...
Page is loading ...
Page is loading ...
Page is loading ...
Page is loading ...

57
E††HNIKA
ÅÚ. ÇÔÏÙ¿˙ Æ˯·Ó. ∑˘ıÌÈ˙. ÑÚ¿ÛË Ω·Ì. ∫„. ºÔÚÙÈÛÙ‹˜ ΩÚfiÓÔ˜
ú·Ù·Ï. π·¯‡Ù. úψ٘ ÑfiÓËÛ˘ π·¯. π·¯. ÅÚ. ú·Ù. ºfiÚÙÈÛ˘
KC8402C 8.4V 2 300 850 A9253 (807708) 3ÒÚ˜
KC8452C 8.4V 2 • 0-300 0-850 A9253 (807708) 3ÒÚ˜
KC8462C 8.4V 2 • 0-300 0-850 A9254 1ÒÚ·
KC8482C 8.4V 2 •• 0-300 0-850 A9254 1ÒÚ·
KC9662C 9.6V 2 • 0-350 0-1000 A9255 1ÒÚ·
KC9682C 9.6V 2 •• 0-350 0-1000 A9255 1ÒÚ·
KC1282C 12.0V 2 •• 0-400 0-1200 A9256 1ÒÚ·
π¯ÓÈΤ˜ ÚԉȷÁڷʤ˜

58
R
Belgique/België Black & Decker Belgium NV Tel: 02 719 07 11
Weihoek 1, Nossegem Tlx: 22749 BLADE BB
1930-Zaventem-Zuid Fax: 02 721 40 45
Deutschland Black & Decker GmbH Tel: 06126 210
Black & Decker Straße 40 Fax: 06126 212435
65510 Idstein
España Black & Decker de España SA Tel: 977 802011
Ctra. de Acceso a Roda de Bará, km 0,7 Tlx: 56631 BLADE E
43883-Roda de Bará Fax: 977 802342
Tarragona
France Black & Decker (France) Sarl Tel: 72 20 39 20
Le Paisy Tlx: 300 250
69570 Dardilly Fax: 72 20 39 00
Lyon
Helvetia Black & Decker AG Elektrowerkzeuge Tel: 01 730 69 31 32
Rutistrasse 14 Tlx: 54462 BDZH CH
8952 Schlieren Fax: 01 730 70 67
Schweiz/Suisse
Italia Black & Decker Italia SpA Tel: 039 23 87 1
Viale Elvezia 2 Fax: 039 23 02 97 3
20052 Monza (Mi)
Nederland Black & Decker (Nederland) BV Tel: 31 1608 82000
Florijnstraat 10 Tlx: 54970 BLADE A
4879 Ah Etten-Leur Fax: 31 1608 38184
Österreich Black & Decker Tel: 0222 670 64 10
Werkzeugevertriebs GmbH Tlx: 13228 BLACK A
Erlaaerstrasse 165 Fax: 0222 670 64 114
Postfach 69, 1235 Wien
Portugal Black & Decker Tel: 468 76 13/468 75 13
Rua Egas Moniz 173 Tlx: 16 607 BLADEC P
Apartado 19, S. João do Estoril Fax: 467 15 80
2768 Estoril, Codex
United Kingdom Black & Decker Tel: 01753 511234
210 Bath Road Tlx: 848317 BAND MH
Slough Fax: 01753 551155
Berkshire SL1 3YD
EÏÏ¿˜ Black & Decker (EÏÏ¿˜) AE πËÏ: 9242870-75
†ÂˆÊ. ∏˘ÁÁÚÔ‡ 154 Service: 9242876-7
Åı‹Ó· 176 71 Fax: 9242869
Page is loading ...
-
 1
1
-
 2
2
-
 3
3
-
 4
4
-
 5
5
-
 6
6
-
 7
7
-
 8
8
-
 9
9
-
 10
10
-
 11
11
-
 12
12
-
 13
13
-
 14
14
-
 15
15
-
 16
16
-
 17
17
-
 18
18
-
 19
19
-
 20
20
-
 21
21
-
 22
22
-
 23
23
-
 24
24
-
 25
25
-
 26
26
-
 27
27
-
 28
28
-
 29
29
-
 30
30
-
 31
31
-
 32
32
-
 33
33
-
 34
34
-
 35
35
-
 36
36
-
 37
37
-
 38
38
-
 39
39
-
 40
40
-
 41
41
-
 42
42
-
 43
43
-
 44
44
-
 45
45
-
 46
46
-
 47
47
-
 48
48
-
 49
49
-
 50
50
-
 51
51
-
 52
52
-
 53
53
-
 54
54
-
 55
55
-
 56
56
-
 57
57
-
 58
58


Black & Decker KC9662C User manual
- Category
- Power drills
- Type
- User manual
Ask a question and I''ll find the answer in the document
Finding information in a document is now easier with AI
in other languages
- italiano: Black & Decker KC9662C Manuale utente
- français: Black & Decker KC9662C Manuel utilisateur
- español: Black & Decker KC9662C Manual de usuario
- Deutsch: Black & Decker KC9662C Benutzerhandbuch
- Nederlands: Black & Decker KC9662C Handleiding
- português: Black & Decker KC9662C Manual do usuário
Related papers
-
BLACK DECKER XTC183BK Owner's manual
-
BLACK DECKER GW180 Type 5 Owner's manual
-
Black & Decker GW180 User manual
-
-
BLACK DECKER GSC500 Owner's manual
-
BLACK+DECKER KR60 User manual
-
BLACK DECKER KR60 Owner's manual
-
Black & Decker KC1261F User manual
-
Black and Decker kc 1461 User manual
Other documents
-
Makita DA391DWD Datasheet
-
 Topelek Cordless Drill User manual
-
Fox F12-921A User manual
-
 Valex 1429401 User manual
-
Ferm CDM1079 FPCD-1800I Owner's manual
-
Milwaukee T-TEC 201 Instructions For Use Manual
-
Husqvarna Car Seat DS 50 User manual
-
-
-
HYPERICE Hypervolt User manual

