Frymaster Computer M2000 User manual

Category
Deep fryers
Type
User manual

This manual is also suitable for

Frymaster, a member of the Commercial Food Equipment Service Association, recommends
using CFESA Certified Technicians.
24-Hour Service Hotline
1-800-551-8633
NOVEMBER 2003
M2000 Computer
Operation Manual
*8195833*
M2000 Computer
Table of Contents
Overview 1-1
Quick Reference
Basic Operation 2-1
Cooking With Multi-Product Display 2-2
Cooking With Dedicated Display 2-3
Changing from Breakfast to Lunch 2-4
Changing from Lunch to Breakfast 2-5
Computer Initial Setup/Language Selection 3-1
Programming Fry Station 4-1
Programming Multi-Product Fryer 5-1
Adding New Menu Items 6-1
Add Boil Out 7-1
Select Boilout 7-1
Programming and Test Codes 8-1
Programming 8-1
Set Up 8-1
Recovery Check 8-2
Loading Default Settings 8-2
Choosing Sound Level, Language 8-3
Change from Fahrenheit to Celsius 8-3
Hi-Limit Check 8-4
Moving Computer 8-5
Distress Codes 9-1
M2000 Overview
1-
1
1.1 General
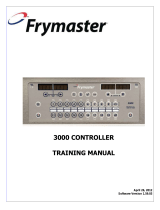
Welcome to the M2000, a computer that retains the one-button ease of the M100B and
adds the utility of 40-product menu capability. The computer is easy to use. One button
push starts a cook cycle for an item cooked in a dedicated vat. The same flexible
computer on a multi-product
vat requires only two button
pushes to launch a cook cycle.
Just choose a menu item on a
product buttons and press, and
then press a cook cycle button
under the display showing the
desired item. The computer
can move seamlessly from
McNuggets to Crispy Chicken
to any added menu item.
In a typical store setting, the
M2000s on the three-vat fry
station display FR FRIES
(shown above) and will launch
a cook cycle with one push of
a cook channel button.
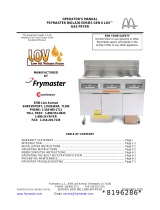
On the chicken/filet station,
the LED display shows dashed
lines. To launch a cook cycle,
press a product button and
then press the cook cycle
button that corresponds with
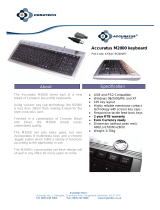
the location of the dropped basket. By pressing the product button for McChicken,
McChick will appear in the display. Just press the cook cycle button corresponding to the
location of the appropriate dropped basket.
2
34
DEF
GHI
JKL
MNO
PQR
STU
VWX
5
6
78
ABC
1
YZ-
09
+
*
12
2
FR F Ries
FR F Ries
1
Product buttons
ON/OFF
ON/OFF
Cook Cycle
Buttons
Cook Cycle
Buttons
Temp
button
Programming
button
2
34
DEF
GHI
JKL
MNO
PQR
STU
VWX
5
6
78
ABC
1
YZ-
09
+
*
12
2
-------- -------
1
-------- -------
C
P
S
Y
N
U
G
M
c
C
H
W
I
N
G
C
P
S
Y
N
U
G
M
c
C
H
W
I
N
G
Pressing product buttons 3 or 9 displays McChick.
2
3
4
DEF GHI JKL MNO
PQR
STU
VWX
5
6
78
ABC
1
YZ-
09
+
*
12
2
1
Mc chick
C
P
S
Y
N
U
G
M
c
C
H
W
I
N
G
C
P
S
Y
N
U
G
M
c
C
H
W
I
N
G
Mc chick
Pressing either cook cycle button under the McChick displays launches a
cook cycle.
M2000 Overview
1-
2
The M2000 will operate with electric and gas fryers, both full- and split-pot.
1.2 Service Information
Call the “800” number on the cover of this manual for the location of your nearest
maintenance & repair center. When requesting service assistance, always give the model
and serial numbers of your cooking computer and the type of fryer this cooking computer
is installed on.
To assist you more efficiently, the following information will be needed:
Model Number
Serial Number
Type of Fryer
Nature of the
Problem
Any other information which may be helpful in solving your service problem.
M2000 Computer
2-1
2
4
DEF JKL
MNO
PQR
VWX
5
6
8
YZ-
09
+
*
2
1
STU
7
1
ABC
1
Basic Operation
Fr F ries Fr F ries
Product Buttons
ON/OFF
ON/OFF
Cook Channel
Buttons
Cook Channel
Buttons
Temp
Program
ming
Displays
Turn Fryer ON
Press right key for full pot;
press key on desired side
on a split pot.
Turn Fryer OFF
Press right key for full pot;
press key on desired side
on a split pot.
Check Frypot Temperature
Press Temp key once.
Displays show frypot
temperatures.
Check Frypot Setpoint
Press Temp key twice.
Displays show frypot
setpoint temperatures.
Start One-Button Cook Cycle (Dedicated Mode)
Press key under display
showing desired item.
2
2
Start Two-Button Cook Cycle (Multi-Product Mode)
Press product key bearing
icon for desired product.
Press cook channel button
to begin cook cycle.
2
3
GHI
3
GHI
Cancel Duty or Remove Alarm
Press key under active
display.
2
Change From Dedicated
to Multi-Product Mode
Press Cook Channel
button under displayed
menu item for 5 seconds.
Display changes to
dashed lines.
2
Change From Multi-Product
to Dedicated Mode
Press product key bearing
icon for desired product.
Press cook channel button
under display showing
desired item for 5 seconds.
2
3
GHI
M2000 Computer
2-2
2
3
4
DEF GHI JKL MNO
PQR
STU
VWX
5
6
78
YZ-
09
+
*
2
2
- - - - - - - - - -
Cooking With Multi-Product Display
Press a product button.
Vat with appropriate
setpoint displays:
If a duty is required for
this menu item, duty is
displayed when it is time
to perform a duty, such
as shake.
duty
Pull is displayed
when the cook time is
complete; an alarm
sounds.
pull
Mc chick
1
Press a cook channel
button to begin cook
cycle.
1
2
3
4
5
6
7
8
9
- - - - -- - - - -
ABC
1
Vat with inappropriate
setpoint displays:
<<<<>>>>
1
1
Display alternates
between MCCK and
remaining cook time.
Dashed lines appear in
both displays.
- - - - - - - -
Dashed lines reappear
under active display at
the end of the cook
cycle.
- - - - - - - -
Press cook channel
button under duty
display to cancel
alarm.
10
Mc cK
2:34
Press cook channel
button under pull
display to cancel
alarm.
11
M
c
C
K
2
2
M2000 Computer
2-3
2
3
4
DEF GHI JKL MNO
PQR
STU
VWX
5
6
78
ABC
1
YZ-
09
+
*
12
2
FR F Ries
FR F Ries
Cooking With Dedicated Display
QA is displayed when
the quality time has
elapsed.
QA
Pressing the cook
channel button
restores the display to
FR FRIES and the unit
is ready for cooking.
FR FRies
Pressing the cook
channel button now
will launch a cook
cycle and end the
quality countdown.
2:34
1
1
9
10
11
1
Press a cook channel
button to begin the
cook cycle.
1
2
Display alternates
between abbreviated
product name and
remaining cook time.
3
FRis
Duty is displayed when it
is time to shake the fry
basket.
duty
4
1
Press cook channel
button to cancel
alarm.
6
5
Pull is displayed
when the cook cycle
is complete.
pull
Press cook channel
button to cancel alarm.
1
7
A menu item, such as
FR FRIES shows in
display
1
fr fries
Q7 is displayed and
alternates with FRES.
As the quality time
counts down.
Q7 Fris
Q1 Fris
8
M2000 Computer
2-4
Press product button for
french fries.
<<<<<>>>>>
1
ABC
1
Computer will change
from Hash Brn to
<<<<<>>>>>; an
alarm will sound.
Press and hold the cook
channel button under the
display for five seconds.
Display changes to FR
Fries.
fr fries
hash brn
2
34
DEF
GHI
JKL
MNO
PQR
VWX
5
6
8
YZ-
09
+
*
2
12
hash brn
STU
7
1
hash brn
ABC
1
Changing from Breakfast Setup to Lunch
1
2
3
4
Change both displays to FR FRIES
F
F
R
Y
M2000 Computer
2-5
p
Press product button for
hash browns.
<<<<<>>>>>
1
Computer display will
change from FR
Fries to <<<<<>>>>>;
an alarm sounds.
Press and hold the cook
channel button under the
display for five seconds.
Display changes to
Hash Brn.
hash brn
fr fries
2
34
DEF
GHI
JKL
MNO
PQR
VWX
5
6
8
YZ-
09
+
*
2
12
STU
7
1
ABC
1
Changing from Lunch Setup to Breakfast
1
2
3
4
Fr F ries Fr F ries
Computer displays
FR FRies
5
H
a
s
h
b
r
n
M2000 Installation/Setup
3-
1
Computer
Setup: Selecting
Language,
Sound Volume
1. Computer displays OFF.
2. Press
.
3. code shows in the left display.
4. Press
3 3 2 2
(3322).
5. The left computer display will alternate between loading and
menu. The right display will count up to 39 and go blank.
6. Computer displays OFF.
7. Press .
8. code shows in the left display.
9. Press
1 6 5 5
(1655).
10. VOLUME appears in the left display; HIGH or LOW in the
right.
11. Press
to toggle between high and low-volume warning
sounds.
12. With preferred setting in right display, press to lock in
choice.
13. Language appears in the left display*; English in the
right. See page 8-3 for instructions to change temperature display
from Fahrenheit to Celsius.
14. Press to toggle between language choices.
15. With desired language in the right display, press to lock in
choice.
Used for initial
setup of
computer.
Computer has
two volume
settings.
Used to set
language shown
in display.
*NOTE:
Changing the
language
displayed or the
menu parameter
on a previously
programmed
computer
eliminates any
programming
entered for
special menu
items.
M2000 Installation/Setup
3-
2
16. Menu appears in the left display*; USA or Non-USA
appears in the right.
17. Press to toggle between menu choices.
18. With desired menu in the right display, press to lock in
choice. If changed from the default English setting, the left
computer display will alternate between loading and
menu. The right display will count up to 38 and go blank.
19. The computer will display Off.
20. Press .
21. Code appears in left display.
22. Press
1
6
5
6
(1656) with product keys.
23. GAS appears in the left display. YES in the right.
24. Press to toggle between YES and NO. Choose YES for a
gas fryer. Choose NO for an electric fryer.
25. With desired choice displayed in the right window, press to
advance to the next choice.
26. Split appears in the left display, Yes in the right. Press
to toggle between YES and NO. Use Yes for split vats; NO
for full.
27. Press to advance to next choice.
28. Screen goes blank. OFF is displayed. The computer is ready for
programming as outlined in the following sections.
Sets up fryer for
gas or electric,
full or split vat
operation.
Used to set menu
parameter
defaults for US or
non-US menu
items.
*NOTE:
Changing the
language or the
menu choicer on
a previously
programmed
computer
eliminates any
programming
entered for
special menu
items.
Programming for Dedicated Product Operation
4-1
Example:
Programming
Dedicated Vats
1. Computer displays OFF (Computer must be off to enter program mode.)
2. Press
3. Code appears in left display
4. Press
1
6
5
0
(1650) with product keys.
5. FR FRIES appears in the left display. Right display is blank.
6. The LED will illuminate in product button 1, the default product
button for fries.
7. Press
2
to advance to another menu item if required. In
this example the computer is dedicated to french fries.
8. Press on right side of computer. YES appears above both
buttons on a full pot; it appears only above on a split pot.
This step sets the vat setpoint to 335°F (168°C), the setpoint for
french fries.
9. Press on right side of computer. YES appears in display
above button. This step sets the right vat setpoint on a splitpot to
335°F (168°C).
10. Press
. Duty 1 appears in the left display. M :30 in the
right. This sets the seconds into the cook cycle that a duty alarm
sounds. M :30 is the default setting and should be used.
11. Press
to toggle between automatic and manual alarm
canceling. The left display will alternate between M :30 and A
:30 as is pressed. Manual alarm canceling is the default
setting.
12. Press . Duty 2 appears in the left display. M :00 appears
in the right. This sets the time into the cook cycle in which a
Stores menu item
in product button.
Sets setpoint for
fries.
Sets duty time.
Sets alarm
cancellation
choice.
Sets second duty
alarm.
Programming for Dedicated Product Operation
4-2
second duty alarm will sound.
13. Use numbered product keys to enter a time if required. M :00 is
the default setting.
14. Follow step 10 to toggle between automatic and manual alarm
canceling.
15. Press . Remove appears in left display. M 3:10 appears
in the right. This sets cook time for the product selected. Use
numbered keys to change time as required. 3:10 is the default
cook time for french fries.
16. Press to toggle between automatic and manual alarm
canceling.
17. Press . QUAL appears in left display. M 7:00 in the right.
This is the default quality hold time for french fries. Use
numbered product keys to change time as required. Entering zero
will disable the quality timer.
18. Press to toggle between automatic and manual alarm
canceling.
19. Press . Set-Temp appears in the left display. 335F
(168°C) appears in the right. This is the default setpoint for
french fries. Use numbered product keys to change if required.
20. Repeat steps 7-19 for additional items.
21. With the last programmed menu item displayed on the computer,
press to lock in menu item and exit programming.
Sets Cooktime.
Sets Quality
time.
Sets product
cooking
temperature or
setpoint.
Programming Multi-Product Operation
5-1
Programming
Multi-Item Vat
1. Computer displays OFF (Computer must be off to enter
programming mode.)
2. Press
3. Code appears in left display
4. Press
1
6
5
0
(1650) with product keys.
5. FR FRIES appears in the left display. Right display is blank.
6. The LED will illuminate in product button 1, the default product
button for fries.
7. Press
2
to move to the next menu item.
8. Filet appears in the left display.
9. Choose and press the product button to store the cooking cycle.
The LED in the chosen product button will illuminate. The right
display is blank.
10. Press on the right side of the split pot fryer and YES
appears in the display above the cook channel button. This sets
the setpoint to the temperature for filets.
11. Press . Duty 1 appears in the left display. M :00 in the
right. This sets the seconds into the cook cycle that a duty alarm
sounds.
12. Press
to toggle between automatic and manual alarm
canceling. The left display will alternate between M :00 and A
:00 as is pressed. Manual alarm canceling is the default
setting.
13. Press
. Duty 2 appears in the left display. M :00 appears
in the right. This sets the time into the cook cycle in which a
second duty alarm will sound.
Stores menu item
in product button.
Sets duty time.
Sets cooking
tem
p
erature.
Programming Multi-Product Operation
5-2
14. Use numbered product keys to enter a time if required. M :00 is
the default setting.
15. Follow step 12 to toggle between automatic and manual alarm
canceling.
16. Press . Remove appears in the right display. M 3:40, the
default cook time for filets, appears in the right display. Use
numbered product keys to enter a new cook time in minutes and
seconds as required.
17. Press to toggle between automatic and manual alarm
canceling.
18. Press . Qual appears in the left display; M :00 in the
right. Use numbered product keys to enter a hold time for the
product. If quality timer is not required, enter 0:00.
19. Press to toggle between automatic and manual alarm
canceling.
20. Press . Set-Temp appears in the left display; 350F
(176°C) appears in the right. Use numbered product keys to enter
a new setpoint if required.
21. Press
. Filet appears in left display; Yes in right.
22. Press
2
to move to the next desired menu item, for
example, McChicken.
23. Repeat steps 9-21 to enter additional menu items.
24. With the last programmed menu item displayed on the computer,
press
to lock in menu item and exit programming.
Sets vat to be
used for chosen
product.
Sets cook time.
Sets quality time.
Programming New Menu Items
6-1
Adding New
Menu Items
1. Computer displays OFF (Computer must be off to enter
programming mode.)
2. Press
3. Code appears in left display
4. Press
1
6
5
0
(1650) with product keys.
5. Use the
2
to advance through menu items until the display
reads Prod 8 or a higher number.
6. Press and right display will read EDIT. The first character
in the left display will flash.
7. Use
1
ABC
keys to enter name of the product. Each key can display
one of three letters. Press the key labeled with the needed letter
until that letter appears.
8. Press
2
to advance cursor. Use the #0 key to insert a space.
9. For example to enter “WINGS”, press the #8 product key until w
appears in the display.
10. Use the
2
to advance the cursor to the next display space.
Press the #3 key until I appears. Continue until WINGS is
spelled out on display.
11. Press .
12. A P flashes and a number is displayed. Use steps 7-10 to enter
an abbreviated name for the menu item. The shortened name will
alternate with the cook time during a cook cycle.
13. Press . The newly entered product name appears on left.
14. Choose and press a product button, if desired, to store the cooking
cycle for the new product. The LED in the chosen product button
will illuminate. The right display is blank.
Enter product
name.
Programming New Menu Items
6-2
15. Press . Duty 1 appears in the left display. M :00 in the
right. Use product keys to enter a duty time as required.
16. Press to toggle between automatic and manual alarm
canceling. Manual alarm canceling is the default setting.
17. Press . Duty 2 appears in the left display. M :00 appears
in the right.
18. Use numbered product keys to enter a time if desired.
19. Press to toggle between automatic and manual alarm
canceling.
20. Press . Remove appears in the right display. M:00 in the
right. Use numbered product keys to enter a cook time in minutes
and seconds.
21. Press to toggle between automatic and manual alarm
canceling.
22. Press . Qual appears in the left display; M :00 in the
right. Use program keys to enter a hold time for the product as
required.
23. Press to toggle between and manual alarm canceling.
24. Press
. Set-Temp appears in the left display; 32F (0°C)
appears in the right. Use product keys to enter a setpoint
25. Press
and PROBE appears in the left display; YES appears
in the right..
26. Use
to toggle between YES and NO. Leave NO in the
display to disable probe feature.
27. Press . The new product name appears in the left display,
YES in the right.
Sets first duty.
Sets cook time.
Sets setpoint.
If no duty time is
required, enter
0:00.
Programming New Menu Items
6-3
28. Press
2
to advance to next programmable menu location.
29. With the last programmed menu item displayed on the computer,
press to lock in menu item and exit programming.
M2000 Adding/ Selecting Boilout
7-1
Add Boil Out
1. Computer displays OFF.
2. Press .
3. Left display shows CODE.
4. Enter
1
6
5
0
(1650) with product keys.
5. Use
1
to back through programmed items and numbered
products to Boil Out, which is in the product 40 position.
6. Press a gray product button to store Boil Out. Green LED in
button will illuminate.
7. Press ON/OFF button to turn off fryer and lock in
programming.
Select Boil Out
1. Press to turn fryer off.
2. Computer displays OFF.
3. Drain shortening from fryer.
4. Add boil-out solution to frypot to be cleaned.
5. Press to turn fryer on. Display will show LOW Temp on
display.
6. Press used to store boil out programming.
7. <<<<>>> will appear in computer display.
  • Page 1 1
  • Page 2 2
  • Page 3 3
  • Page 4 4
  • Page 5 5
  • Page 6 6
  • Page 7 7
  • Page 8 8
  • Page 9 9
  • Page 10 10
  • Page 11 11
  • Page 12 12
  • Page 13 13
  • Page 14 14
  • Page 15 15
  • Page 16 16
  • Page 17 17
  • Page 18 18
  • Page 19 19
  • Page 20 20
  • Page 21 21
  • Page 22 22
  • Page 23 23
  • Page 24 24
  • Page 25 25
  • Page 26 26
  • Page 27 27
  • Page 28 28
  • Page 29 29
  • Page 30 30

Frymaster Computer M2000 User manual

Category
Deep fryers
Type
User manual
This manual is also suitable for

Ask a question and I''ll find the answer in the document

Finding information in a document is now easier with AI