Point of View Onyx 506 Android 4.0 Owner's manual
- Category
- Tablets
- Type
- Owner's manual
This manual is also suitable for

Point of View TAB-P506- Android 4.0 Tablet PC English
1
Contents
General notices for use ........................................................................................................2
Disclaimer .............................................................................................................................2
Box Contents ........................................................................................................................2
1.0 Product basics ................................................................................................................3
1.1 Buttons and connections .............................................................................................. 3
1.2 Start up and shut down ................................................................................................ 3
2.0 Introduction to Google Android 4.0 ...............................................................................4
2.1 The Desktop ................................................................................................................ 4
2.2 The App drawer – right top corner ................................................................................ 5
2.3 Google Search / Voice search – left top corner ............................................................ 5
2.4 Navigation icons – bottom left of the screen ................................................................. 6
2.5 Status information area – right bottom of the screen .................................................... 6
3.0 General operation ...........................................................................................................7
3.1 Battery status / Charging your tablet ............................................................................ 7
3.2 Installing Apps ............................................................................................................. 7
3.3 Administer / remove apps ............................................................................................ 7
3.4 Add an account ............................................................................................................ 8
4.0 Basic setup .....................................................................................................................9
4.1 Changing operating language ...................................................................................... 9
4.2 WiFi settings ................................................................................................................ 9
4.3 Connecting the tablet to your PC ................................................................................10
4.4 Inserting SIM 1 and SIM 2 ...........................................................................................11
4.5 Calling, SMS and phonebook ......................................................................................12
4.6 Enabling GPS on your tablet .......................................................................................13
5.0 Frequently Asked Questions ....................................................................................... 14

English Point of View TAB-P506- Android 4.0 Tablet PC
2
General notices for use
- This product is a highly advanced electronics device, disassembly, customization or repairs without the
appropriate knowledge and pre-cautions can lead to dangerous situations with chance on damaging the
product and serious injuries.
- Avoid use in extreme conditions such as high and low temperatures, high humidity or moist
environments and around magnetic fields. Also avoid long-time exposure to sunlight.
- Only use by the manufacturer permitted accessories to avoid damages to the product with possibly
warranty loss.
- Please follow the relevant local environmental regulations to deal with obsolete machines and
accessories.
- Use a protective folder to avoid extreme physical shocks to the device (i.e. of dropping).
Disclaimer
- The screenshots are for Android reference only. They may be made on a device with a different
resolution or hardware configuration than yours and therefore can be slightly different that the final
product.
- The manufacturer takes no responsibility for loss of information or data caused by hardware or software
failure. The user is responsible for performing timely backups of important data.
- All information and images used in this user manual are provided ‘as is’ and are subject to change
without notice.
- The manufacturer accepts no liability for the information offered in this document.
Box Contents
- Android Tablet PC
- Device charger (DC / 5V – 2A)
- Instruction manual
- USB Cable
- Headphone (optional)
- MicroSD Card (optional)
Dear customer,
Thank you very much for your purchase of a POINT Of VIEW product.
This product comes with 2 year hardware warranty. Exception is the battery; it comes with 6 months warranty.
Please register your purchase product within 30 days on our website. By means of this registration, we can bring
you the best technical support.
On this website you can also obtain more information about the warranty.
www.pointofview-online.com/club
If you have further questions, please contact with Point of View Service Center, through the e-mail address:
rma@pointofview.eu

Point of View TAB-P506- Android 4.0 Tablet PC English
3
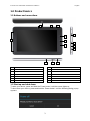
1.0 Product basics
1.1 Buttons and connections
1
DC adapter
2
Mini USB
3
Headphone
4
Microphone
5
Micro SD card reader
6
SIM
7
Webcam
8
Volume +/-
9
Power on/off
10
Reset
11
Speaker
12
Menu
13
Home
14
Back
1.2 Start up and shut down
To start your device, press and hold the ‘Power button’ until the screen lights up.
To shut down your device, press and hold the ‘Power button’ until the following dialog popup
appears.
9
8
7
10
11
5
2
3
1
12
13
4
6

English Point of View TAB-P506- Android 4.0 Tablet PC
4
2.0 Introduction to Google Android 4.0
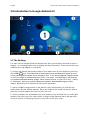
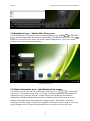
2.1 The Desktop
The main area of interest will be the desktop itself. Here you will place shortcuts to Apps or
widgets – a visual application that can display real-time information. There may be some pre-
installed icons and widgets on your tablet.
To change the desktop background image of your tablet return to your desktop by pressing
the ‘HOME’ icon. Press and hold an open space on the desktop (don’t press an icon) -
until a popup appears named ‘Select wallpaper from’. In the list may appear multiple options
to select an image or animated image of choice. The option ‘Live Wallpapers’ will show the
pre-installed animated desktop images. Other options such as a ‘Super-HD Player’, ‘Gallery’
or ‘Wallpapers’ allow you to select (widescreen) photos, downloaded images or other
images; depending on the features of that specific application.
To place a widget or app shortcut on the desktop, touch and hold the icon until the App
drawer fades and the desktop appears. Move your finger to the location where you want to
place the icon and release your touch to place the icon.
To move or delete icons and widgets from your desktop, touch and hold the icon until a grid
appears. Move the icon to the new location or drag it to the ‘Remove’ bar on the top of the
screen to remove it. Releasing the touch screen will confirm your action.

Point of View TAB-P506- Android 4.0 Tablet PC English
5
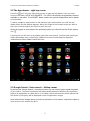
2.2 The App drawer – right top corner
Press the icon in the top right of the screen to open the App drawer. Here you have
access to two tabs; ‘APPS’ and ‘WIDGETS’. The ‘APPS’ tab displays all applications that are
available on the tablet. The ‘WIDGET’ tablet contains the optional widgets that can be added
to the desktop.
To place a widget or app shortcut on the desktop, touch and hold the icon until the App
drawer fades and the desktop appears. Move your finger to the location where you want to
place the icon and release your touch to place the icon.
When using apps or other parts of the operating system you often will see the ‘Extra options’
icon .
Pressing this icon will open a secondary menu with more options. Functions like opening an
advanced settings menu, switching to a different account or refreshing the displayed
information are often ‘hidden’ behind this icon.
2.3 Google Search / Voice search – left top corner
By clicking the ‘Google search’ / microphone button you can quickly type or speak keywords
of your search. The search application will automatically determine whether the keyword(s)
apply to an application or a web search. In the latter case a web browser will be opened and
the results of your query will be displayed on the Google search engine.
Note that both the ‘Google search’ function as well as the ‘Voice search’ requires the tablet to
have access to the internet (by WiFi).

English Point of View TAB-P506- Android 4.0 Tablet PC
6
2.4 Navigation icons – bottom left of the screen
On the left side you will find three icons: use the navigation icons ‘HOME’ or ‘RETURN’
to close the App drawer and return to your desktop. The ‘RECENT ACTIVITY’ icon
will show an overview of the active and recently opened applications. Click on the small
displayed preview to open that application.
recent activity preview
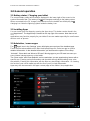
2.5 Status information area – right bottom of the screen
The bottom icon bar will show the some system information (i.e. ) in the bottom
right corner. The contents of this area can change if installed applications place additional
information here. Pressing it will open a small overlay menu displaying the date/time
information, the tablet’s current network status, the battery status and a shortcut icon to
another quick menu where some things like ‘Airplane mode’, ‘Wifi On/Off’, the screen
brightness and other options can be set or toggled. Also this quick menu contains a shortcut
to the ‘Settings’ menu. Simply clicking elsewhere on the screen will close this menu.

Point of View TAB-P506- Android 4.0 Tablet PC English
7
3.0 General operation
3.1 Battery status / Charging your tablet
The current battery status will be always displayed in the lower right of the screen in the
system information bar. The battery icon will change accordingly to the battery status.
When connected to the DC charger, the status area on the bottom bar will display the
charging icon. Note the lightning symbol inside the battery icon.
3.2 Installing Apps
You can install your own Apps by opening the Apps shop. This button can be found in the
‘App drawer’. The Apps shop is located on the top right of the screen. Note that not all
applications may function properly for your tablet. Some are made especially for small screen
devices such as phones.
3.3 Administer / remove apps
The ‘Apps’ item in the ‘Settings’ menu will display an overview of the installed apps.
There are four tabs available which filter the displayed app list. Select an app to view its
detailed information. In the detailed information you also have the options ‘Force Stop’,
‘Uninstall’, ‘Clear data’ and ‘Move to SD card’. Moving apps to your SD card can save you
some internal storage memory on the tablet.
The ‘Clear cache’ and ‘Clear defaults’ can be used when you are experiencing issues with a
specific app. Clearing cached information and (possible wrong) default settings may solve
the problem. Clearing this information will also wipe any stored login information. i.e. clearing
the cache of your social media app will also force you to re-login afterwards.
Apps may also be removed in the apps content page of the market / shop application.

English Point of View TAB-P506- Android 4.0 Tablet PC
8
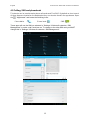
3.4 Add an account
The best way to fully make use of your Android tablet is by linking your Google / Gmail
account to your device. Open the ‘Settings’ menu and choose the ‘Accounts & sync’ item.
Without any added accounts the right pane will display nothing. Instead select the option
‘Add account’ in the top right corner. To add a Google / Gmail account please select ‘Google’
in the pop-up and follow the instructions on the screen. After entering your Google username
and password you have the option to automatically back-up your apps, settings (i.e.
bookmarks and WiFi passwords) and other data.
You can also add a POP3, IMAP or Exchange email account by selecting ‘Email’. The pop-
up option ‘Corporate’ will setup a ‘Microsoft Exchange’ link.
Your system or network administrator can supply you with the server information and login
credentials. Follow the steps displayed on-screen to complete the account linking process.
After you successfully linked your account(s) with the tablet you can toggle the automatic
synchronisation on and off by using the switch next to the ‘Add account’ option.

Point of View TAB-P506- Android 4.0 Tablet PC English
9
4.0 Basic setup
4.1 Changing operating language
Press the icon in the top right of the screen to open the App drawer. Select the ‘Settings’
option to open the Android settings menu.
When selecting the option ‘Language & input’ the contents will be displayed in the right
pane. Now open the option ‘Language’ and choose a language for your tablet to operate in.
This pane also displays the keyboard settings which you can customize, enable or disable.
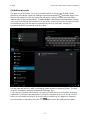
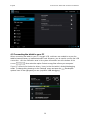
4.2 WiFi settings
Press the icon in the top right of the screen to open the App drawer. Select the ‘Settings’
option to open the Android settings menu. When selecting the option ‘WiFi’ the contents
will be displayed in the right pane. The switch allows you to quickly toggle WiFi on
and off.
In the ‘WiFi’ content panel you can view the formerly used WiFi networks and the WiFi
networks that have been detected by the tablet. To research for new available networks;
please press ‘SCAN’ located in the right top corner. The option ‘ADD NETWORK’ allows you
to add a network by manually inputting the SSID network and security method.
Whether manually added or automatically detected, you may need to fill in a password to be
accepted on the network. Please contact your system or network administrator for the correct
information.
Advanced network settings can be found by clicking the options icon .

English Point of View TAB-P506- Android 4.0 Tablet PC
10
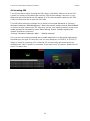
4.3 Connecting the tablet to your PC
When connecting the tablet to your PC through USB, no drivers are needed to access the
tablet’s internal memory or inserted microSD card. However, you do need to confirm the USB
connection: click the notification area in the system information bar at the bottom of the
screen . Now select the option ‘Select to copy files to/from your computer’.
If your PC still asks for the device drivers, it may be that the tablet is Android debugging
mode. To change this, please go to the ‘Settings’ menu and open the ‘Developers
options’ item. In the right pane you can (un)check ‘USB debugging’.

Point of View TAB-P506- Android 4.0 Tablet PC English
11
4.4 Inserting SIM
Turn off your device before inserting the SIM cards in your tablet. Please look at the SIM
symbols on the back of the tablet and insert the SIM card accordingly. Now turn on your
tablet and wait until Android has fully started. If a PIN code has been enabled on the SIM
card(s) the device will ask to enter the PIN code.
This SIM setting and others settings can be found and changed afterwards in “Settings /
Wireless & networks / SIM Management”. Also in this screen, make sure that “Data enabled”
is checked to allow internet over 3G. Also when you are on a roaming network (contact your
mobile provider for information), check “Data roaming” as well. Settings regarding the
network provider are located in:
“Settings / Wireless & networks / More … / Mobile networks”.
Once you are connected you should see a ‘mobile network icon’ in the bottom right corner.
Depending on your type of connection, this icon may display an H (HSDPA), G (GPRS), E
(Edge) or simply R (roaming) or 3G. Note that 3G communication will automatically be
disabled when a Wi-Fi network is connected. If you want to use 3G network, please turn off
the Wi-Fi network first

English Point of View TAB-P506- Android 4.0 Tablet PC
12
4.5 Calling, SMS and phonebook
This device can be used to make phone calls and send Text SMS. By default an icon to each
of these Apps are located on the desktop but they can also be found in the app drawer. Open
the “App drawer” and locate the following icons:
Phone dialer : Phone book: SMS :
These apps will use the SIM you selected in “Settings / Wireless & networks / SIM
Management” to make a call, send text etc. To change to the other SIM card you MUST
change this in “Settings / Wireless & networks / SIM Management”.

Point of View TAB-P506- Android 4.0 Tablet PC English
13
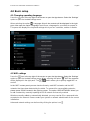
4.6 Enabling GPS on your tablet
This device has a built-in GPS receiver but does require specific maps, navigation or other
application which use its signal. Google’s own applications such as Maps, StreetView and
Navigation are location in Google’s Play Store.
To enable your GPS, please go to:
Settings / Location services and enable the setting: GPS satellites
You can also enable the setting “Google’s location service” to speed up your GPS location
and use mobile and WiFi networks to indicate your location.
Note that the GPS function can drain a battery very fast. Disabling GPS after use will allow
your device to work longer on a single battery charge.

English Point of View TAB-P506- Android 4.0 Tablet PC
14
5.0 Frequently Asked Questions
1) Is there a software update available for my tablet?
All tablet firm wares are posted on http://downloads.pointofview-online.com
2) I downloaded [app name] and now it doesn’t work (properly)?
Android software was initially developed for mobile phones and some have no
support for Android devices with larger screens. Try to update the software or find a
compatible alternative app. This incompatibility also sometimes occurs with software
written for previous Android versions.
3) How can I manually install an APK file?
By default, it is not possible to manually install APK files. To enable this you have to
enable the setting ‘Unknown sources’. This can be found in the settings menu ->
Security.
4) My battery is only lasting xx hours!
The operating time of the tablet on one battery load depends very much on the
specific tasks that is has to perform. WiFi, Bluetooth and other wireless
communication technologies are known to consume a lot of energy. Also CPU
intensive applications such as games and HD video clips can use up the energy of
the battery fast.
To maximize the duration of your battery, you can optimize the following settings:
- Choose a low or dynamic screen brightness
- A short press on the power button will directly place the tablet in standby mode
- Download an ‘App killer’ to clear the memory from previous started apps
- Disable Wireless devices when not using them
- Remove USB devices (these use power as well)
- Avoid use/charging extremely hot or cold environments
5) Can the tablet charge through USB?
Yes, however it will charge quite slow due to the limited power the USB port
(500mAh) can supply. The charger can supply up to 2A and will charge much faster.
-
 1
1
-
 2
2
-
 3
3
-
 4
4
-
 5
5
-
 6
6
-
 7
7
-
 8
8
-
 9
9
-
 10
10
-
 11
11
-
 12
12
-
 13
13
-
 14
14


Point of View Onyx 506 Android 4.0 Owner's manual
- Category
- Tablets
- Type
- Owner's manual
- This manual is also suitable for
Ask a question and I''ll find the answer in the document
Finding information in a document is now easier with AI
Related papers
-
Point of View P731N Android 4.0 User guide
-
-
-
-
-
-
-
Point of View PROTAB 2XXL Owner's manual
-
-
Other documents
-
Shenzhen TK22 User manual
-
NST M1045W User manual
-
-
Polaroid Jet 704 PMID704GK User manual
-
Denver TAD-70102G Owner's manual
-
Denver TAD-97072G Owner's manual
-
Xtreamer Ban-G Getting Started Manual
-
Prestigio PMP-7170B 3G User manual
-
Nexus 7 2012 Manual Book
-
Google 1B32-4G User manual