Page is loading ...

Product Features
15¾” x 14⅛”
8⅛” deep basin
Single compartment
Undercounter or drop-in
Drain width 3½”
Centered drain hole
Rim width 1¼”
Glass thickness at drain ½”
Template provided
Cabinet cradle installation recommended.
Codes/Standards Applicable
Specified model meets or exceeds the following:
IAMPO/UPC
Canadian Standards Association (CSA)
KITCHEN SINK MODEL #009-XXX-XXX
MODEL DESCRIPTION COLORS
009-009-(XXX) KITCHEN SINK UNDERMOUNT 17 COLORS
009-008-(XXX) KITCHEN SINK DROP-IN 17 COLORS
Specified Model
Lustre Colors Premium Colors Precious Metals
Crystal - 000 White Smoke - 011 24 Gold - 400
Crystal Reflections - 300 Pewter - 021 Platinum - 500
Champagne Gold - 100 Steel Gray - 244
Gold Reflections - 101 Slate Blue Reflections - 344
Sea Green - 200 Teal - 020
Green Reflections - 201 Pearl - 330
Black Nickel - 022 Blue Reflections - 140
Copper - 010
Colors
Product Specification:
The kitchen sink shall be 15¾” length, and 14⅛” width. Sink shall be made of JSG Oceana
“Hard Roc” glass. Sink shall be a single compartment. Sink shall include a stainless steel #305
basket. Sink shall be known as Model #009-XXX-XXX.

2
8 5/8”
3 ½”
Depth: 8 1/8”
KITCHEN SINK MODEL #009-XXX-XXX
Fixture*: basin area water depth
Sink 15¾” x 14⅛” 8⅝”
Outlet 3½” D
Product Information
*Approximate measurements for comparison only.
18 1/8”
16 1/2”
14 1/8”
15 3/4”
Included Components:
Stainless Steel #305 Basket
Cutout template
Top rim: 1¼”
Underneath rim: ⅝”
Allow 2” minimum for clearance
around sink rim for clip attachment.
Double bowl installation: it is recommended
to allow 3” of countertop between the bowls.
Product Diagram
Sink
Countertop
Clip (not included)
Silicone
Foam bumpers
Countertop

3
Safety Goggles (eye protection)
Ear Protection
Pencil
Measuring Tape
Drill and drill bit
Slotted screwdriver
Silicone adhesive sealant (clear)
3/8” thick plywood sheet for cutting a template
Two 6” bar clamps
Framing Square
JSG Oceana Undermount kitchen sinks are recommended to be installed with a negative reveal. (see diagram).
Negative Reveal - The countertop must extend over the edge of the sink on
all sides by approximately ¼”.
Templates are supplied only as a guide. The physical use of the sink will assure a more accurate cutout.
The instructions that follow are for installing a JSG Oceana undermount glass sink in a solid surface countertop
only. Minimum thickness of the actual countertop is 1/2”.
JSG Oceana recommends that undermount sinks and routering of your solid surface material should be
installed by a professional installer for best results.
Requirements vary for installation in a granite, marble, stone or butcher block countertop. Please contact your
fabricator for specific details.
Before installing, inspect the sink for damage. Do not install a damaged unit. Store the sink in the protective
carton whenever possible.
Remember, it is your responsibility to follow all local plumbing and building codes.
The warranty will be voided if these installation instructions are not followed.
KITCHEN SINK MODEL #009-009-XXX
Undermount Installation Instructions
Undermount template supplied by JSG Oceana.
Undermount clips (NOTE: these are not supplied by Oceana. Most professional fabricators use their own
unique fastner system. Also the hardware will be determined by your fabricator based on the type of coun-
tertop you have chosen.)
Tools and Materials you will need
1. Create a template (Recommended for professional installers only.)
Using a framing square, draw a line from the front to the back on the bottom of the countertop, indicating the
location of the center of the sink.
Draw a line parallel to the front edge of the countertop, indicating how far back the sink should be located.
Typically the setback is 2” to 2½” from the front of the counter, depending on the countertop overhang, the
type of sink bowl, and the size of the sink deck.
NOTE: Check for adequate clearance between the sink, faucet, and backsplash. Verify the sink will not
interfere with the cabinet during installation.
NOTE: For multiple sink installations, a minimum distance of 3” is required between sinks.
To create a template, turn the sink upside down on the piece of plywood and draw around it., or place the tem-
plate paper on plywood. NOTE: Paper templates are supplied only as a guide. Using the actual sink ensures
a more accurate cutout.
Adjust the template size to allow for a negative reveal.
Cut the plywood template paying particular attention to the corner radius.
Ball peen hammer (6 oz.)
File
Stop block (for drilling holes of a consistent depth)
Router
5/8” template guide with straight fluted router bit
Rags
Denatured alcohol
Wood braces
1/2” square adhesive-backed foam bumper (1/8” thick)

4
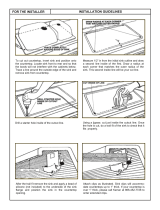
2. Cut the Sink Mounting Hole (Recommended for profession installers only.)
CAUTION: RISK OF PRODUCT DAMAGE. To avoid damage to the sink, do not cut, drill, or sand the
countertop while it is in position over the sink.
Make the sink cutout. Find the center of the sink template and align it with the center mark drawn on the
countertop. Place the template with the front edge along the front edge line drawn on the countertop.
Secure the plywood template to the countertop using 6” bar claps. Place the router over the plywood template
and cut around it, making sure the router follows the edge of the template. This creates the sink cutout.
Finish the inside of the sink cutout according to the recommendations of the countertop material supplier.
!
KITCHEN SINK MODEL #009-009-XXX
3. Attach the Undermount Clip (Recommended for professional installers only.)
JSG Oceana recommends the use of a cabinet cradle for sink installation,
follow the manufacturer’s instructions.
Utilize two undermounter sets to secure all four sides of your sink, (refer to
diagram at right).
(JSG Oceana recommends the “Sink Undermounter™”).
Contact Vance Industries.
Phone: 847.983.0960 Fax: 847.983.0992
www.vanceind.com
If a cabinet cradle is not utilized follow the following steps:
Position the bowl so that the reveal is equidistant. Then on the underside of the countertop, drill holes for
brass inserts for undermount clips. Use a drill bit with a stop block to avoid drilling through the top. For 1/2”
countertop material, drill 3/8” deep holes.
Use three clips on the long sides of the sink and two clips on the short sides of the sink. Drill the hole 1” back
from the cutout edge.
Tap in the brass inserts for the clips into the pre-drilled holes with the slotted ends first.
Thread a wingnut onto a screw, up near the head. Adhere a 1/2” adhesive-backed foam bumper (1/8”thick) to
the end of the clip that fits securely under the sink rim. With the washer and slotted clip in place loosely install
the mounting bracket to the countertop. Repeat for each clip.
Turn the brackets parallel to the opening to allow for easy installation of the sink.
4. Install the sink. (Recommended for professional installers only.)
Clean the bottom of the countertop and the top flange (or rim) of the sink with denatured alcohol. Then apply
a generous bead of silicone adhesive to the rim of the sink near the inside edge.
Position and align the sink with the opening in the countertop.
Rotate the mounting brackets over the sink rim.
Hand tighten the wingnuts to secure the sink bowl.
NOTE: do not fully tighten one clip at a time. Partially tighten a clip, then partially tighten the clip across
form it. After each clip is partially tightened, repeat the process, fully tightening each clip. This en
sures a secure installation and avoids damage to the sink. DO NOT OVERTIGHTEN.
Remove the excess sealant from the inside lip of the bowl using a dry cloth.
Allow the sealant to cure for a minimum of 30 minutes. Follow the instructions provided with the sealant.
Sink
Countertop
Clip (not included)
Silicone
Foam bumpers
Countertop
This end of the clip is
secured to the counter-
top as instructed by the
countertop manufac-
turer.
/