Page is loading ...

Dirt Adjustable Installation Instructions
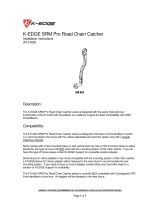
Description:
The K-Edge Dirt Adjustable series was designed to offer riders the freedom of choice between triple (Dirt 3), double (Dirt
2T), and double specific (Dirt 2) drivetrains while being able to utilize a K-Edge chain catcher for any of those situations
with the simple 'swap' of a pad. Furthermore, it was designed to give the rider adjustability depending on his/her crankset
configuration.
Compatibility:
The K-Edge Dirt Adjustable series can be used with cranksets compatible with an 'E-Type' or 'Bottom Bracket Mount' front
derailleur utilizing external bottom bracket cups or NON-GXP bottom brackets. This device cannot be used in conjunction
with an 'E-Type' front derailleur as it is mounted in the same location.
Chainring Size Range:
Dirt 3 Adjustable Pad: 22T-26T
Dirt 2T Adjustable Pad: 32T-36T
Dirt 2 Adjustable Pad: 26T-30T
Warnings:
All K-Edge products are to be installed by a professional bicycle mechanic.
These instructions are generalized to accommodate a wide range of setups for a bike, if your setup does not match what
is being described take extra care in the process of your setup and contact K-Edge Support if you have any questions.
Improper installation of any K-Edge product or use outside of its design intentions could lead not only to damaging the
bike but could also cause personal injury to the rider.
Parts Included:
1x Dirt Adjustable Body
3x 0.5mm Nylon Spacers
1x Dirt Pad
1x M3 x 0.5 x 6mm SS Bolt
Tools/Items Required:
Manufacturer's Instructions with torque specs for Crankset and Bottom Bracket
Bottom Bracket Tool
Torque Wrench
Metric Allen Set (2mm for Pad)

Installation Steps:
1. Remove crankset per manufacturer's recommendations.
2. Remove driveside (right side) bottom bracket cup.
3. Replace 2.5mm spacer (normally reserved for an 'E-Type' front derailleur) with the Dirt Adjustable. Install
components in accordance to the image below:
4. Reinstall driveside (right side) bottom bracket cup and hand-tighten only.
5. Position Dirt Adjustable angle either halfway between down-tube and seat-tube of frame OR to where the top
plane of the pad is parallel to the ground when the bike is on its wheels.
6. Check to ensure clearance between front derailleur cage and Dirt Adjustable pad and adjust accordingly.
7. Torque the driveside (right side) bottom bracket cup per manufacturer's recommendations while maintaining
the angle of the Dirt Adjustable.
8. Ensure proper pad is installed for your given setup.
9. Adjust pad position as close as possible (without touching/rubbing) to the chain while on the smallest chainring
and largest cog, the default position for the Dirt Adjustable is with 2x 0.5mm Nylon Spacers. Max torque on pad
bolt is 2N-m.
10. Check that all components are secure and ride.

Troubleshooting:
• Pad does not get close enough to chain.
o Check to see if you have the proper pad.
o Check that the secondary 2.5mm spacers (for 68mm BB Shells only) is placed between the Dirt
Adjustable and BB shell.
o Check to ensure that the 2.5mm spacer (normally reserved for an 'E-Type' front derailleur) is not
installed with the Dirt Adjustable.
o Install 1x or more 0.5mm Nylon Spacer(s) but do not exceed 3x spacers.
• Pad rubs excessively with chain and there are no spacers installed.
o Check to see if you have the proper pad.
o Check to see if your crankset is compatible with the Dirt Adjustable.
o Check the alignment of the Dirt Adjustable and ensure it is not bent outward towards the chainrings.
• There is a clicking noise and/or my front shifting is not operating normally.
o Check for clearance between the pad and the front derailleur cage and adjust accordingly.
o Check to ensure that the 2.5mm spacer (normally reserved for an 'E-Type' front derailleur) is not
installed with the Dirt Adjustable.
o Check that the installation of the crankset is in accordance to the manufacturer's recommendations.
• Chain still falls off to the inside while I ride.
o Check to see if you have the proper pad.
o Check that the pad is positioned as close as possible (without touching/rubbing) to the chain and
adjust accordingly.
o Check the alignment of the Dirt Adjustable and ensure it is not bent inward towards the frame.
o Check position of the Dirt Adjustable, the angle can be either halfway between down-tube and seat-
tube of frame OR to where the top plane of the pad is parallel to the ground when the bike is on its
wheels.
• The Dirt Adjustable moved/rotated when it was guiding the chain onto the small chainring.
o Check that the driveside (right side) cup was installed appropriately to the manufacturer's
recommendations - tighten to the upper end of the torque specification range.
o Check that all components are properly installed and accounted for - a missing/inappropriate spacer
can cause a lack of friction within the Dirt Adjustable and the frame.
o Check that there is no grease between the Dirt Adjustable and the BB Cup and the BB shell/2.5mm
spacer.
Support/Contact:
If problem(s) still persist after troubleshooting, please contact K-Edge Support for further assistance at info@K-Edge.com
immediately. Please be sure to include your full name, phone number, K-Edge product purchased, brand and model of
bike, crankset with ring sizes, front derailleur, cassette size (if applicable), rear derailleur (if applicable) and a brief
description of your problem.
/