Western Under Tailgate Spreader UTS 696 (Serial #0216 and higher) Owner's manual
- Category
- Spreader
- Type
- Owner's manual

July 15, 2004
Lit. No. 94838
UTS 696 Under Tailgate Spreader
Owner’s Manual
This manual is for UTS 696 Under Tailgate Spreaders with serial numbers 0216 and higher.
CAUTION
Read this manual before installing or operating
the spreader.


Lit. No. 94837/94838 15 July 15, 2004
TABLE OF CONTENTS
iii
PREFACE ................................................................................................................................................................ 1
SAFETY INFORMATION .......................................................................................................................................... 2
Before You Begin ............................................................................................................................................... 2
Lock Out Procedure Label and Warning/Caution Label ....................................................................................... 3
Torque Chart ....................................................................................................................................................... 3
LOADING ................................................................................................................................................................. 4
Certification ........................................................................................................................................................ 4
Material Weights ................................................................................................................................................ 4
OPERATING THE SPREADER - CAB CONTROL .................................................................................................... 5
Cab Control Identification .................................................................................................................................... 5
Operating the Cab Control .................................................................................................................................. 5
OPERATING THE SPREADER ................................................................................................................................6
Dumping over the Spreader ................................................................................................................................. 6
Spreading ........................................................................................................................................................... 6
Clearing Jammed Auger/Emptying Material ........................................................................................................ 6
Spread Patterns ................................................................................................................................................. 7
Application Rates ............................................................................................................................................... 8
HYDRAULIC CIRCUIT DIAGRAM ............................................................................................................................. 9
MAINTENANCE ..................................................................................................................................................... 10
Hydraulic Spreaders ......................................................................................................................................... 10
Grease ............................................................................................................................................................. 10
After each use:................................................................................................................................................. 10
At the end of each season: .............................................................................................................................. 10
Troubleshooting ................................................................................................................................................ 10


Lit. No. 94837/94838 1 July 15, 2004
PREFACE
This manual has been prepared to acquaint you with the
safety information, operation and maintenance of your
new spreader. Please read this manual carefully and
follow all recommendations. This will help ensure
profitable and trouble-free operation of your spreader.
Keep this manual accessible. It is a handy reference in
case minor service is required.
When service is necessary, bring your spreader to your
local outlet. They know your spreader best and are
interested in your complete satisfaction.
NOTE: This spreader is designed to spread snow
and ice control materials only. Do not use it for
purposes other than those specified in this manual.

July 15, 2004 2 Lit. No. 94837/94838
SAFETY INFORMATION
NOTE: Lubricate grease fittings after each use. Use
good quality multi-purpose grease.
WARNING
Indicates a potentially hazardous situation that,
if not avoided, could result in death or serious
personal injury.
CAUTION
Indicates a situation that, if not avoided, could
result in damage to product or property.
NOTE: Identifies tips, helpful hints and
maintenance information the owner/operator
should know.
Before You Begin
• Park the vehicle on a level surface, place shift lever
in PARK or NEUTRAL and set the parking brake.
Turn off the engine and remove keys.
WARNING
• Driver to keep bystanders minimum of 25 feet
away from operating spreader.
• Before working with the spreader, secure all
loose-fitting clothing and unrestrained hair.
• Before operating the spreader, verify all
safety guards are in place.
• Before servicing the spreader, wait for
conveyor and spinner to stop, then lock out
power.
• Do not climb into or ride on spreader.
WARNING
Overloading could result in an accident or
damage. Do not exceed GVWR or GAWR
ratings as found on the driver-side vehicle door
cornerpost. See Loading Section to determine
maximum volumes of spreading material.
WARNING
Do not install the control for this product in the
deployment path of an air bag. Refer to vehicle
manufacturer’s manual for air bag deployment
area(s).
WARNING
Hydraulic fluid under pressure could cause skin
injection injury. If you are injured by hydraulic
fluid, get medical attention immediately.
CAUTION
If rear directional, CHMSL light or brake
stoplights are obstructed by the spreader, the
lights shall be relocated, or auxiliary
directional or brake stoplights shall be
installed.
CAUTION
During the spreader installation we
recommend the addition of an OSHA compliant
Backup Alarm. This alarm is required for OSHA
governed employers.
CAUTION
• Do not operate a spreader in need of
maintenance.
• Before operating the spreader, reassemble
any parts or hardware removed for cleaning
or adjusting.
• Before operating the spreader, remove
materials such as cleaning rags, brushes,
and hand tools from the spreader.
• Before operating the spreader, read the
owner’s manual.
• While operating the spreader, use auxiliary
warning lights, except when prohibited by law.
• Tighten all fasteners according to the Torque
Chart. Refer to Torque Chart for the
recommended torque values.
CAUTION
Disconnect hydraulic power and lock out auger
before cleaning, servicing or performing
maintenance.
CAUTION
Do not leave unused material in hopper.
Material can freeze or solidify, causing unit to
not work properly. Empty and clean hopper
after each use.

Lit. No. 94837/94838 3 July 15, 2004
SAFETY INFORMATION
Please become familiar with the Warning
and Caution labels on the spreader!
Warning/Caution Label
WARNING CAUTION
• DO NOT EXCEED GVWR OR GAWR WITH SPREADER AND LOAD.
• TURN SPREADER OFF BEFORE FILLING, ADJUSTING, OR CLEANING.
• BYSTANDERS TO STAY A MINIMUM OF 25 FEET AWAY FROM OPERATING
SPREADER.
• DO NOT CLIMB OR RIDE ON SPREADER.
• KEEP HANDS, FEET, CLOTHING AWAY FROM MOVING CONVEYOR AND
SPINNER.
• LOCK OUT AUGER BEFORE SERVICING, CLEANING OR CLEARING JAM.
• READ OWNER'S MANUAL BEFORE OPERATING OR SERVICING
SPREADER.
• EMPTY AND CLEAN SPREADER AFTER EVERY USE.
Warning/Caution
Label
AUGER UNLOCKED AUGER LOCKED
WARNING
Lock out auger before servicing,
cleaning or clearing jam.
Lock Out
Procedure Label
Lock Out Procedure Label
TORQUE CHART
Recommended Fastener Torque
Chart (Ft.-Lb.)
Size SAE
Grade 2
SAE
Grade 5
SAE
Grade 8
1/4-20
5/16-18
3/8-16
3/8-24
7/16-14
1/2-13
9/16-12
5/8-11
3/4-10
7/8-9
1-8
6
11
19
24
30
45
66
93
150
150
220
9
18
31
46
50
75
110
150
250
378
583
13
28
46
68
75
115
165
225
370
591
893
Metric Grade 8.8 (Ft.-Lb.)
Size TorqueSize
Torque
M 6
M 8
M 10
M 12
M 14
M 16
7
17
35
60
95
155
These torque values apply to fasteners
except those noted in the instruction.
CAUTION
Read instructions before assembling. Fasteners
should be finger tight until instructed to tighten
according to the torque chart. Use standard
methods and practices when attaching
spreader including proper personal protective
safety equipment.

July 15, 2004 4 Lit. No. 94837/94838
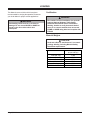
LOADING
This Manual covers vehicles which have been
recommended for carrying the spreader. Please see
your local dealer for proper vehicle applications.
Material Density
(lb. per cubic yd.)
Fine Salt - Dry 1,350
Coarse Salt – Dry 1,215
Coarse Sand – Dry 2,700
Coarse Sand – Wet 3,240
Cinders 1,080
60% Sand/40% Salt 2,106
Material Weights
Certification
WARNING
New untitled vehicle installation of a spreader
requires National Highway Traffic Safety
Administration altered vehicle certification
labeling. Installer to verify that struck load of
snow or ice control material does not exceed
GVWR or GAWR rating label and complies with
FMVSS.
WARNING
Overloading could result in an accident or
damage. Do not exceed GVWR or GAWR as
found on the driver-side vehicle door
cornerpost.
CAUTION
Read and adhere to manufacturer’s ice control
package labeling including Material Safety
Data Sheet requirements.

Lit. No. 94837/94838 5 July 15, 2004
Cab Control Identification
Typical Spreader Control Valve (Sold as an accessory)
OPERATING THE SPREADER - CAB CONTROL
AUGER
SPINNER
1
2
3
4
5
6
7
8
9
10
11
1
2
3
4
5
6
7
8
9
10
11
I
N
C
R
E
A
S
E
I
N
C
R
E
A
S
E
ON Position
OFF Position
Operating the Cab Control
1. Engage the hydraulic system with the spreader
lever in the “OFF” position.
2. To turn the spreader on, move the lever to the “ON”
position. The spinner and auger should begin to
turn.
3. The spinner and auger speeds are independently
adjusted by rotating the detented adjustment
knobs. The knobs can be adjusted either during
operation or with lever in the “OFF” position. These
speed settings will be maintained when the lever is
placed in the “OFF” position.
WARNING
• Driver to keep bystanders minimum of 25 feet
away from operating spreader.
• Before working with the spreader, secure all
loose-fitting clothing and unrestrained hair.
• Before operating the spreader, verify all
safety guards are in place.
• Before servicing the spreader, wait for
conveyor and spinner to stop, then lock out
power.
• Do not climb into or ride on spreader.
CAUTION
• Do not operate a spreader in need of
maintenance.
• Before operating the spreader, reassemble
any parts or hardware removed for cleaning
or adjusting.
• Before operating the spreader, remove
materials such as cleaning rags, brushes,
and hand tools from the spreader.
• Before operating the spreader, read the
owner’s manual.
• While operating the spreader, use auxiliary
warning lights, except when prohibited by law.
• Tighten all fasteners according to the Torque
Chart. Refer to Torque Chart for the
recommended torque values.

July 15, 2004 6 Lit. No. 94837/94838
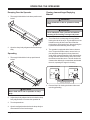
OPERATING THE SPREADER
Dumping Over the Spreader
1. The trough lid should be in the down position and
locked.
2. Open the dump body tailgate and raise the dump
body.
Spreading
1. The trough lid should be in the up position and
locked.
2. Adjust dump body tailgate chains such that the dump
body tailgate does not contact the spreader lid.
3. Turn the spreader on.
4. Open the tailgate latch and raise the dump body to
allow material to flow into the auger.
Clearing Jammed Auger/Emptying
Material
1. Turn off and lock out the power source(s) before
leaving the cab of the truck. This includes but is not
limited to turning off the Power Take-Off and/or
truck engine, removing the keys, disconnecting the
hydraulic hoses and locking out the auger.
2. The spreader is equipped with a bottom cleanout
door. To open the cleanout door, remove lock out
pins and place through the lock out plates and
auger shaft, rotate the handles of the cleanout door
to align the latch hooks with the slots. Next, slide
the latches toward the center. This will release the
cleanout door allowing it to rotate down and toward
the truck, exposing the auger for cleaning.
3. Reverse Step 2 for closing the cleanout door and
resuming spreading.
AUGER UNLOCKED AUGER LOCKED
WARNING
Lock out auger before servicing,
cleaning or clearing jam.
WARNING
Never climb into or ride on spreader or dump
body.
WARNING
Never climb into or ride on spreader or dump
body.
WARNING
Never attempt to clear a jammed unit without
shutting off and locking out auger and power.

Lit. No. 94837/94838 7 July 15, 2004
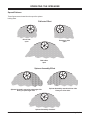
OPERATING THE SPREADER
Spread Patterns
These figures are as viewed from the top of the spinner
looking down.
Spinner Assembly moved to passenger side
Heavy on passenger side.
Spinner Assembly Centered
Spinner Assembly moved to driver side
Heavy on driver side.
Driver side
open Passenger side
open
Both sides
open
Spinner Assembly Effect
Deflector Effect

July 15, 2004 8 Lit. No. 94837/94838
OPERATING THE SPREADER
Application Rates
Motor Fine Coarse
Displacement cu ft/rev Sand Salt/Sand Salt Salt
0.1286 lb/cu ft lb/cu ft lb/cu ft lb/cu ft
valve motor/auger 125 100 50 45
gpm setting rpm cu ft/min lb/min lb/min lb/min lb/min
0.00 0 0 0.00 0.0 0.0 0.0 0.0
1.36 1 17.6 2.26 282.9 226.3 113.2 101.8
2.73 2 35.2 4.53 565.8 452.6 226.3 203.7
4.09 3 52.8 6.79 848.7 678.9 339.5 305.5
5.45 4 70.4 9.05 1131.5 905.2 452.6 407.4
6.82 5 88.0 11.32 1414.4 1131.5 565.8 509.2
8.18 6 105.6 13.58 1697.3 1357.8 678.9 611.0
9.55 7 123.2 15.84 1980.2 1584.2 792.1 712.9
10.91 8 140.8 18.10 2263.1 1810.5 905.2 814.7
12.27 9 158.4 20.37 2546.0 2036.8 1018.4 916.5
13.64 10 176.0 22.63 2828.8 2263.1 1131.5 1018.4
15.00 11 193.6 24.89 3111.7 2489.4 1244.7 1120.2
Valve Max
15 gmp
Motor
Displacement
valve spinner
gpm setting rpm
0.00 0 0
0.91 1 72
1.82 2 145
2.73 3 217
3.644 290
4.55 5 362
5.456 434
6.36 7 507
7.27 8 579
8.18 9 652
9.09 10 724
10.00 11 797
Valve Max
10 gpm

Lit. No. 94837/94838 9 July 15, 2004
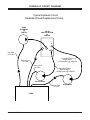
HYDRAULIC CIRCUIT DIAGRAM
Typical Hydraulic Circuit
Dedicated Fixed Displacement Pump
T
P
A
S
PUMP
23 GPM Min
@
1500 PSI VALVE
Rated to 40 GPM
@
1500 PSI
Auger Motor
TANK
Spinner Motor
Controlled Flow to
Spinner Motor:
10 GPM (max.) @ 1500 PSI
Return Flow
to Tank
Return Flow
to Tank
Excess Flow
to Tank
Controlled Flow to
Auger Motor:
15 GPM (max.) @ 1500 PSI
Inlet Flow
from Tank

July 15, 2004 10 Lit. No. 94837/94838
MAINTENANCE
Hydraulic Spreaders
1. Check hydraulic fluid level before every use. Add
fluid as required.
2. Periodically inspect the hoses and fittings for
damage and possible leaks.
3. Change the hydraulic fluid after the first 50 hours of
operation of a new unit.
4. Reservoir should be drained through the drain plug
only, NOT through the suction outlet.
• Flush and refill reservoir annually, or sooner if fluid
shows signs of break-down or contamination.
• The use of proper hydraulic fluid in the system is
critical to satisfactory performance. Only clean, new
hydraulic fluid, of the proper type and viscosity as
recommended by the pump manufacturer, should be
used.
• Keep all hydraulic fluids in original containers. Use
only clean measuring containers and funnels when
pouring fluids. Keep all containers closed when not
in use.
Grease
• After every 10 hours of operation, grease the
bearings on the auger shaft.
To keep your spreader functioning properly, observe the
following recommendations:
After each use:
• Wash out hopper and rinse off all external surfaces.
• Lubricate all grease fittings.
At the end of each season:
• Wash out hopper and all external surfaces.
• Lubricate all grease fittings.
• Oil or paint all bare metal surfaces.
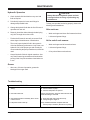
PROBLEM CORRECTION
1. Unit speed does not increase with the dial
setting.
2. Unit stalls under load.
3. Unit speed fluctuates momentarily when control
is first turned on.
4. Pump blows seals at start up.
A. Increase the truck engine speed.
B. Check condition of pump.
C. Check for adequate PTO percent.
Check circuit pressure. 900-1200 PSI maximum with
relief valve lifting at 1500 PSI.
A. Oil is cold. Wait until oil has warmed up.
B. Change to lighter weight oil.
Pump installed backwards. Replace seals and
reverse pump in driveline. (Note arrow on pump.)
Troubleshooting
CAUTION
Always disconnect hydraulic power and lock
out auger before servicing or performing any
maintenance.

Lit. No. 94837/94838 11 July 15, 2004

Copyright © 2004 Douglas Dynamics, L.L.C. All rights reserved. This material may not be reproduced or copied, in whole or in part, in any
printed, mechanical, electronic, film or other distribution and storage media, without the written consent of Western Products. Authorization to
photocopy items for internal or personal use by Western Products outlets or spreader owner is granted.
Western Products reserves the right under its product improvement policy to change construction or design details and furnish equipment when
so altered without reference to illustrations or specifications used. Western Products and the vehicle manufacturer may require and/or
recommend optional equipment for spreaders. Do not exceed vehicle ratings for a spreader. Western Products offers a limited warranty for all
spreaders and accessories. See separately printed page for this important information. The following is a registered (®) trademark of Douglas
Dynamics, L.L.C.: WESTERN®.
Printed in U.S.A.
July 15, 2004 Lit. No. 94838
A DIVISION OF DOUGLAS DYNAMICS, L.L.C.
WESTERN PRODUCTS
P.O. BOX 245038
MILWAUKEE, WISCONSIN 53224-9538
-
 1
1
-
 2
2
-
 3
3
-
 4
4
-
 5
5
-
 6
6
-
 7
7
-
 8
8
-
 9
9
-
 10
10
-
 11
11
-
 12
12
-
 13
13
-
 14
14
-
 15
15
-
 16
16


Western Under Tailgate Spreader UTS 696 (Serial #0216 and higher) Owner's manual
- Category
- Spreader
- Type
- Owner's manual
Ask a question and I''ll find the answer in the document
Finding information in a document is now easier with AI
Related papers
-
Western (1.5-2.5 Cu. Yd.) Poly Hopper Spreaders Installation guide
-
-
-
-
Fisher PRO-CASTER Owner's manual
-
-
-
-
-
Other documents
-
 Weber Rescue Systems SP 60 Operating Instructions Manual
-
 SnowEx V-Maxx G2 VX-6010 Installation Instructions Manual
-
 SnowEx Bulk Pro SP-1575 Owner's Manual and Installation Instructions
-
 SnowEx V-Maxx G2 VX-2200HO Installation Instructions Manual
-
 SnowEx SP-1575-1 Owner's manual
-
 Swenson Spreader S series Installation And Operating Instruction Manual
-
 SnowEx SR-210 Owner's Manual and Installation Instructions
-
Meyer 39100 User manual
-
Power Acoustik M-944 User manual
-
 Boss Snowplow TGS 600 Owner's manual


